Welcome back, my greenhorn hackers!
I recently began a series on scripting and have received such positive feedback that I'm going to keep this series going. As I've said before, to graduate from the script kiddie to the pro hacker, you'll need to have some scripting skills. The better you are at scripting, the more advanced your hacking. Ultimately, we are leading up to developing the skills to build your own zero day exploits.
I left off teaching you the basics of shell scripting in BASH and built a simple script that utilized nmap with our user-supplied inputs to scan for open ports on a range of IP addresses. I hope you saved that script, as we'll be building upon it here, adding additional functionality.
Open a Text Editor
The first step in building any script is to open a text editor. You can use any text editor, but I will be using kwrite in the KDE version of BackTrack (if you are using the GNOME version, gedit works just as well).
Now, in this lesson, we'll be studying conditional statements. Those are statements within our script that enable us to make decisions. In other words, "If this happens, do this. If the other happens, then do that."
If...then...else
The most basic type of conditional statement that is available in nearly every programming language is the if...then...else. This enables us to check for a condition (if) and if it is true, then execute some statement or statements, or else do something different. Its basic form is:
Let's Add a Conditional to Our Scanner Script
Now that we have the basic concept of a conditional script, let's add one to our scanning script named Scannerscript. Let's ask the user whether they want to use nmap or hping3 to scan the target. If they say they want nmap, then we can execute the original part of our script that does the nmap scan. If they want to use hping3, we will have to add a new section to gather info and then run an hping scan. So, our script structure should look like this:
- if you want to run nmap
- then run nmap prompts and commands
- else run hping prompts and commands
Create Our Conditional Statement
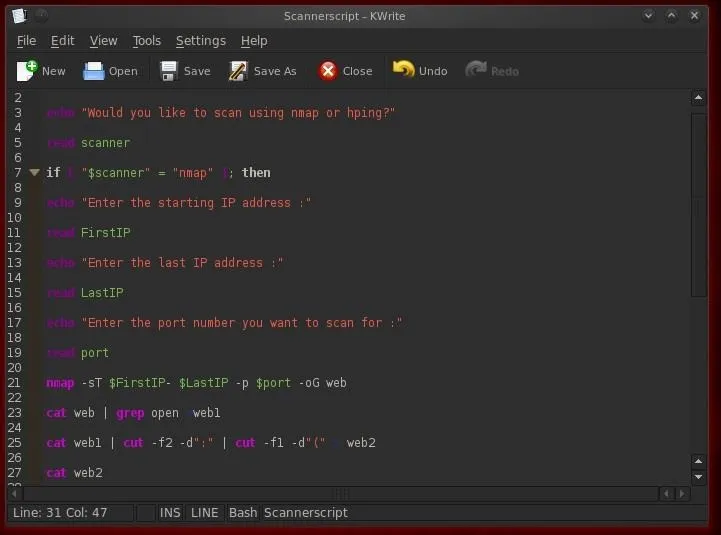
Now, let's edit our Scannerscript to give the user a choice of either using nmap or hping to scan. First, we need ask the user which they want to use with an echo statement.
- echo "Would you like to scan using nmap or hping"
This simply asks the user to enter which scanner they would like to use and enter it from the keyboard. Next, we need to capture their input into a variable named scanner.
- read scanner
Now, comes the key part of our conditional statement, the if...then...else. We create a statement that checks to see what value the user entered when prompted, and then sends our script to either the nmap section, or our yet to be created hping section. We can do this with the following statement:
- if "$scanner" = "nmap" then

Please note a few things here.
First, the if is lowercase. Anything else will throw a "command not found" error. Second, I used double quotation marks around the value of the variable scanner. This is to indicate that I want a string to compare to the string "nmap". Third, when retrieving the value of a variable, I precede it with a $ sign.
Build the Hping Scan Section
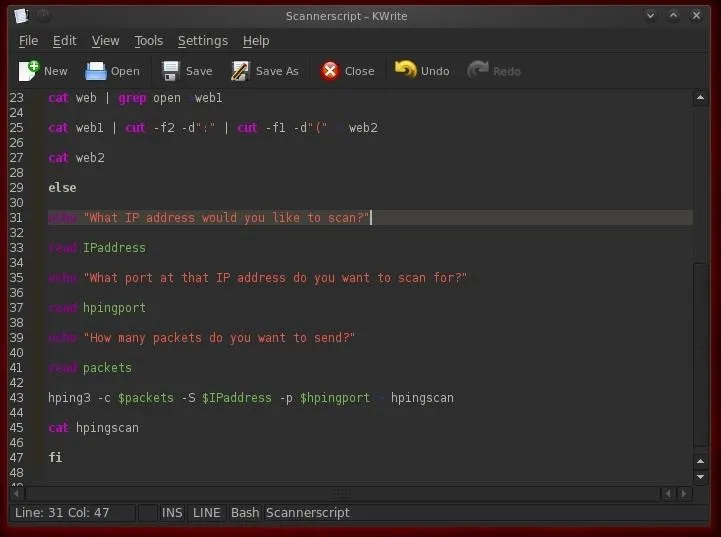
Now that we've developed our basic structure and logic of our conditional statement, let's build the hping section that will be executed if the user chooses they want to run an hping scan. Let's start by prompting the user for which IP address they want to scan and capturing the data into a variable called IPaddress.
- echo "Which IP address would you like to scan? :
- read IPaddress
Next, let's prompt the user which port they would like to scan and capture the data into a variable called hpingport.
- echo "What port would you like to scan for ?:
- read hpingport
Finally, let's ask the user how many packets they would like to send. Remember, hping continues to send packets until stopped just like the ping command in Linux (and unlike the ping command in Windows that only sends 4 packets and then stops). We can determine how many packets to scan by using the -c switch in the hping command. So, let's ask the user how many packets they would like to send and gather that info into a variable called packets.
- echo "How many packets would you like to send?"
- read packets
Create Our hping3 Scan Command
Now we have all the information we need from the user and saved it into variables to create our hping3 command.
- hping3 -c $packets $IPaddress -p $hpingport > hpingscan

This statement says run the hping3 command and send $packets number of packets to the $IPaddress IP address, scanning for $hpingport port open and send it all to a file named hpingscan.
Let's Test It
To run this script and see whether it works, let's first re-save it as Scannerscript. Now let's open a terminal and run it by typing;
- ./Scannerscript

As you can see, when I asked it to run the nmap scan, it did just that.
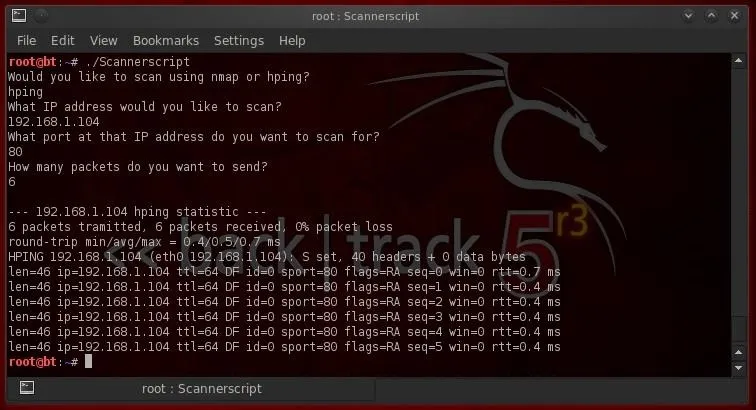
Now, comes the critical part. Let's ask our Scannerscript to run an hping scan. To do so, it will have to check to see whether the user requested a nmap or hping scan, and if an hping scan, skip over the nmap section of our code and go directly to the hping section. This utilizes our conditional statement. Let's give it a try.

Success! Our script enabled the user to select either a nmap or a hping scan by using the conditional if...then...else!
In future tutorials, we will continue to build functionality to this script, so make sure you save it. We will eventually look at other scripting languages such as Perl, Ruby, and Python so we can build our own zero day exploit!


Comments
Be the first, drop a comment!