


Once you've installed Ubuntu with security in mind and reduced the possibility of network attacks on your system, you can start thinking about security on an application level. If a malicious file is opened on your system, will an attacker be able to access every file on the computer? The chances are much slimmer if you put the proper defenses in place.
In this third part of our mini-series on strengthening your primary Ubuntu installation, you'll learn how Ubuntu package repositories work, which repos you should avoid, and how to update. You'll also see how to import additional AppArmor profiles to limit resources that apps can use and create sandboxes to isolate unsafe applications from the operating system completely.
If you missed the beginning of this article series, you should check out the first part to learn more about my motivations for starting this four-part guide.
Install the Lastest System Updates
Part of keeping your system secured is simply ensuring the latest package and application updates are installed.
If you're coming from Windows 10, you'll be used to downloading and installing new applications from random websites. This practice is inherently unsafe. Unsigned, unverified applications distributed by one source creates the potential for supply chain attacks.
Linux handles installing software differently. Ubuntu uses several repositories (servers) that contain packages (software and dependencies) audited by Canonical, Ubuntu developers, and the security team. Not all of Ubuntu's repositories are audited by the Ubuntu team, however.
The Ubuntu repositories are set up in the following categories:
- Main: The main component contains applications that are free software, can be freely redistributed, and are fully supported by the Ubuntu team. This includes the most popular and most reliable open-source applications available, many of which are included by default when installing Ubuntu. The software in Main includes a hand-selected list of applications that the Ubuntu developers, community, and users feel are most important and that the Ubuntu security team are willing to support. When we install software from the Main repository, we're assured that the software will come with security updates and that support is available from Canonical.
- Universe: The Universe repository is a collection of free, open-source software. It houses almost every piece of open-source software, all built from a range of public sources. Canonical will provide regular security updates for software in the Universe repo when made available by the community. Popular or well-supported pieces of software will move from Universe into Main if they are backed by maintainers willing to meet the Ubuntu team's standards.
- Restricted: Ubuntu's commitment is only to promote free software, i.e., software available under a free license. However, they make exceptions for a small set of tools and drivers that make it possible to install Ubuntu and its free applications on everyday hardware. These proprietary drivers are kept in the Restricted repository. Please note that it may not be possible to provide complete support for this software because Ubuntu developers cannot fix the software; they can only forward problem reports to the actual authors. Ubuntu developers will only use non-open-source software when there is no other way to install Ubuntu. The Ubuntu team works with vendors to accelerate the open-sourcing of their software to ensure that as much software as possible is available under a free license.
- Multiverse: The Multiverse repository contains software that is not free, which means this software's licensing requirements do not meet the Ubuntu license policy. The responsibility is on you to verify your rights to use this software and comply with the copyright holder's licensing terms. This software is not supported and usually cannot be fixed or updated. Use it at your own risk.
Disabling Unsafe Repositories
Before updating any packages, open the "Software & Updates" window and disable the "multiverse" and "restricted" repositories in the "Ubuntu Software" tab. These repositories distribute closed-source software, can't be audited, and sometimes require non-free (paid) user licenses.
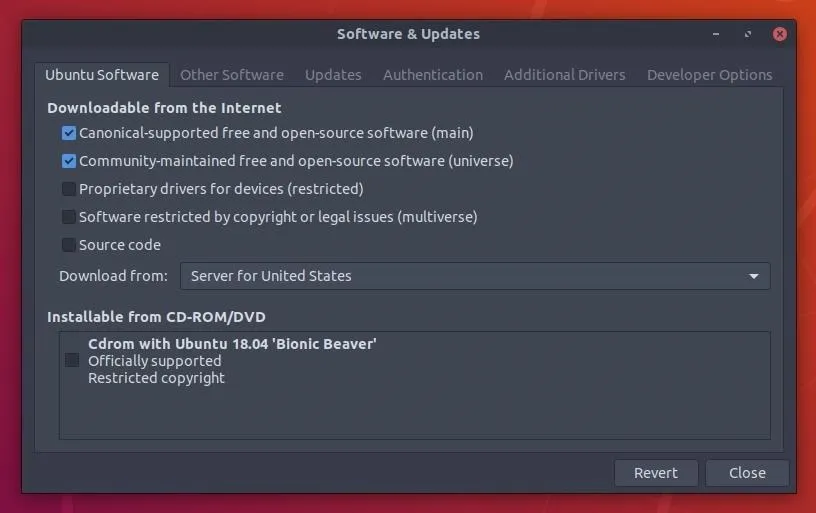
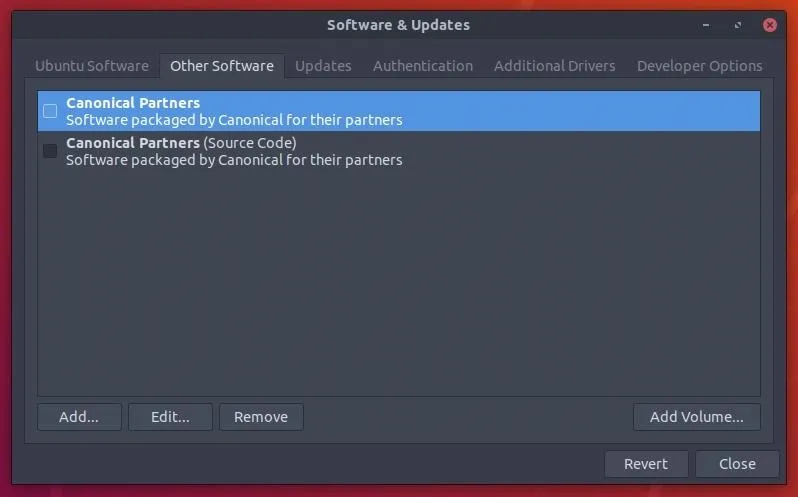
Then, head over to the "Other Software" tab and uncheck the "Canonical Partners" options.
Disabling Backports
Backports offers a way to selectively provide newer versions of software for older Ubuntu releases. Most commonly, the Backports team will provide new versions of standalone applications which can be safely updated without impacting the rest of the system. However, the Ubuntu security team does not update packages in Backports. For that reason, disabling backports is recommended. In the "Update" tab, make sure "bionic-backports" is unchecked.
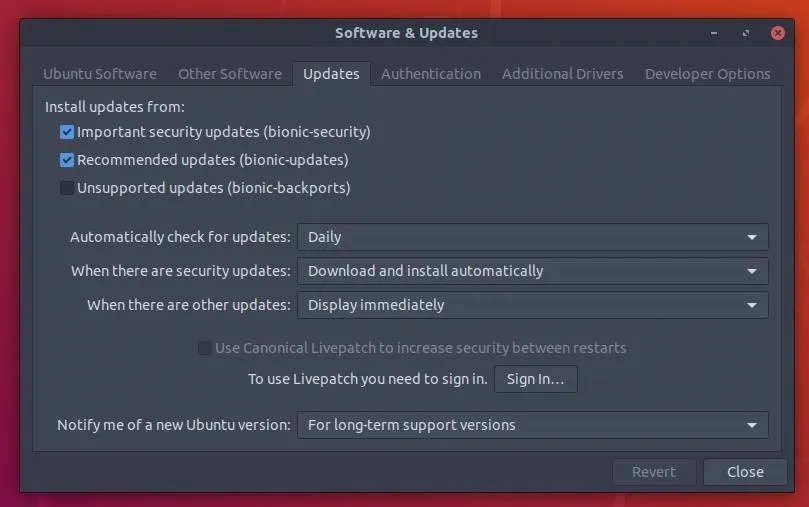
By default, Ubuntu should download and update security updates automatically on a daily basis.
Manually Checking for Updates
To check for updates manually, use the sudo apt update && sudo apt dist-upgrade command.
~$ sudo apt update && sudo apt dist-upgrade

Hit:1 http://nz.archive.ubuntu.com/ubuntu bionic InRelease
Hit:2 http://nz.archive.ubuntu.com/ubuntu bionic-updates InRelease
Hit:3 http://security.ubuntu.com/ubuntu bionic-security InRelease
Reading package lists... Done
Reading package lists... Done
Building dependency tree
Reading state information... Done
Calculating upgrade... Done
0 upgraded, 0 newly installed, 0 to remove and 0 not upgraded.
Use AppArmor Profiles
AppArmor is a kernel enhancement that confines applications and programs to a limited set of resources. For example, using AppArmor, it's possible to restrict a PDF viewer from accessing the internet and predefined directories on the OS. If a malicious PDF is opened, it won't be allowed to view certain directories or exfiltrate data the attacker's server. AppArmor is already installed and enabled in every Ubuntu installation. This can be verified using the below command.
~$ sudo aa-statusInstalling Additional AppAmrmor Profiles
Use the sudo apt install apparmor-profiles apparmor-utils command to add more AppArmor profiles.
~$ sudo apt install apparmor-profiles apparmor-utils

Reading package lists... Done
Building dependency tree
Reading state information... Done
The following additional packages will be installed:
   python3-apparmor (2.12-4ubuntu5)
   python3-libapparmor (2.12-4ubuntu5)
Suggested packages:
   vim-addon-manager (0.5.7)
The following NEW packages will be installed:
   apparmor-profiles (2.12-4ubuntu5)
   apparmor-utils (2.12-4ubuntu5)
   python3-apparmor (2.12-4ubuntu5)
   python3-libapparmor (2.12-4ubuntu5)
0 upgraded, 4 newly installed, 0 to remove and 0 not upgraded.
Need to get 189 kB of archives.
After this operation, 1,329 kB of additional disk space will be used.
Do you want to continue? [Y/n] y
Enabling Every Profile
Then, use the following aa-enforce command to enable all of the newly added profiles.
~$ sudo aa-enforce /etc/apparmor.d/*

Profile for /etc/apparmor.d/abstractions not found, skipping
Profile for /etc/apparmor.d/apache2.d not found, skipping
Setting /etc/apparmor.d/bin.ping to enforce mode.
Profile for /etc/apparmor.d/cache not found, skipping
Profile for /etc/apparmor.d/disable not found, skipping
Profile for /etc/apparmor.d/force-complain not found, skipping
Profile for /etc/apparmor.d/local not found, skipping
Setting /etc/apparmor.d/sbin.dhclient to enforce mode.
Setting /etc/apparmor.d/sbin.klogd to enforce mode.
Setting /etc/apparmor.d/sbin.syslogd to enforce mode.
Setting /etc/apparmor.d/sbin.syslog-ng to enforce mode.
Setting /etc/apparmor.d/snap.core.4830.usr.lib.snapd.snap-confine to enforce mode.
Profile for /etc/apparmor.d/tunables not found, skipping
Setting /etc/apparmor.d/usr.bin.chromium-browser to enforce mode.
Setting /etc/apparmor.d/usr.bin.evince to enforce mode.
Setting /etc/apparmor.d/usr.bin.firefox to enforce mode.
Setting /etc/apparmor.d/usr.bin.man to enforce mode.
Setting /etc/apparmor.d/usr.lib.dovecot.anvil to enforce mode.
Setting /etc/apparmor.d/usr.lib.dovecot.auth to enforce mode.
Setting /etc/apparmor.d/usr.lib.dovecot.config to enforce mode.
Setting /etc/apparmor.d/usr.lib.dovecot.deliver to enforce mode.
Setting /etc/apparmor.d/usr.lib.dovecot.dict to enforce mode.
Setting /etc/apparmor.d/usr.lib.dovecot.dovecot-auth to enforce mode.
Setting /etc/apparmor.d/usr.lib.dovecot.dovecot-lda to enforce mode.
Setting /etc/apparmor.d/usr.lib.dovecot.imap to enforce mode.
Setting /etc/apparmor.d/usr.lib.dovecot.imap-login to enforce mode.
Setting /etc/apparmor.d/usr.lib.dovecot.lmtp to enforce mode.
Setting /etc/apparmor.d/usr.lib.dovecot.log to enforce mode.
Setting /etc/apparmor.d/usr.lib.dovecot.managesieve to enforce mode.
Setting /etc/apparmor.d/usr.lib.dovecot.managesieve-login to enforce mode.
Setting /etc/apparmor.d/usr.lib.dovecot.pop3 to enforce mode.
Setting /etc/apparmor.d/usr.lib.dovecot.pop3-login to enforce mode.
Setting /etc/apparmor.d/usr.lib.dovecot.ssl-params to enforce mode.
Setting /etc/apparmor.d/usr.lib.snapd.snap-confine.real to enforce mode.
Setting /etc/apparmor.d/usr.sbin.avahi-daemon to enforce mode.
Setting /etc/apparmor.d/usr.sbin.cups-browsed to enforce mode.
Setting /etc/apparmor.d/usr.sbin.cupsd to enforce mode.
Setting /etc/apparmor.d/usr.sbin.dnsmasq to enforce mode.
Setting /etc/apparmor.d/usr.sbin.dovecot to enforce mode.
Setting /etc/apparmor.d/usr.sbin.identd to enforce mode.
Setting /etc/apparmor.d/usr.sbin.ippusbxd to enforce mode.
Setting /etc/apparmor.d/usr.sbin.mdnsd to enforce mode.
Setting /etc/apparmor.d/usr.sbin.nmbd to enforce mode.
Setting /etc/apparmor.d/usr.sbin.nscd to enforce mode.
Setting /etc/apparmor.d/usr.sbin.rsyslogd to enforce mode.
Setting /etc/apparmor.d/usr.sbin.smbd to enforce mode.
Setting /etc/apparmor.d/usr.sbin.smbldap-useradd to enforce mode.
Setting /etc/apparmor.d/usr.sbin.tcpdump to enforce mode.
Setting /etc/apparmor.d/usr.sbin.traceroute to enforce mode.
It's also possible to create script profiles for any application on the OS. For a comprehensive look at AppArmor, use the man command to view the manuals.
~$ man apparmor
~$ man aa-status
~$ man aa-enforce
Isolate Files & Apps in a Sandboxed Environment
Firejail, created by netblue30, reduces the risk of security breaches by using a lightweight visualization technology to isolate applications and restrict them to sandboxed (container) environments. Below is a GIF of Evince, Ubuntu's default PDF reader, opening an unsafe file in a heavily sandboxed environment.
Both Firejail and AppArmor can be used together (cooperatively) or independently of each other. If one of them failed to restrict a certain file or directory, it would be possible for the other to compensate and contain the vulnerability.
Firejail container's support a number of features:
- Blacklisting: Deny access to specific files and directories. Access attempts are reported to syslog.
- Whitelisting: Allow only files and directories specified by the user.
- Temporary filesystem: Mount a temporary filesystem on top of a directory.
- Private: Mount copies of files and directories and discard them when the sandbox is closed.
- Restricted home: Only the current user /home directory is available inside the sandbox.
- Reduced system information leakage: Restrict access to sensitive directories such as /boot, /proc, and /sys.
1. Download Firejail
Head over to the download page and grab the latest stable version of Firejail and the .asc file. At the time of this writing, the latest version is "firejail_0.9.54_1_amd64.deb." Then, open a new terminal, change into the Downloads/ directory using cd and view its contents using the ls command.
~$ cd Downloads/
~/Downloads$ ls

firejail_0.9.54_1_amd64.deb firejail-0.9.54.asc
2. Import the Developer's Public Key
The downloaded firejail-0.9.54.asc file contains the secure cryptographic hashes used to verify the .deb download hasn't been tampered with by SourgeForge or any third-parties. Download netblue30's public key from a PGP keyserver and import it into your GPG keyring.
~$ wget -O- 'https://pgp.mit.edu/pks/lookup?op=get&search=0x2CCB36ADFC5849A7' | gpg --import

----  https://pgp.mit.edu/pks/lookup?op=get&search=0x2CCB36ADFC5849A7
Resolving pgp.mit.edu (pgp.mit.edu)... 18.9.60.141
Connecting to pgp.mit.edu (pgp.mit.edu)|18.9.60.141|:443... connected.
HTTP request sent, awaiting response... 200 OK
Length: 2341 (2.3K) [text/html]
Saving to: ‘STDOUT’

-                  100%[==============>]   2.29K  --.-KB/s    in 0s

gpg: key 2CCB36ADFC5849A7: public key "netblue (firejail key) <netblue30@yahoo.com>" imported
gpg: Total number processed: 1
gpg:               imported: 1
3. Verify the Hashes
Then, to verify the .asc file, use the gpg --verify firejail-0.9.54.asc command.
~$ gpg --verify firejail-0.9.54.asc

gpg: Signature made Wed 16 May 2018 06:50:24 AM PDT
gpg:                using RSA key F951164995F5C4006A73411E2CCB36ADFC5849A7
gpg: Good signature from "netblue (firejail key) <netblue30@yahoo.com>" [unknown]
gpg: WARNING: This key is not certified with a trusted signature!
gpg:          There is no indication that the signature belongs to the owner.
Primary key fingerprint: F951 1649 95F5 C400 6A73  411E 2CCB 36AD FC58 49A7
Notice the "Good signature" line above. This is verification that the .asc file is legitimate. We can now view the contents of the file using the cat command. If you do not see the good signature line, don't panic. It's possible the Firejail .asc was malformed during the download. Try downloading it again.
~$ cat firejail-0.9.54.asc

     1  -----BEGIN PGP SIGNED MESSAGE-----
     2  Hash: SHA256
     3
     4  08698324685adac8a2d3935e7f493f527cbd5ae792ac21226728a42dd9f84c3f  firejail-0.9.54-1.x86_64.rpm
     5  ce996854278863f3e91ff185198c7cc1377fb70053d37a43e3b1ef1021c57756  firejail-0.9.54.tar.xz
     6  0e92d90d583b3fe549539a261a4f48ff2b3632ba6c1868bddaf09eaad2dcaaf9  firejail_0.9.54_1_amd64.deb
     7  080f72ab8467570e70953910d9001c1dce43be5c5b932a2bed3cd213af44351b  firejail_0.9.54_1_i386.deb
     8  -----BEGIN PGP SIGNATURE-----
     9
    10  iQEzBAEBCAAdFiEE+VEWSZX1xABqc0EeLMs2rfxYSacFAlr8NyAACgkQLMs2rfxY
    11  Sae8UAf+IkDv99oiTc+ihmhq6rrFrV/41Tb92jMIJJW8hfEZFJFWd0ZHhmZv/7Fz
    12  nW6W+gKrPf9MhC9bVmhOeU/UwcIUBlR5yQs+frJbHE8zuBzBGWZqgKGj78hlrkov
    13  7Xyab/jrSOm4FgpvKAqBh5nLWYyLtZKTT1DGswl2XpsXncMVdNFPnYjVOb1l5aDl
    14  ga2VHVKbGkrOY+8r7Vuhc0G+B+mugMt7jwUWMJgo84H4fY+Bpl/+6qS7RzJZw2Ew
    15  JlH/RADxbiFMGqBlk0hWY8jhJhE6R79Ea2+5bsCzJIbI89PgbUuyvlwCtVv38hsN
    16  C72d/NJJ6QrafBqWUWjTQPWSdMBt3g==
    17  =IEak
    18  -----END PGP SIGNATURE-----
Copy the hash on line #6 and use the below grep command to compare the SHA256 hash of the .deb to the .asc. If all went well, the command will produce the following result.
~/Downloads$ sha256sum firejail_0.9.54_1_amd64.deb | grep '0e92d90d583b3fe549539a261a4f48ff2b3632ba6c1868bddaf09eaad2dcaaf9'

0e92d90d583b3fe549539a261a4f48ff2b3632ba6c1868bddaf09eaad2dcaaf9  firejail_0.9.54_1_amd64.deb
4. Install Firejail
Finally, install the .deb using the below dpkg command.
~$ sudo dpkg -i firejail_0.9.54_1_amd64.deb

Selecting previously unselected package firejail.
(Reading database ... 170565 files and directories currently installed.)
Preparing to unpack firejail_0.9.54_1_amd64.deb ...
Unpacking firejail (0.9.54-1) ...
Setting up firejail (0.9.54-1) ...
Processing triggers for man-db (2.8.3-2) ...
Use the --help argument to view Firejail's available options and verify it was installed correctly.
~$ firejail --helpFirejail has too many features to cover in this article, so I'll show two practical uses.
Sandboxing Unsafe PDFs Found on the Internet
One of Firejail's greatest features is its ability to create temporary, offline sandboxes that are disposed of when the application is closed. Use the below command to create a strict temporary sandbox configuration.
~$ firejail --seccomp --nonewprivs --private --private-dev --private-tmp --net=none --x11 --whitelist=/tmp/unsafe.pdf evince /tmp/unsafe.pdfThere a lot going on in the above command, so I'll breakdown each argument one by one.
- --seccomp: Seccomp (secure computing mode) is enabled by default, but I included it in the command because it's one of Firejail's best features. Seccomp is a computer security facility in the Linux kernel. It allows a process to make a one-way transition into a "secure" state where it cannot make any system calls. Should an application inside the sandbox attempt any other system calls, the kernel will aggressively terminate the process.
- --nonewprivs: This option allows you to restrict processes from gaining new privileges inside the container. This ensures that child processes cannot acquire new privileges using the execve system call.
- --private: Create a new /root and /home/user directories in temporary filesystems. All modifications are discarded when the sandbox is closed.
- --private-dev: The /dev directory generally contains sensitive device files. Using the --private-dev argument, Firejail will create a new (temporary) /dev directory isolated from the operating systems actual /dev.
- --private-tmp: The /tmp directory in an Ubuntu operating system usually contains temporary storage files created by running applications. Data in these files may be sensitive and should be isolated from sandboxed applications.
- --net=none: The only interface available in the sandbox is a new loopback interface (lo). Use this option to deny network access to programs that don't really need internet access.
- --x11: Sandbox the application using Xephyr. The sandbox prevents screenshot and keylogger applications started inside the sandbox from accessing clients running outside the sandbox.
- --whitelist: Whitelist directory or file. Modifications to whitelisted files are persistent; everything else is discarded when the sandbox is closed.
- evince /tmp/unsafe.pdf: This final bit of the command calls the Evince PDF reader and then opens the specified file.
Sandboxing Web Browsers
For a more lenient set of sandboxing rules, use the below command.
~$ firejail --seccomp --nonewprivs --private --private-tmp firefoxThis will open Firefox in a sandboxed environment and dispose of files saved in the temporary /home directories created by the --private argument.
I've barely scratched the surface of what Firejail can do. For more, check out the official documentation and Firetools, Firejail's optional graphical user interface.
Next Up: Auditing, Antivirus & Monitoring
To conclude this series on locking down your Ubuntu system, we'll get into auditing the system for vulnerabilities using (free) professional software, using antivirus software that respects your privacy, and effectively monitoring system logs for abnormalities.
Cover image by Justin Meyers/Null Byte; Screenshots by tokyoneon/Null Byte


Comments
Be the first, drop a comment!