


After installing Ubuntu as your primary OS, you should have protected against USB Rubber Ducky payloads, defended against hard drive forensics, and reduced the overall attack surface against physical strikes. When defending against network-based attacks, you'll want to minimize hardware disclosures, prevent packet sniffers, harden firewall rules, and much more.
To be more specific, in this part of the mini-series for strengthening your primary Ubuntu installation, you'll learn to spoof your MAC address to trick passive attackers, disable unused networking services such as CUPS and Avahi, create specific firewall rules to block data exfil on certain ports, and prevent hackers from sniffing passwords and cookies in your packets with a VPN.
If you missed the previous article, you should check out part one to learn more about my motivations for starting this four-part guide — even if you already have Ubuntu installed and just want to lock it down.
Defend Against Hardware Enumeration
When connecting to new Wi-Fi networks and routers, spoof the Wi-Fi adapter's MAC address. This won't prevent a motivated attacker from learning which operating system you're using, but it may confuse and prevent them from discovering hardware information.
For example, a hacker on a coffee shop Wi-Fi network might focus their attacks on non-Apple devices. If you appear on the network with an Apple MAC address, the attacker may completely ignore your device. Or, they might try some macOS-specific attack against your device, which won't work, because you're not actually using a MacBook — you only appear on the network as using Apple hardware. This coupled with a spoofed browser user-agent may really confuse a passive adversary.
To spoof your MAC address in Ubuntu, open up Network Manager and "Edit" your Wi-Fi connection. In the Identity tab, enter the MAC address you want to use into the Cloned Address box.

Defend Against Listening Service Abuse
A background process (or service) in a "LISTEN" state could mean other services and applications on the device and network can interact with it. These listening services are always waiting for data to trigger some dynamic response. Any service with a local address of 0.0.0.0 and in a listen state is likely accessible to anyone on the local network and possibly anyone on the internet.
A new Ubuntu installation will only have a few running services installed — so no scary listening ports to worry about by default. But be mindful of applications that you install in the future. They may open listening ports without informing you.
To keep track of which background processes are in a listening state, we'll use netstat, a tool used to print network connections, open ports, and running services. Because the minimal Ubuntu installation was used, the net-tools suite of applications (which includes netstat) will need to be installed manually. This can be done using the sudo apt install net-tools command.
~$ sudo apt install net-tools

Reading package lists... Done
Building dependency tree
Reading state information... Done
The following NEW packages will be installed:
  net-tools
0 upgraded, 1 newly installed, 0 to remove and 0 not upgraded.
Need to get 194 kB of archives.
After this operation, 803 kB of additional disk space will be used.
Selecting previously unselected package net-tools.
(Reading database ... 149085 files and directories currently installed.)
Preparing to unpack .../net-tools_1.60+git20161116.90da8a0-1ubuntu1_amd64.deb ...
Unpacking net-tools (1.60+git20161116.90da8a0-1ubuntu1) ...
Processing triggers for man-db (2.8.3-2) ...
Setting up net-tools (1.60+git20161116.90da8a0-1ubuntu1) ...
Use the below netstat command to view services in a "LISTEN" state.
~$ sudo netstat -ntpul

Active Internet connections (only servers)
Proto Recv-Q Send-Q Local Address           Foreign Address         State       PID/Program name
tcp        0      0 127.0.0.53:53           0.0.0.0:*               LISTEN      651/systemd-resolve
tcp        0      0 127.0.0.1:631           0.0.0.0:*               LISTEN      806/cupsd
tcp6       0      0 ::1:631                 :::*                    LISTEN      806/cupsd
udp    47616      0 127.0.0.53:53           0.0.0.0:*                           651/systemd-resolve
udp        0      0 0.0.0.0:631             0.0.0.0:*                           812/cups-browsed
udp     2304      0 0.0.0.0:5353            0.0.0.0:*                           750/avahi-daemon: r
udp        0      0 0.0.0.0:38284           0.0.0.0:*                           750/avahi-daemon: r
udp6       0      0 :::37278                :::*                                750/avahi-daemon: r
udp6   25344      0 :::5353                 :::*                                750/avahi-daemon: r
Systemd-resolve is used to resolve domain names and probably shouldn't be modified or removed. I'll explain "cupsd" and "avahi-daemon" in the next sections.
Disable or Remove CUPS
Cupsd is a scheduler for CUPS, a service used by applications to interface with printers. There are several Nmap NSE scripts designed to pull information from CUPS services and pose a very minor security risk. However, if you very rarely need to interact with printers, CUPS can be disabled using the below systemctl disable cups-browsed command. The changes will take effect after a reboot.
~$ systemctl disable cups-browsed

Synchronizing state of cups-browsed.service with SysV service script with /lib/systemd/systemd-sysv-install.
Executing: /lib/systemd/systemd-sysv-install disable cups-browsed
If you're never going to use a printer, CUPS can be removed entirely with sudo apt autoremove cups-daemon.
~$ sudo apt autoremove cups-daemon

Reading package lists... Done
Building dependency tree
Reading state information... Done
The following packages will be REMOVED:
   bluez-cups (5.48-0ubuntu3)
   cups (2.2.7-1ubuntu2)
   cups-browsed (1.20.2-0ubuntu3)
   cups-core-drivers (2.2.7-1ubuntu2)
   cups-daemon (2.2.7-1ubuntu2)
   hplip (3.17.10+repack0-5)
   printer-driver-gutenprint (5.2.13-2)
   printer-driver-hpcups (3.17.10+repack0-5)
   printer-driver-postscript-hp (3.17.10+repack0-5)
   printer-driver-splix (2.0.0+svn315-6fakesync1)
0 upgraded, 0 newly installed, 10 to remove and 0 not upgraded.
After this operation, 8,383 kB disk space will be freed.
Do you want to continue? [Y/n] ^C
root@nullbyte:/home/tokyoneon# apt-get purge -V cups-daemon
Reading package lists... Done
Building dependency tree
Reading state information... Done
The following packages will be REMOVED:
   bluez-cups* (5.48-0ubuntu3)
   cups* (2.2.7-1ubuntu2)
   cups-browsed* (1.20.2-0ubuntu3)
   cups-core-drivers* (2.2.7-1ubuntu2)
   cups-daemon* (2.2.7-1ubuntu2)
   hplip* (3.17.10+repack0-5)
   printer-driver-gutenprint* (5.2.13-2)
   printer-driver-hpcups* (3.17.10+repack0-5)
   printer-driver-postscript-hp* (3.17.10+repack0-5)
   printer-driver-splix* (2.0.0+svn315-6fakesync1)
0 upgraded, 0 newly installed, 10 to remove and 0 not upgraded.
After this operation, 8,383 kB disk space will be freed.
Do you want to continue? [Y/n] y
Disable or Remove Avahi
The Avahi daemon implements Apple's Zeroconf architecture (also known as "Rendezvous" or "Bonjour"). The daemon registers local IP addresses and static services using mDNS/DNS-SD.
In 2011, a denial of service vulnerability was discovered in the avahi-daemon. While this CVE is quite old and low in severity, it illustrates how attackers on a local network find vulnerabilities in networking protocols and manipulate running services on a target's device.
If you don't plan on interacting with Apple products or services on other devices, avahi-daemon can be disabled using the following sudo systemctl disable avahi-daemon command.
~$ sudo systemctl disable avahi-daemon

Synchronizing state of avahi-daemon.service with SysV service script with /lib/systemd/systemd-sysv-install.
Executing: /lib/systemd/systemd-sysv-install disable avahi-daemon
Removed /etc/systemd/system/dbus-org.freedesktop.Avahi.service.
Removed /etc/systemd/system/sockets.target.wants/avahi-daemon.socket.
Avahi can also be completely removed with sudo apt purge avahi-daemon.
~$ sudo apt purge avahi-daemon

Reading package lists... Done
Building dependency tree
Reading state information... Done
The following packages will be REMOVED:
   avahi-daemon* (0.7-3.1ubuntu1)
   avahi-utils* (0.7-3.1ubuntu1)
   libnss-mdns* (0.10-8ubuntu1)
0 upgraded, 0 newly installed, 3 to remove and 0 not upgraded.
After this operation, 541 kB disk space will be freed.
Do you want to continue? [Y/n] y
Defend Against Port Abuse
An amateur hacker might try to exfiltrate data on port 1337 or create a reverse shell on port 4444 (literally listed on Wikipedia as Metasploit's default port). A firewall that only allows outgoing transmissions on a handful of ports will stop leet h4x0rz dead in their tracks.
To manage port allowances, we'll use UFW, a program that aims to provide an easy to use interface while configuring firewalls. UFW literally stands for Uncomplicated FireWall. It acts as an Iptables (packet filtering) frontend and is not intended to provide complete firewall functionality, but instead an easy way to add or remove simple rules.
1. Deny All Incoming & Outgoing Connections
Use the sudo ufw enable command to enable UFW.
~$ sudo ufw enable

Firewall is active and enabled on system startup
Disallow all incoming connections with the following.
~$ sudo ufw default deny incomingNext, disallow all forward connections:
~$ sudo ufw default deny forwardAnd then disallow all outgoing connections:
~$ sudo ufw default deny outgoingAt this point, you won't be able to access the internet using Firefox or any other application.
2. Find Your Wireless Interface
To allow outgoing connections, you'll first need to find your Wi-Fi adapter's name using the ifconfig -a command.
~$ ifconfig -a

enp0s8: flags=4163<UP,BROADCAST,RUNNING,MULTICAST>  mtu 1500
        inet 192.168.1.44  netmask 255.255.255.0  broadcast 192.168.1.255
        ether e8:e1:e8:c2:bc:b9  txqueuelen 1000  (Ethernet)
        RX packets 631  bytes 478024 (478.0 KB)
        RX errors 0  dropped 0  overruns 0  frame 0
        TX packets 594  bytes 60517 (60.5 KB)
        TX errors 0  dropped 0 overruns 0  carrier 0  collisions 0
        device interrupt 16  base 0xd040

lo: flags=73<UP,LOOPBACK,RUNNING>  mtu 65536
        inet 127.0.0.1  netmask 255.0.0.0
        inet6 ::1  prefixlen 128  scopeid 0x10<host>
        loop  txqueuelen 1000  (Local Loopback)
        RX packets 259  bytes 17210 (17.2 KB)
        RX errors 0  dropped 0  overruns 0  frame 0
        TX packets 259  bytes 17210 (17.2 KB)
        TX errors 0  dropped 0 overruns 0  carrier 0  collisions 0
I'm using Ubuntu in VirtualBox for this demo, so my interface name is "enp0s8." Using the ifconfig command, your wireless interface may appear as "wlp3s0," "wlp42s0," or something similar.
3. Create Firewall Exceptions & Configure a Secure DNS Resolver
Allow DNS, HTTP, and HTTPS traffic out on the wireless interface using the following three commands.
~$ sudo ufw allow out on <interface> to 1.1.1.1 proto udp port 53 comment 'allow DNS on <interface>'
~$ sudo ufw allow out on <interface> to any proto tcp port 80 comment 'allow HTTP on <interface>'
~$ sudo ufw allow out on <interface> to any proto tcp port 443 comment 'allow HTTPS on <interface>'
The "1.1.1.1" address in the DNS command is CloudFlare's new privacy-focused DNS resolver. Many internet users don't realize that even if you're viewing a website using encrypted transmissions (little green lock in the URL bar), ISPs can still see every domain name you visit through DNS requests. Using CloudFlare's DNS resolver will help prevent Internet Service Providers (ISPs) from snooping on your traffic.
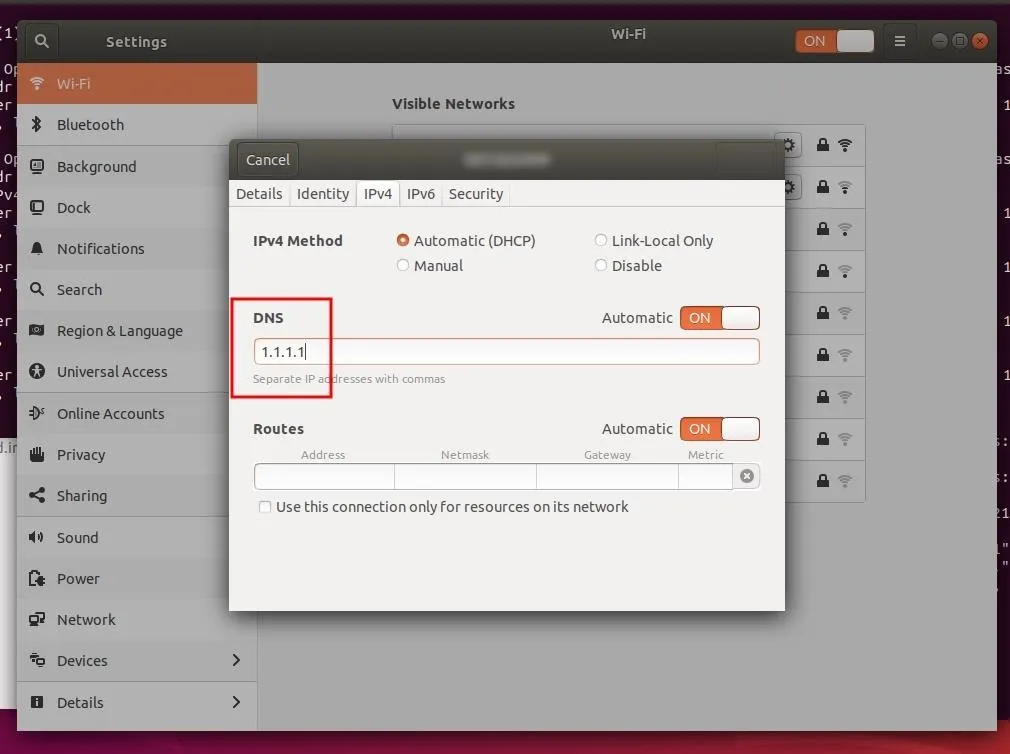
4. Update the Network Manger DNS Configuration
After setting the UFW rules, in the Network Manager, "Edit" your Wi-Fi connection and change the DNS field to 1.1.1.1. Disconnect and reconnect to the Wi-Fi network for the DNS changes to take effect.
View the newly created rules using the sudo ufw status numbered command.
~$ sudo ufw status numbered

Status: active

     To                         Action      From
     --                         ------      ----
[ 1] 1.1.1.1 53/udp             ALLOW OUT   Anywhere on enp0s8         (out) # allow DNS on enp0s8
[ 2] 443/tcp                    ALLOW OUT   Anywhere on enp0s8         (out) # allow HTTPS on enp0s8
[ 3] 80/tcp                     ALLOW OUT   Anywhere on enp0s8         (out) # allow HTTP on enp0s8
Ubuntu will be able to make standard HTTP/HTTPS requests on ports 80 and 443 on the wireless interface you specified. If these rules are too strict for day-to-day activity, allow all outgoing packets using the below command.
~$ sudo ufw default allow outgoing5. Monitor the Firewall
If you're trying to debug incoming or outgoing connections, use the tail command with the -f argument to follow UFW log messages and discrepancies in real time. The command would be tail -f /var/log/ufw.log.
~$ tail -f /var/log/ufw.log

kernel: [ 3900.250931] [UFW BLOCK] IN= OUT=enp0s8 SRC=192.168.1.44 DST=104.193.19.59 LEN=60 TOS=0x00 PREC=0x00 TTL=64 ID=47090 DF PROTO=TCP SPT=35944 DPT=9999 WINDOW=29200 RES=0x00 SYN URGP=0
kernel: [ 3901.280089] [UFW BLOCK] IN= OUT=enp0s8 SRC=192.168.1.44 DST=104.193.19.59 LEN=60 TOS=0x00 PREC=0x00 TTL=64 ID=47091 DF PROTO=TCP SPT=35944 DPT=9999 WINDOW=29200 RES=0x00 SYN URGP=0
In the above logs, UFW is blocking outgoing connections (OUT=
~$ sudo ufw allow out on <interface> from 192.168.1.44 to 104.193.19.59 proto tcp port 9999For more on UFW, use the man ufw command to view the manual and available options.
~$ man ufwReaders interested in firewalling on a granular level should check out Arch Linux's wiki on Iptables.
Defend Against Packet Sniffers & Cookie Hijacking
Packet manipulation attacks on hostile networks can be prevented by using a virtual private network (VPN). VPNs offer a suite of technologies that:
- Prevent hackers on Wi-Fi networks from manipulating and spying on your activity.
- Prevent internet service providers (ISP) like Verizon and AT&T from spying on your activity and selling your data to third parties.
- Allow for censorship evasion where ISPs or network firewalls prevent access to certain websites.
Most premium VPN services start at around $5 a month. Some noteworthy VPN providers include: ProtonVPN, Mullvad, VyprVPN, and Private internet Access.

Next Up: Application Hardening & Sandboxing
That's it for hardening your presence and activity on hostile networks. In the following article, we'll learn a bit about sandboxing applications and securing our system in the event a malicious program is executed on the device. After that, we'll dive into auditing, using antivirus software, and monitoring system logs.
Cover image (original) by Tinh t? Photo/Flickr; Screenshots by tokyoneon/Null Byte (unless otherwise noted)


Comments
Be the first, drop a comment!