


When learning Wi-Fi hacking, picking a compatible Wi-Fi network adapter is the first step to learning to crack Wi-Fi passwords.
Many compatible adapters have swappable antennas, and there are several different kinds of specialized antennas you can add to a network adapter to increase its range and performance. Using a high-gain omnidirectional antenna, a panel antenna, and a parabolic grid, we'll examine the effect on Wi-Fi signal strength for each category of Wi-Fi antenna.
Antennas Expand What Network Adapters Can Do
Wireless network adapters frequently come with a small omnidirectional antenna attached, which can be replaced with an aftermarket antenna. These omnidirectional antennas can pick up a signal about equally from every direction and work best in an office or home where there is no way to know what direction the signal will be coming from. In circumstances where the signal still isn't strong enough, we can sacrifice the ability to get a reasonably strong signal from any direction for a much more substantial gain in directional signal strength.
Some applications of directional antennas include extreme range and the ability to hunt down signals by signal strength. While omnidirectional antennas make signal hunting extremely difficult, directional antennas will record a spike in signal strength whenever they are pointed towards the source of a Wi-Fi transmission.
You'll also find different types of directional antennas connecting long-range Wi-Fi links that can span over a mile with a clear line of sight. They are popular on boats, remote sensor stations, and construction sites with remotely linked security cameras.
Omnidirectional Antennas
The standard antenna you'll expect to see on a router or network adapter is the "Rubber Ducky" style antenna that looks like a simple stick. These are simple, cheap, and work very well for what most consumers need.
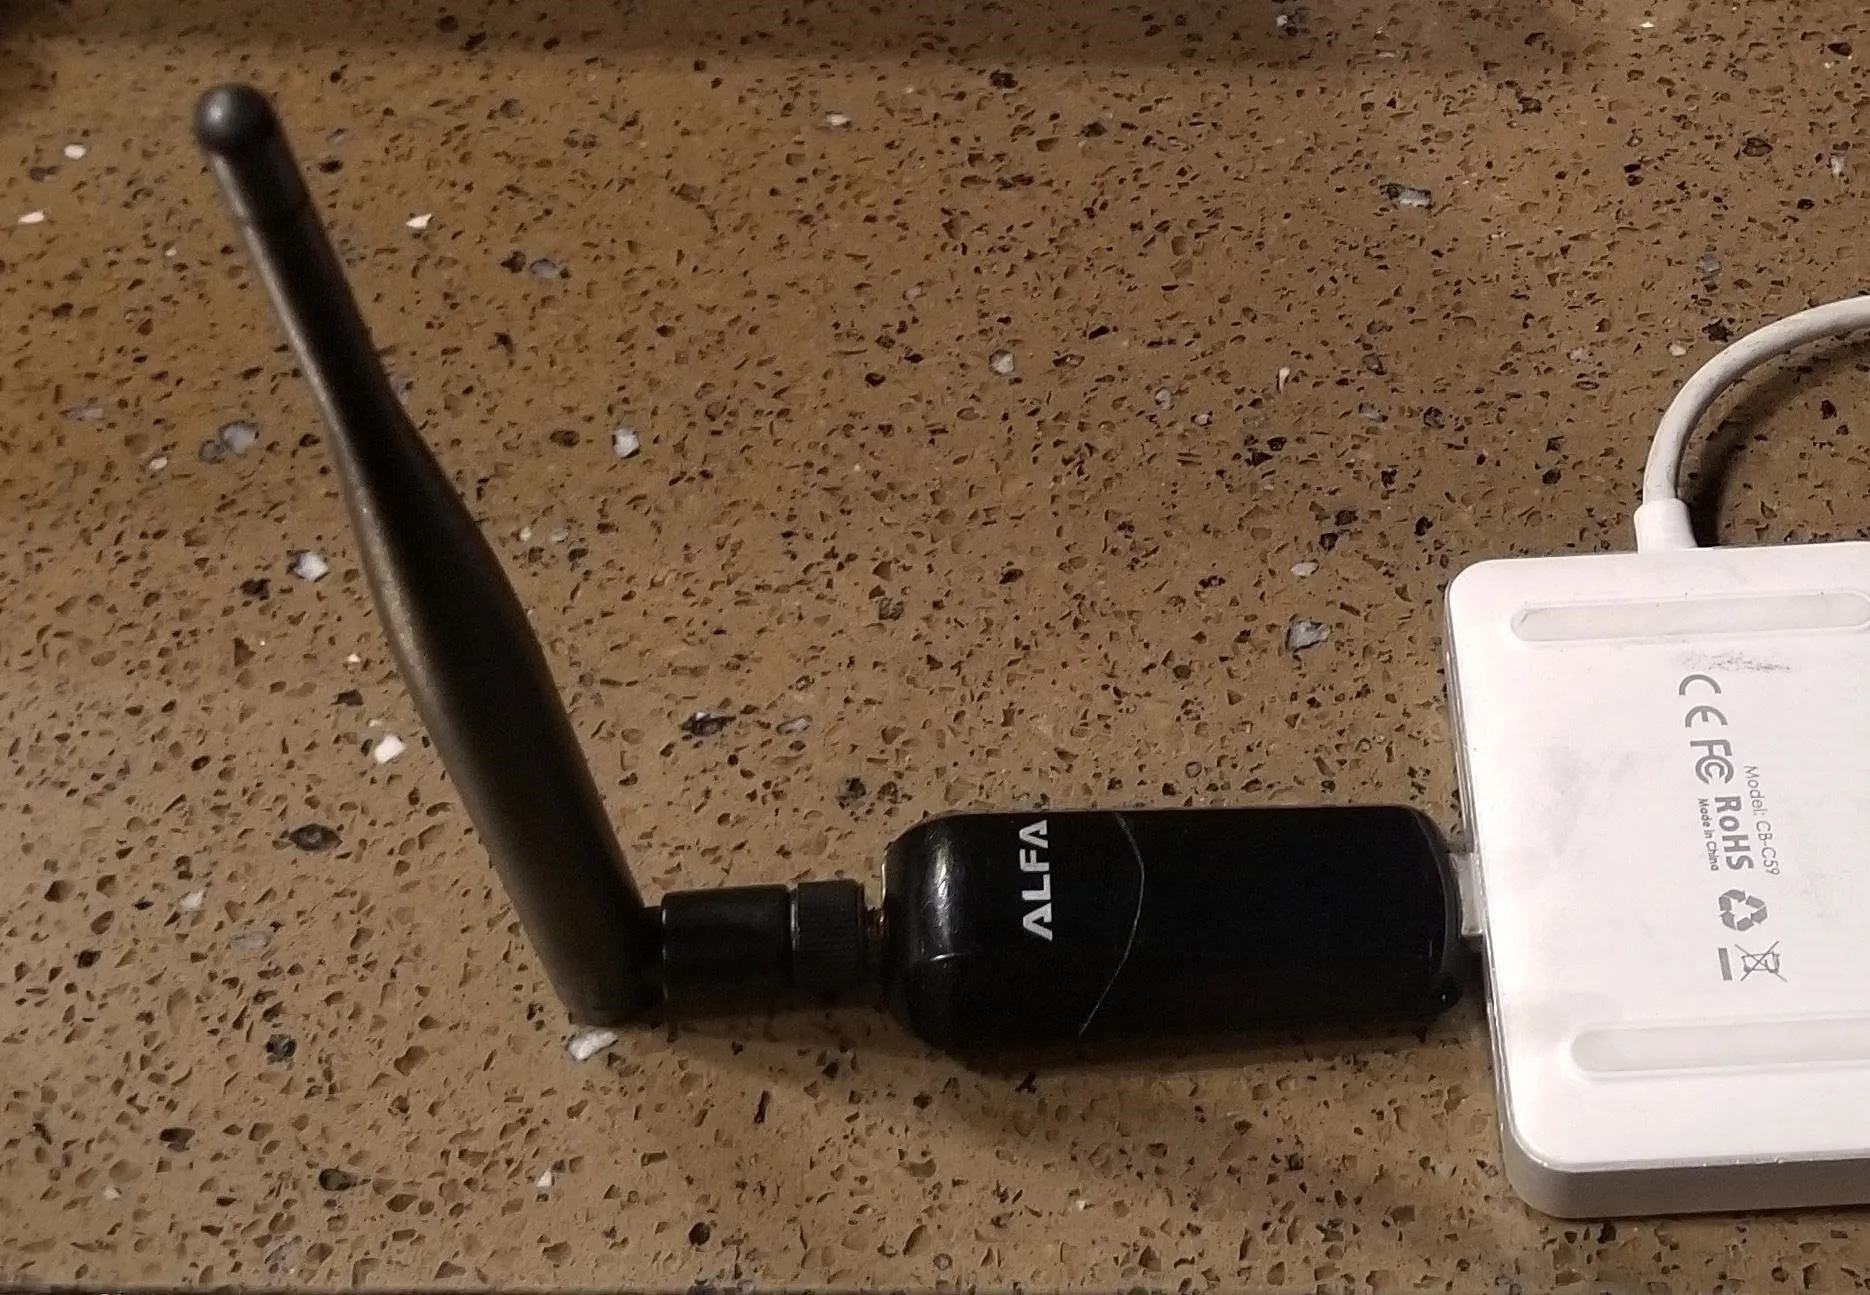
The [https://www.amazon.com/Alfa-AWUS036NEH-Wireless-Long-Range-Original/dp/B003ZW6CZC Alfa AWUS036NEH] network adapter.
This kind of antenna will have a flat, round radiation pattern that looks like a donut.
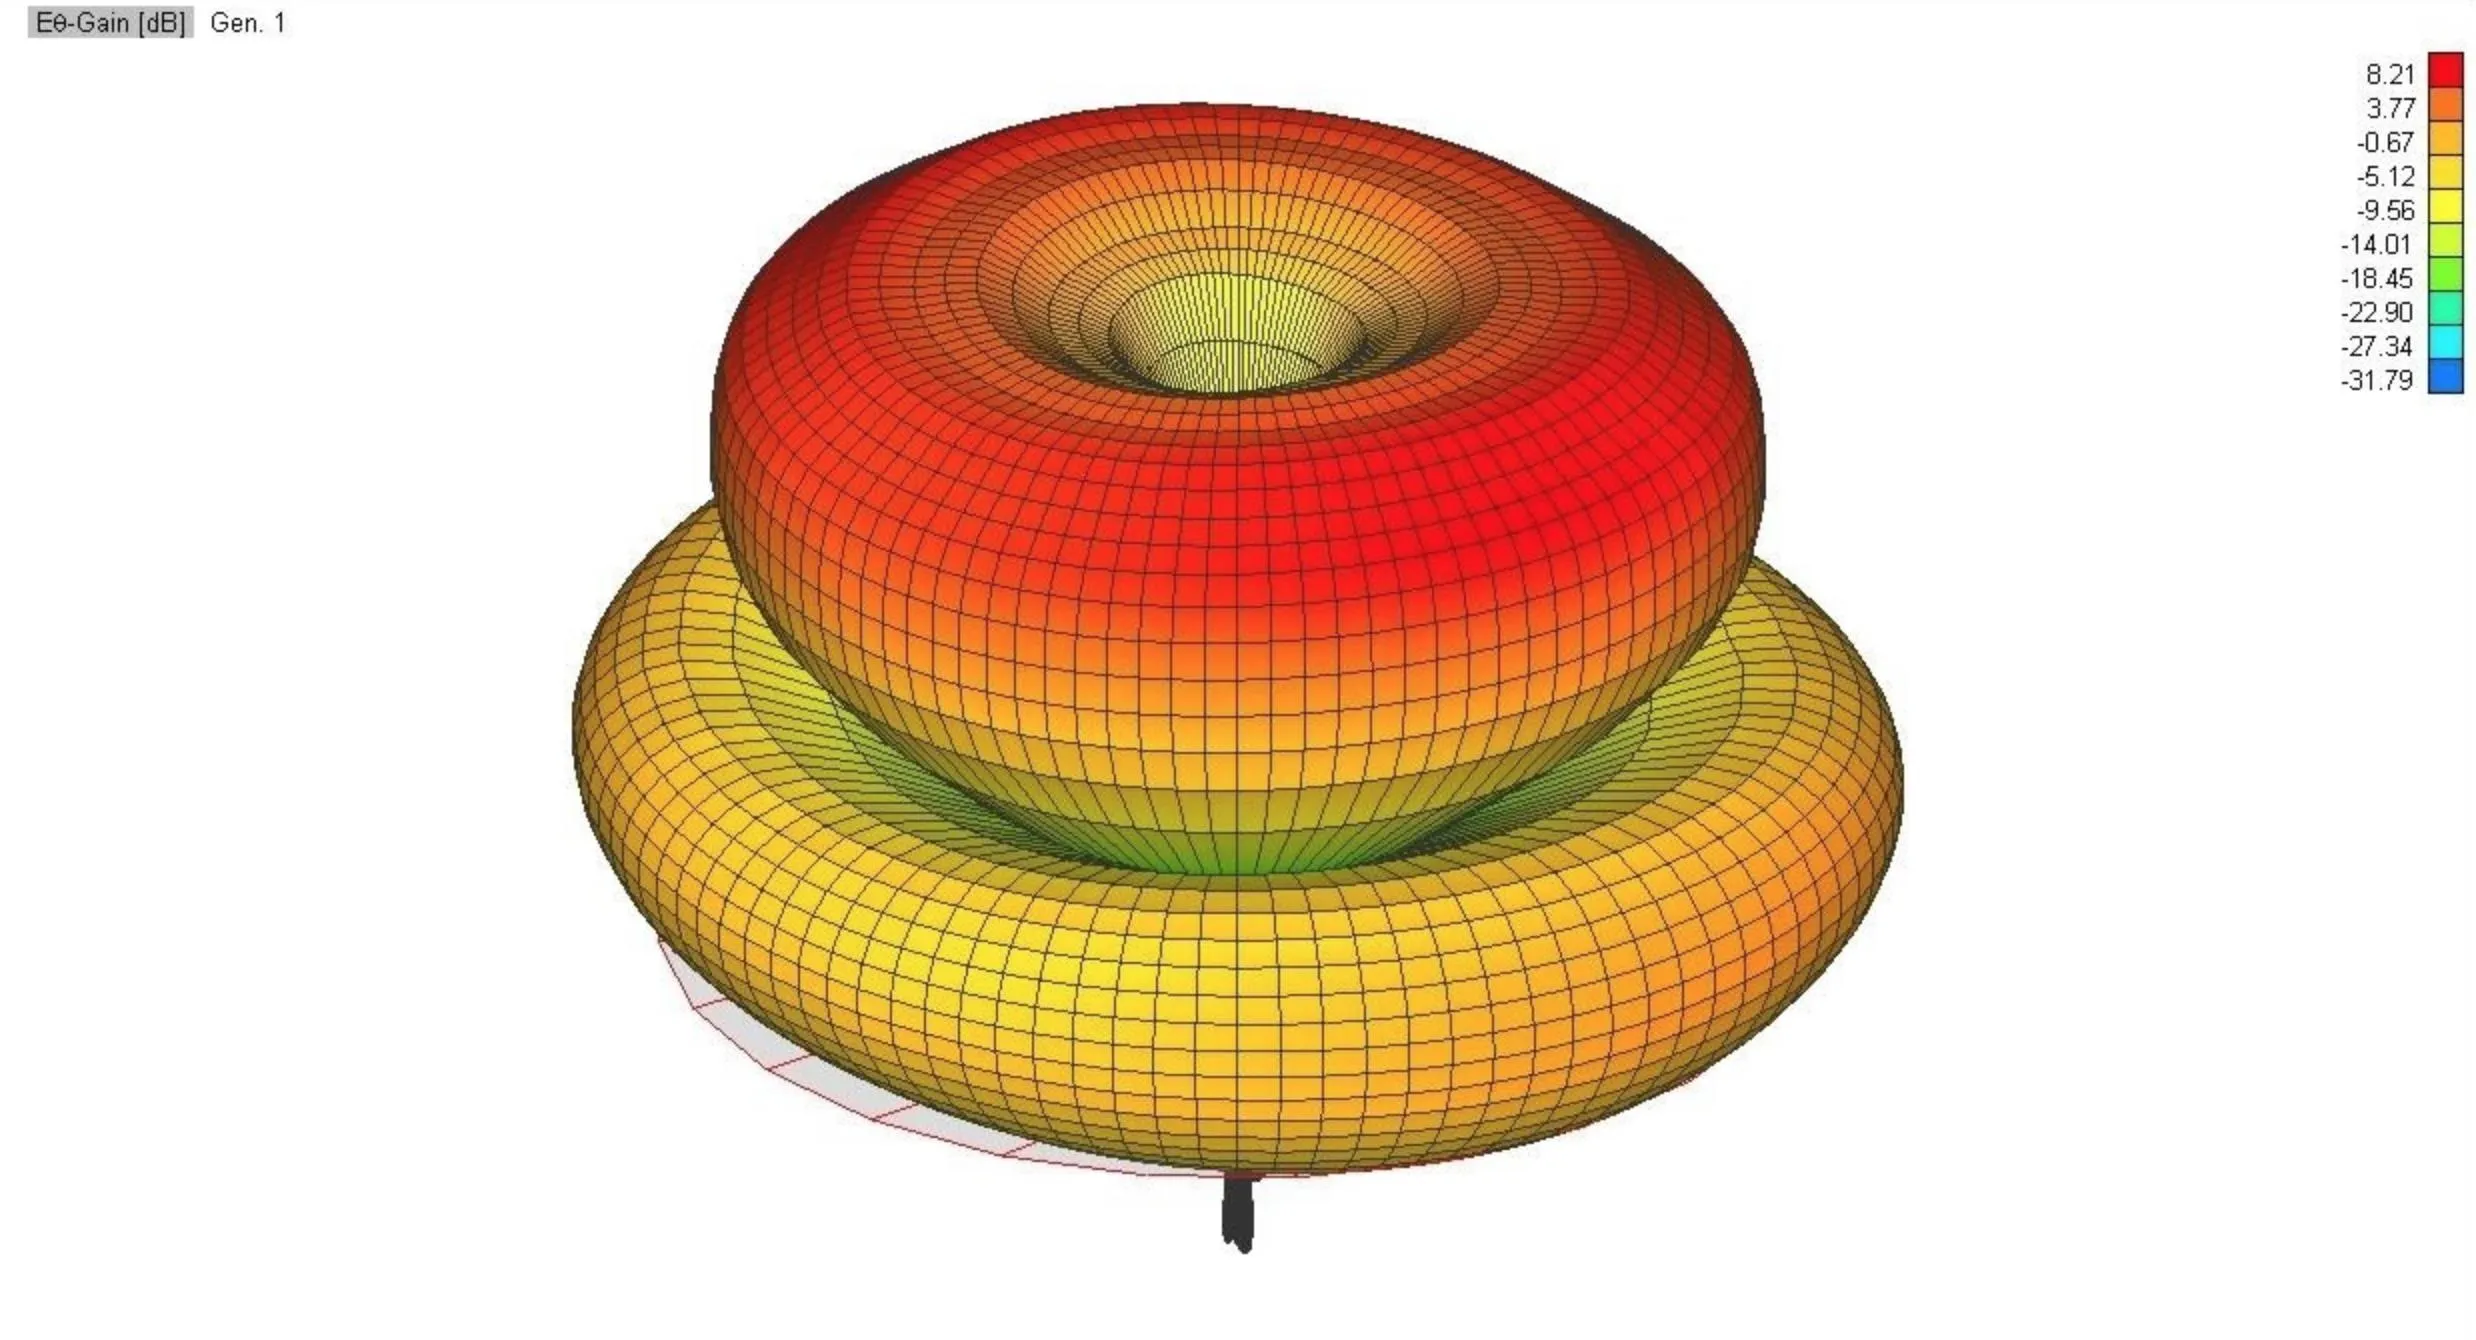
The radiation pattern of an omnidirectional antenna.
The pattern is ideal for connecting to a wireless access point on the same floor but isn't suitable for connecting to any network outside its range or on another level.
Panel Directional Antennas
Directional panel antennas have a radiation pattern that looks more like a flashlight than a donut. This pattern is much weaker than an omnidirectional antenna in most directions but very strong both directly in front and behind the antenna.
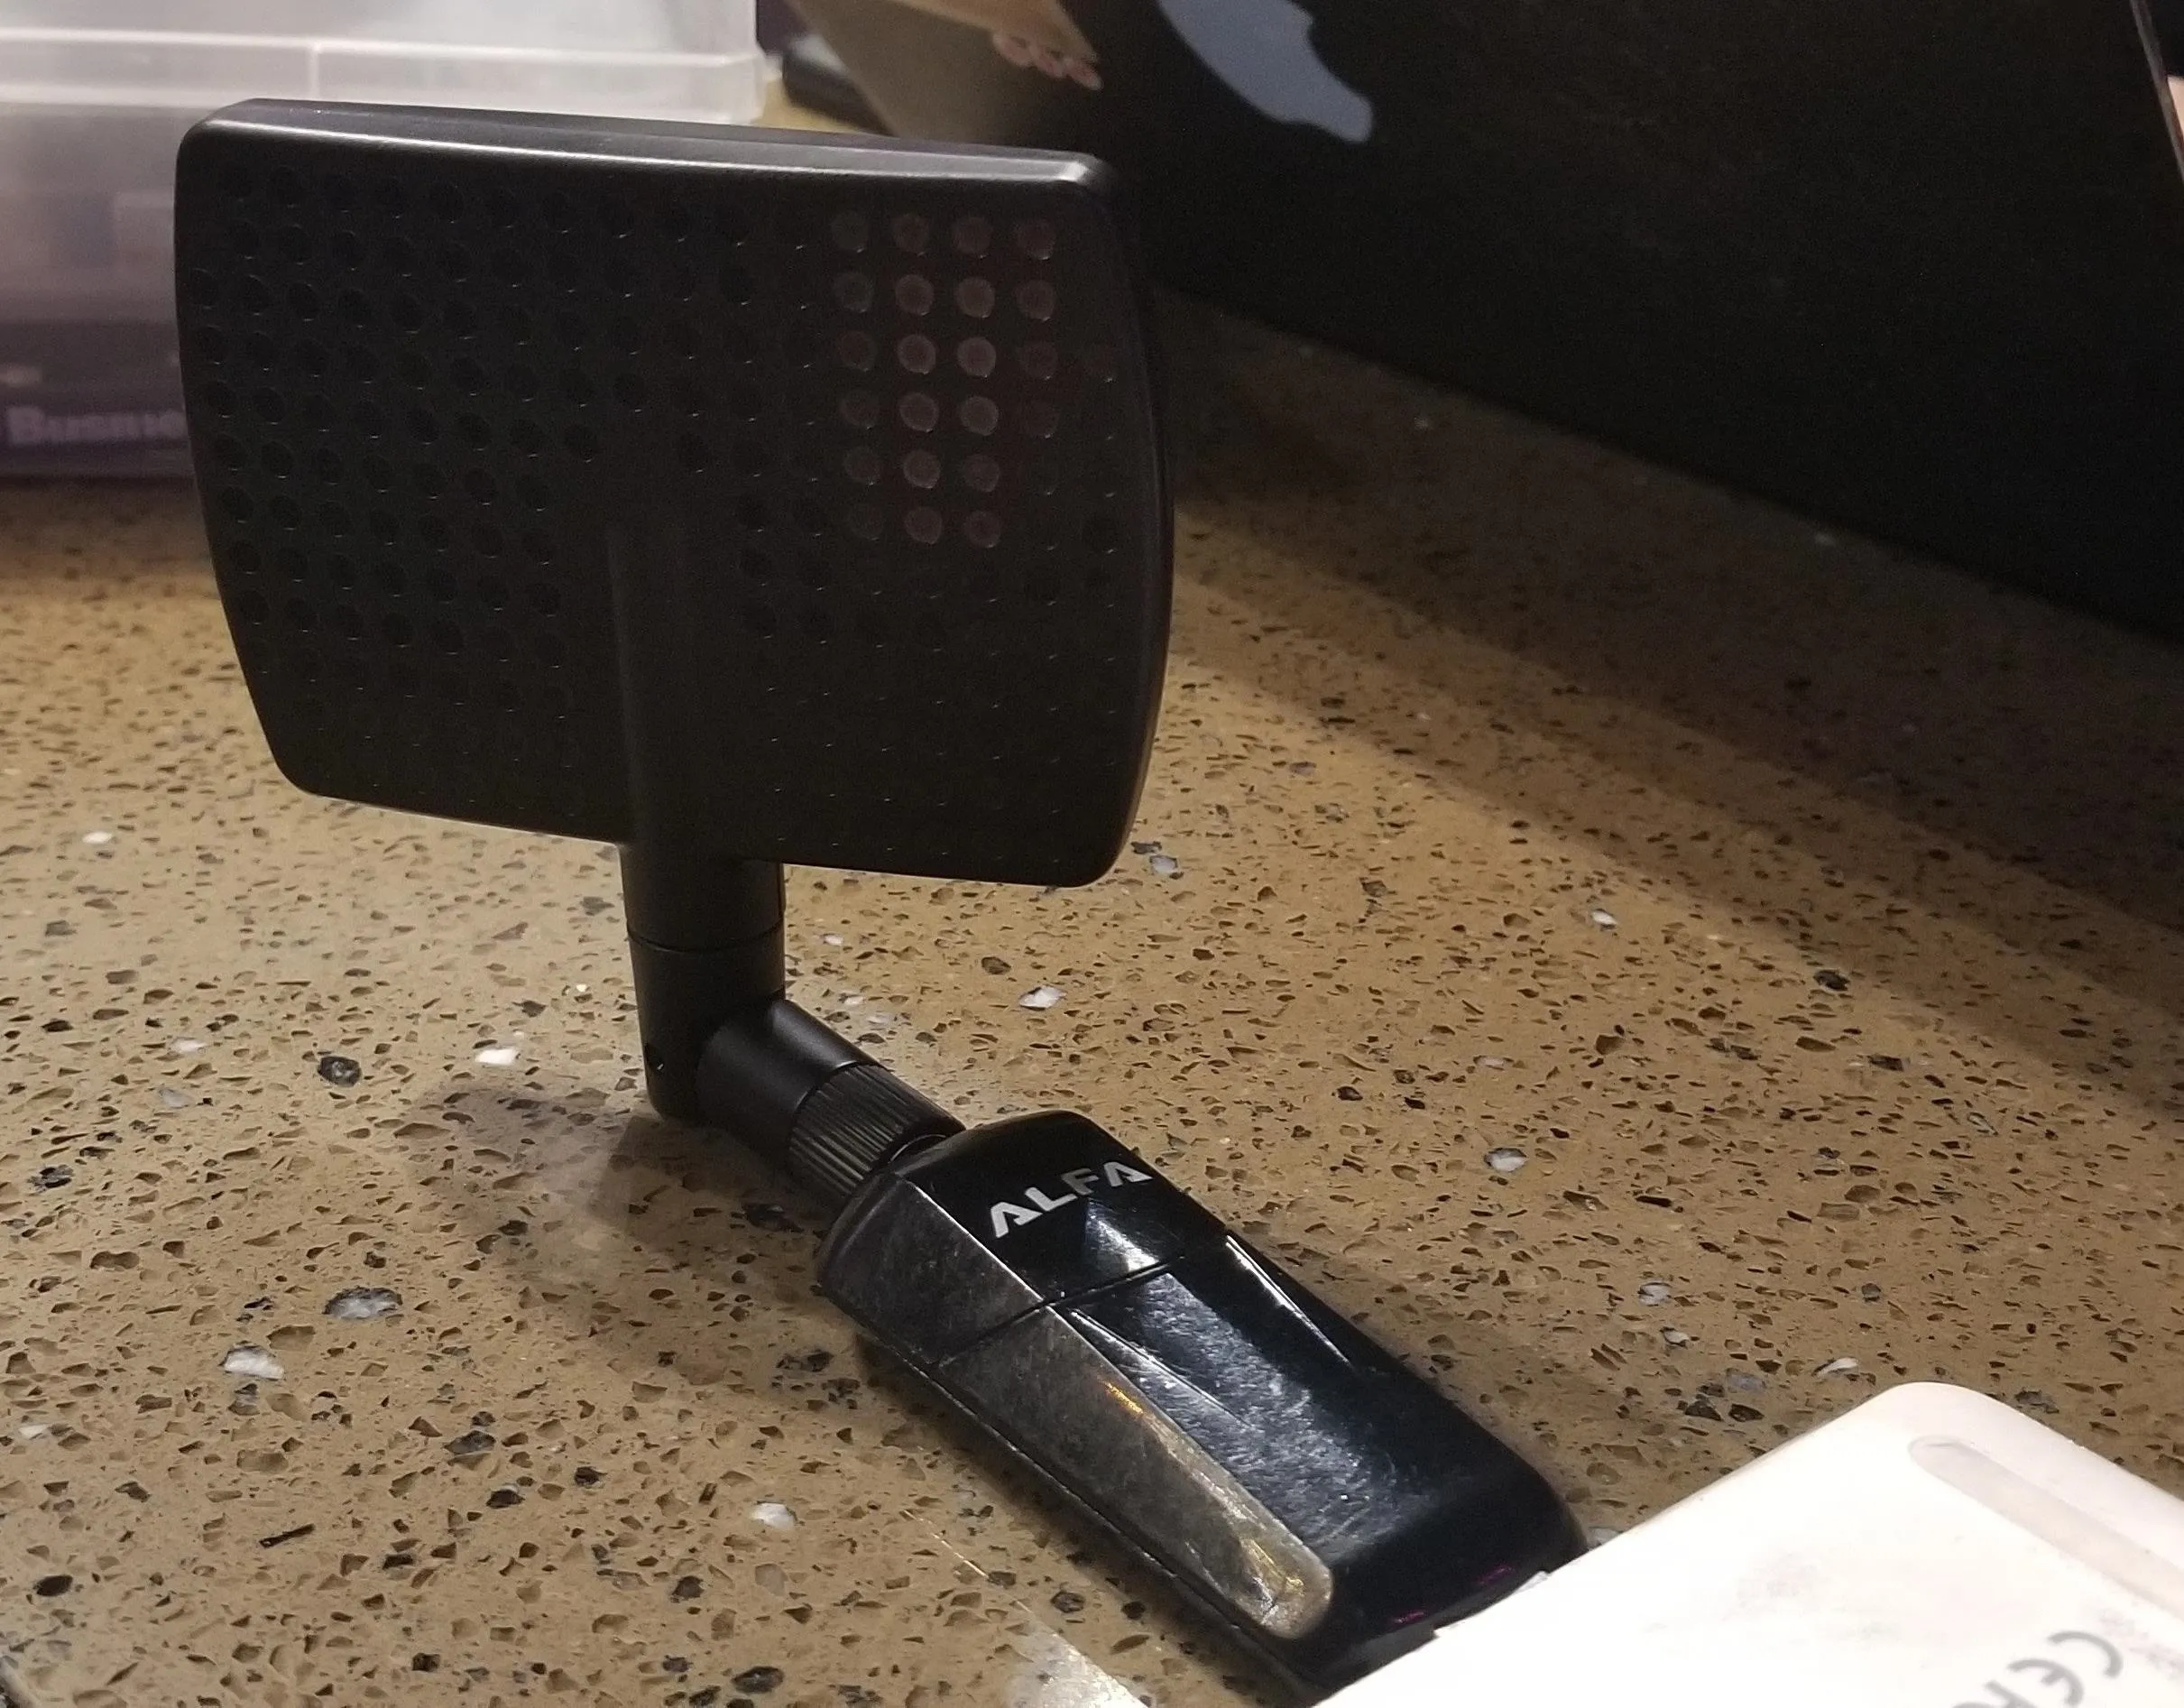
The [https://www.amazon.com/Alfa-AWUS036NEH-Wireless-Long-Range-Original/dp/B003ZW6CZC Alfa AWUS036NEH] and [https://www.amazon.com/Alfa-2-4HGz-RP-SMA-Screw-Antenna/dp/B003ZWPRUI/ Alfa RP-SMA 7] panel antenna.
The main lobe of this radiation pattern, when pointed at the source of a Wi-Fi network, can project extreme range where a regular "Duck" antenna could never reach. If the antenna is moved even a small amount, however, the signal strength can drop off rapidly.
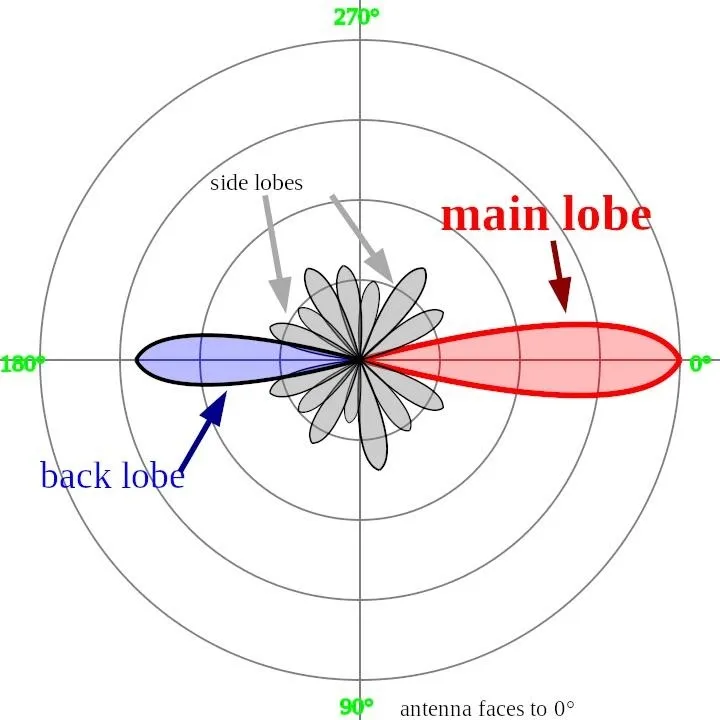
The radiation pattern of a directional antenna.
This makes a panel antenna an excellent choice for a fixed location but a poor choice for an environment where you don't know the direction of the Wi-Fi signal.
Parabolic Grid Antennas
If the radiation pattern of a panel antenna is like a flashlight, the radiation pattern for a parabolic dish antenna is more like a laser beam. These antennas can get an extreme range and are meant for remote fixed locations that can span many miles with a clear line of sight.
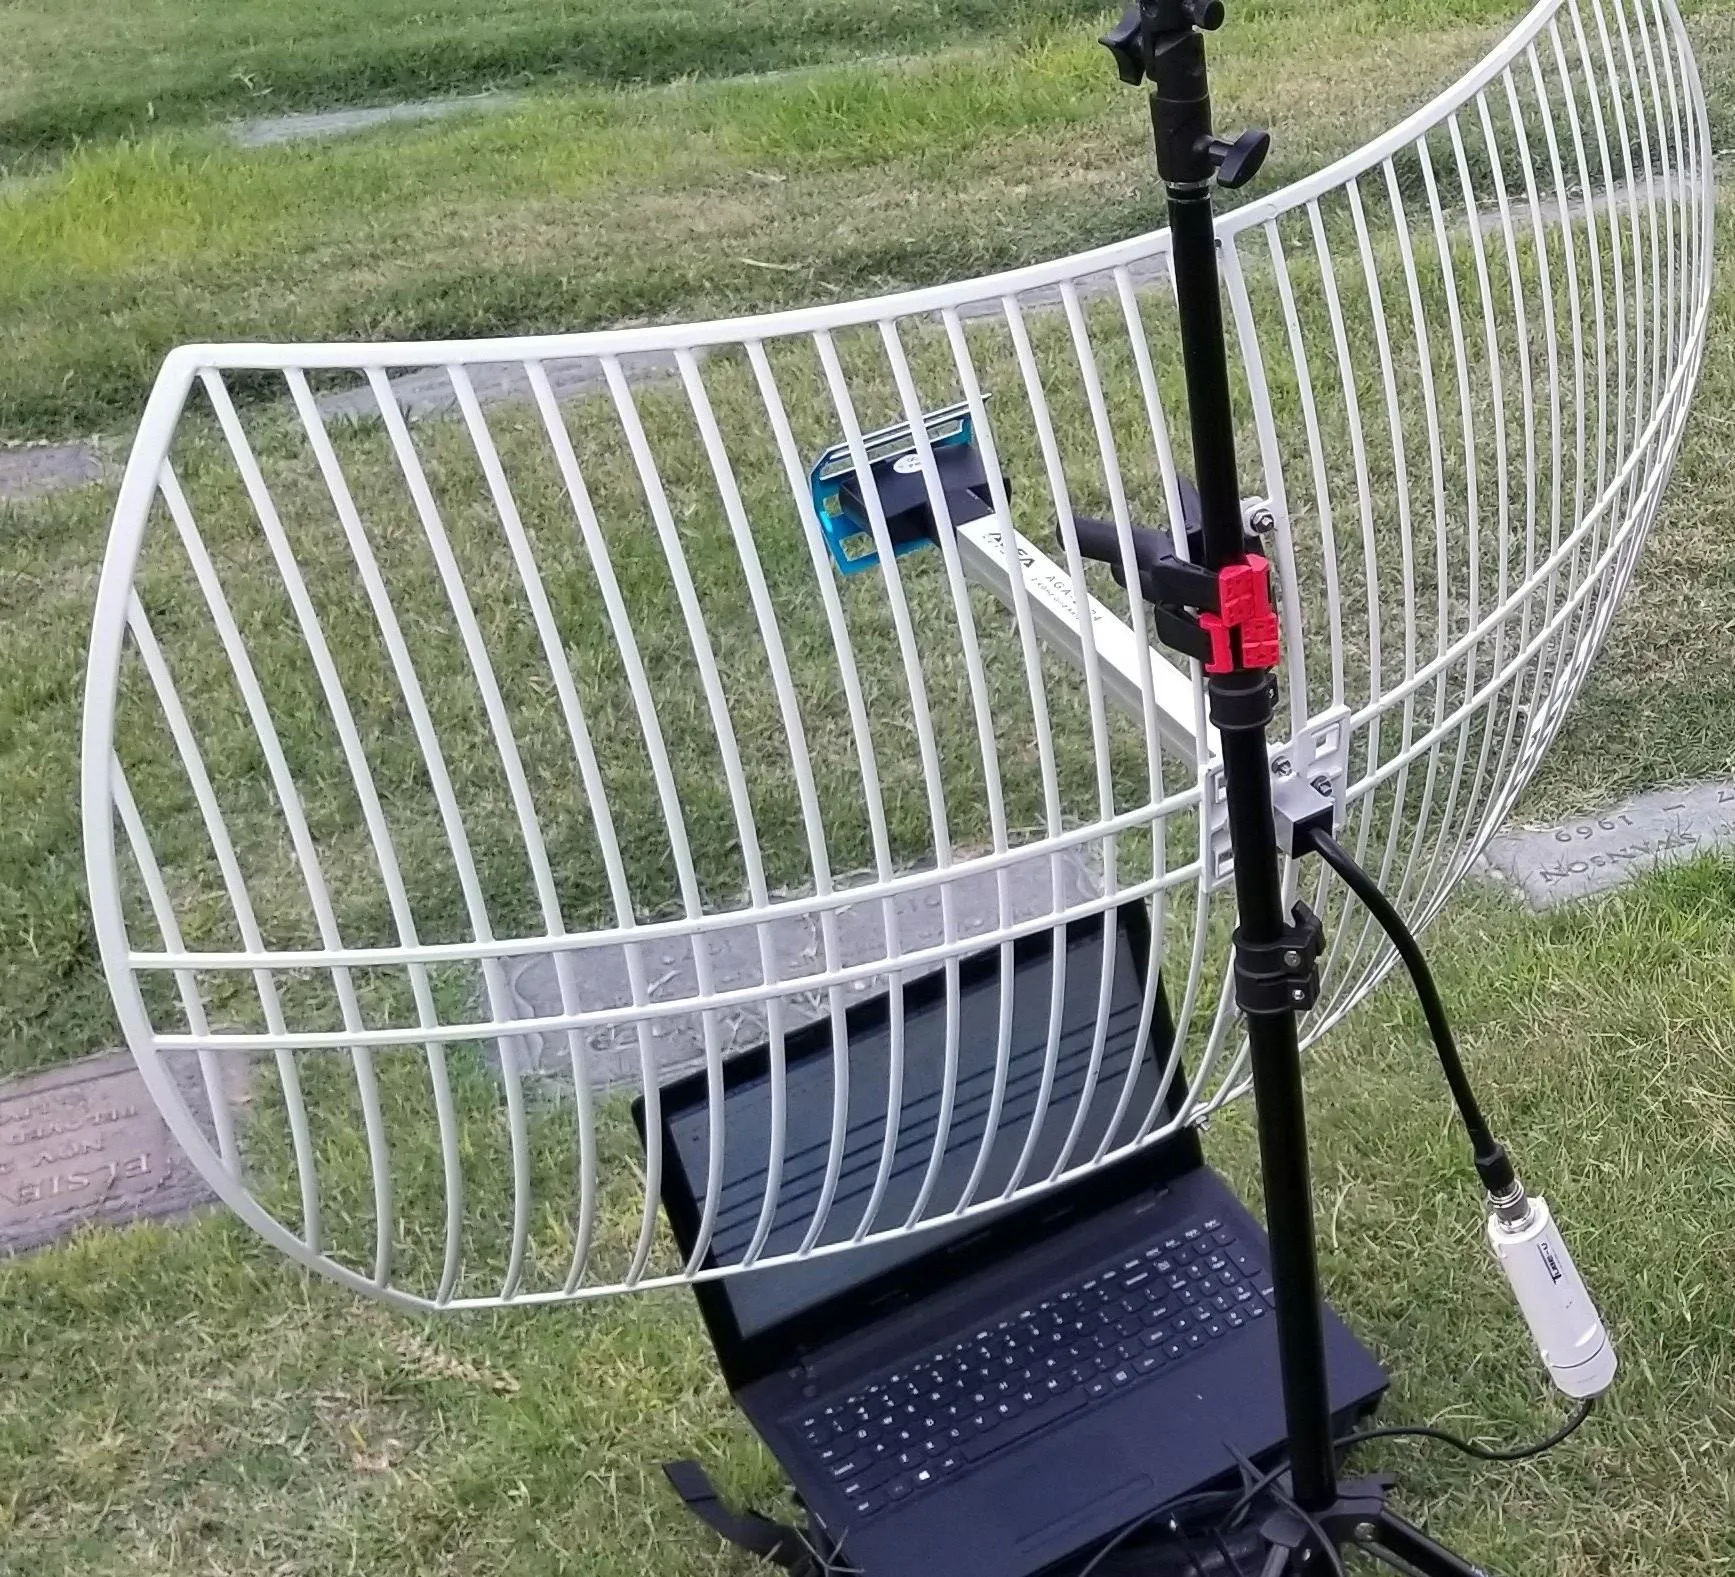
The [https://www.amazon.com/SimpleWiFi-G2424-Directional-High-Speed-Antenna/dp/B00NQGVMSE/ SimpleWiFi G2424] parabolic grid antenna.
While parabolic grids are bulky and not subtle at all, they have the most extreme reach of nearly any kind of Wi-Fi antenna. Thanks to their high gain and directionality, they can sniff information when compared with programs like Kismet from miles away when positioned correctly.
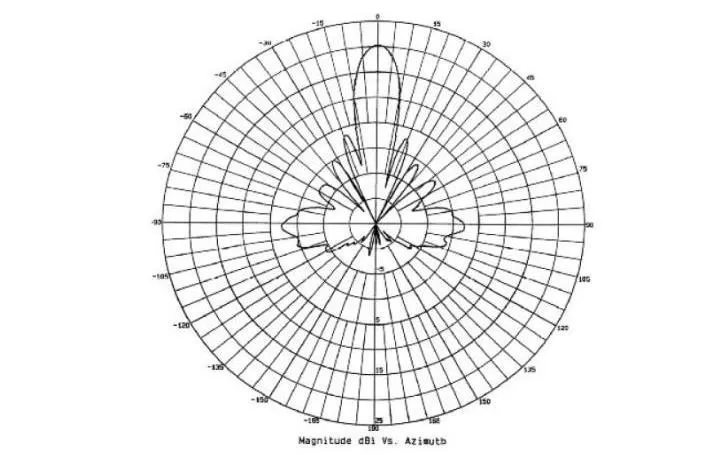
The radiation pattern of a parabolic dish antenna.
Like panel antennas, bumping or changing the angle of the antenna can cause the signal to degrade rapidly. As we learned later, even picking up the Wi-Fi device we were tracking can cause a measurable signal spike.
What You'll Need
To follow this guide, you'll need a Kali-compatible Wi-Fi network adapter like the Alfa AWUS036NEH, which has a removable Wi-Fi antenna.
- Buy on Amazon: Alfa AWUS036NEH (Alt)
For an omnidirectional antenna, check out high-gain omnidirectional antennas like the Alfa ARS-N19 Wireless 9 dBi antenna. There are a variety of indoor and outdoor panel adapters available, but I used the Alfa RP-SMA 7 dBi panel antenna. Parabolic grids are more expensive but are worth it if you're looking for the best possible range. If portability and subtlety aren't a consideration, the SimpleWiFi G2424 parabolic grid antenna has the best range of any of the other options we tried.
- Buy on Amazon: Alfa ARS-N19
- Buy on Amazon: Alfa RP-SMA 7
- Buy on Amazon: SimpleWiFi G2424
Connect the Adapter & Enable Monitor Mode
First, you'll need to connect your Kali-compatible Wi-Fi network adapter. Once it's plugged in, you can run ip a to find it. It should be named something like wlan1 if your internal card is wlan0.
~# ip a

1:  lo: <LOOPBACK,UP,LOWER,UP> tu 65536 qdisc noqueue state UNKNOWN group default qlen 1000
     link/loopback 00:00:00:00:00:00 brd 00:00:00:00:00:00
     inet 127.0.0.1/8 scope host lo
        valid_lft forever preferred_lft forever
     inet6 ::1/128 scope host
        valid_lft forever preferred_lft forever
2:  eth0: <NO-CARRIER,BROADCAST,MULTICAST,UP> mtu 1500 qdisc pfifo_fast state DOWN group default qlen 1000
     link/ether ##:##:##:##:##:## brd ff:ff:ff:ff:ff:ff
3:  wlan0: <BROADCAST,MULTICAST,UP,LOWER_UP> mtu 1500 qdisc noqueue state UP group default qlen 1000
     link/ether ##:##:##:##:##:## brd ff:ff:ff:ff:ff:ff
     inet 192.168.0.24/24 brd 129.168.0.255 scope global dynamic noprefixroute wlan0
        valid_lft 2335sec preferred_lft 2335sec
     inet6 ####:####:####:####:####:####:####:####/64 scope global dynamic noprefixroute
        valid_lft 3599sec preferred_lft 3599sec
     inet6 ####::####:####:####:####/64 scope link noprefixroute
        valid_lft forever preferred_lft forever
6:  wlan1mon: <BROADCAST,ALLMULTI,PROMISC,NOTRAILERS,UP,LOWER_UP> mtu 1500 qdisc mq state UNKNOWN group default qlen 1000
     link/ieee802.11/radiotap ##:##:##:##:##:## brd ff:ff:ff:ff:ff:ff
Next, in a terminal window, run the following ifconfig command to bring the network adapter up and the airmon-ng command to put it into monitor mode. If your card is named something besides wlan1, make sure to change the name to match yours. Once your card is in monitor mode, you can run ifconfig to confirm the card is now named something like wlan1mon.
~# ifconfig wlan1 up
~# airmon-ng start wlan1
~# ifconfiq
Now that our card is in monitor mode, we'll be selecting a network to track as our reference point. We'll use the strength of this network's signal to test out our antennas and see what kind of signal strength each type of antenna gives us.
First, let's pull up a list of Wi-Fi networks we can target. We can do this by running airodump-ng wlan1mon and watching the adapter scan through all the Wi-Fi channels. After the list has populated a bit, press Control-C to cancel the scan.
~# airodump-ng wlan1mon

 CH 11 ][ Elapsed: 0 s ][ 2020-04-30 04:36

 BSSID              PWR  Beacons    #Data,  #/s  CH  MB   ENC  CIPHER   AUTH ESSID

 ##:##:##:##:##:##  -80        2        0     0  11  130  WPA2 CCMP     PSK  belkin.4d6
 ##:##:##:##:##:##  -83        2        0     0  11  130  OPN                DAGOBAH SYSTEM-guest
 ##:##:##:##:##:##  -81        2        0     0  11  130  WPA2 CCMP     PSK  DAGOBAH SYSTEM
 ##:##:##:##:##:##  -65        2        0     0  11  130  WPA2 CCMP     PSK  Sky.NET
 ##:##:##:##:##:##  -76        2        0     0   5  130  WPA2 CCMP     PSK  MySpectrumWiFi1b-2G
 ##:##:##:##:##:##  -68        5        1     0  11  130  WPA2 CCMP     PSK  Carmen Merendez
 ##:##:##:##:##:##  -82        3        0     0   1  130  WPA2 CCMP     PSK  MySpectrumWiFi58-2G

 BSSID              STATION             PWR Rate    Lost    Frames  Probe

 ##:##:##:##:##:##   ##:##:##:##:##:##  -54  0 - 6      0        3
Now, identify the channel that a network with a strong signal is on. We'll rerun the airodump-ng command with the added -c flag to scan only on the channel our target network is broadcasting. If we want to scan on channel 1, our command would look like below.
~# airodump-ng wlan1mon -c 1

 CH  1 ][ Elapsed: 6 s ][ 2020-04-30 04:36

 BSSID              PWR  RXQ  Beacons    #Data,  #/s  CH  MB   ENC  CIPHER   AUTH ESSID

 ##:##:##:##:##:##  -78   68       48        3     0   1  195  WPA2 CCMP     PSK  MySpectrumWiFi58-2G
 ##:##:##:##:##:##  -82    0        6        3     0   1  195  WPA2 CCMP     PSK  TC8715D49
 ##:##:##:##:##:##  -83    5        3        0     0   1   65  WPA2 CCMP     PSK  LG Aristo 6082

 BSSID              STATION             PWR Rate    Lost    Frames  Probe
Leave this running in the terminal window. From here, we'll open Wireshark to begin graphing the data.
Open Wireshark & Select Target
Once Wireshark is open, select your network adapter as the source and click on the shark fin icon to start the capture. After the capture is started, you'll see a lot of packets from various networks in the area. Locate a broadcast packet from the network you want to track and click on it.
Under the IEEE 802.11 Beacon Frame information, look for the transmitter address and right-click on it. From the menu, click on "Apply as Filter" and then "Selected" to create a display filter for only transmissions from that Wi-Fi device.
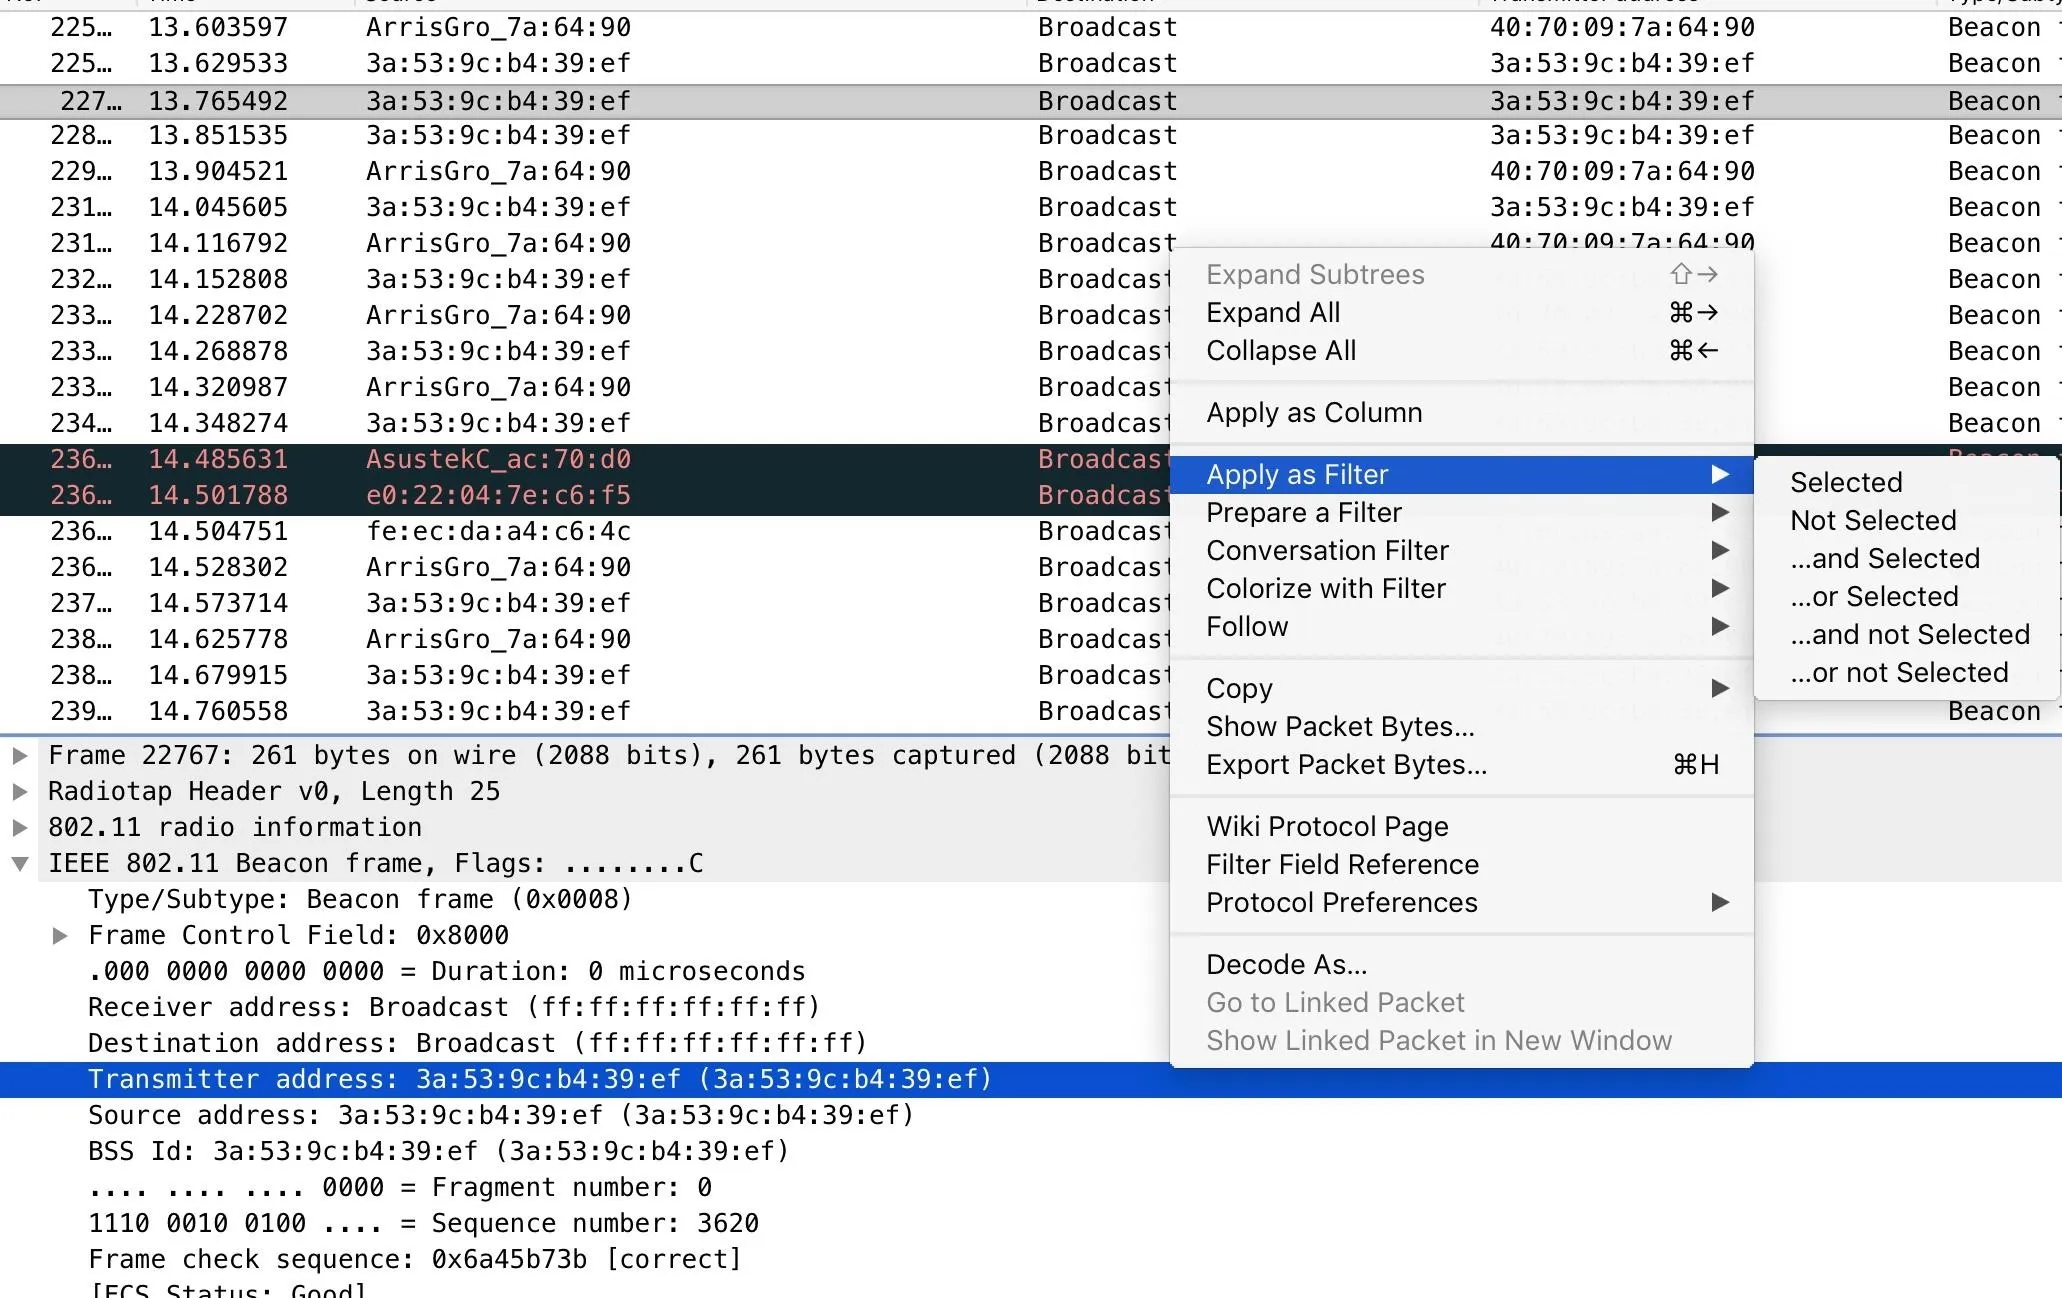
Now, you should only see packets from the device you're tracking, and you should have a display filter like the one below in the Wireshark filter bar.
wlan.ta == 3a:53:9c:b4:39:efThis is telling Wireshark to only display packets with a transmitter address matching that of the device you want to track. You can track any other device that is consistently broadcasting the same way, but you may have to target other data packets because smartphones don't give off beacon frames.
Monitor Signal Strength & Test Omnidirectional Antenna
Now, plug in your omnidirectional antenna. After getting no signal at first, the signal jumps up when we screw on our omnidirectional antenna and stays there relatively no matter what angle the adapter is held.
This steady signal is good enough for reception and is resistant to change as I move the adapter around and through the room. The only position it doesn't like is its tip facing directly towards the Wi-Fi source.
Test the Directional Panel Antenna
Next, screw in your directional panel antenna. After a signal drop from removing the omnidirectional antenna, we start to see a pattern take shape. The directional antenna can get a consistently higher signal strength when it is pointed directly at the source of the broadcasts but gets worse signal strength when pointed away.
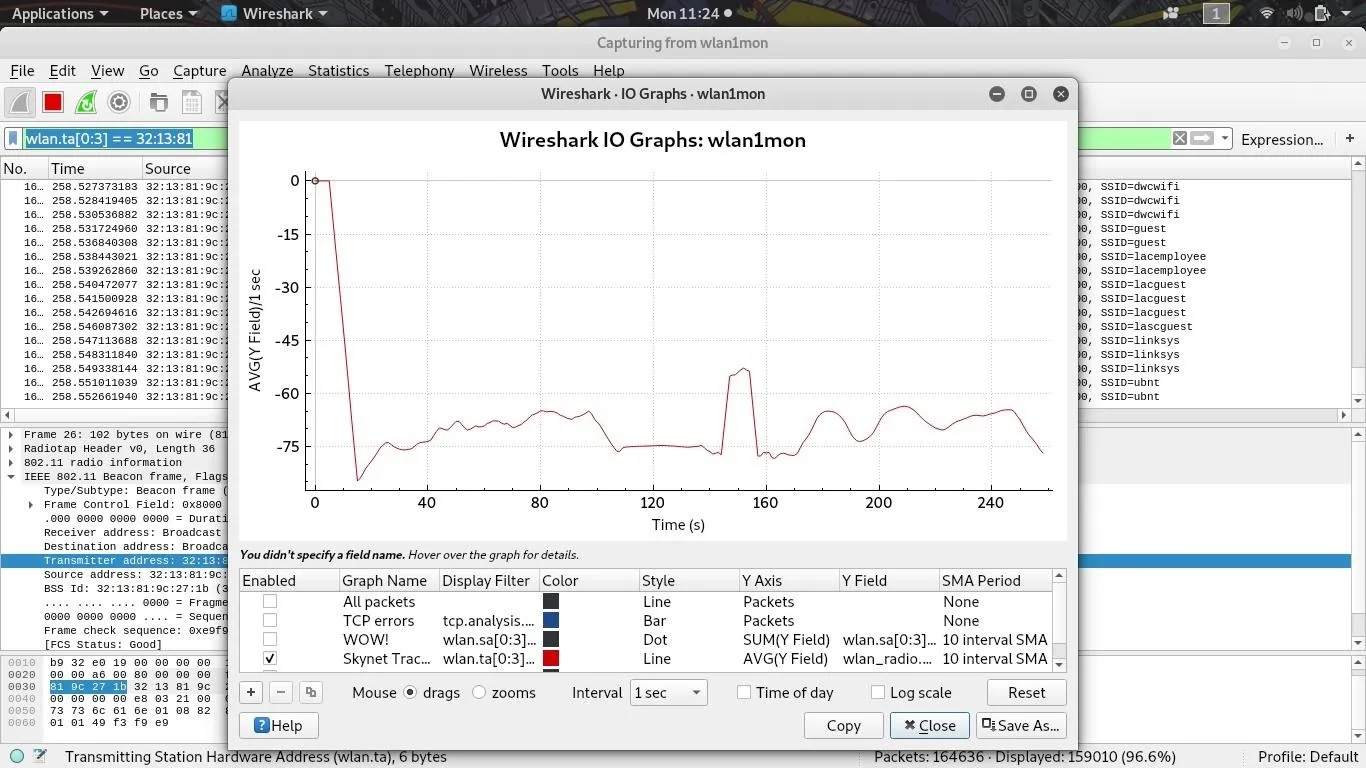
We can use this directionality to achieve a higher signal strength when pointed at any fixed Wi-Fi target, but moving targets will cause a signal drop when they wander out of the main lobe of the panel.
Test the Parabolic Grid Antenna
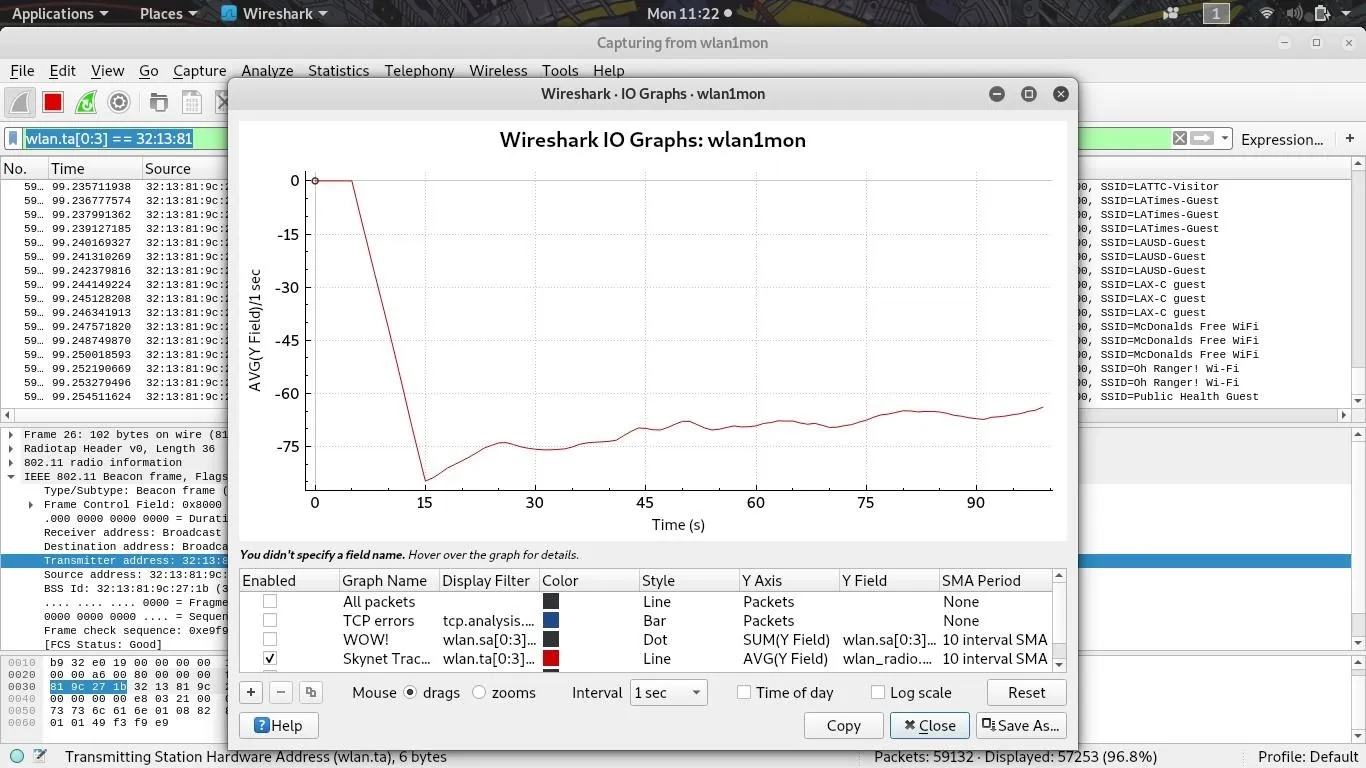
Finally, we attach the parabolic grid, and after a huge spike from unplugging the panel antenna, we start to get the highest signal strength we've been able to achieve so far. While sweeping the antenna back and forth, I can not only tell exactly where the source is, I can also get spikes of signal strength that greatly exceed anything I was able to get with the omnidirectional or panel antenna.
In the graph below, the omnidirectional and panel antenna are on the left of the signal spike in the middle, and the parabolic grid is on the right. Once we zeroed the parabolic dish in, we got a much stronger and more sensitive signal.
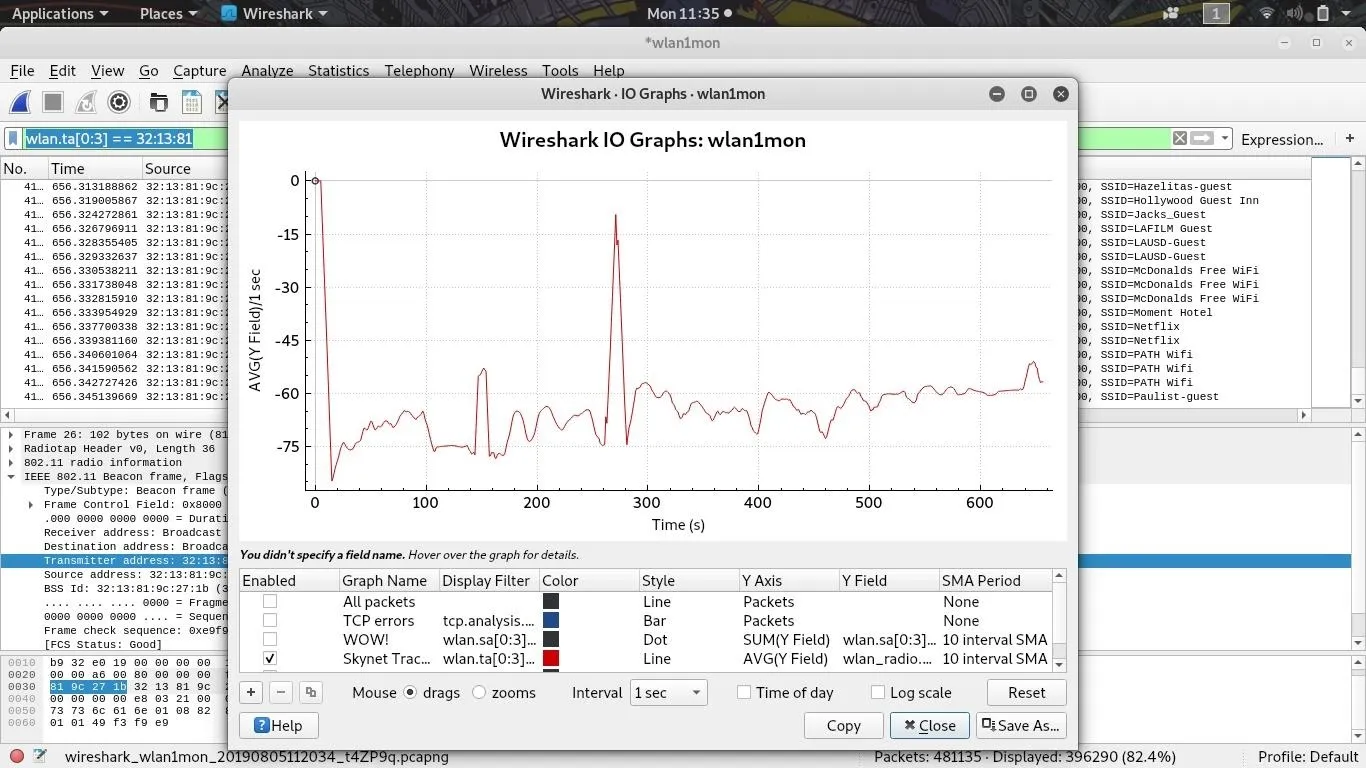
Towards the end of the capture, I picked up the Wi-Fi device we were tracking in another room and observed a jump in signal strength from the dish, meaning it's possible to even detect when someone is moving a device physically with a highly directional antenna.
Directional Antennas Create Useful Radiation Patterns
While directional network adapter can dramatically increase the signal of a network when aimed correctly, the advantage disappears or can shift as Wi-Fi signals bounce off walls and other obstacles. In an environment with many obstacles, you may find that the strongest signal a directional antenna can receive may be from an angle other than directly towards the source.
It's also worth noting that a larger omnidirectional antenna doesn't always mean a stronger signal. If a Wi-Fi source is closeby, a larger antenna can extend the strongest part of the radiation pattern beyond where the target is located.
I hope you enjoyed this guide to using specialized antennas for Wi-Fi hacking! If you have any questions about this tutorial on using directional and omnidirectional antennas, leave a comment below, and feel free to reach me on Twitter @KodyKinzie.
Cover photo by Kody/Null Byte


Comments
Be the first, drop a comment!