


Individually addressable LEDs, also commonly called "NeoPixels" after the popular Adafruit product, are a bright and colorful way to get started with basic Python programming. With an inexpensive ESP8266 or ESP32 microcontroller, it's easy to get started programming your own holiday lighting animations on a string of NeoPixels with beginner-friendly MicroPython!
NeoPixels are a great way to get started programming hardware, and if you want to get started using Python to create your own holiday light animations, you can get started using ultra-cheap components. Thanks to how easy it is to load MicroPython on an ESP8266 microcontroller, you can pick up a D1 Mini development board for less than $5 and start programming holiday animations on a strip of LEDs without needing to know much programming at all.
In our example today, we'll take a strip of NeoPixels and cut a strip of ten to program in MicroPython. We'll connect it to a D1 mini development board and then use Jupyter Notebook to control the lights while we prototype different animations.
What You Need
First, you'll need an ESP8266-based microcontroller. I'll be working with the D1 Mini today, but the NodeMCU or an ESP32 should work fine. The latter would be good if you plan on using a lot of NeoPixels. These boards are cheap and easy to find on websites like AliExpress and Amazon.
You'll also need a computer with Python3 and a Micro-USB cable to connect to the board. You'll need an internet connection to download the MicroPython firmware binary, a mini breadboard for connecting components, jumper wires, and the individually addressed LED strip. If you don't have a three-color RGB LED, you can use regular LEDs as well.
Optionally, you can add Ping-Pong balls on top of the LEDs to diffuse the light. I find this makes them look much better from further away. If you want to do this, you can hot glue them securely on top of the LEDs.
- D1 Mini board (Amazon)
- Micro-USB cable (Amazon)
- mini breadboards (Amazon)
- individually addressed LED strip (Amazon)
- jumper wires (Amazon)
- Ping-Pong balls (Amazon) (optional)
To wire this project, connect the ground pin of the NeoPixel strip to the Ground pin of the D1 Mini. Connect the Power pin to the 5v or VCC pin of the D1, and connect the middle Signal pin of the NeoPixel strip to the D4 pin of the D1. In MicroPython, this is GPIO Pin 2, which is how we'll address it in our code. The nice thing is that these pins are all in a row, starting with power, ground, and then signal. Just make sure not to get them mixed up!
You can see the wiring in this example, with red as power, blue as ground, and yellow as signal.
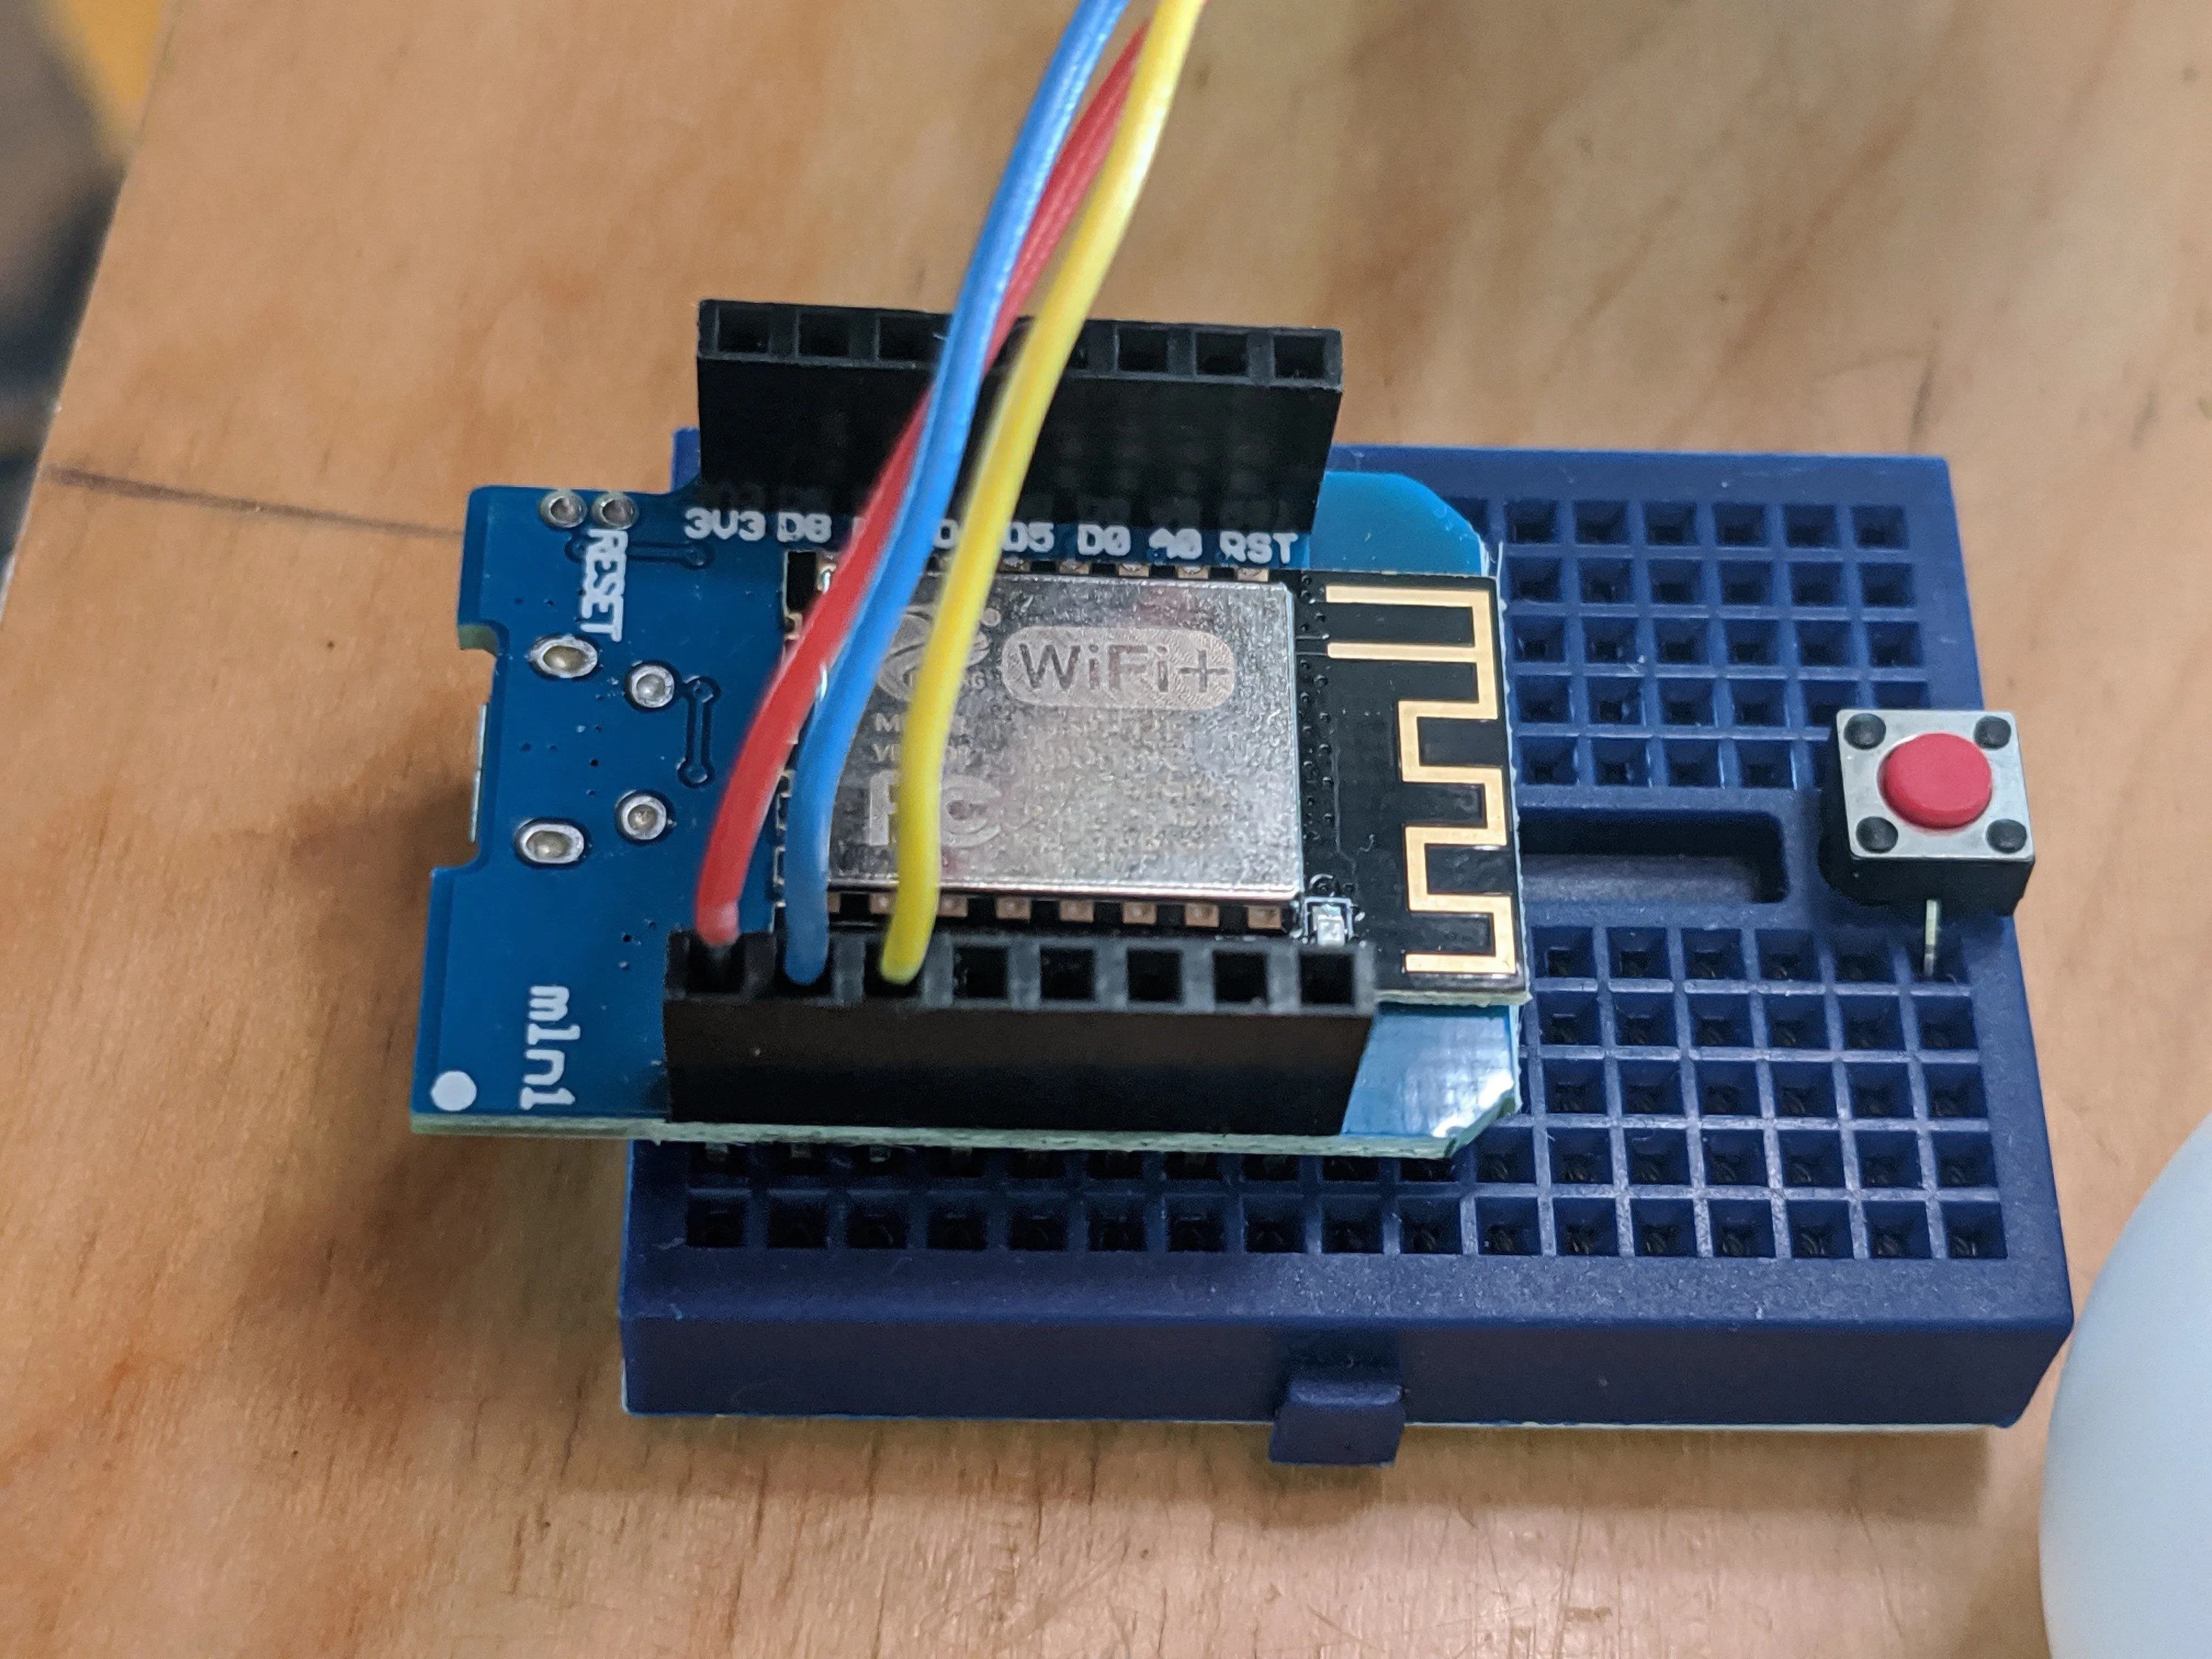
Kody/Null Byte
Flash MicroPython Binary
If you haven't flashed MicroPython to your board before, check out our article on getting started with MicroPython, which details the process in full with some beginner examples. In brief, you need to download the MicroPython binary, download one of the stable builds, then install two tools that will let us flash the firmware and upload files to the board.
To reiterate briefly, install esptool, which will let us erase and flash the board. You can do so with the following command in a terminal window. If you have trouble with this, see our intro guide for help.
~$ pip3 install esptoolAlso, install Ampy so we can load files onto the board later.
~$ pip3 install adafruit-ampyNext, plug in the board, and then locate which port it's connected to. On a macOS system, the command to find it ls /dev/cu* and should look like /dev/cu.wchusbserial14440. On Windows, you can find the COM port in the device manager and it should look like COM1. On Linux, you can search for it with dmesg | grep tty and it should look like /dev/ttyUSB0.
Once you know the serial port the board is connected to, run esptool to erase it. Replace SERIAL_PORT with the port the ESP8266 is connected to.
~$ esptool.py --port SERIAL_PORT erase_flashNow, it's time to flash the firmware you downloaded. Again, replace SERIAL_PORT with the port your board is connected to, and FIRMWARE_PATH with the path to the firmware.BIN file you downloaded.
~$ esptool.py --port SERIAL__PORT --baud 460800 write_flash --flash_size=detect 0 FIRMWARE__PATHOnce it completes, you should have MicroPython installed on your ESP8266 and ready to connect. If you're on macOS or Linux, you can confirm this with the following command (again replacing SERIAL_PORT).
~$ screen SERIAL__PORT 115200On Windows, you can connect using PuTTY after connecting to the right COM port with the "speed" setting at 115200.
Once connected, press "Enter" a few times and you should see a MicroPython REPL appear. You can test it with a simple piece of code.
��c�
MicroPython v1.11-8-g48dcbbe60 on 2019-05-29; ESP module with ESP8266
Type "help()" for more information.
>>> x = "Hello Bytes"
>>> print(x)
Hello Bytes
>>>
You can exit this window by typing Control-A at the same time, and then the letter K. Disconnect from the terminal window, and let's get started with Jupyter!
Install the Jupyter Notebook MicroPython Kernel
To install Jupyter Notebook, run the following command to upgrade your Pip installation.
~$ python3 -m pip install --upgrade pip

Collecting pip
  Downloading https://files.pythonhosted.org/packages/00/b6/9cfa56b4081ad13874b0c6f96af8ce16cfbc1cb06bedf8e9164ce5551ec1/pip-19.3.1-py2.py3-none-any.whl (1.4MB)
    100% |████████████████████████████████| 1.4MB 916kB/s
Installing collected packages: pip
  Found existing installation: pip 18.1
    Not uninstalling pip at /usr/lib/python3/dist-packages, outside environment /usr
    Can't uninstall 'pip'. No files were found to uninstall.
Successfully installed pip-19.3.1
Then this command to install Jupyter Notebook:
~$ python3 -m pip install jupyter

Collecting jupyter
  Downloading https://files.pythonhosted.org/packages/83/df/0f5dd132200728a86190397e1ea87cd76244e42d39ec5e88efd25b2abd7e/jupyter-1.0.0-py2.py3-none-any.whl
Collecting jupyter-console
  Downloading https://files.pythonhosted.org/packages/cb/ee/6374ae8c21b7d0847f9c3722dcdfac986b8e54fa9ad9ea66e1eb6320d2b8/jupyter_console-6.0.0-py2.py3-none-any.whl
Collecting qtconsole
  Downloading https://files.pythonhosted.org/packages/7c/57/3528b84ffa753e2089908bbf74bb5ae60653eb7a63797b6234e88b847d67/qtconsole-4.6.0-py2.py3-none-any.whl (121kB)
     |████████████████████████████████| 122kB 1.6MB/s
Collecting notebook
  Downloading https://files.pythonhosted.org/packages/f5/69/d2ffaf7efc20ce47469187e3a41e6e03e17b45de5a6559f4e7ab3eace5e1/notebook-6.0.2-py3-none-any.whl (9.7MB)
     |████████████████████████████████| 9.7MB 6.6MB/s
Collecting nbconvert
  Downloading https://files.pythonhosted.org/packages/79/6c/05a569e9f703d18aacb89b7ad6075b404e8a4afde2c26b73ca77bb644b14/nbconvert-5.6.1-py2.py3-none-any.whl (455kB)
     |████████████████████████████████| 460kB 11.5MB/s
Collecting ipywidgets
  Downloading https://files.pythonhosted.org/packages/56/a0/dbcf5881bb2f51e8db678211907f16ea0a182b232c591a6d6f276985ca95/ipywidgets-7.5.1-py2.py3-none-any.whl (121kB)
     |████████████████████████████████| 122kB 34.2MB/s
Collecting ipykernel
  Downloading https://files.pythonhosted.org/packages/e1/92/8fec943b5b81078399f969f00557804d884c96fcd0bc296e81a2ed4fd270/ipykernel-5.1.3-py3-none-any.whl (116kB)
     |████████████████████████████████| 122kB 26.1MB/s
Collecting jupyter-client
  Downloading https://files.pythonhosted.org/packages/13/81/fe0eee1bcf949851a120254b1f530ae1e01bdde2d3ab9710c6ff81525061/jupyter_client-5.3.4-py2.py3-none-any.whl (92kB)
     |████████████████████████████████| 92kB 3.5MB/s
Requirement already satisfied: pygments in /usr/lib/python3/dist-packages (from jupyter-console->jupyter) (2.3.1)
Collecting ipython
  Downloading https://files.pythonhosted.org/packages/c4/c0/dc2e62d068f0f63910a3ab565a7fbbe1a20946b23f0945525826d9bbc98f/ipython-7.10.2-py3-none-any.whl (778kB)
     |████████████████████████████████| 788kB 14.0MB/s
Collecting prompt-toolkit<2.1.0,>=2.0.0
  Downloading https://files.pythonhosted.org/packages/87/61/2dfea88583d5454e3a64f9308a686071d58d59a55db638268a6413e1eb6d/prompt_toolkit-2.0.10-py3-none-any.whl (340kB)
     |████████████████████████████████| 348kB 25.6MB/s
Requirement already satisfied: ipython-genutils in /usr/lib/python3/dist-packages (from qtconsole->jupyter) (0.2.0)
Requirement already satisfied: jupyter-core in /usr/lib/python3/dist-packages (from qtconsole->jupyter) (4.4.0)
Requirement already satisfied: traitlets in /usr/lib/python3/dist-packages (from qtconsole->jupyter) (4.3.2)
Requirement already satisfied: nbformat in /usr/lib/python3/dist-packages (from notebook->jupyter) (4.4.0)
Collecting pyzmq>=17
  Downloading https://files.pythonhosted.org/packages/bf/dd/547bee2080beefe6546c332422cb0f189b3cd71cfff048146cd9ac3751cc/pyzmq-18.1.1-cp37-cp37m-manylinux1_x86_64.whl (1.1MB)
     |████████████████████████████████| 1.1MB 11.2MB/s
Collecting Send2Trash
  Downloading https://files.pythonhosted.org/packages/49/46/c3dc27481d1cc57b9385aff41c474ceb7714f7935b1247194adae45db714/Send2Trash-1.5.0-py3-none-any.whl
Requirement already satisfied: jinja2 in /usr/lib/python3/dist-packages (from notebook->jupyter) (2.10)
Requirement already satisfied: tornado>=5.0 in /usr/lib/python3/dist-packages (from notebook->jupyter) (5.1.1)
Collecting prometheus-client
  Downloading https://files.pythonhosted.org/packages/b3/23/41a5a24b502d35a4ad50a5bb7202a5e1d9a0364d0c12f56db3dbf7aca76d/prometheus_client-0.7.1.tar.gz
Collecting terminado>=0.8.1
  Downloading https://files.pythonhosted.org/packages/ff/96/1d9a2c23990aea8f8e0b5c3b6627d03196a73771a17a2d9860bbe9823ab6/terminado-0.8.3-py2.py3-none-any.whl
Collecting bleach
  Downloading https://files.pythonhosted.org/packages/ab/05/27e1466475e816d3001efb6e0a85a819be17411420494a1e602c36f8299d/bleach-3.1.0-py2.py3-none-any.whl (157kB)
     |████████████████████████████████| 163kB 30.7MB/s
Collecting testpath
  Downloading https://files.pythonhosted.org/packages/1b/9e/1a170feaa54f22aeb5a5d16c9015e82234275a3c8ab630b552493f9cb8a9/testpath-0.4.4-py2.py3-none-any.whl (163kB)
     |████████████████████████████████| 174kB 13.1MB/s
Collecting defusedxml
  Downloading https://files.pythonhosted.org/packages/06/74/9b387472866358ebc08732de3da6dc48e44b0aacd2ddaa5cb85ab7e986a2/defusedxml-0.6.0-py2.py3-none-any.whl
Collecting pandocfilters>=1.4.1
  Downloading https://files.pythonhosted.org/packages/4c/ea/236e2584af67bb6df960832731a6e5325fd4441de001767da328c33368ce/pandocfilters-1.4.2.tar.gz
Collecting mistune<2,>=0.8.1
  Downloading https://files.pythonhosted.org/packages/09/ec/4b43dae793655b7d8a25f76119624350b4d65eb663459eb9603d7f1f0345/mistune-0.8.4-py2.py3-none-any.whl
Requirement already satisfied: entrypoints>=0.2.2 in /usr/lib/python3/dist-packages (from nbconvert->jupyter) (0.3)
Collecting widgetsnbextension~=3.5.0
  Downloading https://files.pythonhosted.org/packages/6c/7b/7ac231c20d2d33c445eaacf8a433f4e22c60677eb9776c7c5262d7ddee2d/widgetsnbextension-3.5.1-py2.py3-none-any.whl (2.2MB)
     |████████████████████████████████| 2.2MB 1.1MB/s
Requirement already satisfied: python-dateutil>=2.1 in /usr/lib/python3/dist-packages (from jupyter-client->jupyter-console->jupyter) (2.7.3)
Collecting pexpect; sys_platform != "win32"
  Downloading https://files.pythonhosted.org/packages/0e/3e/377007e3f36ec42f1b84ec322ee12141a9e10d808312e5738f52f80a232c/pexpect-4.7.0-py2.py3-none-any.whl (58kB)
     |████████████████████████████████| 61kB 3.8MB/s
Requirement already satisfied: setuptools>=18.5 in /usr/lib/python3/dist-packages (from ipython->jupyter-console->jupyter) (40.8.0)
Collecting pickleshare
  Downloading https://files.pythonhosted.org/packages/9a/41/220f49aaea88bc6fa6cba8d05ecf24676326156c23b991e80b3f2fc24c77/pickleshare-0.7.5-py2.py3-none-any.whl
Requirement already satisfied: decorator in /usr/lib/python3/dist-packages (from ipython->jupyter-console->jupyter) (4.3.0)
Collecting jedi>=0.10
  Downloading https://files.pythonhosted.org/packages/e9/97/55e575a5b49e5c3df9eb3c116c61021d7badf556c816be13bbd7baf55234/jedi-0.15.2-py2.py3-none-any.whl (1.1MB)
     |████████████████████████████████| 1.1MB 16.8MB/s
Collecting backcall
  Downloading https://files.pythonhosted.org/packages/84/71/c8ca4f5bb1e08401b916c68003acf0a0655df935d74d93bf3f3364b310e0/backcall-0.1.0.tar.gz
Requirement already satisfied: six>=1.9.0 in /usr/lib/python3/dist-packages (from prompt-toolkit<2.1.0,>=2.0.0->jupyter-console->jupyter) (1.12.0)
Collecting wcwidth
  Downloading https://files.pythonhosted.org/packages/7e/9f/526a6947247599b084ee5232e4f9190a38f398d7300d866af3ab571a5bfe/wcwidth-0.1.7-py2.py3-none-any.whl
Collecting ptyprocess; os_name != "nt"
  Downloading https://files.pythonhosted.org/packages/d1/29/605c2cc68a9992d18dada28206eeada56ea4bd07a239669da41674648b6f/ptyprocess-0.6.0-py2.py3-none-any.whl
Requirement already satisfied: webencodings in /usr/lib/python3/dist-packages (from bleach->nbconvert->jupyter) (0.5.1)
Collecting parso>=0.5.2
  Downloading https://files.pythonhosted.org/packages/9b/b0/90353a5ece0987279837835224dead0c424833a224195683e188d384e06b/parso-0.5.2-py2.py3-none-any.whl (99kB)
     |████████████████████████████████| 102kB 8.5MB/s
Building wheels for collected packages: prometheus-client, pandocfilters, backcall
  Building wheel for prometheus-client (setup.py) ... done
  Created wheel for prometheus-client: filename=prometheus_client-0.7.1-cp37-none-any.whl size=41402 sha256=8a0b0f7bba470c5e6fdc1506cfacb387326c5d03643169cc3148e56c85facee6
  Stored in directory: /root/.cache/pip/wheels/1c/54/34/fd47cd9b308826cc4292b54449c1899a30251ef3b506bc91ea
  Building wheel for pandocfilters (setup.py) ... done
  Created wheel for pandocfilters: filename=pandocfilters-1.4.2-cp37-none-any.whl size=7856 sha256=3fbcd7d58aec591cf27769d82f6e28b444b583fd8829106267bc25433f8affd3
  Stored in directory: /root/.cache/pip/wheels/39/01/56/f1b08a6275acc59e846fa4c1e1b65dbc1919f20157d9e66c20
  Building wheel for backcall (setup.py) ... done
  Created wheel for backcall: filename=backcall-0.1.0-cp37-none-any.whl size=10413 sha256=62b20109002d1a60e129806870ac0807071103fb2ba5339d8b2a012fcdb5a94e
  Stored in directory: /root/.cache/pip/wheels/98/b0/dd/29e28ff615af3dda4c67cab719dd51357597eabff926976b45
Successfully built prometheus-client pandocfilters backcall
ERROR: jupyter-client 5.3.4 has requirement jupyter-core>=4.6.0, but you'll have jupyter-core 4.4.0 which is incompatible.
ERROR: notebook 6.0.2 has requirement jupyter-core>=4.6.0, but you'll have jupyter-core 4.4.0 which is incompatible.
Installing collected packages: pyzmq, jupyter-client, wcwidth, prompt-toolkit, ptyprocess, pexpect, pickleshare, parso, jedi, backcall, ipython, ipykernel, jupyter-console, qtconsole, Send2Trash, bleach, testpath, defusedxml, pandocfilters, mistune, nbconvert, prometheus-client, terminado, notebook, widgetsnbextension, ipywidgets, jupyter
Successfully installed Send2Trash-1.5.0 backcall-0.1.0 bleach-3.1.0 defusedxml-0.6.0 ipykernel-5.1.3 ipython-7.10.2 ipywidgets-7.5.1 jedi-0.15.2 jupyter-1.0.0 jupyter-client-5.3.4 jupyter-console-6.0.0 mistune-0.8.4 nbconvert-5.6.1 notebook-6.0.2 pandocfilters-1.4.2 parso-0.5.2 pexpect-4.7.0 pickleshare-0.7.5 prometheus-client-0.7.1 prompt-toolkit-2.0.10 ptyprocess-0.6.0 pyzmq-18.1.1 qtconsole-4.6.0 terminado-0.8.3 testpath-0.4.4 wcwidth-0.1.7 widgetsnbextension-3.5.1
Now, to prevent any issues with some of the stuff that comes up next, go ahead and upgrade the Juypter client, or you might run into errors when installing the kernel. If you think you're good, you can skip this, but come back if you run into errors.
~$ pip install --upgrade jupyter_client

Requirement already up-to-date: jupyter_client in /usr/local/lib/python3.7/dist-packages (5.3.4)
Requirement already satisfied, skipping upgrade: pyzmq>=13 in /usr/local/lib/python3.7/dist-packages (from jupyter_client) (18.1.1)
Requirement already satisfied, skipping upgrade: python-dateutil>=2.1 in /usr/lib/python3/dist-packages (from jupyter_client) (2.7.3)
Requirement already satisfied, skipping upgrade: traitlets in /usr/lib/python3/dist-packages (from jupyter_client) (4.3.2)
Requirement already satisfied, skipping upgrade: tornado>=4.1 in /usr/lib/python3/dist-packages (from jupyter_client) (5.1.1)
Collecting jupyter-core>=4.6.0
  Downloading https://files.pythonhosted.org/packages/fb/82/86437f661875e30682e99d04c13ba6c216f86f5f6ca6ef212d3ee8b6ca11/jupyter_core-4.6.1-py2.py3-none-any.whl (82kB)
     |████████████████████████████████| 92kB 1.2MB/s
Installing collected packages: jupyter-core
  Found existing installation: jupyter-core 4.4.0
    Uninstalling jupyter-core-4.4.0:
      Successfully uninstalled jupyter-core-4.4.0
Successfully installed jupyter-core-4.6.1
Next, we'll need to install the MicroPython kernel. We can get it from the Jupyter MicroPython Kernel GitHub repo. We'll download it using the following command.
~$ git clone https://github.com/goatchurchprime/jupyter_micropython_kernel.git

Cloning into 'jupyter_micropython_kernel'...
remote: Enumerating objects: 14, done.
remote: Counting objects: 100% (14/14), done.
remote: Compressing objects: 100% (10/10), done.
remote: Total 340 (delta 7), reused 11 (delta 4), pack-reused 326
Receiving objects: 100% (340/340), 122.27 KiB | 1.77 MiB/s, done.
Resolving deltas: 100% (236/236), done.
Next, we'll install it to Python3 using the following command:
~$ pip3 install -e jupyter_micropython_kernel

Traceback (most recent call last):
  File "/usr/bin/pip3", line 11, in <module>
    sys.exit(main())
TypeError: 'module' object is not callable
If something goes wrong, you can try using sudo before the command or use pip instead of pip3.
~$ sudo pip3 install -e jupyter_micropython_kernel

Obtaining file:///root/jupyter_micropython_kernel
Requirement already satisfied: pyserial>=3.4 in /usr/lib/python3/dist-packages (from jupyter-micropython-kernel==0.1.3) (3.4)
Requirement already satisfied: websocket-client>=0.44 in /usr/lib/python3/dist-packages (from jupyter-micropython-kernel==0.1.3) (0.53.0)
Installing collected packages: jupyter-micropython-kernel
  Running setup.py develop for jupyter-micropython-kernel
Successfully installed jupyter-micropython-kernel
Finally, let's install the kernel into Jupyter. We'll do so with the following command.
~$ python -m jupyter_micropython_kernel.install

Installing IPython kernel spec of micropython
/root/jupyter_micropython_kernel/jupyter_micropython_kernel/install.py:29: DeprecationWarning: replace is ignored. Installing a kernelspec always replaces an existing installation
  k.install_kernel_spec(td, 'Micropython', user=user, replace=True, prefix=prefix)
...into /usr/local/share/jupyter/kernels/micropython
This should make Jupyter ready to work with MicroPython. To test it, type jupyter kernelspec list into the terminal window and see what kernels are available. You should see something like below.
~$ jupyter kernelspec list

Available kernels:
  micropython    /Users/skickar/Library/jupyter/kernels/micropython
  python3        /usr/local/share/jupyter/kernels/python3
Now, to open Jupyter, type the following to launch the web interface of the main Jupyter Notebook menu.
~$ jupyter notebookYou should see an interface like below open in a web browser.

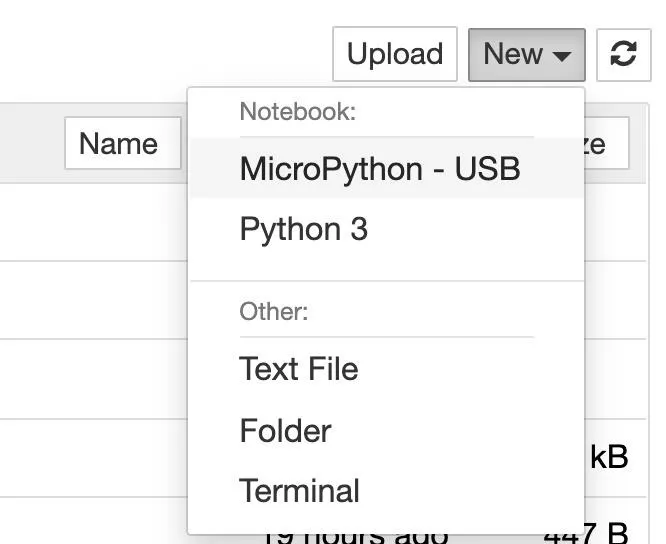
Open a MicroPython Jupyter Notebook
To create a MicroPython file, click on "New" and select "MicroPython - USB" as the type of document to create.
Now, we should find ourselves in a blank Jupyter notebook. We can add cells to run with the plus (+) button, and then run cells with the play button to see how our code runs. Before we can do that, however, we'll need to add a cell to connect.
Tip: You can follow along with my notebook hosted on GitHub.
Connect to Your ESP
First, we'll need to connect to the ESP8266. Plug it in, and then replace SERIAL_PORT in the code below with the serial port of the ESP. Then, run the code below in the first cell to connect MicroPython to the ESP2866.
# Connect to ESP8266 via serial

%serialconnect to --port=SERIAL__PORT --baud=115200
You should see a result like below.

Now that we're connected, make a new cell below the first one, and let's get started with our code!
Create a Random Function & Import Modules
One thing MicroPython lacks is a good random number generator, which we'll need to make our light animations more interesting. We'll also need to import some modules like neopixel, math, time, random, and machine to work with the pins and NeoPixel objects, as well as manage the timing of our animations.
Below, we set up the modules we need, and create a random function called randint that gives us a random integer based on the lower and upper number we supply.
We also need to create a NeoPixel object. We'll do this by using the code np = neopixel.NeoPixel(machine.Pin(PIXEL_PIN), NUMBER_OF_PIXELS) to create an object to work with.
In the code below, we are telling the code we have 10 pixels, and the pixels are connected to pin 2, which is the D4 pin on the D1 mini microcontroller.
## Import neopixels and create object, include the Pin number and Number of pixels

## On the D1 Mini, the "D4" pin, located next to power and ground, is actually Pin 2.
# You can see the pinout on the D1 mini for more info on finding the right pin to connect to

import machine, neopixel, random, math, time
np = neopixel.NeoPixel(machine.Pin(2), 10)

## Create a random function
def randint(lower, upper):
    gap = upper - lower
    if gap == 0:
        return lower
    return (random.getrandbits(int(math.log(gap, 2)))% gap) + lower
After running this code in a cell, we can interact with our NeoPixel objects and call the randint() function to get a random number. Let's try it out!
Set Individual Pixels to a Color
To set a the color of an individual color, we can follow this format general.
np[[PIXEL_NUMBER]] = (RED, GREEN, BLUE)The value of each red, green, or blue value can be anything between 0 for off, or 255 for full on. So, to make the fist pixel (np[0]) red, we would use the following code.
np[[0]] = (255, 0, 0)Then, to write the changes to the strip, we run the following command.
np.write()This should write the fist pixel on the strip to full red. Running the example below will set all 10 to a specific color.
## Set Individual Pixels a color

np[0] = (255, 0, 0) # set to red, full brightness
np[1] = (0, 128, 0) # set to green, half brightness
np[2] = (0, 0, 64)  # set to blue, quarter brightness
np[3] = (255, 0, 255) # set to purple, red blue full brightness
np[4] = (0, 128, 0) # set to green, half brightness
np[5] = (255, 255, 255)  # set to white, full brightness
np[6] = (255, 128, 255)  # set to white, minimum brightness
np[7] = (255, 64, 64)  # set to white, full brightness
np[8] = (64, 64, 255)  # set to purple, full brightness
np[9] = (128, 255, 128)  # set to teal, partial brightness
np.write() # to write the colors we set
Now that we can set an individual pixel, let's practice turning them off and making animations.
Wipe (Turn Off) Pixels
In order to transfer between animations of just turn off the lights, we'll need to make a turning off function. We can use a simple loop to do so, which goes between pixels 0 and 9 in a loop, turning them off with a .2 second delay to make it look nice.
## Wipe Pixels

def ErasePixels():
    for i in range(0,10):
        np[i] = (0,0,0)
        np.write()
        time.sleep(.2)

ErasePixels()
If we remove the delay, they turn off instantly.
Create a Random Color Animation
To create an animation that sets each pixel to a random color in a loop, we can start using our randint() function we created before. We can also use a while True loop to make this loop run forever. To make it stop, press the stop icon in Jupyter Notebook.
## Create random colors on each LED!

while True:
     for i in range(0,10):
         np[i] = (randint(0,255),randint(0,255),randint(0,255))
         np.write()
         time.sleep(.2)
In this example, we combine the loop with the random number generator to set the red, green, and blue values all to random colors as we go through the loop.
Create an Animation That Runs in Reverse
To reverse the random colors order, we can make our loop run backwards. Instead of running from 0 to 9, this loop runs from 9 to 0 in a loop.
## Create dimmer random colors on each LED... Backwards!

while True:
    for i in range(10,0, -1):
        np[i-1] = (randint(0,150),randint(0,150),randint(0,150))
        np.write()
        time.sleep(.2)
By changing the way our loop runs, we can change the direction of our animation to make it either bounce back and forth or alternate in other ways.
Create an Animation That Picks from Various Holiday Colors
Now, let's make an animation that uses holiday colors! We'll create a few lists for this. One is Christmas colors, the second is blue and white Hanukkah colors, and the last is a mix of all three.
ChristmasColors = [(255, 0, 0), (0, 255, 0), (255, 0, 0), (0, 255, 0)]
AllColors = [(255, 0, 0), (0, 255, 0), (255, 255, 255), (0, 0, 255)]
WhiteBlue = [(255, 255, 255), (0, 0, 255), (255, 255, 255), (0, 0, 255)]
Now we can pick from these lists while we are setting the color in our loop. To make it random, we can use the following code to pick from the "AllColors" list randomly.
while True:
    for i in range(0,10):
        np[i] = AllColors[randint(0,4)]
        np.write()
        time.sleep(.1)
Now, if we combine them and run them together, we should see random holiday colors appear on our lights.
ChristmasColors = [(255, 0, 0), (0, 255, 0), (255, 0, 0), (0, 255, 0)]
AllColors = [(255, 0, 0), (0, 255, 0), (255, 255, 255), (0, 0, 255)]
WhiteBlue = [(255, 255, 255), (0, 0, 255), (255, 255, 255), (0, 0, 255)]
while True:
    for i in range(0,10):
        np[i] = AllColors[randint(0,4)]
        np.write()
        time.sleep(.1)
Create a Racing Animation
To make an animation that has a single light racing from one side of the strip to the other (or in a circle if you make them into a ring), we'll need a simple loop to light up one pixel, then turn off the pixel immediately after it. This should allow us to progress through each pixel while leaving the rest off.
In this example, we'll pull randomly from the WhiteBlue list to create a racing animation.
## Make a racing animation!

while True:
    for i in range(0,10):
        np[i] = WhiteBlue[randint(0,4)]
        np[i-1] = (0,0,0)
        np.write()
        time.sleep(.1)
When we run this code, we'll see randomly picked white or blue Hanukkah colors racing down the strip.
Double Racing Animation
To create an animation that has two lights racing along the length of the strip, we can add some more code to turn on two rather than one. In this code, the first of the two racing lights will be Christmas colored, while the second will be Hanukkah colors.
## Double Racing animation

while True:
    for i in range(0,10):
        np[i] = ChristmasColors[randint(0,4)]
        np[i-1] = WhiteBlue[randint(0,4)]
        np[i-2] = (0,0,0)
        np.write()
        time.sleep(.1)
Once you have an animation you like, we'll need to condense it into one piece of code and save it to a Python file. The MicroPython code for my animation looks like below:
## Import neopixels and create object, include the Pin number and Number of pixels
## On the D1 Mini, the "D4" pin, located next to power and ground, is actually Pin 2.
# You can see the pinout on the D1 mini for more info on finding the right pin to connect to

import machine, neopixel, random, math, time
np = neopixel.NeoPixel(machine.Pin(2), 10)

## Create a random function
def randint(lower, upper):
    gap = upper - lower
    if gap == 0:
        return lower
    return (random.getrandbits(int(math.log(gap, 2)))% gap) + lower

ChristmasColors = [(255, 0, 0), (0, 255, 0), (255, 0, 0), (0, 255, 0)]
AllColors = [(255, 0, 0), (0, 255, 0), (255, 255, 255), (0, 0, 255)]
WhiteBlue = [(255, 255, 255), (0, 0, 255), (255, 255, 255), (0, 0, 255)]

## Double Racing animation

while True:
    for i in range(0,10):
        np[i] = ChristmasColors[randint(0,4)]
        np[i-1] = WhiteBlue[randint(0,4)]
        np[i-2] = (0,0,0)
        np.write()
        time.sleep(.1)
If we like this, then it's time to upload the code to run forever on a loop.
Uploading Your Final Code
Once you find an animation you like, you'll need to upload the final code. Create a new text file in nano by typing nano boot.py in a terminal window. In the blank document, drop your code, and then save it by pressing Control-X at the same time.
Now, we'll need to transfer over your code to the microcontroller. Unplug your ESP8266 to disconnect it from Jupyter, and then plug it back into the same port. Now, we'll use Ampy to transfer over the "boot.py" file we created. Make sure to replace "PATH_TO" with the location of your boot.py file, and "SERIAL_PORT" with the port your ESP8266 is connected to.
~$ ampy --port SERIAL__PORT put PATH_TO/boot.pyOnce the boot.py file is on your board, you can unplug it and plug it back in to see the effect. If it only runs once, it might be crashing, or you may have forgotten to include a "while True" loop.
Troubleshooting
MicroPython doesn't handle "while True" loops gracefully, and because it's so busy running the code, it won't check for new code you're trying to upload. If you can't upload new code to a board running a while true loop, these are the steps to fix it.
First, connect to the board via screen or PuTTY. Press Control-C at the same time a few times to stop the forever-running loop. Next, type the following lines.
import uos
uos.remove('boot.py')
This will remove the "boot.py" file that contains the loop that's running forever. Now, you can connect to the board in Jupyter again and flash new files to the board in Ampy.
Take Things Even Further Using Wi-Fi
If you want to make this project even better, you can take advantage of the ESP8266's Wi-Fi interface to try making your own remotely controlled version of these light or add a sensor to make them go off when a person is detected nearby. MicroPython makes it easy to add sensors as triggers, so adding a light-dependent resistor to detect light could allow your lights to only turn on at night or to switch animations with the push of a button.
A word of warning about going big with these small microcontrollers: the longer the NeoPixel strip, the slower your animations will go as the computational cost of keeping track of the number of pixels involved begins to stress the microcontroller's abilities. To fix this, the ESP32 has more memory and can solve some of the problems that come from working with a larger number of pixels.
If you make an animation you're proud of, share it with us on Twitter or in the comments!
I hope you enjoyed this guide to programming your own holiday lights in MicroPython! If you have any questions about NeoPixels programming on the ESP8266, please ask below, and if you have a comment or idea for a future episode, feel free to reach me on Twitter @KodyKinzie.
Cover photo by Kody/Null Byte


Comments
Be the first, drop a comment!