


The price of hacking Wi-Fi has fallen dramatically, and low-cost microcontrollers are increasingly being turned into cheap yet powerful hacking tools. One of the most popular is the ESP8266, an Arduino-programmable chip on which the Wi-Fi Deauther project is based. On this inexpensive board, a hacker can create fake networks, clone real ones, or disable all Wi-Fi in an area from a slick web interface.
The Rise of Microcontrollers as Offense Wi-Fi Tools
Wi-Fi hacking has usually relied on a couple of pieces of hardware to do the trick. First, you'd need a computer capable of running whatever attack program you're trying to use. Second, you'd need a wireless network adapter with a chipset that supports whatever bad Wi-Fi thing you're trying to do. Things could get expensive, with the cheapest combination of a Raspberry Pi and a wireless network adapter still coming in at around $70 to get started.
For a lot less, microcontrollers are capable of many of the same attacks the larger and more expensive Raspberry Pi can do. While a microcontroller isn't capable of running a full operating system like Kali Linux, they are often easier to run due to the simple way in which they are programmed. It's made even more simple by the fact that these microcontrollers can be programmed in the popular Arduino IDE, allowing projects to be easily shared.
While Wi-Fi-enabled microcontrollers like the ESP8266 do not officially support attacking Wi-Fi networks, and old SDK allows a hacker to build packets manually, thus being able to emulate many kinds of useful packets. That led CS student and chicken-in-space Stefan "Spacehuhn" Kremser to create the Wi-Fi Deauther, a program for the ESP8266 capable of several powerful Wi-Fi attacks.
The ESP8266 Deauther Program
The most useful packets the Wi-Fi Deauther can create are deauthentication and disassociation packets. These packets are often abused because they are unauthenticated, meaning anyone on a network can send them to anyone else while pretending the messages are coming from the router. When a device on the Wi-Fi network receives the packet, it immediately disconnects from the network. The Wi-Fi Deauther does this over and over, spamming connected devices with "disconnect" messages. It results in a "jamming" effect on the network as devices cannot connect fast enough to avoid being instantly kicked off.
That's not the only trick the Deauther program has up its sleeve. It's also capable of scanning for both nearby access points and connected devices, and cloning any Wi-Fi network it sees. It can also generate dozens of fake Wi-Fi networks with any names you want, monitor channels for packet traffic between devices, and do all of this from a fancy built-in web interface similar to a Wi-Fi Pineapple.
The Wi-Fi Deauther program can be run on nearly any ESP8266-based development board, including the NodeMCU, the D1 Mini, and others. These boards are cheap and can be as low as $2 to $6 depending on the manufacturer, and they allow anyone to get started hacking Wi-Fi.
While the cheapest boards are a good start, they lack a few things that make the Deauther a lot more useful. The most simple, cheap boards have no screen, no buttons or controls, and no indicators to know what's going on just by looking at the device. To control it, you'd need to log in to the web interface or buy and attach the hardware yourself.
The ESP8266 Deauther Board
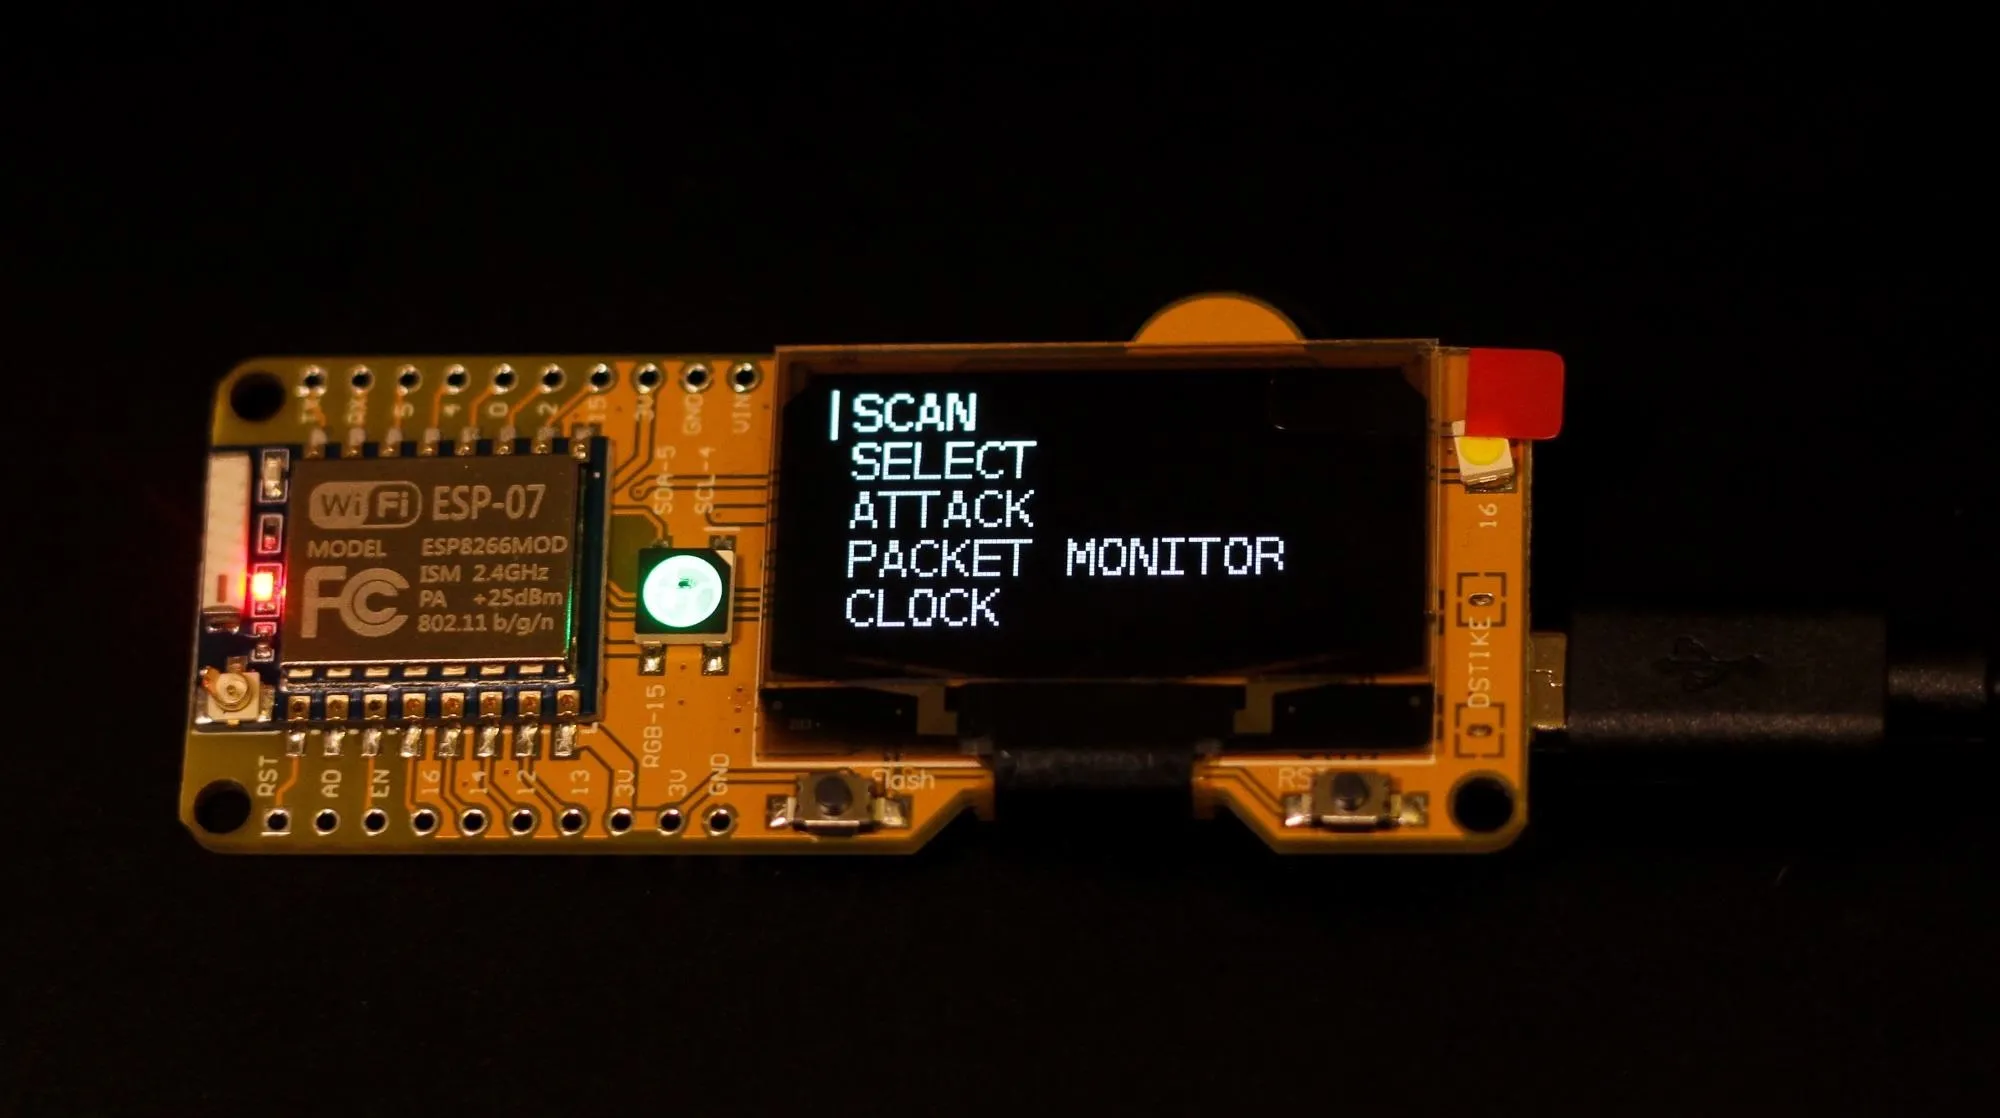
Fortunately, Spacehuhn partnered with a board producer to create a custom ESP8266-based development board for security projects. This version of the ESP8266 features options that can be explored through a (somewhat fragile) selector switch that scrolls through menu options on an OLED display. The board allows any external antenna to be mounted on it, features an RGB LED for showing what mode the device is in, and connects either to a LiPo battery or USB power source directly.
Kody/Null Byte
Upon powering up the custom board, it's easy to scroll through the options to operate the board by hand. It's is a leg up on even the Raspberry Pi, which tells you almost nothing just by plugging it in without a screen. With only a battery pack, you can power the Deauther board, select a target, and launch an attack without the need for a viewing or controlling device, as is often the case with devices like the Pi Zero W.
Due to reliability issues with cheap suppliers and the numerous hardware benefits the official board offers, I highly recommend the official DSTIKE version for anyone wanting to try this project, which costs $12. There are some copycat versions available on Amazon, but they usually cost more and, again, could come from cheap suppliers. Also, while it's possible to do this with a cheap NodeMCU, you'll need a second device to log in and control the device.
What You'll Need
To get started with the Wi-Fi Deauther project, you'll need an ESP8266-based development board. The best way to follow the project and stay involved with updates to the software is to purchase the original board design on Tindie. This project should work with the following Spacehuhn-designed boards.
- DSTIKE WiFi Deauther MiNi
- DSTIKE WiFi Deauther OLED V4
- DSTIKE Deauther Wristband V2
- DSTIKE WiFi Deauther Monster V2
While all of these boards are unique and come with different hardware, all are based on the ESP8266, and any will work with the Wi-Fi Deauther program. Also, buying them supports the researcher behind the program, and it gives you access to extended hardware features that make the board more useful without needing a second device to control it.
While there are rip-offs of the designs available for less or even more, they often don't use the same hardware or use cheaper manufacturing techniques, leading to frustrating failures that add up over time.
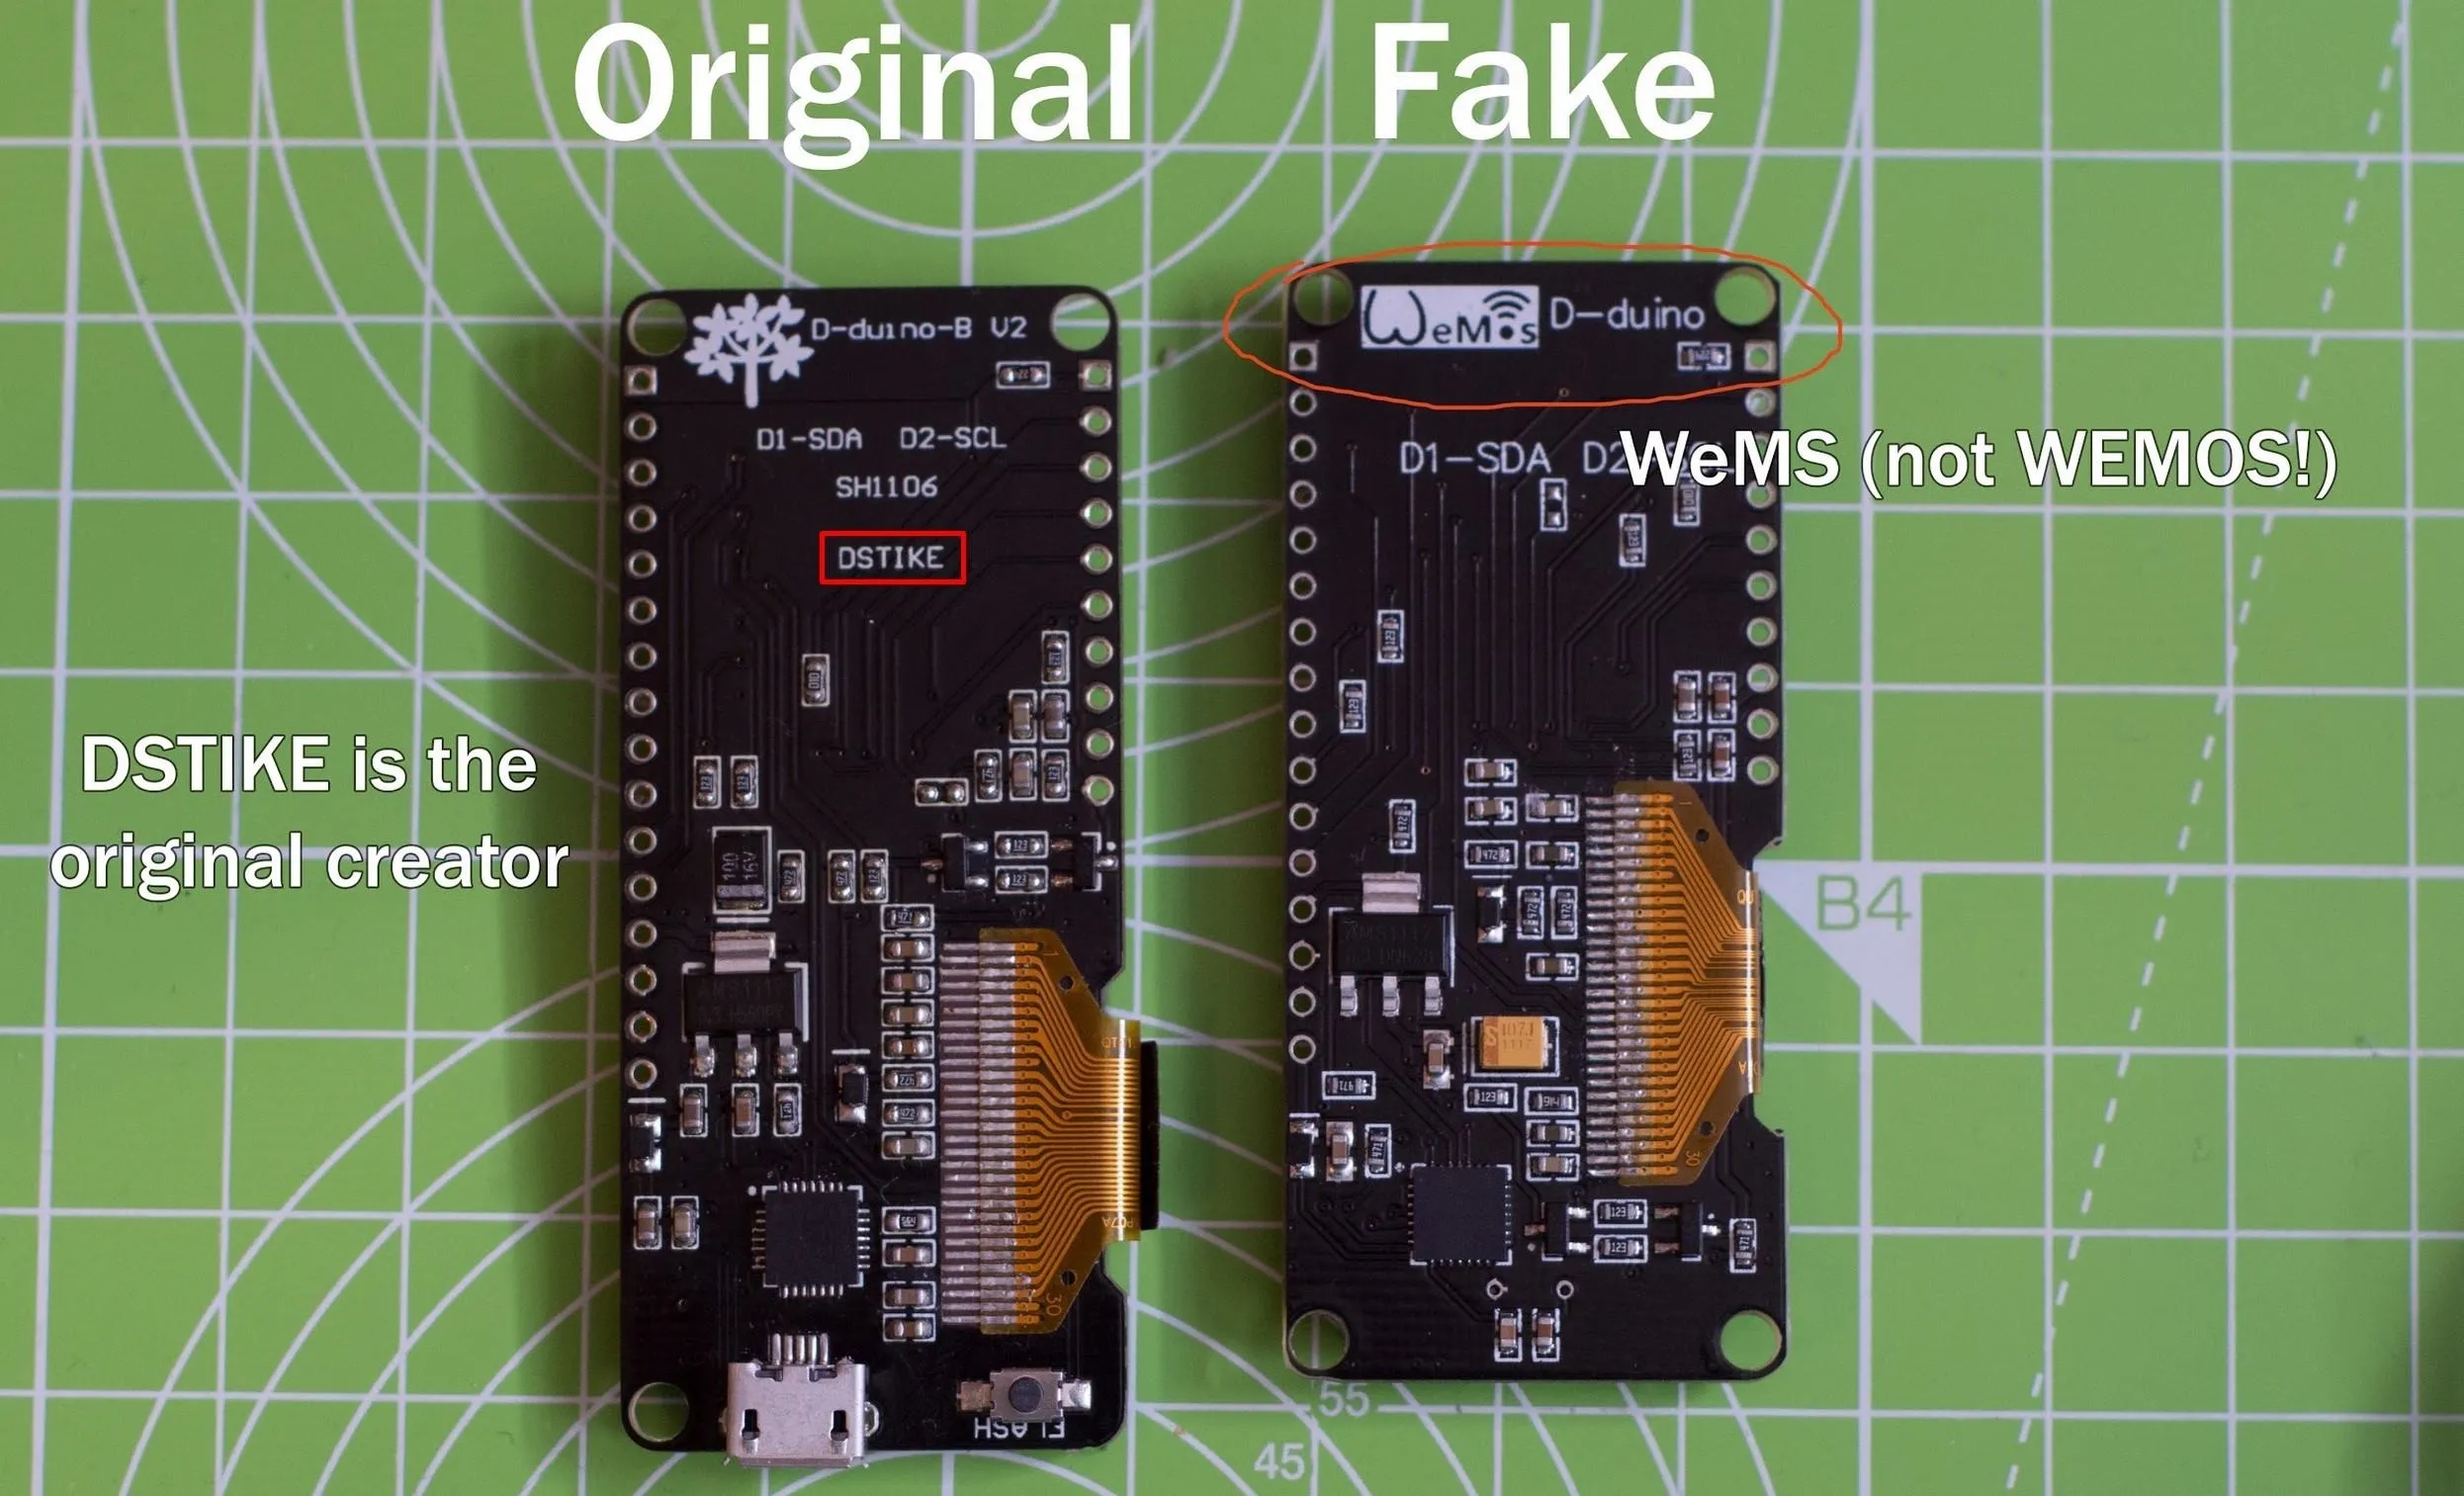
Real and fake Deauther boards for comparison.
If you're on a budget and don't mind using a device without a screen, you can do this project for cheap with either of the following boards. You can read more about the kinds of boards that will work for this project on Spacehuhn's GitHub page.
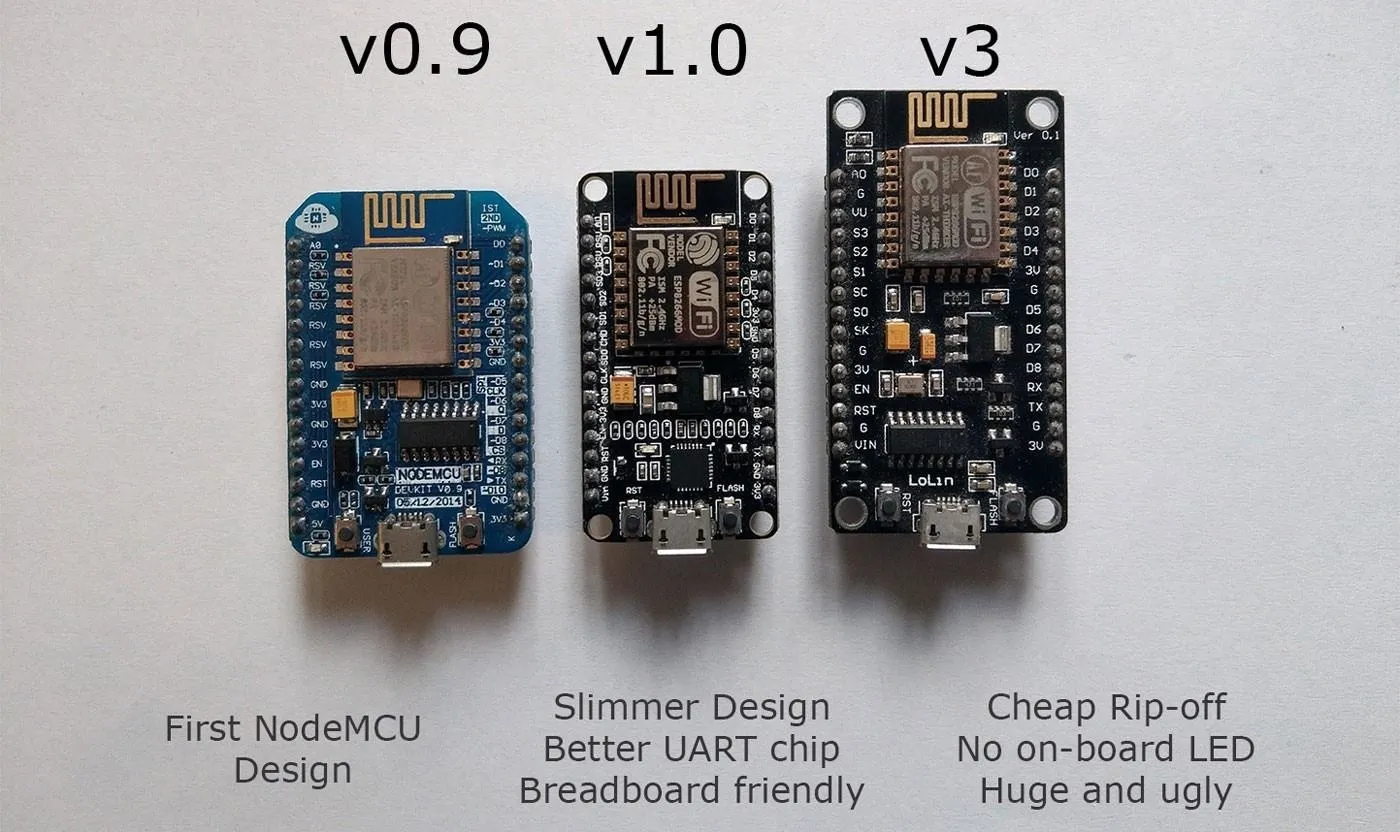
There are several versions of the NodeMCU, but only the version 1.0 fits nicely on a breadboard. The V3 is not as good for this project.
Aside from the board, you'll need a computer or smartphone with Wi-Fi to join the network that the board creates. You'll need a Micro-USB cable to supply power, and a power source like a battery to plug it in to. Once you have a computer or smartphone to control the Deauther, with Micro-USB cable and power source, as well as a network you have permission to test out the Deauther on, you're ready to begin.
Get Your Board Ready
If you have the original board, it should come preloaded with the latest Wi-Fi Deauther program. You should be able to power on the board by plugging it into a USB power source and using the screen and selector switch to scroll through the menu options directly. Be careful with the selector switch, though, as it has a tendency to become unsoldered from the board and requires some basic knowledge of soldering to reattach.
Skip to Step 2 if you're using the original Deauther board. If not, you'll need to take a few steps to get set up. First, download and install the Arduino IDE. Once you've done that, you'll need to click on the "Arduino" or "File" drop-down menu, then select "Preferences" from the menu that appears. Next, click the dual-window icon next to the Additional Boards Manager URLs field, then paste the following URLs, one each to a line. Once that's complete, click "OK" to save, then "OK" again to close the menu.
http://arduino.esp8266.com/stable/package_esp8266com_index.json
http://phpsecu.re/esp8266/package_deauther_index.json
Next, you'll need to add the board you're using to the Boards Manager. To do this, you'll need to click on "Tools," then hover over the "Board" section to see the drop-down list of supported boards. At the top, click "Boards Manager" to open the window that will allow us to add more boards.
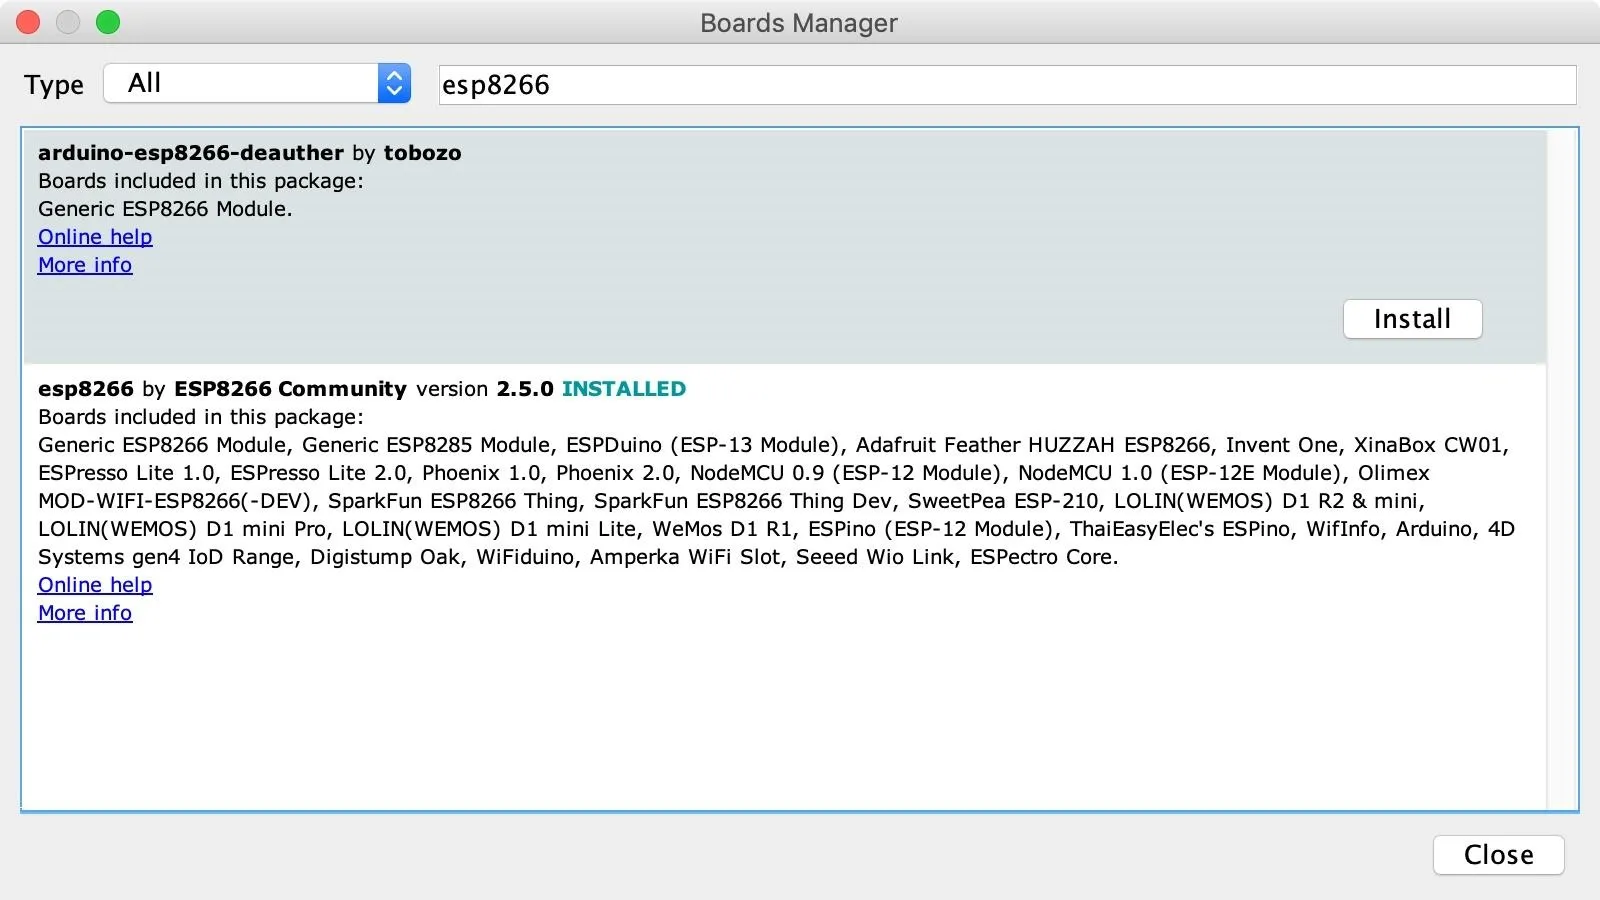
When the Boards Manager window opens, type "esp8266" into the search bar. Select and install both "arduino-esp8266-deauther" and "esp8266" to add support for the board to your Arduino IDE.
Once that is done, you should be ready to program your board. Plug your ESP8266-based board into your computer. When you click on "Tools," you should see the correct port auto-selected, but if not, click on the "Board" option and select the correct one under the Deauther Modules section.
If you're using a bad cable, the port may not show up, so if you don't see anything after you've completed the other steps, try another cable first. If you still don't see anything, there's a good chance you need to install a driver by following these instructions, which is common when using cheap knockoff boards.
Now, let's download the code onto the ESP8266-based Deauther board. Clone the repository with the command below, and then move the "esp8266_deauther" folder into your "Arduino" folder.
~# git clone https://github.com/spacehuhn/esp8266_deauther.gitWhen it's done downloading, open the "esp8266_deauther.ino" file with Arduino from inside the "Arduino" folder. Check your upload settings to make sure your board is properly selected, and press upload to send the program to the ESP8266 device!
Look for the Control Access Point
Once your Wi-Fi Deauther board is powered, you shouldn't need a screen to interact with it. While it's convenient to have a display to see what's going on, we can rely on the web interface to control the ESP8266 device as well.
These chips are amazing because they can be put into many Wi-Fi modes, with the ability to join or even become their own Wi-Fi network. If you look on a smartphone or computer, you should see a Wi-Fi network nearby named "pwned." This is a network being created by our Deauther board!
To access it, connect to the Wi-Fi network and enter the password "deauther" to join. Then, in a browser window, you can navigate to the default IP address of 192.168.4.1 or simply type deauth.me to access the web interface the Deauther board is creating.
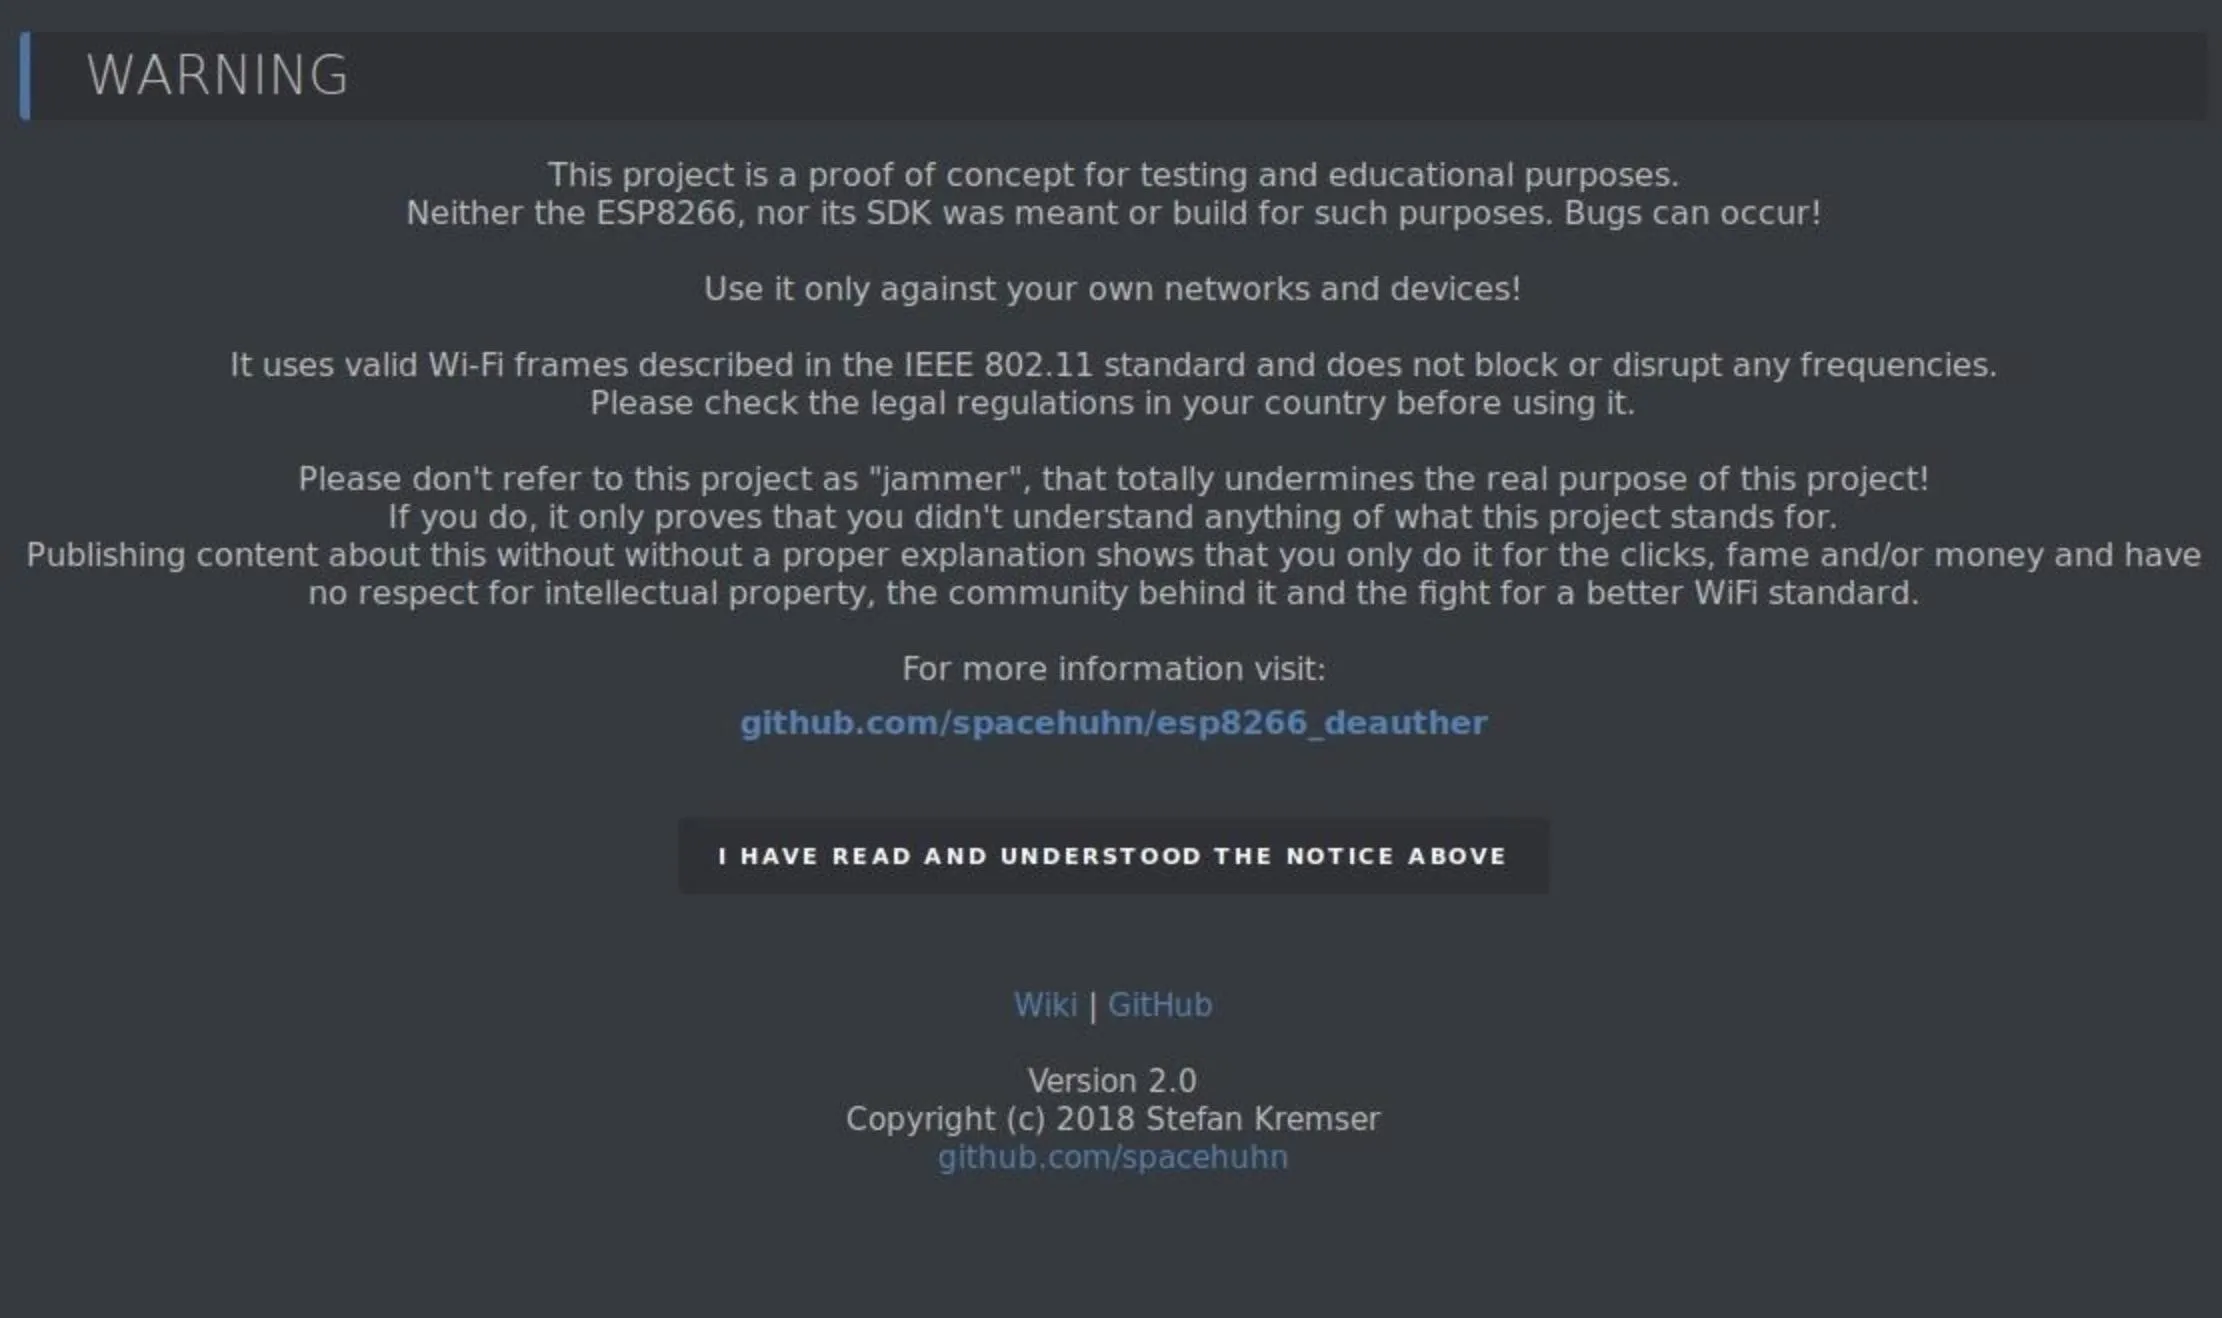
Now, agree to the notice that appears advising you not to do anything bad with this project. Once you agree, you'll have access to the control interface for the device.
Perform a Scan of the Area
First, let's take a scan of the area around us. The first page you'll find yourself on is the "Scan" page, which breaks down results into a few easy to understand categories. First, there are access points. This will give you a list of every device advertising a Wi-fi network in range.
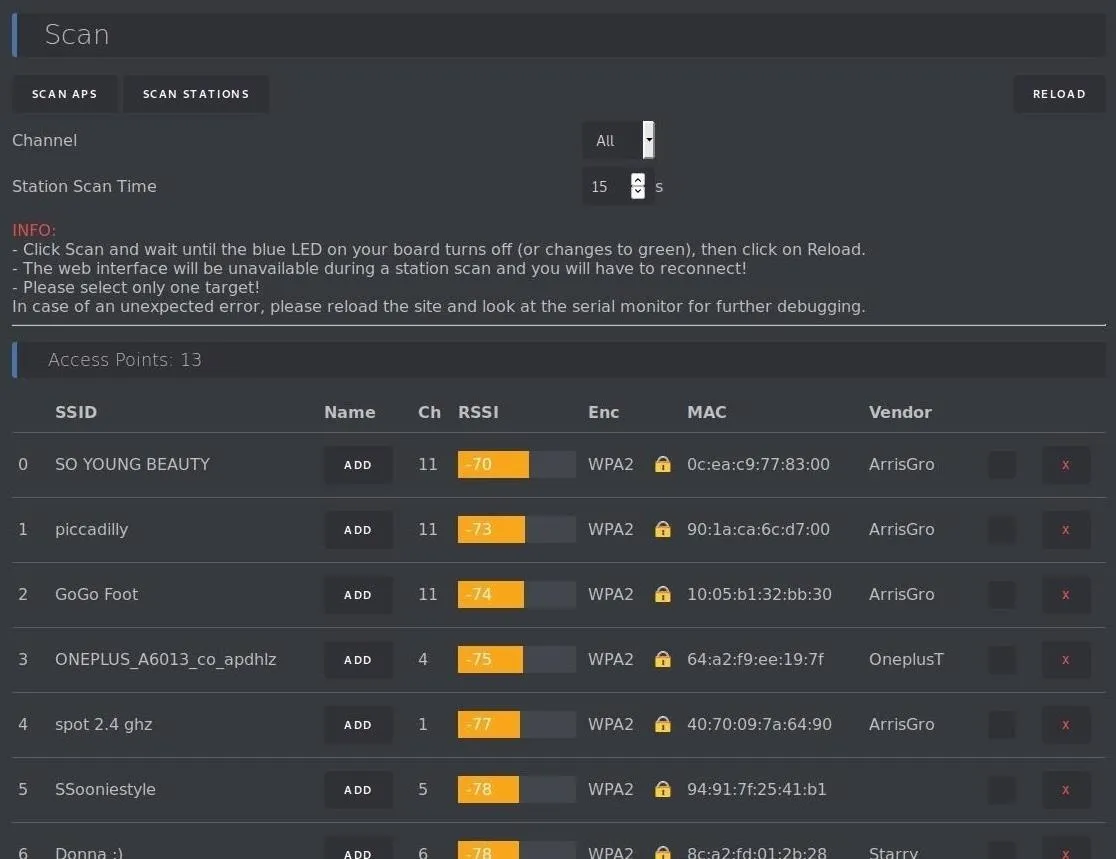
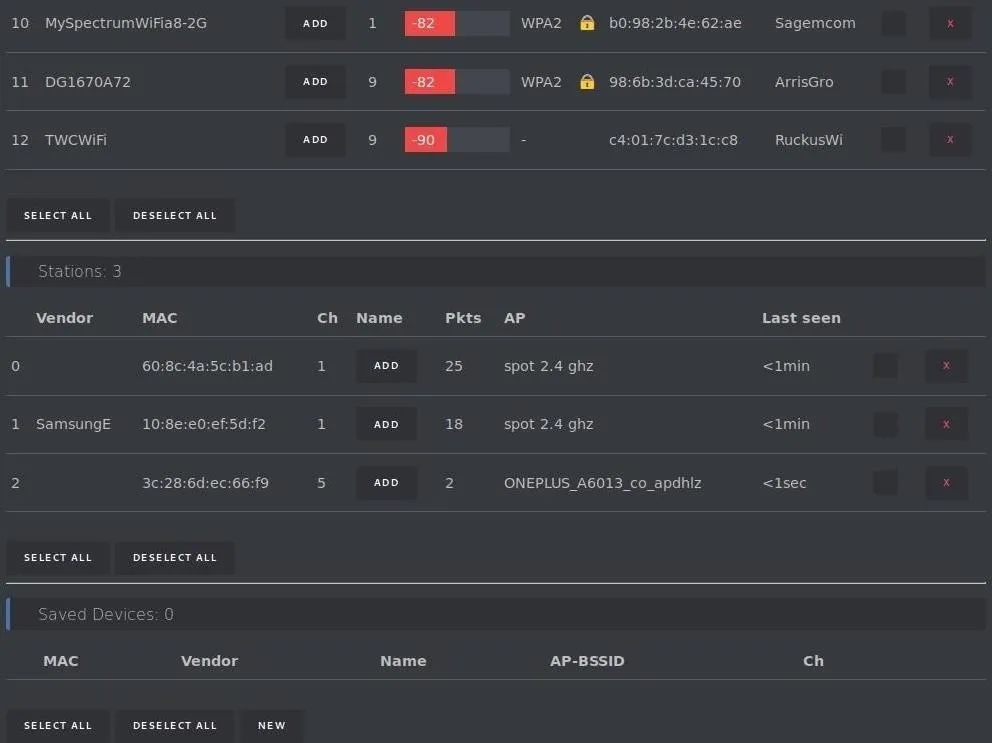
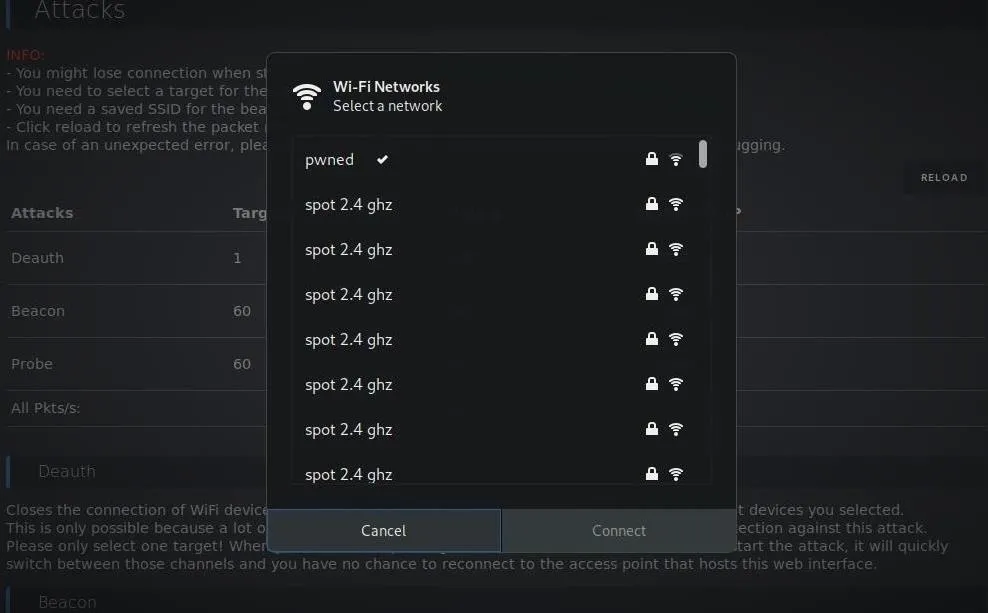
Further down the list, you'll see devices that are connected to a network, as well as which network they are connected to. You can select the "Add" button to save a particular device or network to your target list. Here, we'll select "spot 2.4 ghz" as the network we want to target.
Once you've selected a network to target, we can move on to the "SSIDs" menu by clicking on the menu shortcut in the top left of the screen.
Select Target Networks
In the "SSIDs" section, we'll be able to clone networks, create fake networks, or simply Rickroll everyone.
The top field is for specifying any fake network we want to create. This includes the SSID, or network name, whether or not the network uses WPA security, and how many networks you want to create.
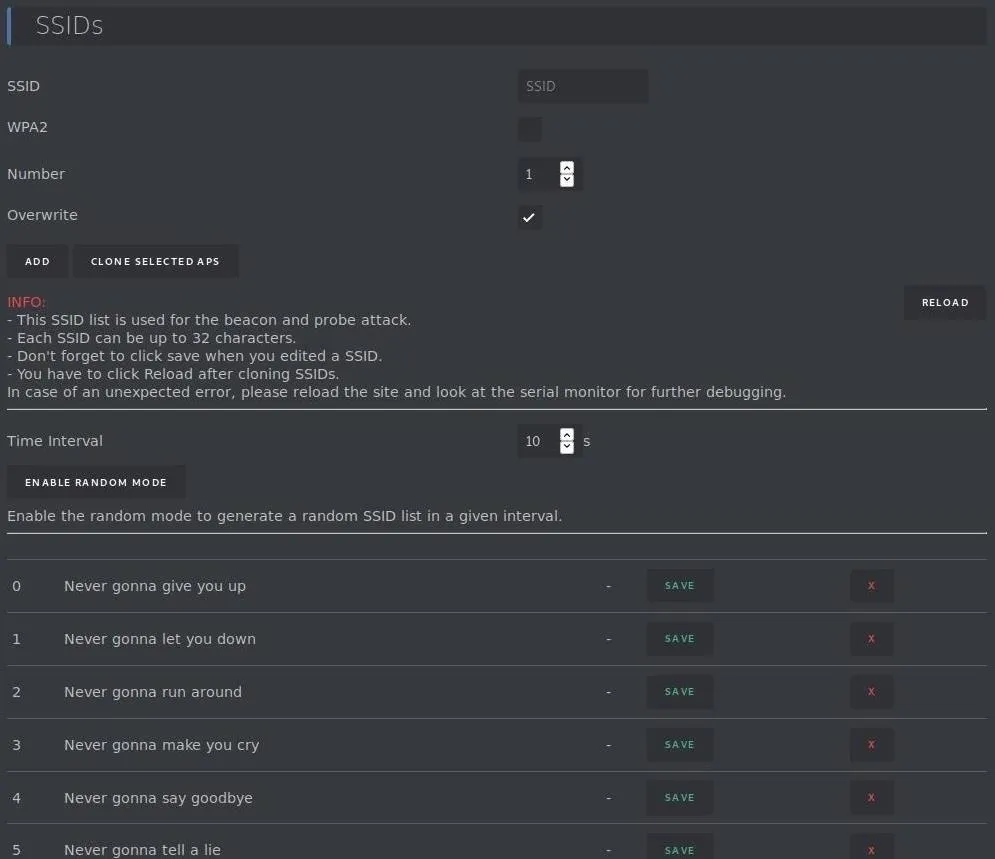
If you selected an access point before, you can click "Clone Selected APs" to generate clones of the targeted network. There is also a module to generate random SSIDs, including several that are just the lines to "Never Gonna Give You Up."
In the image below, we cloned the network many times, making it very hard to find the correct network.
Launch an Attack
Now, let's check out the attacks we can launch in the "Attacks" section of the menu. Here, we can see three primary kinds of attacks.
- Deauth: This will attack any network in range, disconnecting it from Wi-Fi until you disable it. It's worth mentioning that you are connected to the device via Wi-Fi, and this makes it likely that you may unintentionally prevent yourself from connecting to the device to turn it off. If you find yourself disconnected and you can't get back in, you may need to unplug the board to get it to stop.
- Beacon: This attack will create up to a thousand fake networks, either cloning nearby networks or creating entirely fake ones from scratch.
- Probe: Here, the board will send probe requests asking for a network name that's in the list you specify. This will confuse some Wi-Fi trackers and also sometimes cause Wi-Fi attack tools to create fake networks in response to the network names contained in the probe requests.
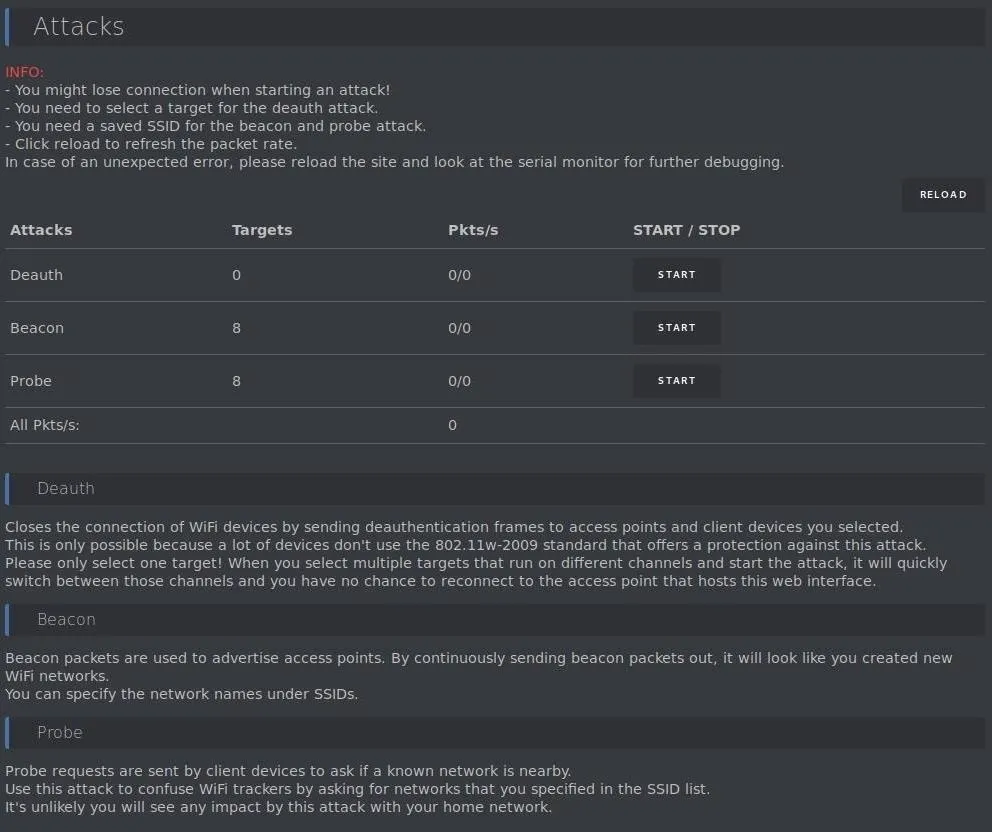
To begin the deauthentication attack, make sure you are somewhere where the only networks that are in range are ones you have permission to attack. Once you are, click the "Start" button next to the "Deauth" attack. When you feel the Wi-Fi devices in your local area have had enough punishment, click "Stop" to end the attack.
The original Wi-Fi Deauther board also comes with the ability to add an external antenna. By doing so, it's possible to extend or change the range of the device by adding a directional antenna.
Customize Your Settings
Now that we've explored the main attacks, we can also configure the board via the "Settings" tab on the top left of the screen. Clicking on it will bring up a menu page allowing you to do things like change the name of the network used to communicate with the board, change the password, and change the channel the device broadcasts its network on.
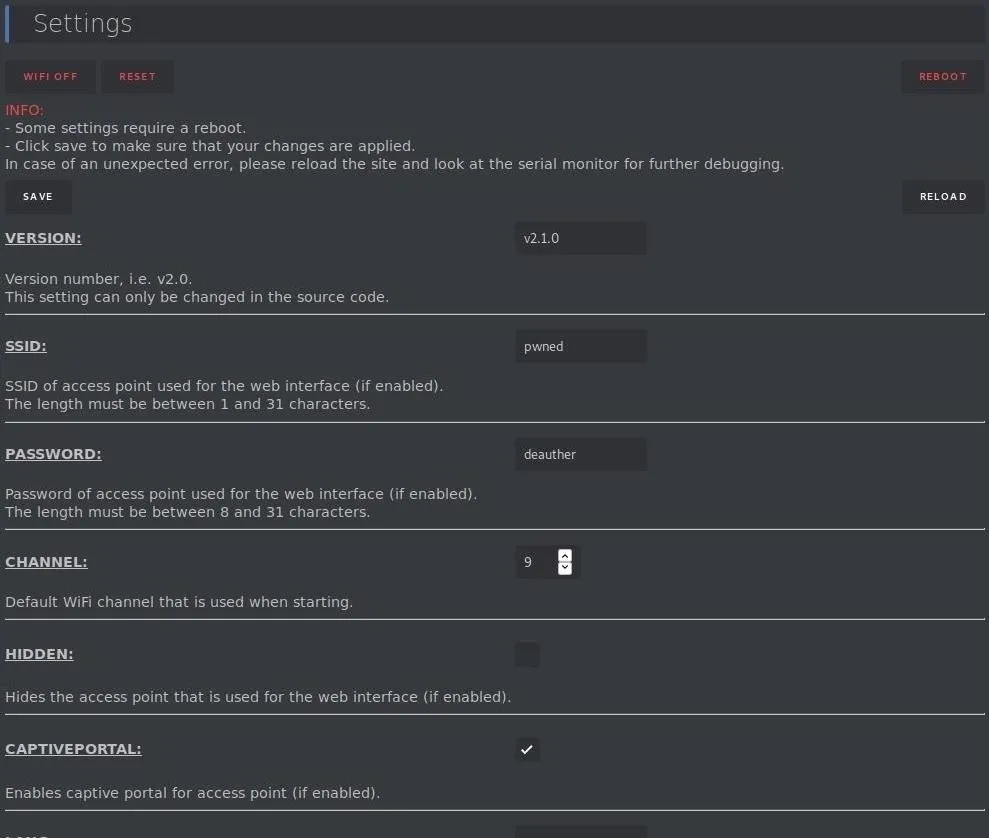
Here, you'll also find an option to create a "Hidden" network, which might seem more stealthy to connect to. In fact, any device you connect to a hidden network will start calling out that network name any time the Wi-Fi is left on, making your phone more trackable.
The reasons devices that have connected to a hidden network always call for them is because they know the station is not broadcasting its network name, so it's up to your device to always be asking if it is nearby.
You can customize settings as much as you like here, but be careful not to disable the Wi-Fi portal and the serial connection at the same time. Doing so will leave you with no way to communicate with the board, so make sure you leave at least one enabled to allow you to get back in.
Once you update your password and the name of your command-and-control Wi-Fi network, you're ready to use the Wi-Fi Deauther anywhere, from any device. After making any changes to the menu or any other settings, make sure to press "Save" and "Reload" to apply the changes you made.
Microcontrollers Are Cheap, Efficient Cyber Weapons
The Raspberry Pi was revolutionary in giving access to powerful hacking tools to anyone who can afford a $35 board. With the Wi-Fi Deauther board, the boundaries of what can be done with low-cost Wi-Fi hardware has been pushed even further than before.
While microcontrollers don't offer a full operating system to work with like a Raspberry Pi, the powerful attacks they're capable of on their own make them more than worth checking out. While the Wi-Fi Deauther board can't capture the numerous WPA handshakes it generates from nearby networks while in operation by itself, it's a perfect companion tool for capturing WPA handshakes in Kali for later cracking.
I hope you enjoyed this guide to the Wi-Fi Deauther project! If you have any questions about this tutorial on the Wi-Fi Deauther board, leave a comment below, and feel free to reach me on Twitter @KodyKinzie.
Cover photo and screenshots by Kody/Null Byte


Comments
Be the first, drop a comment!