


Surveying a target's Wi-Fi infrastructure is the first step to understanding the wireless attack surface you have to work with.
Wardriving has been around since the '90s and combines GPS data and Wi-Fi signal data to create accurate, in-depth maps of any nearby Wi-Fi networks you come within range of. Today, you'll learn to launch this stealthy, impossible-to-detect recon technique from our Kali Pi to map targets of opportunity with the addition of a GPS dongle and wireless network adapter.
Even though wardriving has been around for decades, the science of wardriving has kept up with the times. Big data, plummeting hardware costs, and new ideas have brought wardriving back into the news, with wardriving techniques being deployed in Seattle by students to locate and identify government mass surveillance Stingray devices being used in the city. With low-cost distributed detection networks, a handful of ridesharing drivers can conduct mass surveillance of wireless users across a city or monitor where tools the government uses to secretly spy on people are being deployed.
IoT Devices Are Fun New Targets
IoT devices have also fallen victim to wardrivers, with purchasers of a fancy internet-connected sex toy finding themselves put publically on the map by wardriving of the device's internal hotspot. The easy geolocation of these devices lead to the eventual penetration of the penetration device's already weak Wi-Fi security and hardcoded admin passwords.
Horrifyingly, anyone hacking into the device would find themselves staring at a web-connected endoscope, which is further evidence that it's not always wise to hack into a vulnerable computer when you're not sure what it is (or where it's going). Nevertheless, the location and exploitation of IoT devices through wardriving should be considered in your approach to examining a target's wireless attack surfaces.
Wardriving Tactics for 2017
In my article describing the Kali Linux build, one of the things I mentioned being powerful about Kali Linux on a Raspberry Pi is the flexibility to add components to enable a variety of unique use-cases. Wardriving is a hobby of mine, and I've been able to log millions of unique Wi-Fi networks in my personal database using the Kali Pi when the opportunity to present itself. This includes tens of thousands of vulnerable WEP, open, or misconfigured routers, and required less than $100 in hardware to build.

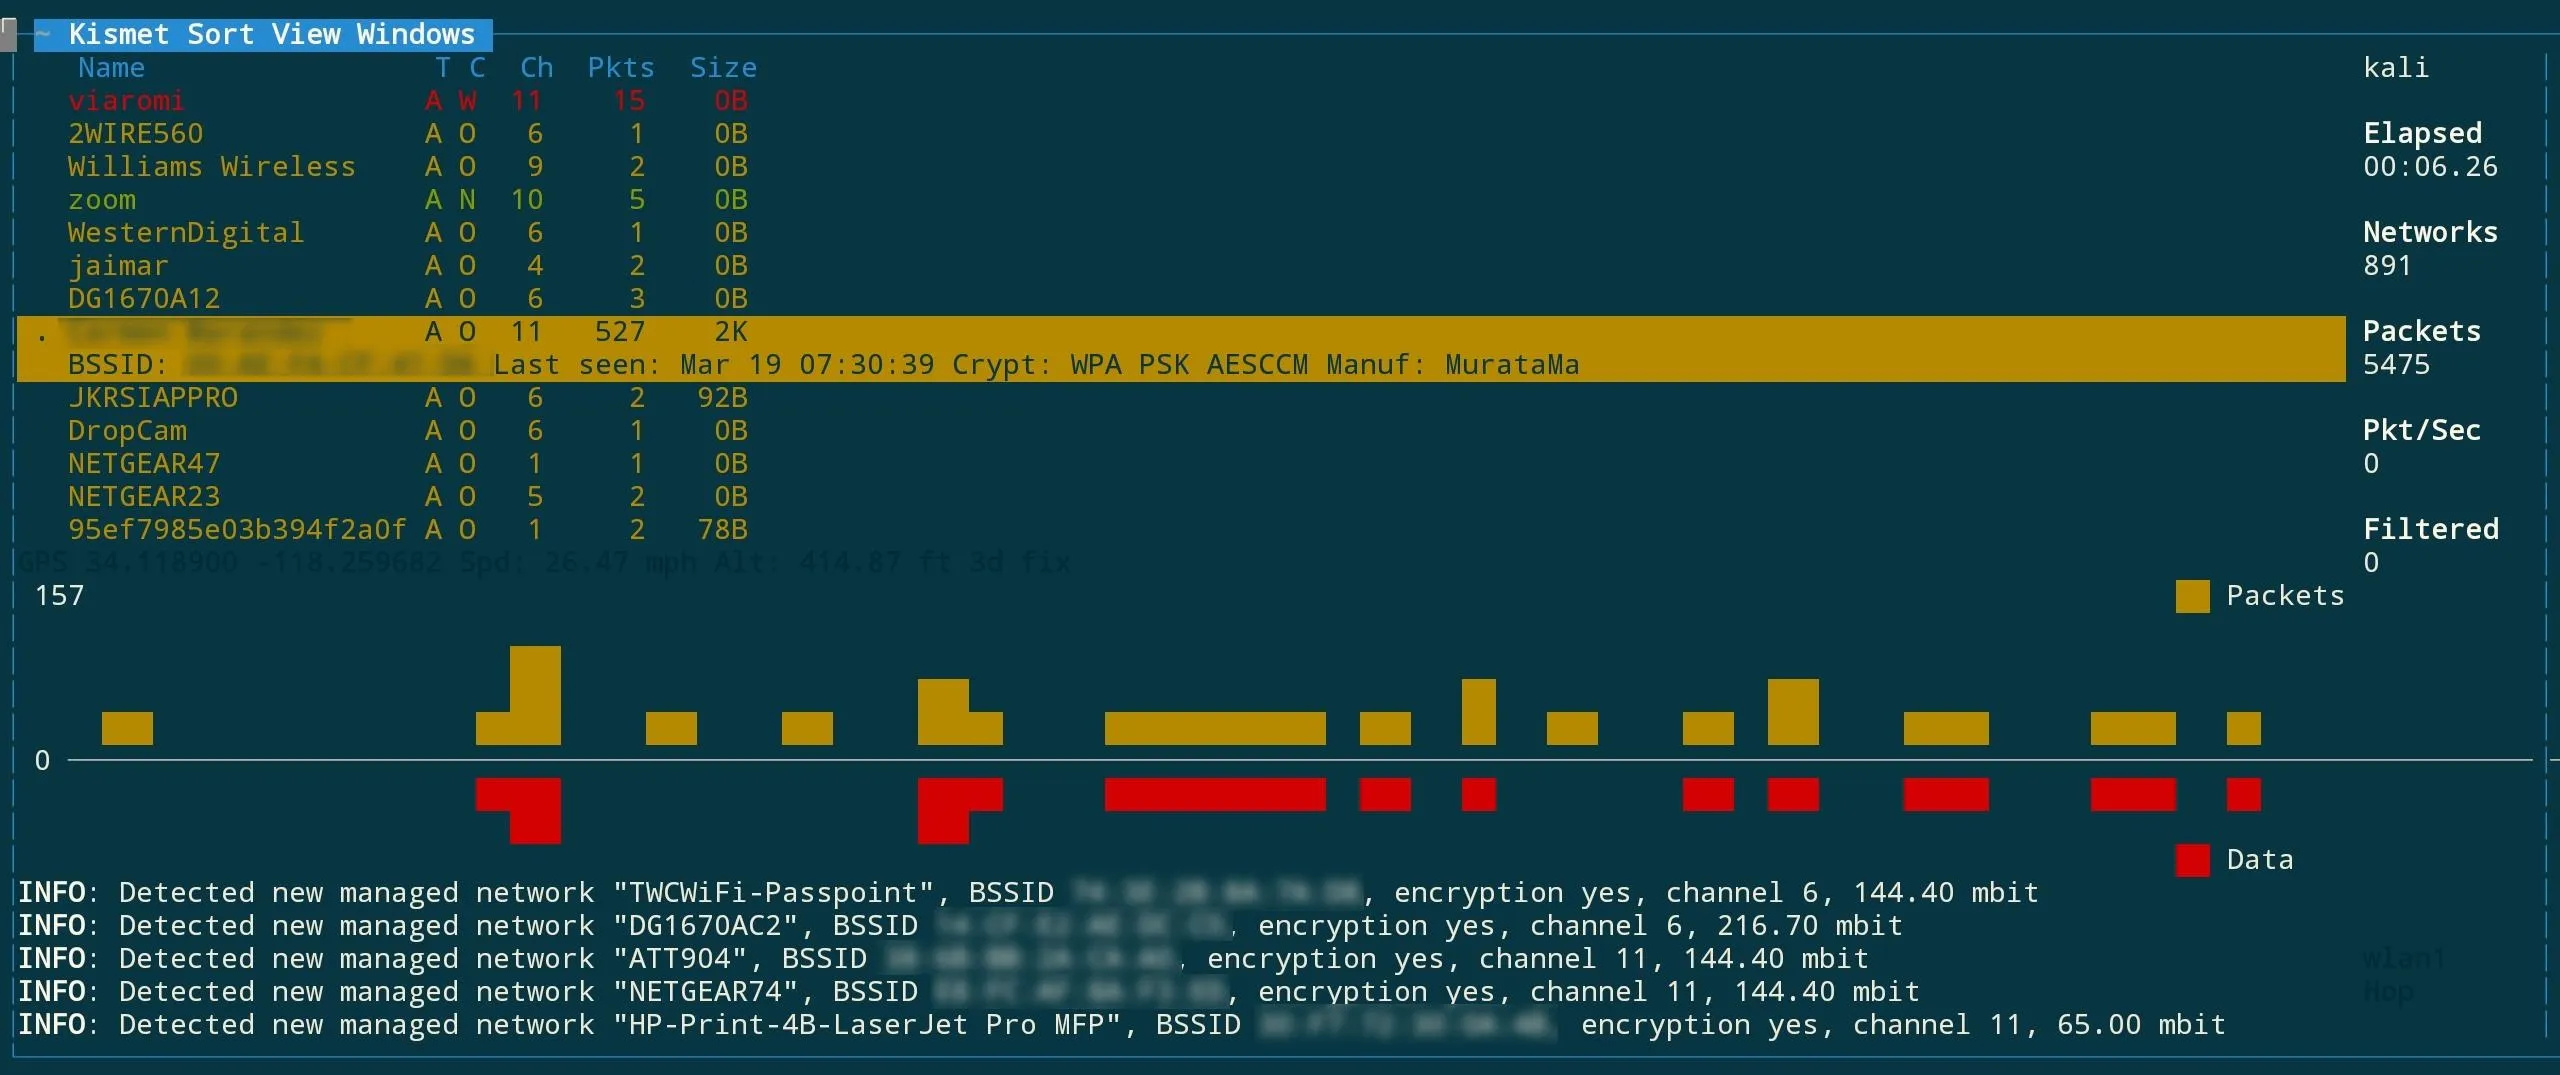
Wardriving with Kismet on the Raspberry Pi.
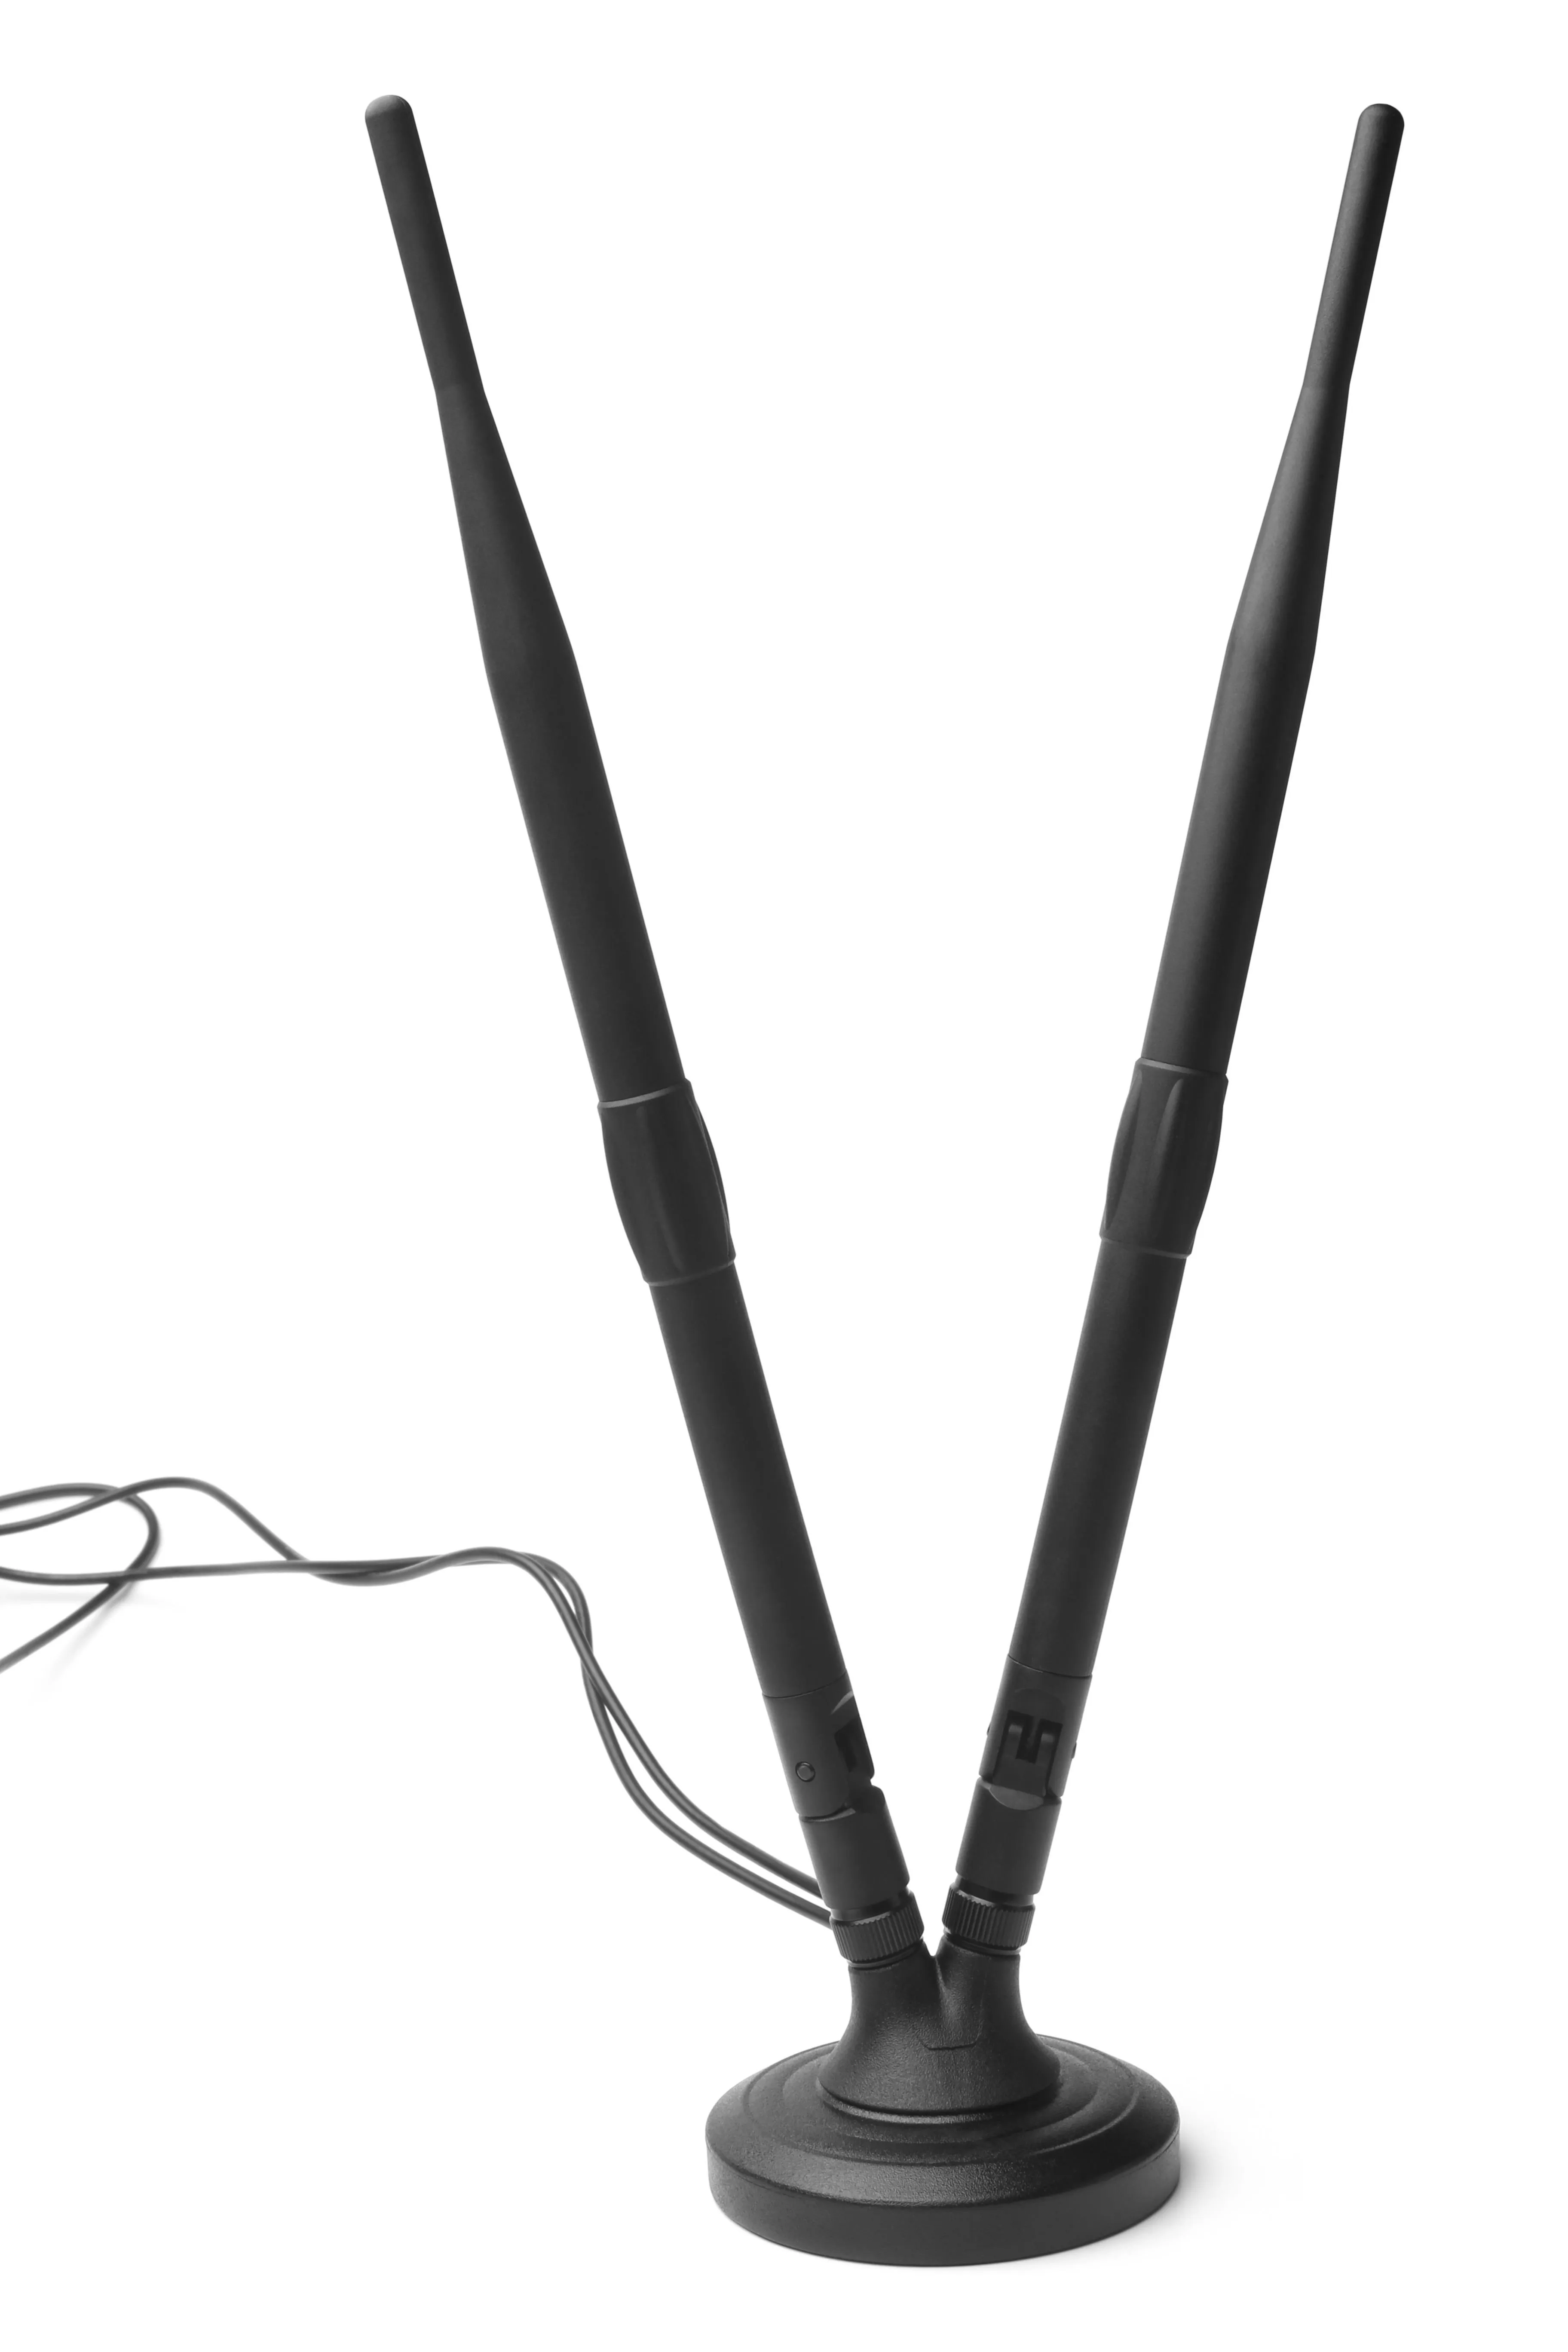
The Raspberry Pi is the base of our system. Depending on the mission, we can create modular payloads to serve our purpose. Whether you want a short-range antenna to only record traffic within a few feet or a highly directional antenna to record all Wi-Fi APs in a high-rise building, the Pi lets you customize your payload as easily as plugging in a USB component.

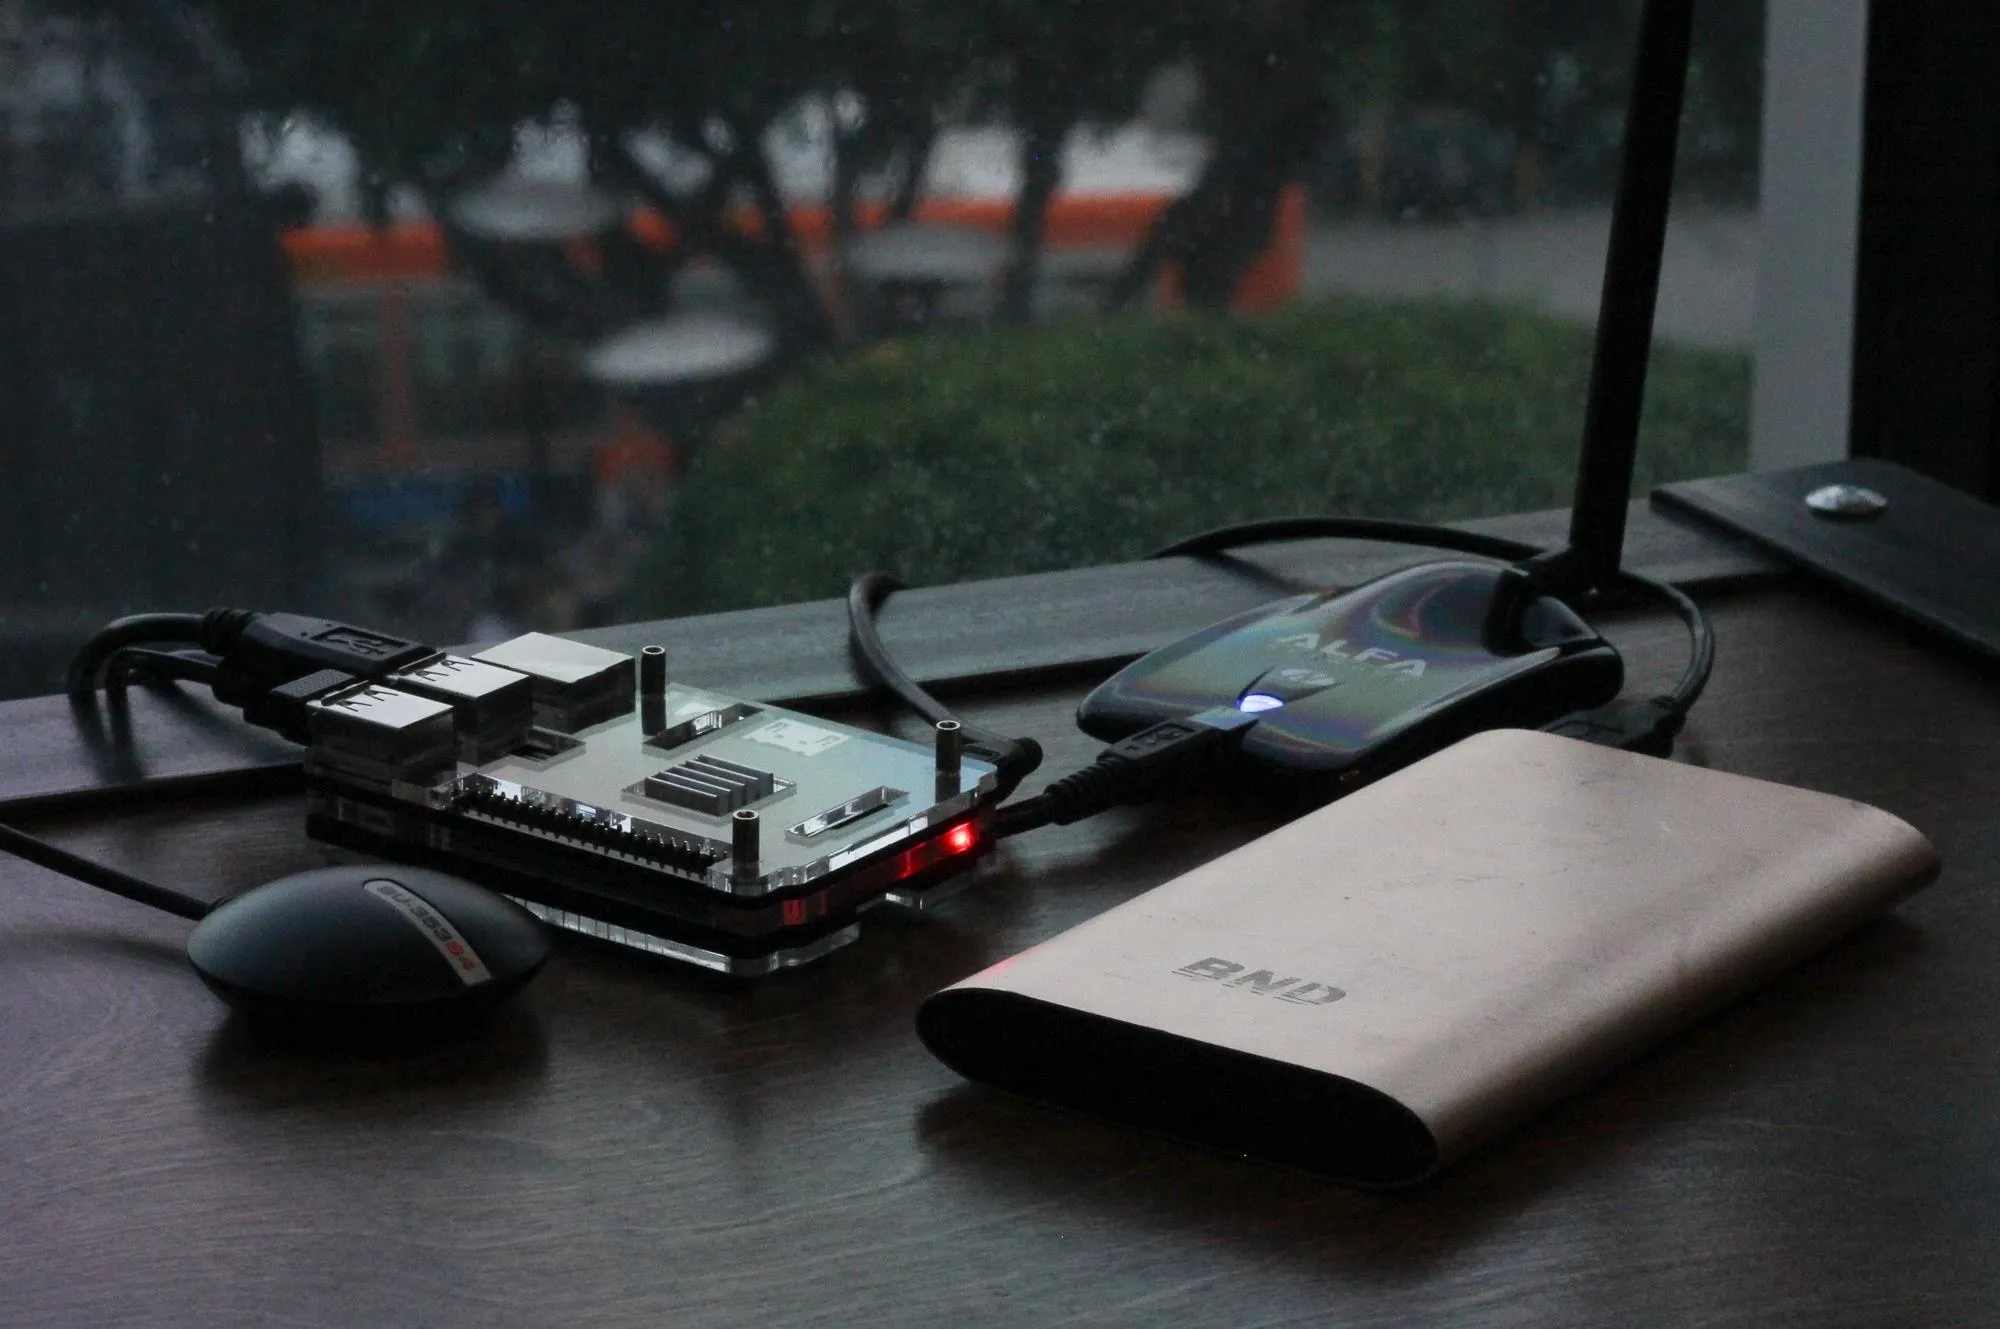
A Raspberry Pi 2 B board plugged into a GPS receiver and Wi-Fi adapter to run a wardriving tool called Kismet.
Sometimes, you will need to conduct an extremely detailed assessment of a target, with information including wireless clients and traffic as well as just broadcast beacons. For your use-case, you have a range of options in the way you configure your Pi. For vehicle surveillance, a high-gain antenna that is exposed to the outside is recommended. For fixed high-rise building surveillance, a cantenna or directional antenna is your best bet. For walkthrough surveillance, a Pi connected to a large omnidirectional antenna in a backpack is the preferred method.
If you want to limit the collection of unrelated data or confine it to a certain room, the Panda Wireless dongle is a perfect (and powerful) mid-range choice. This technique will apply to all versions of the Raspberry Pi running our Kali build, so a Pi Zero W can also be used with the right wireless adapter. Keep in mind the Pi Zero W and the Pi 3 cannot use their internal adapter for this since it can't be put into monitor mode.
High-gain directional antennas scanning on separate channels can give you a highly detailed picture of a local area even at relatively high speeds.
After selecting your hardware load-out, you will need to gain some degree of physical proximity to your target. Take a tour, pretend you're there for an interview, sit in the lobby for as long as you can and move around the building. Driving or biking is also acceptable, but the longer you're physically nearby, the more intel you will collect. This article will detail my personal "SSH Scramble" recon technique to quickly turn our Kali Pi into a signals intelligence collections device.
A wardriving recon kit.
Passive Recon vs. Active Recon
Kismet is a wireless network logger that is completely passive, unlike NetStumbler or other wardriving programs that send active probes for networks. This leaves no trace of our reconnaissance. In spite of being a passive recon tool, Kismet is highly effective and yields detailed information on discovered networks, including MAC address, SSID, the level of encryption used, and even the manufacturer of the hardware.
SSH Scramble Recon Process
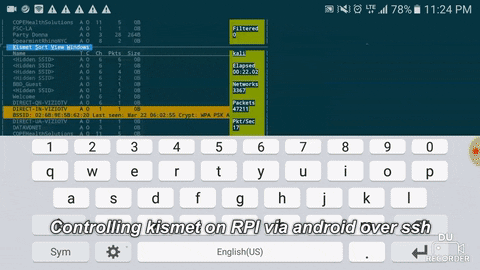
In this tutorial, we will cover how to begin a wardriving scan on the Raspberry Pi running Kali Rolling via SSH using Kismet. This assumes you only want to wardrive occasionally and not have a dedicated Pi configuration for only doing that. I want to keep wardriving easy to use and encourage you to find new ways of using the data. This method can also be automated on a USB Rubber Ducky to quick-start a run and take advantage of physical access by simply inserting the Ducky into the Pi's USB port to begin recording.
Running kismet via SSH on your phone.
What You'll Need
- wireless network adapter
- Raspberry Pi running Kali Linux with power supply
- GPS USB receiver unit (this one is highly recommended)
- smartphone or laptop to start attack, or appropriately programmed USB Rubber Ducky
- Kismet
- GPSD (a GPS data processor)

The Raspberry Pi is modular and simple to connect.
Install Kismet & GPS Dependencies
In order to get everything working, we have two options. The version of Kismet in the Kali Rolling repo is not the newest, but if you're lazy and want to get right to it you can type the following to install the older Kali Rolling version.
apt-get install kismet
If you'd like the newest version, it will require several dependencies to be updated beyond what they are in the Kali repo as well (such as libpcap). To try downloading the newest version, you can run the following in terminal.
git clone https://github.com/kismetwireless/kismet.git
git clone https://github.com/the-tcpdump-group/libpcap.git
sudo apt-get install screen gpsd ncurses-dev libpcap-dev tcpdump libmicrohttpd-dev flex byacc
cd libpcap
./configure
make
sudo make install
cd
cd kismet
./configure
make
sudo make install
The new version got stuck on a lot of dependencies for me, but I added everything my Kali Pi needed to update in the example above. If you get stuck on any dependencies, use the apt-get workaround for now. Just type apt-get install and then the name of any dependencies required to try installing them.
Acquire a Location Data Fix
Plug in your USB GPS dongle, then type lsusb to show a list of attached USB devices. You should see something like:
Bus 001 Device 006: ID 067b:2303 Prolific Technology, Inc. PL2303 Serial Port
If you see that, your GPS unit is being detected. To find the name of the GPS path, type:
dmesg | grep tty
You should see your device as something like "ttyUSB0." This is the name we'll use to start it in the next command. Let's start and test our GPS by typing:
gpsd /dev/ttyUSB0
cgps
If you're successful, you should see a GPS fix in a few seconds.
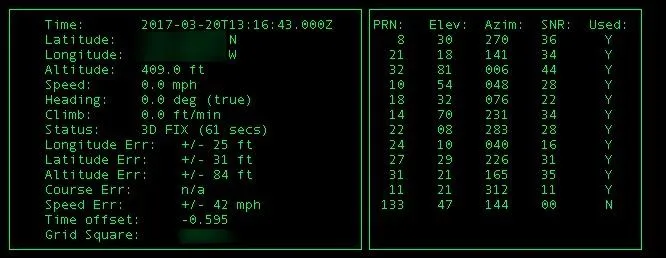
Data from a successful GPS connection.
Start Kismet & Confirm GPS Signal
Log into your Kali Pi via SSH. If you need help with this, we cover it in my previous Kali Pi tutorial.
When you are connected via SSH, run ifconfig to take note of the name of your attack antenna, which is usually wlan1. The Raspberry Pi's internal antenna is usually wlan0, but this can sometimes change. Take note of the IP address you are connected to via SSH and make sure you're tethered through the Pi's internal antenna, otherwise you'll lose your link as soon as Kismet starts on the wrong antenna.
Once you know your attack antenna's name, start GPSD and Kismet by typing:
gpsd /dev/ttyUSB0
kismet
Kismet should open and ask you some configuration questions. You can tab through the fields and ignore everything until the window pops up asking you to add an interface. When prompted, add your attack antenna name to the "interface" field.
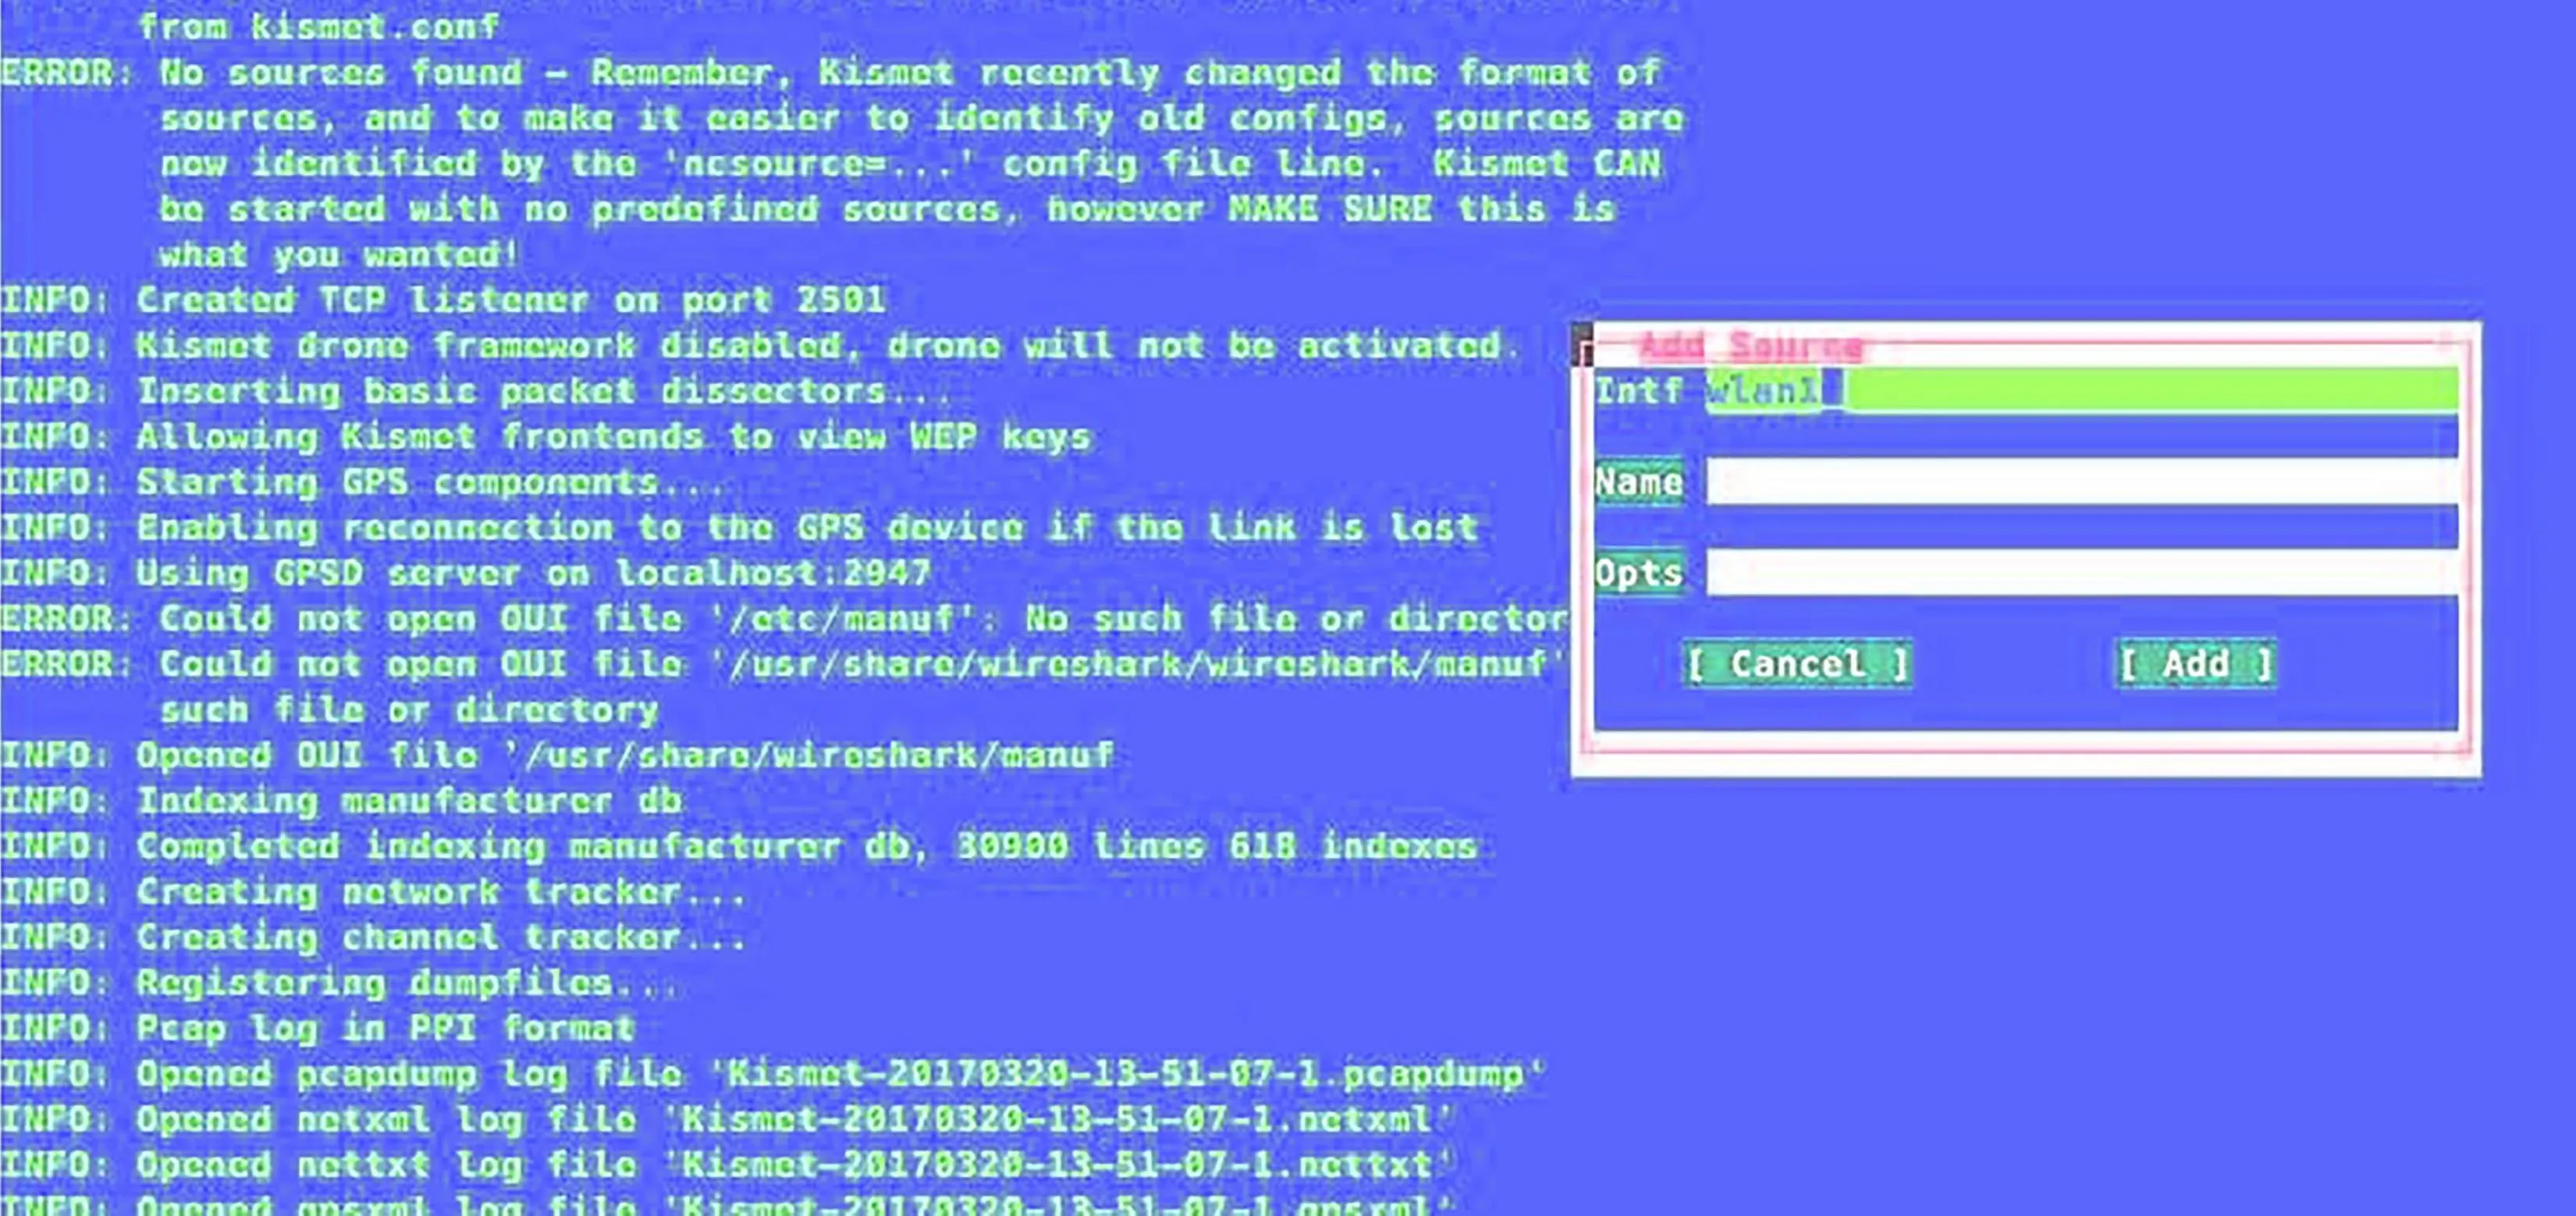
Kismet lets you customize the colors to whatever horrible configuration you want. Sorry.
After adding the interface, press tab until you get to the "add" option and then press return. The console should show the main screen. Tab through until you reach the option to close the screen, and you'll be switched to the main overview seen below. You should see two critical things — networks being detected and GPS data being logged.
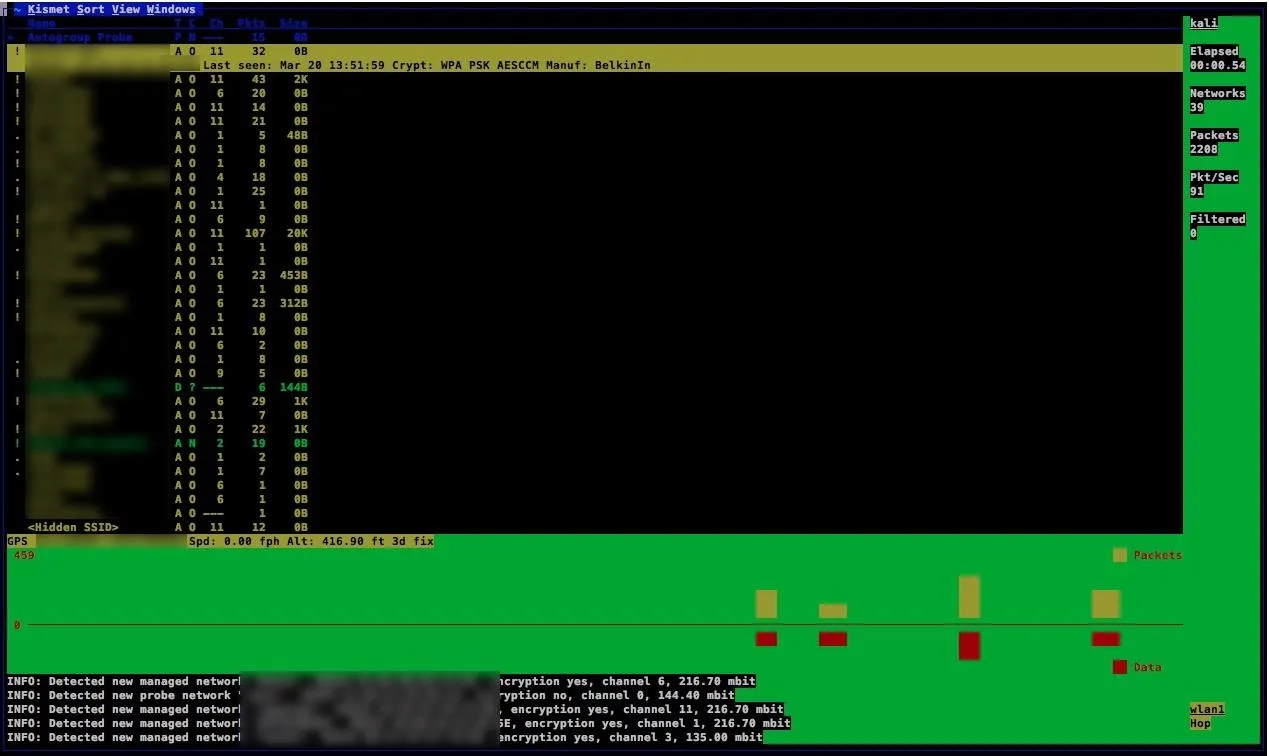
Successful kismet launch.
When you are done recording, press Ctrl-C to shut down the Kismet server. Now, you should see a log in your root directory called "kismet" and then a timestamp. This is a log of the Wi-Fi and GPS data you collected.
Use in the Field
Running GPSD and Kismet at the same time requires us to do two things at once — something difficult to do via SSH. To manage this, we will install screen to create separate "screen" sessions we can switch back to, or even disconnect and reconnect to later. This lets us start a process, disconnect, and then return and reattach to it later, which is great if we are disconnected by accident or need to do more than one thing.
To install screen, type:
apt-get install screen
To use screen during an ssh session, type:
screen
A splash screen will explain the functions; press any key to go through. To disconnect from a screen session, you'll press Ctrl-A and then D. To list all available screen sessions, type screen -list. To reconnect, just type screen -r.
Great! Now we'll combine all these things for our wireless recon command.
From your phone or PC, SSH into your Kali Pi and start a screen session by typing screen. In this session, we'll start GPSD and Kismet.
screen
gpsd /dev/ttyUSB0
ifconfig
kismet
Once we enter our attack antenna into Kismet and we see the startup was successful, hitting Ctrl-A then D will disconnect the screen session. You can rejoin it at any time by logging into the Pi and typing:
screen -r
Reconnecting, you should see something like this:
With Kismet running in a screen session, disconnect from the Pi and focus on getting as much access as possible while Kismet records wireless traffic. When you're done, reconnect to the Kali Pi and reconnect to the screen session with screen -r. End the session by hitting Ctrl-C to shut down the server.
Upload & Convert Data
When you're done with a run, there are two ways to interpret the data. To upload the data to Wigle Wi-Fi, simply go to Wigle.net, sign up for an account or log in, and upload the .xml file Kismet created to the "uploads" section. As soon as the data is done being converted, you can query and view your data run.
To interpret the data yourself, you can convert it to a Google Maps-compatible .kml file with GISKismet. To do so, get GISKismet and create a .db file with:
apt-get install giskismet
giskismet -x (the path of your kismet .xml file here)
giskismet -q "select * from wireless" -o output_all.kml
This should produce a KML file you can open in Google Earth.

Battery pack, GPS receiver, Wi-Fi antenna, and Pi.
Some Warnings
Using a hotspot to tether your device will pollute your results with that SSID showing up everywhere. Using screen and turning off your hotspot until you need to reconnect will avoid this. If your Pi dies while writing Kismet data to root, it will very likely corrupt the OS and need to go Fsck itself before it can be used autonomously again. Make sure to shut down your Pi, or have a "safe kill" USB Rubber Ducky to properly shut down your Pi after a recon run if you can't log in via SSH.
Stay tuned for tutorials on wireless recon and signals intelligence. You can ask me questions here or @sadmin2001 on Twitter or Instagram.
- Follow Null Byte on Twitter and Google+
- Follow WonderHowTo on Facebook, Twitter, Pinterest, and Google+
Cover photo, screenshots, and GIF by SADMIN/Null Byte


Comments
Be the first, drop a comment!