


Due to weaknesses in the way Wi-Fi works, it's extremely easy to disrupt most Wi-Fi networks using tools that forge deauthentication packets. The ease with which these common tools can jam networks is only matched by how simple they are to detect for anyone listening for them. We'll use Wireshark to discover a Wi-Fi attack in progress and determine which tool the attacker is using.
How Script Kiddies Kill Networks
Most denial-of-service (DOS) attacks are pretty basic and take advantage of well-documented flaws in the way WPA networks manage connections. Because the management packets that devices use to control these connections are unencrypted, it's easy for an attacker to craft fake ones after sniffing the wireless channels nearby. Tools to do this are free, widespread, and well-documented on the internet, all perfect for script kiddies.
Most common scripts like Aireplay-ng or MDK3 do this by flooding a target with deauthentication or disassociation packets, which are both normal-seeming packets which have a disruptive effect on the network. Doing so requires only a wireless network adapter which can be put into monitor mode, and a simple command can take out an entire channel with many networks operating on it for up to a block without any specialized equipment.
Detecting Common Wi-Fi DOS Attacks
While these script-kiddie attacks can be very disruptive, they can also be detected by a variety of free and open-source tools. Software like Wireshark can be quite overwhelming for a beginner, especially without knowing what you're looking for in the flood of information available. To get started detecting these attacks, we'll be using Wireshark to sniff packets in the area and separate the types of packets we're interested in with filtering.
Other tools for detection can also identify these attacks in progress. Kismet provides an alert for such attacks under the "Alerts" section, as well as providing alerts for other types of frequent attacks. While Kismet doesn't offer as much information as Wireshark, it's also a great way to get visibility of any attacks going on in your area.
Using Wireshark for Packet Sniffing
In this example, we'll be using Wireshark to detect Wi-Fi jamming attacks from nearby script kiddies. Wireshark can quickly get overwhelming with the amount of information it displays, so we'll need to filter this down to make it useful. As you can see from below, even with some coloring rules, a normally functioning Wi-Fi channel has a tremendous amount of information flying around. To make sense of it, we'll need to organize and filter it.
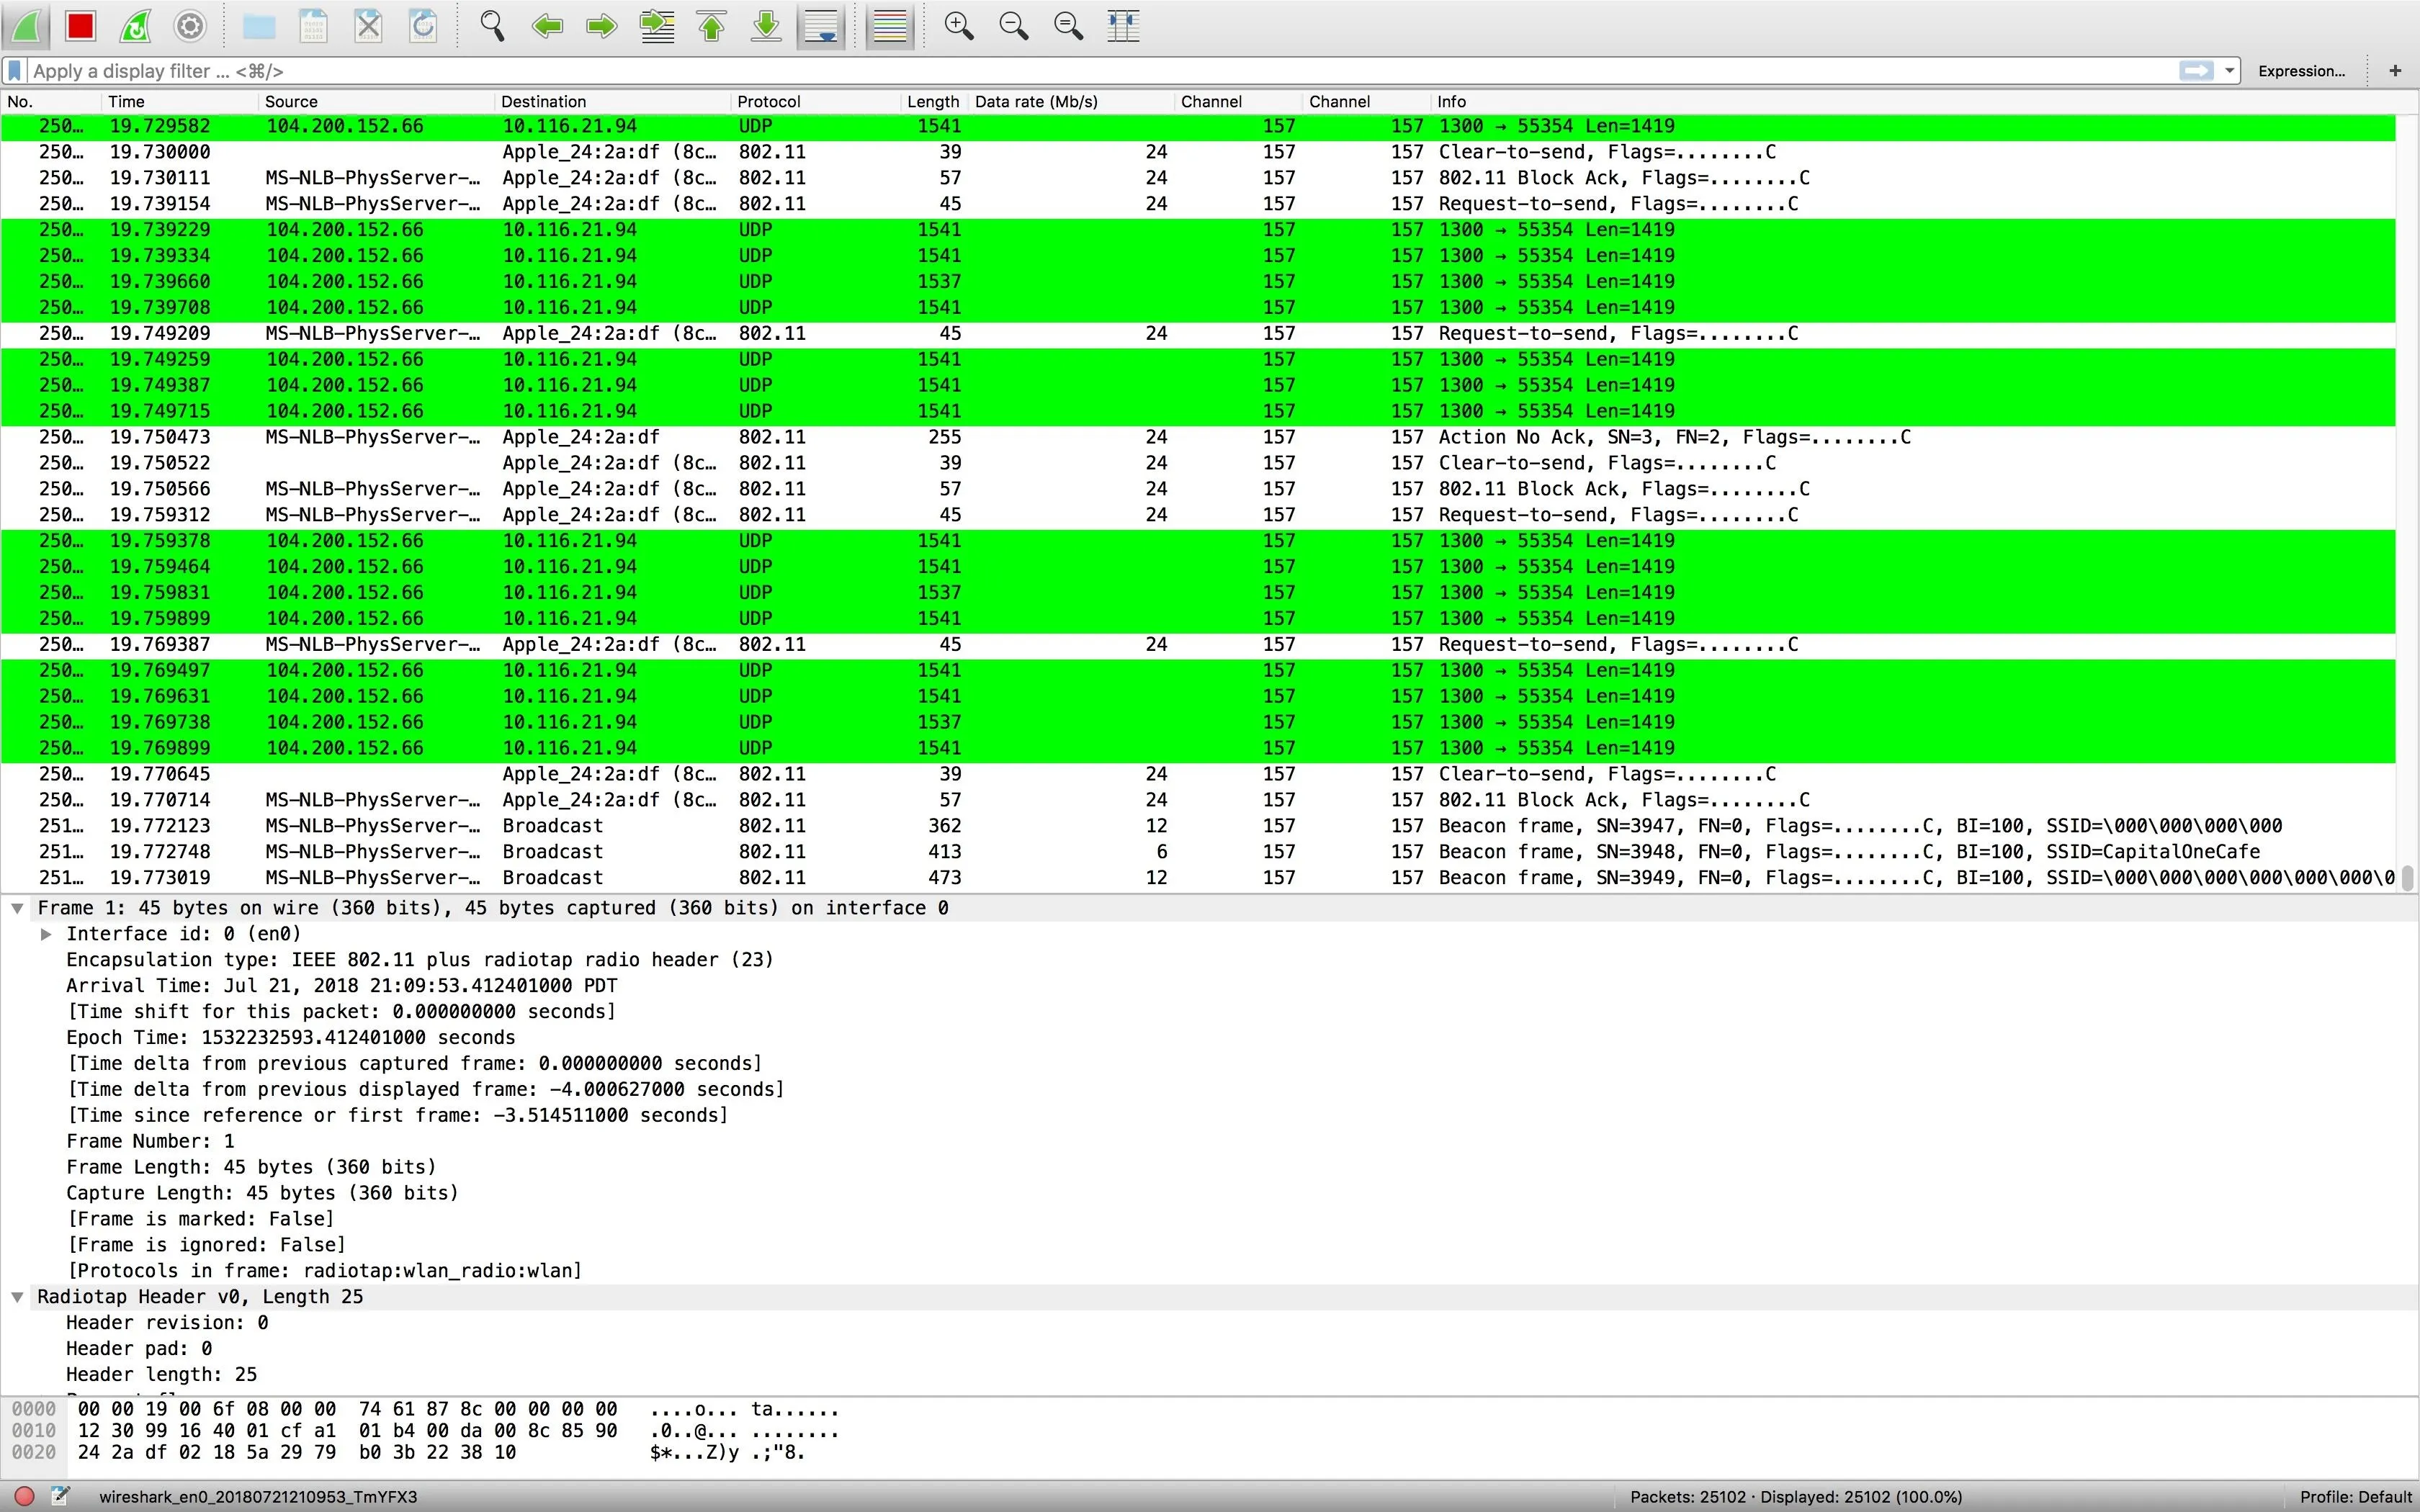
Click or tap on the image to enlarge.
While scanning, Wireshark will not control your wireless network adapter, so you'll need to use another program to set the channel (or to scan through channels). Once you set the channel to a network you want to scan, Wireshark will display all the packets captured on the channel, including other access points (APs) operating on the same channel. To sort through these, we'll use a few custom options in Wireshark.
Wireshark Custom Options
Wireshark comes with a number of ways to filter what we're seeing to be more relevant. The first is by simply dropping packets that aren't relevant to what we're looking for. This can be packets from another AP or just data packets we have no reason to save. By not saving these packets in the first place, you can reduce the size of your capture file and avoid seeing the distracting and irrelevant information.
The next way we can organize information is to tag interesting packets with color codes. This will make packets with specific rules we designate as important stand out more visibly. We can also instantly tell the difference between someone using a program that utilizes deauthentication packets exclusively versus a mix of deauthentication and disassociation, as in MDK3.
The last way we'll organize our view in Wireshark is with display filters. With these, we can choose which packets from our capture will show up and which will be hidden. This can allow us to be even more specific in our search, while still making sure the packets are in the capture file and available for analysis.
What You'll Need
Wireshark is a fantastic program because it's well-supported. It's available for Window, macOS, and Linux, and it's capable of sniffing a variety of packet types. While we'll be using Wireshark to sniff Wi-Fi packets, it can also be used to sniff Bluetooth and Ethernet packets as well.
I'll be doing this project in Kali Linux, which is recommended because it makes it very easy to change the channel your card is scanning on using a tool like Airodump-ng. You can run Kali in a virtual machine or from a bootable USB stick, but it's not strictly necessary to be using Kali to run this project.
You can detect attacks against your W-Fi network without putting your card into monitor mode, but you'll see far more packets by using a card that supports this. Many wireless cards are supported by Wireshark, so you should try your internal one before you use a separate adapter for this project. If your card does not support monitor mode, you can check out our list of adapters that do below.
To download Wireshark, you can navigate to the official website and grab an image from the download page. Follow the command prompts to install Wireshark, and once the installation is complete, we can start with our first Wireshark capture.
Prepare Your Network Card
First, we'll need to set our wireless card to the correct channel we want to monitor. On Kali Linux, we can do this with the following commands, after initially running ifconfig or ip a to find the name of our network interface.
airmon-ng start NameOfYourWirelessCard
airodump-ng NameOfNetworkAdapter
If you're not sure what channel you want to be on, Airodump-ng will switch the card between different channels to scan everything. This has the disadvantage of causing many packets to be "fragmented" as the card is hopping between different networks. For best results, you should set the channel to that of the network you want to test.
Airodump-ng will display all networks it sees. If you want to tune to a specific channel when you find a network you're interested in, you can press Ctrl-C to stop the command and add -c ItsChannelNumber to the end of the previous Airodump-ng to lock the card to the desired channel.
Once this is done, our card will be on the correct channel and scanning in wireless monitor mode. With this complete, we can open Wireshark and start applying capture filters for our investigation.
Capture Filters in Wireshark
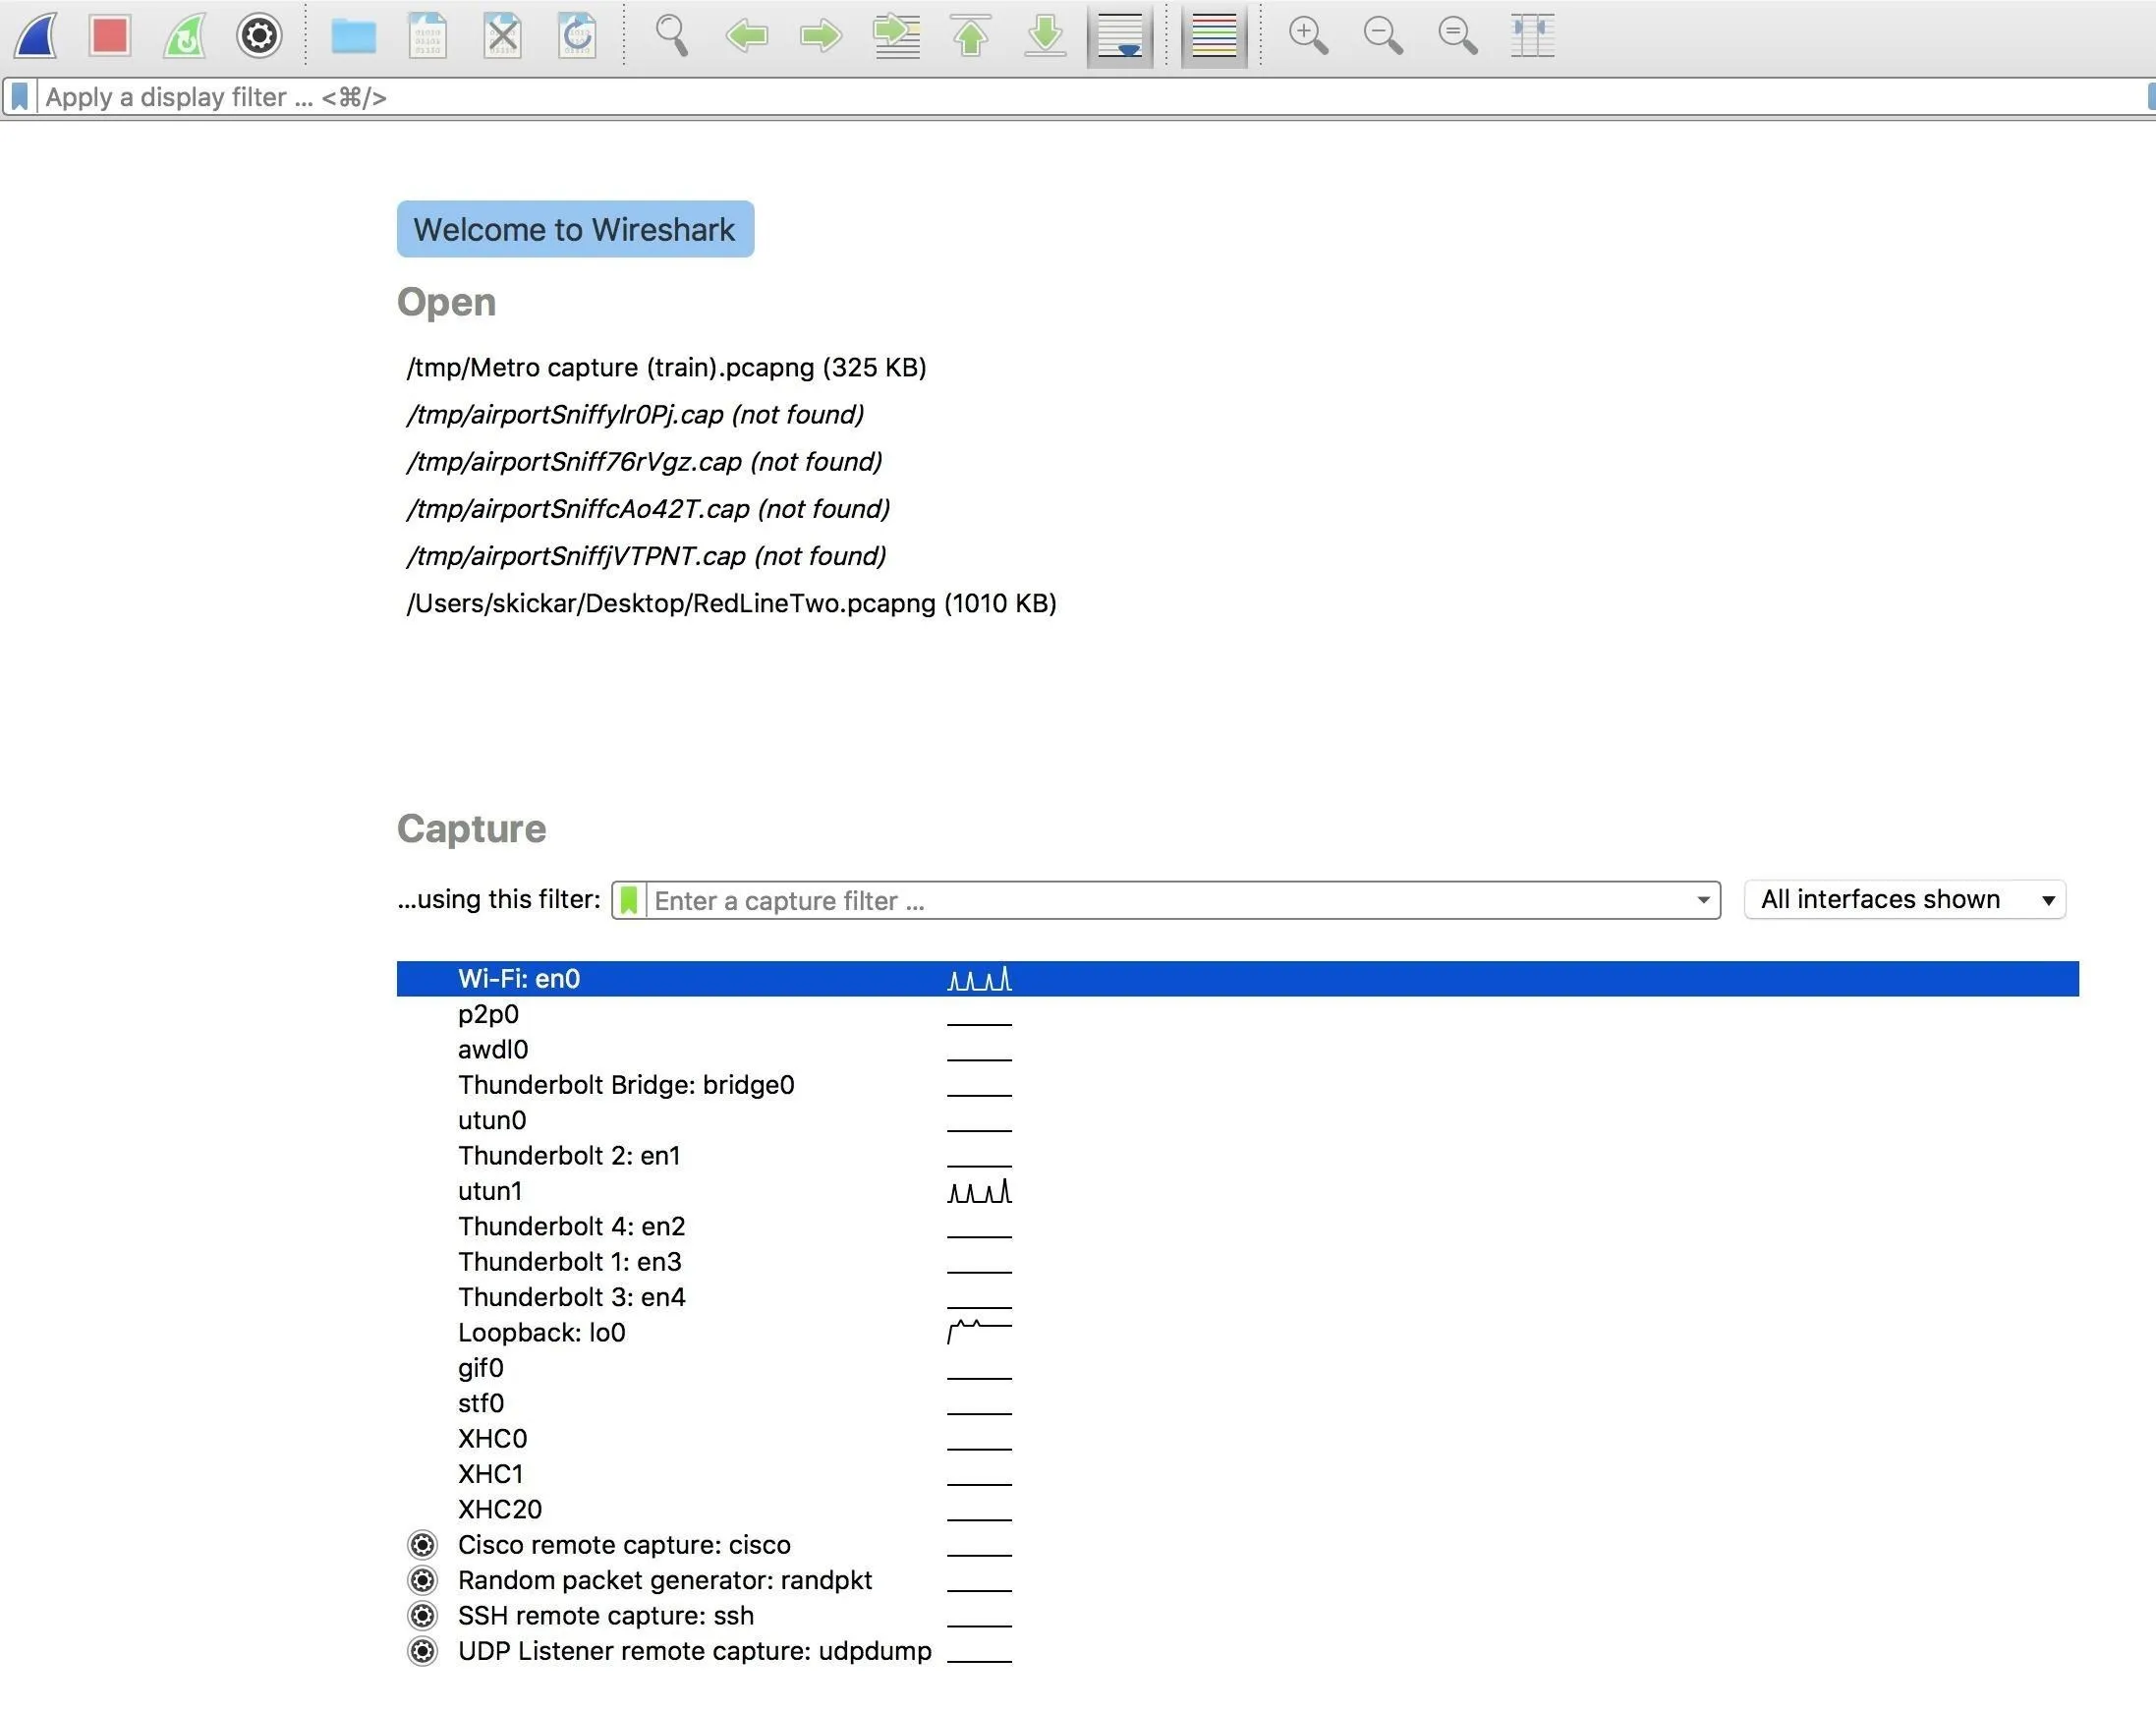
When you first open Wireshark, you'll see the menu below. First, select the adapter you'll be using to capture. In our example, we're using en0. Next, you'll see a field marked "Capture" which is where we can enter capture filters.
We'll want to include some capture filters to ensure we're dropping packets which aren't relevant or interesting to us. To keep our capture to packets pertinent to us, we can specify the following packet filter.
wlan type data or wlan type mgt and (subtype deauth or subtype disassoc)This specifies that we only want to keep wireless LAN packets that are data or management-type packets. Additionally, we want those packets to be either deauthentication or disassociation packets. You can play around with this syntax to develop your own filters. If you want to see more filters you can use, click the green icon next to where you entered the capture filter to see other commonly used filters saved by default.
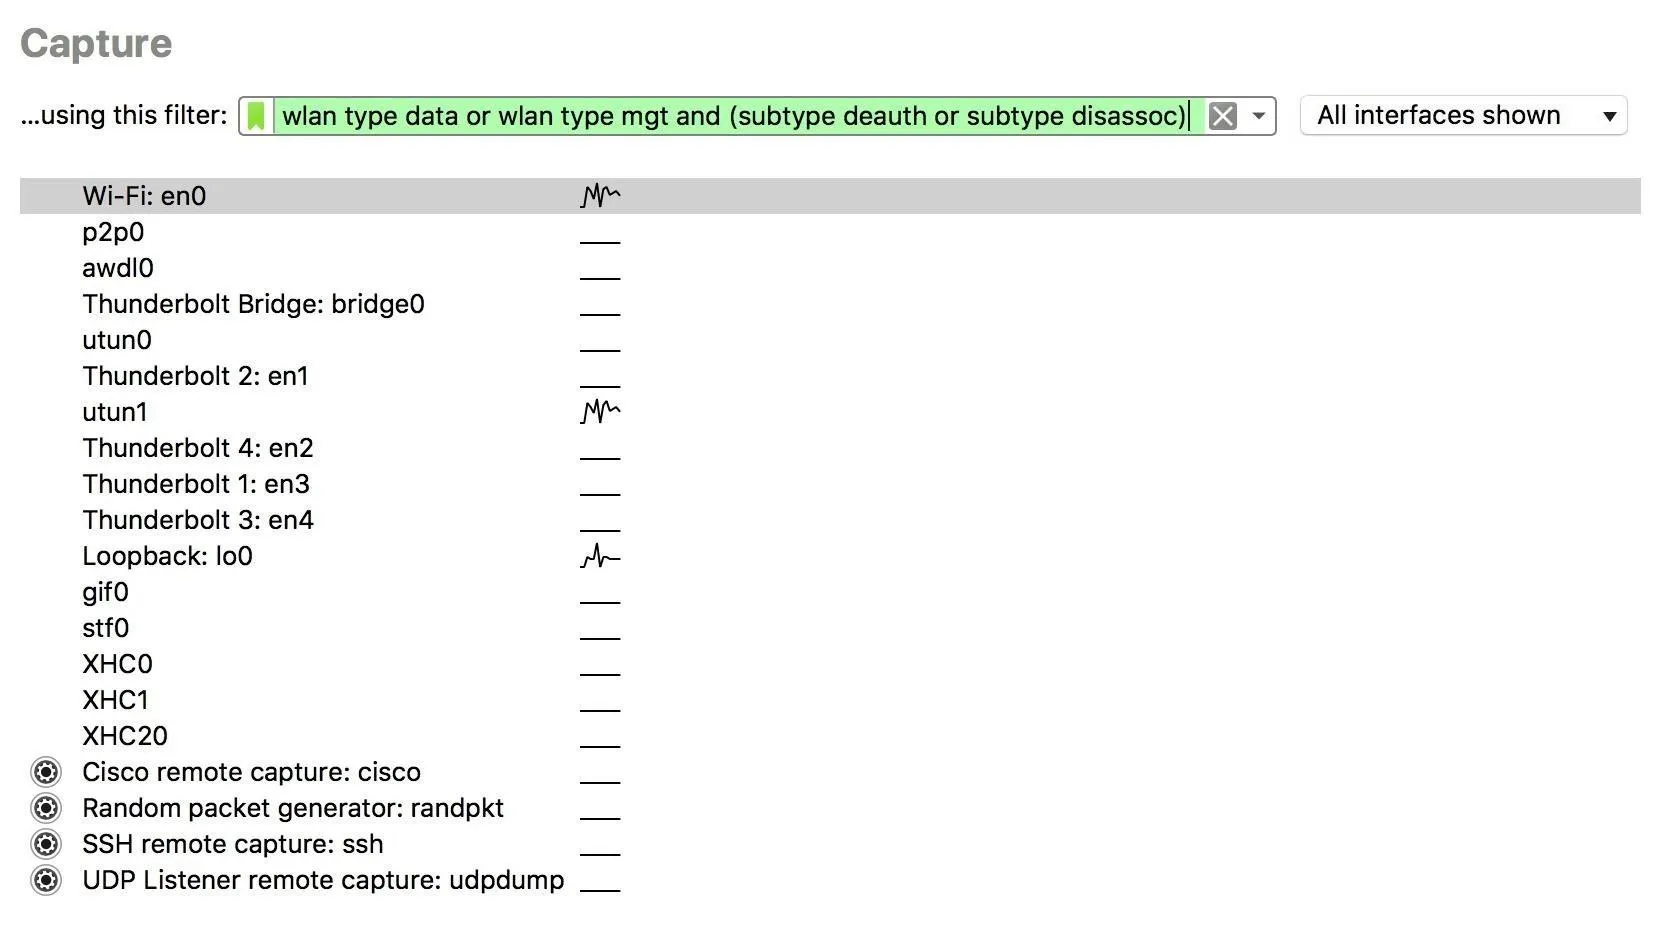
When your window looks like the picture above, double-click on the interface you want to launch or press return to start the Wireshark capture.
Display Filtering, Which Is Different for Some Reason
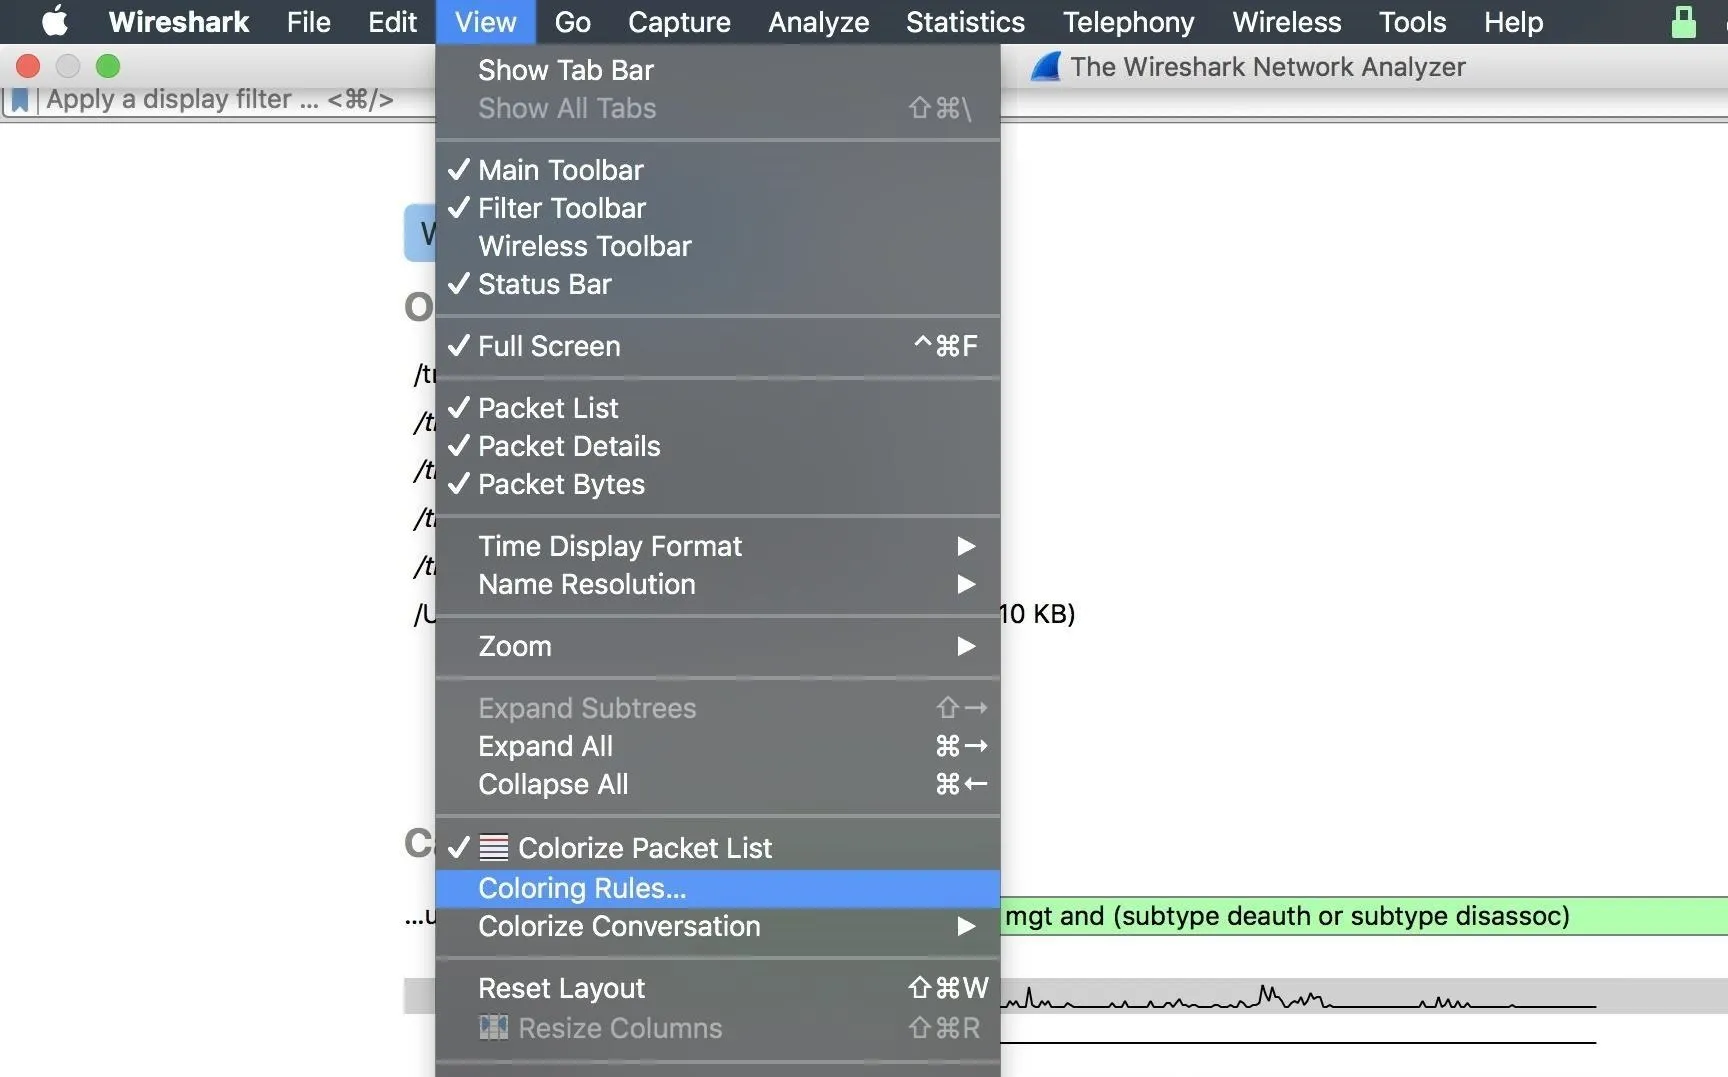
Since we're looking for two types of packets, we can set two coloring rules to make them pop out immediately when we see them. Without this, it may be hard to tell at a glance what's happening when packets are rapidly being added to the list. Click on "View" in the menu bar, then select "Coloring Rules" from the drop-down.
This will lead you to a list of color rules. You can create your own by clicking the plus (+) button in the lower left side. Once there, you can enter a display filter, then a name for the filter in each row.
To change colors, you can click the "Foreground" or "Background" buttons to select the color. I made mine orange to highlight the packets we're looking for.

The filters we will be using will be green for data packets, orange for deauthentication packets, and yellow for disassociation packets. We can set these by setting the following values.
Data flow - data
Deauth: Airmon or MDK3 - wlan.fc.type_subtype == 0x00c
Disassoc: Airmon or MDK3 - wlan.fc.type_subtype == 0x00a
This will set the filter to separate the packets we're looking for by the type of tool that makes them.

With this complete, make sure the new color rules are selected with a checkmark, and click "OK" to save the changes.
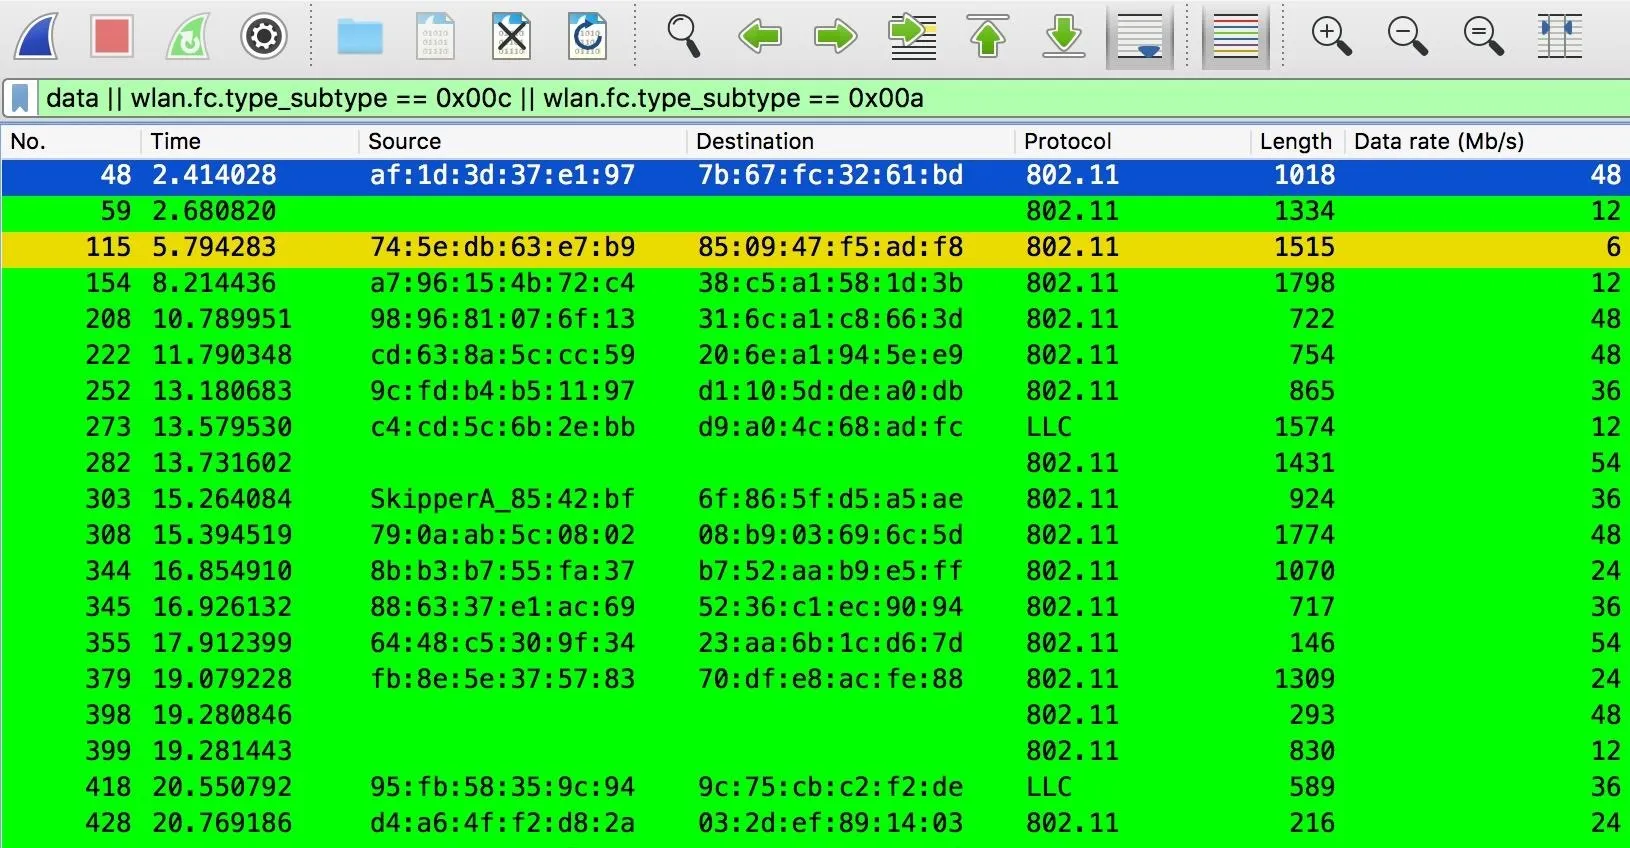
Once in the main window, we can type the following display filter into the main display filter bar. You'll notice it has an entirely different syntax from the capture filter. In this case, we identify the packets by their wireless frame subtype and also allow for data so we can see if connections are being choked.
data || wlan.fc.type_subtype == 0x00c || wlan.fc.type_subtype == 0x00aAfter typing in that filter, we can apply the display filter to all of our data by hitting return.
Classify Common Script-Kiddie Tools
Now, time for a test. Using Aireplay-ng and MDK3 from earlier tutorials, target your own Wi-Fi network (or one you have permission to) and record the results. You should notice two different patterns of in the attacks, and as a defender, you'll be able to determine which program is running from the data Wireshark shows you.
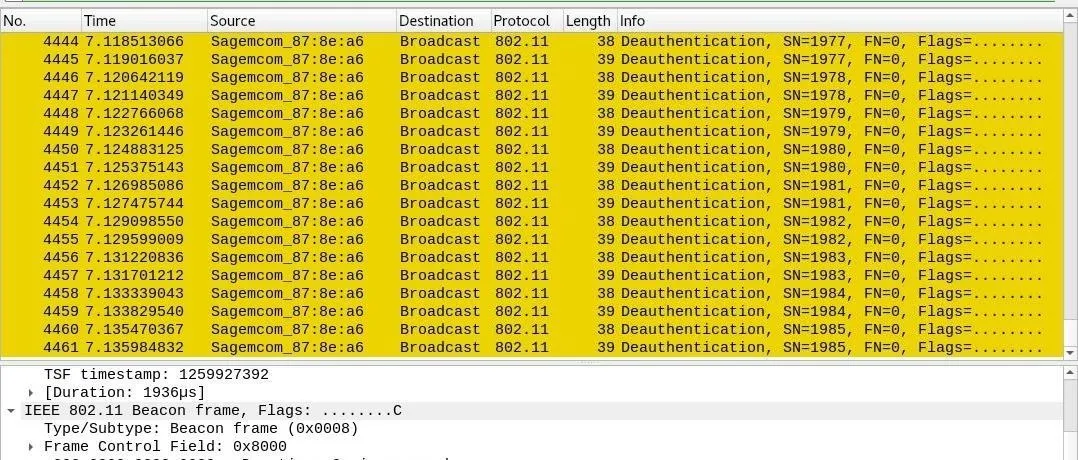
- Aireplay-ng: With Aireplay-ng, you should see nothing but yellow deauthentication attacks; This is the only option given in Aireplay-ng, and you can set a value to the number of packets to send in your attack to see how many you receive intact in Wireshark.
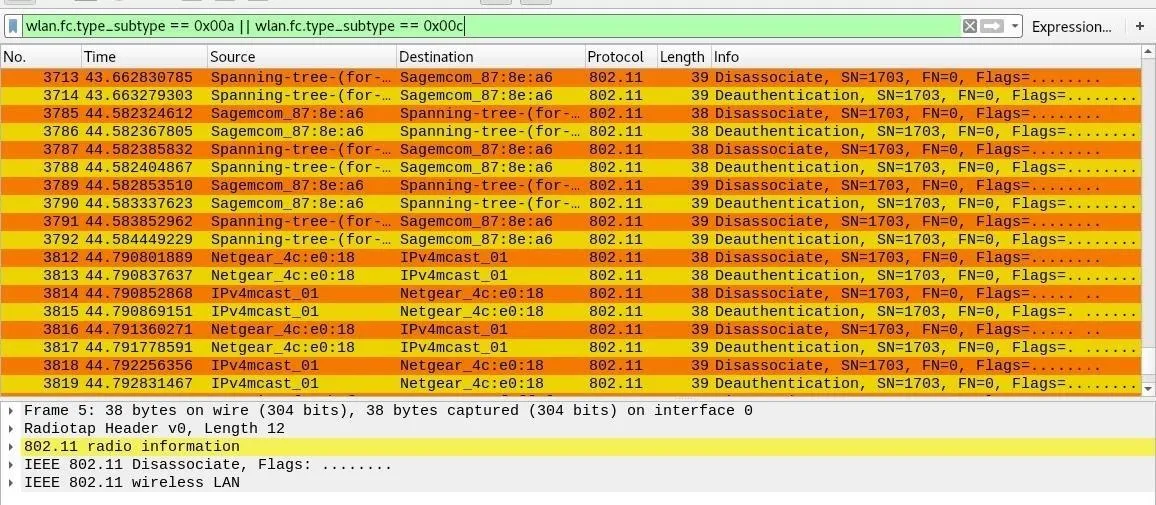
- MDK3: A pattern of orange and yellow stripes make MDK3 stick out as distinct in its attack signature, peppering targets with combined deauthentication and disassociation frames. Training MDK3 on a target will result in choking of green data packets after bursts of yellow and orange packets flood the channel.
While floods of these packets are positive signs of an attack in progress, sometimes these packets do occur under normal circumstances on networks, especially corporate networks capable of "suppressing" rogue access points. If you see a few lone disassociation packets or the occasional deauth, it may not be cause for alarm.
Set Custom Filters
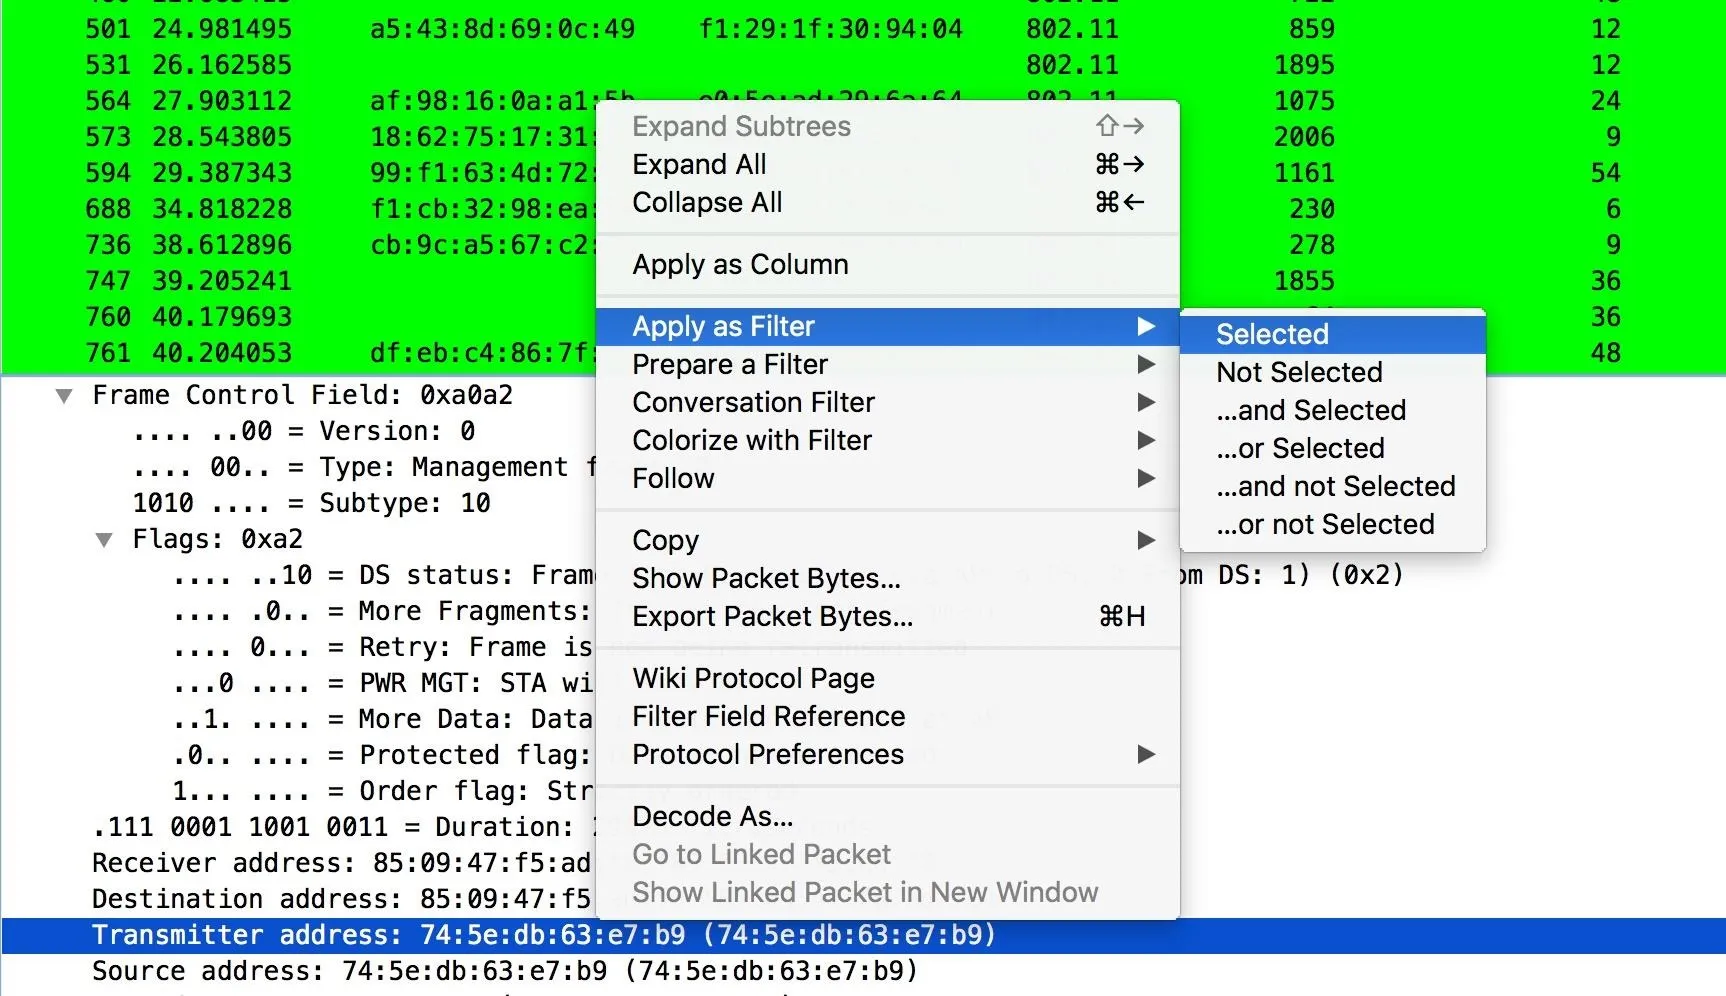
To further refine your search, it's obvious how useful filters are. Rather than painfully learning every type of expression for the syntax allowed, Wireshark has a handy hacker way of setting anything as a display filter. Click on a packet from a network that you are interested in, and we'll use the information inside it to create a new display filter to only show packets transmitted from that device.
On the bottom pane, click the downward facing arrows to expand the information in the packet. If you want to filter for everything like that thing (or filter that thing out), right-click on it, then select "Apply as Filter," followed by "Selected."
You can also easily set colorized filters here, as well.
Now, you can use this to make it so you only see transmissions to or from a particular MAC address. This is helpful for cutting through other devices that meet your display filter but still aren't relevant. To add anything to your filter, just type || after your last filter term, and add a new one. This means "or," allowing you to add more conditions a filter will match.
To build more sophisticated filters, you can also combine them with && statements to make the following filter a requirement, or replace the == symbol with != to specify "does not equal" to filter out anything that does match that an undesirable value.
While It's Easy to Disrupt a Network, It's Also Easy to Detect
Wireshark and other tools can be used to quickly get to the bottom of any suspected jamming. Because the tools to detect and localize jamming are free and available to anyone, hackers using tools like MDK3 and Aireplay-ng may be letting a network administrator know what you're doing, right down to the program you're using for the attack. This level of information is extremely useful for defenders, who can use it to create tools to automatically defend a network. Hackers, on the other hand, should keep in mind how many alarm bells they may trigger with such activities.
The vulnerabilities in current Wi-Fi around unprotected management frames will largely be corrected in the upcoming WPA3 standard, but current users don't need to wait to protect against these script-kiddie-style jamming attacks. Protected management frames have actually been available for some time in the 802.11w standard, but most devices have this disabled by default. If you're interested in protecting yourself from these kinds of attacks, you should look into requiring protected management frames in your router's firmware settings.
I hope you enjoyed this guide to detecting Wi-Fi jamming programs like MDK3 and Aireplay-ng with Wireshark! If you have any questions about this tutorial on Wireshark or you have a comment, feel free to reach me on Twitter @KodyKinzie.
- Follow Null Byte on Twitter, Flipboard, and YouTube
- Follow WonderHowTo on Facebook, Twitter, Pinterest, and Flipboard
Cover photo and screenshots by Kody/Null Byte


Comments
Be the first, drop a comment!