


The Raspberry Pi Zero W and Pi 3 Model B+ include integrated Wi-Fi, Bluetooth Low Energy, and more than enough power to run Kali Linux. They sound like perfect all-in-one penetration testing devices, but the lack of support for monitor mode and packet injection usually meant buying a supported Wi-Fi adapter. Now, it's possible to use monitor mode on the built-in Wi-Fi chip with Nexmon.
The Need for Packet Injection & Monitor Mode
There are plenty of reasons why the ability to put a wireless card in monitor mode would be useful. The wireless card in a Raspberry Pi isn't very good at doing much other than what's needed to establish a basic Wi-Fi connection.
While some tools in Kali Linux may work with a card not supporting monitor mode, it's more common to find that a tool you want to run won't work without it. As a result, most hackers choose to purchase an external, USB-connected wireless network adapter that allows more flexibility.

In the example above, the tiny Pi Zero W is controlling an Alfa AWUS036NHA antenna that's nearly twice its size. While impressive to control such a burly antenna with a tiny device, this huge footprint nearly defeats the purpose of using a Pi Zero W, unless you're trying to hide the Pi inside the antenna.
The Pi Zero W Wireless Card
The Raspberry Pi Zero W contains the same Broadcom BCM43438 wireless chipset used by other Raspberry Pi models. The small chip contains a Wi-Fi radio, Bluetooth radio, and even has the ability to receive FM radio. In spite of these powerful abilities, the chip is incredibly small, allowing the one-inch Raspberry Pi Zero W to access Wi-Fi networks and use Bluetooth peripherals like keyboards or mice.

Due to how widespread the Broadcom BCM43438 is used, community interest in supporting monitor mode has been steadily growing since its introduction. In spite of this, the manufacturer never got around to officially supporting monitor mode, limiting the usefulness of the wireless cards in Raspberry Pi devices.
What this means for a hacker is that if Wi-Fi hacking is involved, the Raspberry Pi as a platform must be considered as only one part of a complete system, including a secondary adapter that supports monitor mode and packet injection. In general, this is not too much of a trade-off, as the Pi's internal antenna is usually used as a "command and control" antenna that allows control of the more powerful "offensive" network adapter.
Nexmon Community Support
While Broadcom never released a patch to enable monitor mode, the community eventually came through with one. The Nexmon project is a firmware patch based in C for the Broadcom/Cypress chips in use within Raspberry Pi devices. One important note before using this patch is that because it's developed by the community, it doesn't come with the same kinds of assurances an official patch would as denoted by the warning on the Nexmon GitHub repo.
WARNING: Our software may damage your hardware and may void your hardware's warranty! You use our tools at your own risk and responsibility! If you don't like these terms, don't use nexmon!
In spite of the stated warnings, Nexmon generally works very well on the cards that are supported. Nexmon goes beyond just supporting the chipset inside the Raspberry Pi and can be used to enable monitor mode in a variety of other wireless chips used in smartphones.
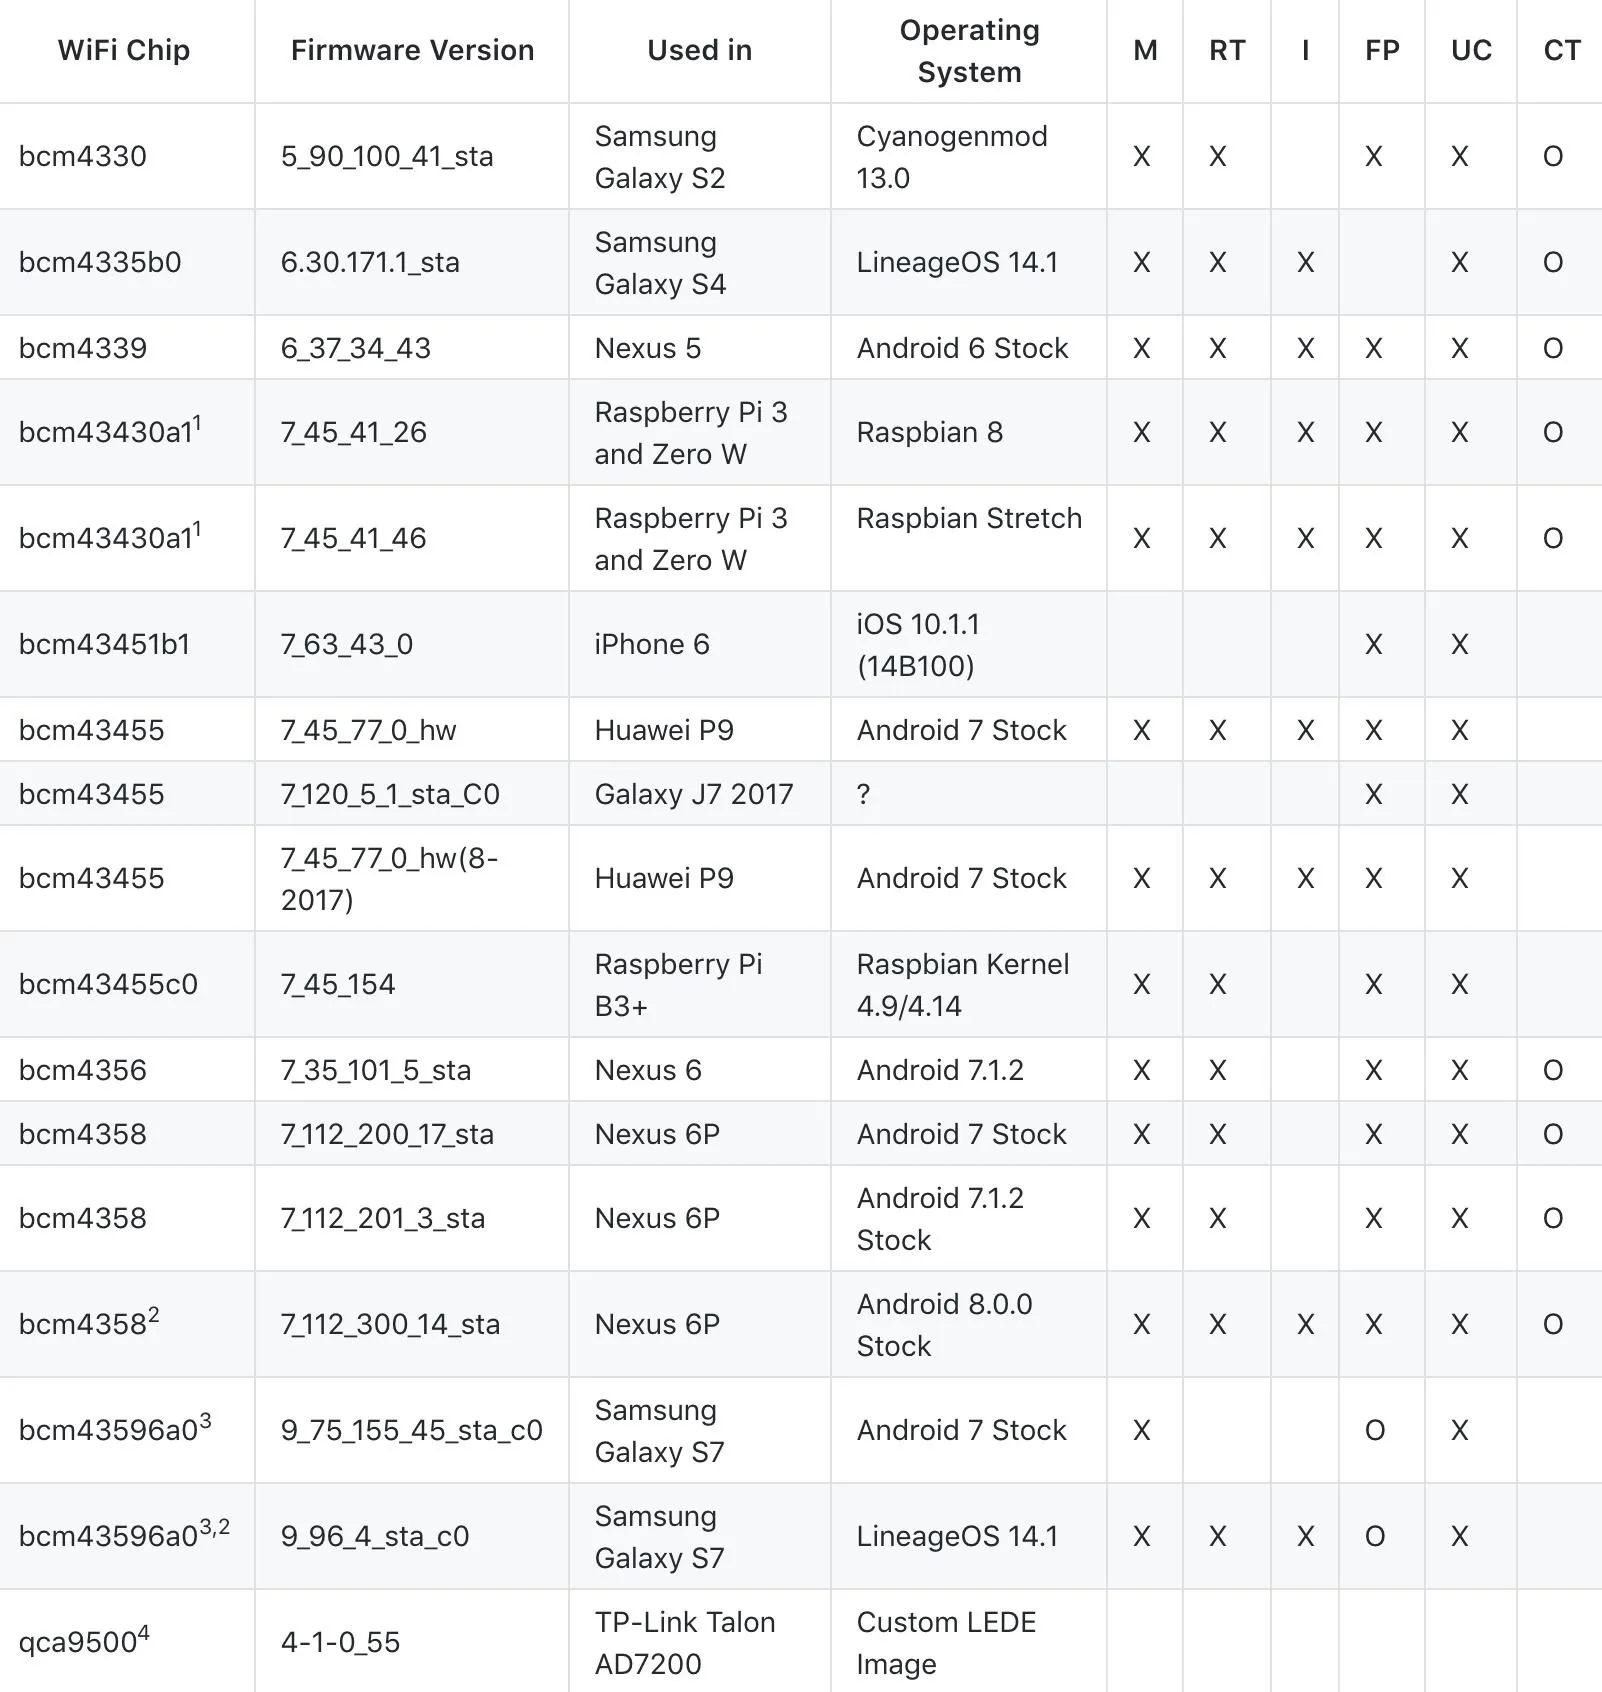
A list of chipsets supported by Nexmon
Set Up Your Raspberry Pi with Nexmon
To get started, you'll need a Raspberry Pi running Kali Linux with a chipset that's supported by Nexmon. Because all chipsets are supported as of this writing, this should work on any Raspberry Pi model. While we'll be covering the Raspberry Pi Zero W in this guide, you can follow along with any model of Pi.

On a New Raspberry Pi
In the first scenario, we'll set up a Pi Zero W that doesn't yet have Kali Linux installed. This is perfect if it's your first time setting up a Pi or otherwise working with a device that doesn't have data on it you want to save. If you have an existing Pi setup you want to add Nexmon to, I'll cover those instructions in the next option.
The easiest way to enable monitor mode is to simply load a Kali image that already has Nexmon installed. One of my favorites is the Sticky Finger's Kali-Pi image, which can be installed on any kind of Raspberry Pi. To download the Sticky Finger's Kali-Pi image, select from the version that matches your model of Raspberry Pi:
When the image is downloaded, flash the image to the SD card of the Pi using Etcher, one of the simplest ways of preparing your SD card. However, if you're running Windows, you can use Win32 Disk Imager to put your image on the card. On a Mac, you can also write a bootable SD image via a terminal using the below instructions.
Before plugging in your SD card, run the following in a terminal, which will display a list of all the disks attached to your system.
df -hAttach your SD card and run the command again, and note the filesystem name of your SD card (it's the one that wasn't there before). It should look like /dev/disk2s1, and you should be very careful not to mix this up in the next steps since doing so could overwrite your hard drive.
Now, you'll use the dd command to load the Kali image onto the card. First, use the following command to unmount the partition so you can write to it, with X being the correct disk number.
sudo diskutil unmount /dev/diskXNext, run the following command to load the image onto the SD card. If there is an "s" after the initial disk number (like rdisk2s1), do not include the "s" or following number. So, "rdisk2s1" should look like "rdisk2." Here's what it should look like all together:
sudo dd bs=1m if=LocationOfKaliImage of=/dev/rdiskXPress enter to begin the process and note that dd does not provide any on-screen information unless there is an error or it finishes. To view the progress during the transfer, you can hit Ctrl-T. Wait for the process to complete. You'll know the process is complete when you see a readout of bytes transferred over and the time the process ran.
Once it's complete, load up your Pi with the SD card and make sure to follow our guide on setting up your new Kali Linux installation and the top 10 things to do after installing Kali Linux.
On an Existing Raspberry Pi
To set up an existing Raspberry Pi, you'll need to either log in via SSH, connect a monitor and keyboard to log in with, or use a connected computer. Make sure your Pi is connected to a Wi-Fi network, and then open a terminal window.
First, make sure you're root and change directory to the right place:
sudo su
cd /usr/local/src
After changing directory, download the current version of the Re4son kernel into the directory.
wget -O re4son-kernel_current.tar.xz https://re4son-kernel.com/download/re4son-kernel-current/Next, extract the file downloaded with the tar command.
tar -xJf re4son-kernel_current.tar.xzAfter the file is extracted, change directories into the directory just decompressed with:
cd re4son-kernel_4*Finally, install the firmware patch by running the install.sh program located inside.
./install.shAfter the installation process is complete, the Wi-Fi card on your Raspberry Pi should support monitor mode.
Test for Monitor Mode & Packet Injection
Now, try putting your card in to monitor mode. The Re4son kernel comes with its own utility for doing so, and you can use the following command to put the card into monitor mode.
sudo mon0 upWhen this is complete, your mon0 interface should now be up and allow you to listen in on other Wi-Fi conversations as well as inject packets. You can confirm the card is in monitor mode by running the following command. You can press Ctrl-C to stop the scan once you've seen the card is able to scan.
airodump-ng mon0Next up, use Aireplay-ng to test the ability of the Pi to inject packets. To do so, make sure you're in proximity to a Wi-Fi network to attempt packet injection on, then run the following command.
aireplay-ng --test mon0If you see a result like below, then it means your Pi can support packet injection.
aireplay-ng --test mon0
12:47:05  Waiting for beacon frame (BSSID: AA:BB:CC:DD:EE) on channel 7
12:47:05  Trying broadcast probe requests...
12:47:06  Injection is working!
12:47:07  Found 1 AP

12:47:07  Trying directed probe requests...
12:47:07  AA:BB:CC:DD:EE - channel: 7 - 'Dobis'
12:47:08  Ping (min/avg/max): 0.891ms/15.899ms/32.832ms Power: -21.72
12:47:08  29/30:  96%
An All-in-One Wi-Fi Hacking Package
The Raspberry Pi Zero W set the bar for a low-cost, ultra versatile single board computer, but the community support added by Nexmon allows a Pi Zero W to act as an all-in-one Wi-Fi hacking computer. While only having one card on the board means that you can't both control a Pi and attack using the same Wi-Fi card, there are plenty of other clever ways of connecting to a Pi, either by serial cable or Bluetooth, that can allow this configuration to be extremely useful.
I hope you enjoyed this guide to adding monitor mode to the Raspberry Pi Zero W! If you have any questions about this tutorial on the Raspberry Pi Zero W or you have an issue about Raspberry Pis in general, feel free to comment below or reach me on Twitter @KodyKinzie.
- Follow Null Byte on Twitter, Flipboard, and YouTube
- Sign up for Null Byte's weekly newsletter
- Follow WonderHowTo on Facebook, Twitter, Pinterest, and Flipboard
Cover photo by SADMIN/Null Byte


Comments
Be the first, drop a comment!