An attacker with shell access to a Linux server can manipulate, or perhaps even ruin, anything they have access to. While many more subtle attacks could provide significant value to a hacker, most attacks also leave traces. These traces, of course, can also be manipulated and avoided through methods such as shell scripting.
Finding evidence of an attack can start with a trace left behind by an attacker like a file modification date. Every time a file is created, modified, or "touched" in Unix terminology, it generally updates the modification time of a file. Every file within a Linux filesystem contains a modification date stored somewhere.
To a system administrator, files which suddenly display a recent modification time may notify them of an attack and prompt them to take action to lock down a system. Luckily for an attacker, modification times are not an infallible record. These modification times themselves can be spoofed or modified. One such way an attacker might automate the process of backing up and restoring modification times is to write a shell script.
Viewing & Manipulating Timestamps
Several tools included on most Linux systems allow us to very quickly view and modify file timestamps. The most relevant tool for affecting this property is referred to as touch. This command allows us to create a new file or update the last time a file or group of files were "touched."
touch file
Running the command above will create a new file named "file" if it does not already exist, and if it does exist, it will update the modification date with the current system time. We can also use a wildcard, like in the string below.
touch *
This command will update the timestamp of every file in the folder in which it was run.
After creating or modifying our file, there are a couple of ways we can view its details. The first is using the stat command.
stat file
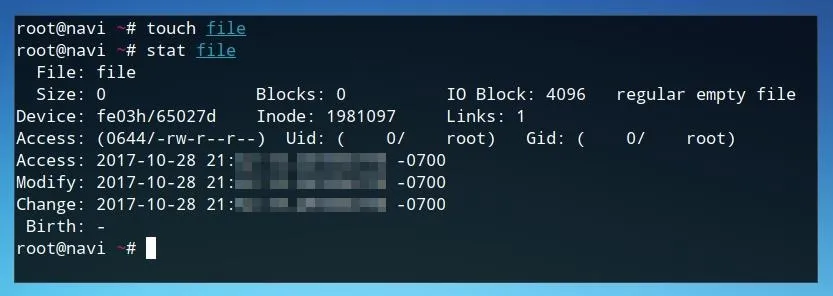
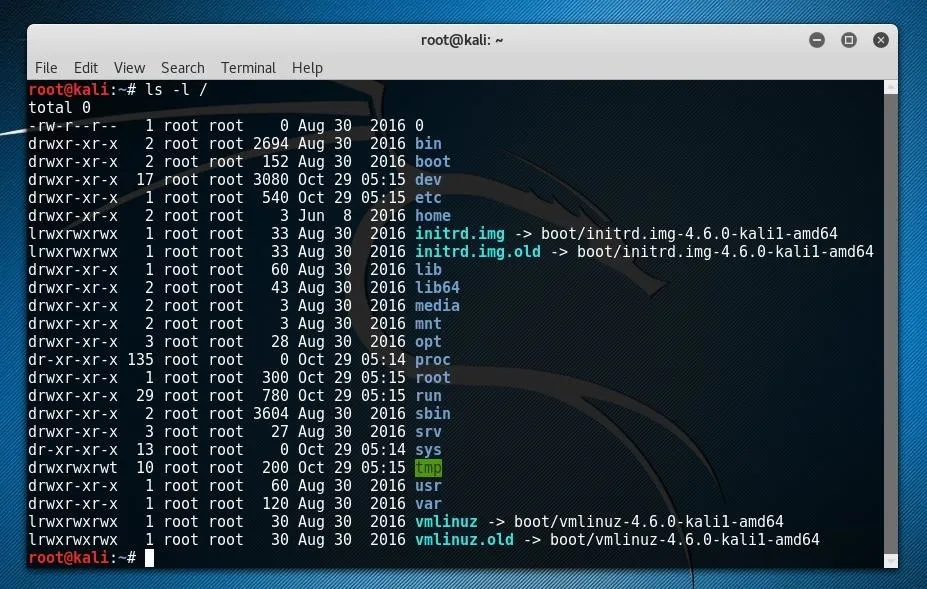
Running stat returns some information about the file, including Access, Modify, and Change timestamps. For a batch of files, we can also view the timestamps of various files within a folder with parameters of ls. This command lists files, and the -l flag, or "long" option, also includes the timestamps of these files within its output.
ls -l
Now that we can set current timestamps and view those which have already been set, we can also use touch to define a custom timestamp. We can do this by using the d flag and defining a specific time in a YYYY-MM-DD format followed by a time in hours, minutes, and seconds.
touch -d "2001-01-01 20:00:00" file
We can confirm this was set by using ls.
ls -l file

While this is useful in individual use cases, it would be very ineffective to use this technique to manually change different modification times on a server after editing the files. We can automate this process with a shell script.
Organizing the Shell Script
Before beginning the script, we should consider exactly what processes we need it to carry out. For the purposes of hiding tracks on a server, an attacker would need to be able to back up the original timestamps of a folder by writing them to a file, as well as to be able to restore them to the original files after we have modified them by whatever configuration changes we create during the exploitation phase.
These two different functions could be triggered by different user inputs, or arguments. As our script will function based on these arguments, we'll also want to have a way to handle errors. This leaves us with a total of three potential courses of action depending on user input.
- no argument: return error message
- save timestamps flag: save timestamps to a file
- restore timestamps flag: restore timestamps to files according to saved list
While we could use nested if/or statements to create this script, we could also assign each one of these functions to their own "if" statement based on the conditions. We can begin writing the script in the text editor of our choice, or perhaps by using nano.
Beginning the Script
We can launch nano from the command line and create a script titled "timestamps.sh" with the command below.
nano timestamps.sh
First, let's begin the script with #!/bin/bash in order to declare the shell script as a bash script, and then write our first if statement. We'll begin with if and add a condition of [ $# -eq 0 ]. This condition indicates that if there is no argument whatsoever, and the program should do what follows the then. In the example case, we return an error message to the user using echo and then exit the program and close the if loop with fi.
#!/bin/bash
if [ $# -eq 0 ]; then
echo "Use a save (-s) or restore (-r) parameter."
exit 1
fi
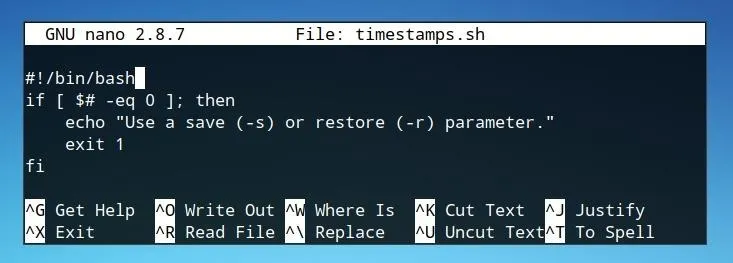
After we save this file, by pressing Ctrl+O in nano, we should mark it as a script which can be run. We can do this with chmod.
chmod +x timestamps.sh
Next, we can run the script with no arguments in order to test the functionality of our error message.
./timestamps.sh

If the script returns our echo statement, we're ready to move on to the next condition.
Writing Timestamps to a File
We'll begin by defining an if statement which will occur only if the user input matches the defined flag.
if [ $1 = "-s" ] ; then
fi
The first line defines the condition for the if statement as if the user input, $1, is equal to "-s" then it should do the sequence of steps within the if statement. As stated in our error statement, the "-s" flag indicates that the script will be run in the "save" function. We can now begin to write what this part of the script actually involves.
The first line should remove, or at least check the existence of, the file which we plan to save the timestamps to. While this could be avoided by using a unique filename, and improved by using a hidden file as prefaced with a period in the filename, it's still ideal to remove the file if it exists. This will avoid accidental overlap or incorrect inputs if the file previously had any sort of content within it.
rm -f timestamps;
This line will remove a file named "timestamps" if that file exists. Next, we'll want to use ls in order to begin generating a list of files and their modification times. We can run ls and pipe its output to another program, such as sed, to help us clean this input later.
ls -l
We'll want to limit the output from ls to only what we need. When running ls -l, the output generally appears similar to the string below.
-rw-r--r-- 1 user user 0 Jan 1 2017 file
For the purposes of saving timestamps, we only need the year, month, day, and filename. While we could attempt to remove everything before the three-letter month abbreviation based on the number of spaces or characters before it, we can be absolutely certain of where we choose to discard unnecessary information by looking for a specific string, such as a month. The string below will remove everything on a line before the occurrence of Jan.
ls -l file | sed 's/^.*Jan/Jan/p'
However, while we now have all of the information we need for our program, it's not in a useable format. For using touch to set the modification times, the months should be in a format of numbers rather than three-letter abbreviations. We can modify this inline by changing the second string within the sed command below.
ls -l file | sed 's/^.*Jan/01/p'
Here, Jan is replaced with 01 in addition to everything before it on the line being replaced. We can extend this system to all other possible months.
ls -l | sed -n 's/^.*Jan/01/p;s/^.*Feb/02/p;s/^.*Mar/03/p;s/^.*Apr/04/p;s/^.*May/05/p;s/^.*Jun/06/p;s/^.*Jul/07/p;s/^.*Aug/08/p;s/^.*Sep/09/p;s/^.*Oct/10/p;s/^.*Nov/11/p;s/^.*Dec/12/p;'
Now, if run within a folder, our output should look similar to below.

This output is usable for our script, so we can add it and send the input to a file with the >> redirection. In this case, output is sent to a file named "timestamps."
do echo $x | ls -l | sed -n 's/^.*Jan/01/p;s/^.*Feb/02/p;s/^.*Mar/03/p;s/^.*Apr/04/p;s/^.*May/05/p;s/^.*Jun/06/p;s/^.*Jul/07/p;s/^.*Aug/08/p;s/^.*Sep/09/p;s/^.*Oct/10/p;s/^.*Nov/11/p;s/^.*Dec/12/p;' >> timestamps
Now, the first two possible actions of the script should be completed, and it should look similar to the image below.

We can test the script by running it with the -s flag we have now defined.
./timestamps.sh -s
After running the script, we can check that the information was saved using cat.
cat timestamps

If a list of times and filenames is returned, we're ready to move on to writing the final part of the script.
Restoring Timestamps to Files
After saving the original timestamps of items within a directory, the post-exploitation function of the script is to restore the timestamp backups to the files such that nothing is changed. The first step of defining this behavior is to begin with an if statement for the new flag, as in the previous section.
if $1 = "-r" ; then
fi
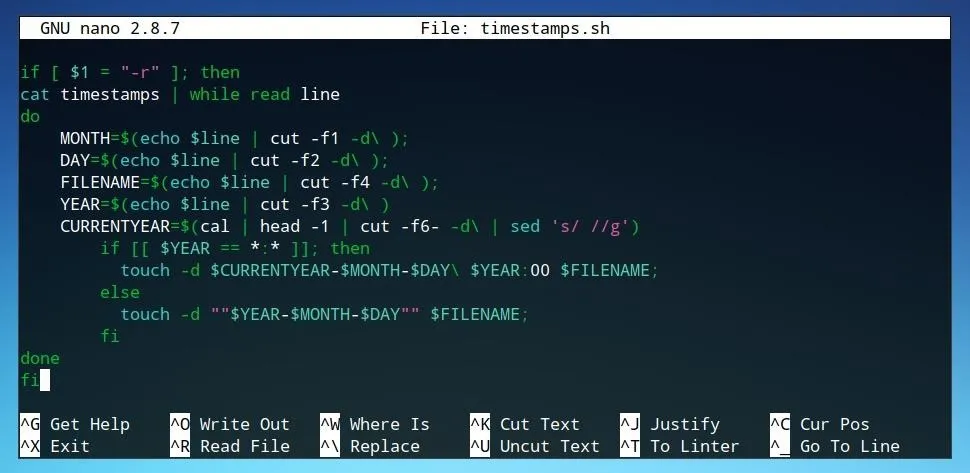
In this case, the "-r" flag is used. Next, we'll want to read in our file of saved timestamps in a way where we can do an action for each line. We can forward the contents of the text file using cat, and use this input in a while read statement. This will be enclosed within the previous if statement.
cat timestamps | while read line
do
done
Anything we do following these lines will be run for each single line of the file independently. Now we can assign some variables to make using the data within the file more simple.
MONTH=$(echo $line | cut -f1 -d\ );
DAY=$(echo $line | cut -f2 -d\ );
FILENAME=$(echo $line | cut -f4 -d\ );
YEAR=$(echo $line | cut -f3 -d\ )
These lines each use a cut statement based on the location of a given element of the string, specifically its reference point to the number of spaces separating them.
While these four variables are all relatively consistent in the way which they are formatted in the saved timestamps file, there is some variation in the way which years and times are formatted. If a timestamp occurred within the past year, it prints the hour rather than the year.
As such, when we only have a time in hour and minutes, we'll need to be able to determine the current year as well. While we could just assign this to the year in which we're writing the script, we can also return it from the system.
One integrated Unix utility for this purpose is cal, or calendar. We can launch this from the command line.
cal
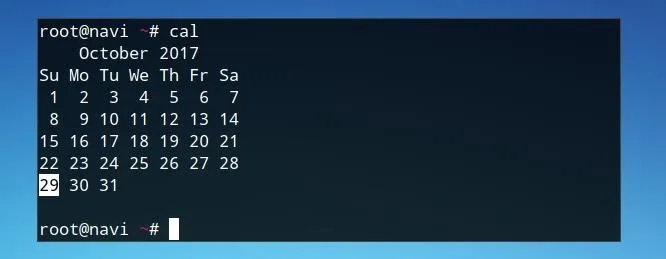
The current year is shown in the first line of the program's output. We can retrieve this as a variable with the line below.
CURRENTYEAR=$(cal | head -1 | cut -f6- -d\ | sed 's/ //g')
We run cal, retrieve only the first line using head, cut it according to what we need using cut, and finally trim unwanted output using sed.

Now that all variables are defined, we can use an if else statement to update the timestamps on files according to the way the date is formatted. We'll use the same touch syntax with the -d parameter as before.
touch -d "2001-01-01 20:00:00" file
Rather than before, however, each of these will be fulfilled by a variable rather than a defined setting. The first if statement will handle dates with times in hours and minutes. These times each contain a colon, so if the input includes a colon it will react accordingly.
if [ $YEAR == *:* ]; then
touch -d $CURRENTYEAR-$MONTH-$DAY\ $YEAR:00 $FILENAME;
If not, we can finish this with an else statement for the normal touch behavior and close the if statement.
else
touch -d ""$YEAR-$MONTH-$DAY"" $FILENAME;
fi
The code for this section now should appear similar to the image below.
With the restoration function completed, the script is now ready to use.
Using the Script
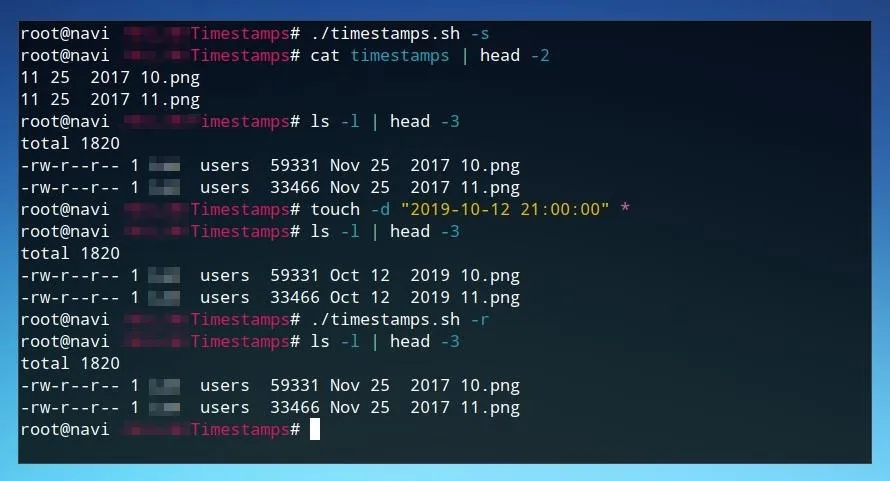
Using the script is as simple as using it with the appropriate flag. The command below saves file timestamps.
./timestamps.sh -s
We can run this first, and if we wish, check the created timestamps file to confirm. After this, we can run a command like the one below in order to manipulate the timestamps for all files within a directory.
touch -d "2050-10-12 10:00:00" *
We can confirm that these files were modified with ls.
ls -a
Now that they've been modified, we can restore them to our backed up version.
./timestamps.sh -r
Finally, we can confirm that this process worked by running ls -a once more. If the timestamps now match those defined in the backup file, the script has worked successfully!
Timestamps Can Lie
This script considers just some of the many fragments and traces which will be left after an attack on a server. When considering how to hide one's traces, hackers must consider every single way and point at which they had accessed or manipulated a server.
A clever attack treads carefully and keeps track of what has been modified, considering how to hide these tracks before they even touch a server. A system administrator must be aware both that many of their logs and protective measures can be manipulated, and they must not always trust that things are secure just because they look like they did previously.
Thanks for reading! If you have any questions, you can leave a comment below or on Twitter at @tahkion.
- Follow Null Byte on Twitter and Google+
- Follow WonderHowTo on Facebook, Twitter, Pinterest, and Google+
Cover image by Kin Lane/Flickr; Screenshots by Takhion/Null Byte


Comments
Be the first, drop a comment!