


A powered-off MacBook can be compromised in less than three minutes. With just a few commands, it's possible for a hacker to extract a target's password hash and crack it without their knowledge.
The goal in this article is to acquire a target's .plist file which contains their hashed password. Then, using a Python script to convert the .plist file into a format Hashcat can interpret, it's brute-forced it to reveal the password. The simplest method for performing this attack requires physical access to the target MacBook, recovery mode, a USB flash drive, another MacBook, and Hashcat.
It's also possible to leave out the USB flash drive and attacker's MacBook by instead creating a temporary user on the target MacBook where the commands can be performed. The temporary user can then be deleted when done. For this guide, however, we will show the USB flash drive method.
Recovery mode is one of several startup modes supported by Mac devices. It includes a number of tools for reinstalling macOS, resetting account passwords, and configuring a firmware password. While this feature was designed to aid users locked out of their account and wipe the internal hard drive, it's often abused by hackers attempting to gain unauthorized access to sensitive files.
Since Mojave 10.14, macOS no longer allows users (not even root) to modify the .plist files containing hashed passwords while the operating system is running. This data can now only be acquired using recovery mode.
- Don't Miss: How to Dump Passwords Stored in Firefox Browsers
The USB flash drive is required to move the target's .plist file from their MacBook to the attacker's. The USB flash drive used in this tutorial is FAT32 formatted, but NTFS and APFS formats should work as well.
There are a few macOS-specific commands in the featured Python script that make it easy to convert the .plist file into a format Hashcat can interpret. This is why another MacBook (or at least another account on the target MacBook) is needed.
To figure out the target's Mac password without changing it, the hash will need to be brute-forced and cracked. MacOS does an excellent job of securing the target's password. It's not possible to view user passwords in plain-text. CPU-based cracking solutions (like JohnTheRipper) will literally take decades to crack a single hash and are therefore not effective. Hashcat with a decent GPU is highly recommended.
Enter Recovery Mode
To access recovery mode, first, make sure the target MacBook is fully powered off. Then, press the power button while holding Command + R on the keyboard. After about 30 seconds, the Apple logo will appear and the Command + R keys can be released. If the below screen appears, recovery mode was enabled successfully and readers can proceed to the next step in this tutorial.
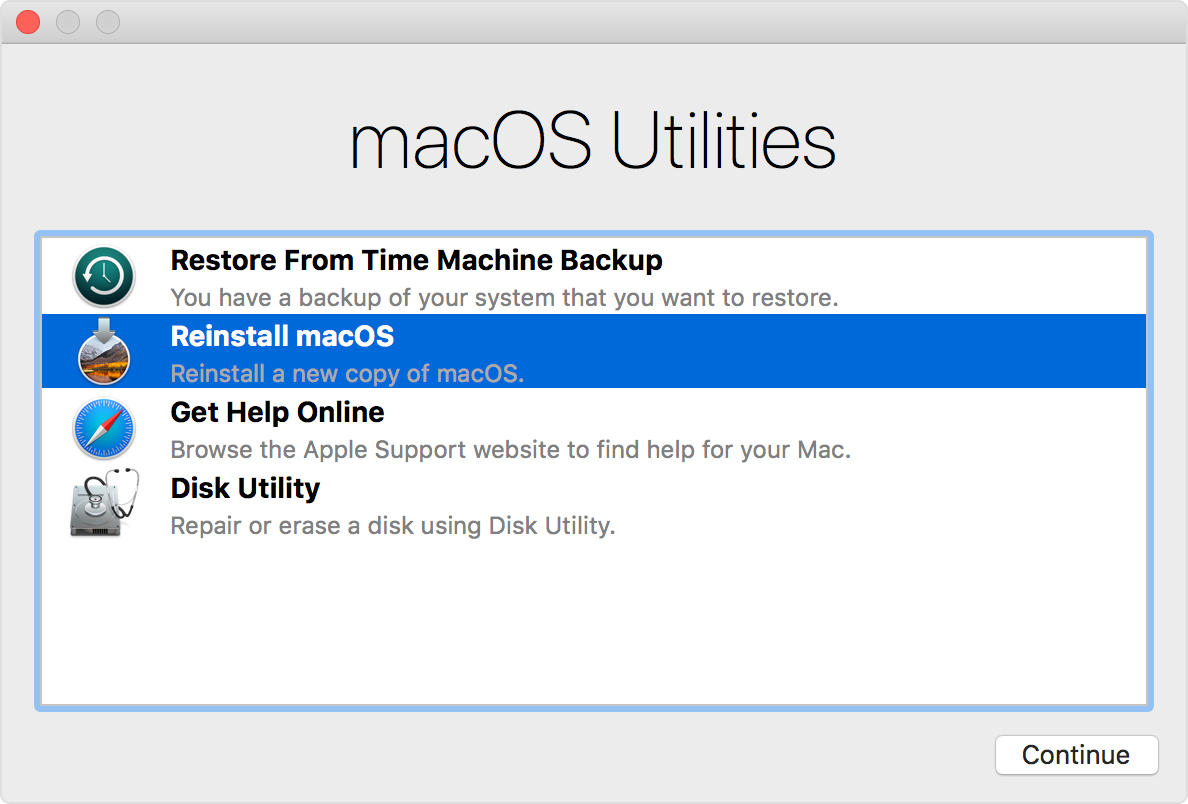
If the MacBook requests a password, it means the firmware is protected and configured to prevent recovery mode attacks. Unfortunately, this means the target MacBook isn't vulnerable to the attack shown in this article.
Disable SIP (Conditional)
Apple's System Integrity Protection (SIP) is a security feature designed to restrict parts of macOS from being modified. Since Mojave, the /var/db/dslocal/nodes/Default/ directory is within the scope of SIP's protection and will return an "Operation not permitted" message if anyone attempts to view it. It even prevents root users from changing and accessing select directories.
In one test, I found the Default/ directory couldn't be viewed or modified even in recovery mode. This was a bit of an anomaly as other tests allowed access to Default/ without first disabling SIP.
To find out if SIP needs to be disabled, open a Terminal while in recovery mode. In the menu bar at the top of the screen, select "Utilities," then "Terminal." Then, use the below ls -R command.
ls -R /Volumes/<hard drive name>/var/db/dslocal/nodes/Default/This command will attempt to recursively (-R) list files in the Default/ directory. If the output returns many .plist files, don't disable SIP and proceed to the next step in this tutorial. If the output returns "Operation not permitted," disable SIP using the below csrutil command.
csrutil disable

Successfully disabled System Integrity Protection. Please restart the machine for the changes to take effect.
After the restart prompt appears, shutdown and boot into recovery mode again. With SIP disabled, it's safe to proceed to the next step in this tutorial.
Extract the Target Plist
Insert the USB flash drive into the target MacBook. Wait a few seconds to allow it to auto-mount. Then, copy the desired .plist file to the USB drive using the below cp command. The target .plist will use the target's username (e.g., tokyoneon.plist).
cp /Volumes/<hard drive name>/var/db/dslocal/nodes/Default/users/<username>.plist /Volumes/<usb name>/Be sure to change the
That's it. The necessary file has been extracted, the target MacBook can be shut down, and the remainder of the tutorial requires a separate MacBook owned by the attacker. If SIP was disabled in the previous step, re-enable it before shutting down with the below command.
csrutil enableCopy the Plist to the Attack's Machine
Using the attacker's MacBook, insert the USB flash drive containing the target's .plist and copy (cp) it to the /tmp/ directory. The /tmp/ directory is hardcoded into the Python script in the next step to make it generic enough for all readers to follow along. As long as the target's .plist file is in the /tmp/ directory, the Python script will be able to convert it into a hash.
cp /Volumes/<usb name>/<username>.plist /tmp/Download & Execute the Hashdump Python Script
The Python script used to convert the extracted .plist file into Hashcat's preferred format was taken from the Empire framework and can be found on GitHub. Open a Terminal and download the hashdump script with the following curl command. The -o argument will save the script with the "hashdump.py" file name.
curl 'https://raw.githubusercontent.com/tokyoneon/hashdump.py/master/hashdump.py' -o hashdump.pyThen, give the script permission to execute using the chmod command.
chmod +x hashdump.pyFinally, execute the hashdump.py script with root privileges.
sudo python hashdump.py

[('tokyoneon', '$ml$27548$ba6261885e349ecb847854136cf32e9561cd1af65616f7ce11abb3f04786729c$88ad7849c5b30cce20b9d6ecde9e5be3b6736646965e0414d45d40510a574f864bafd9c5dc06fdb3cb189b877c3aa1312c2e4497ea854d3653f5861365d41a4250042a78c93dace17d212ccbb6584e3350efe95bd138f27b1705ad97166d2f11fb749b6138139a9e1ebeecb1a96750db53dbf75434c4b320b500589fa64bf5f8')]
Remove text surrounding the hash (shown below) and save it to a file called "hash.txt." Then, move hash.txt to the Hashcat machine.
$ml$27548$ba6261885e349ecb847854136cf32e9561cd1af65616f7ce11abb3f04786729c$88ad7849c5b30cce20b9d6ecde9e5be3b6736646965e0414d45d40510a574f864bafd9c5dc06fdb3cb189b877c3aa1312c2e4497ea854d3653f5861365d41a4250042a78c93dace17d212ccbb6584e3350efe95bd138f27b1705ad97166d2f11fb749b6138139a9e1ebeecb1a96750db53dbf75434c4b320b500589fa64bf5f8Crack the Hash
To crack the target's hash with Hashcat, use the below command.
hashcat -a 0 -m 7100 /path/to/hash.txt /path/to/wordlists/passwords.txt -w 4 --potfile-path /tmp/cracked_hash.potThe dictionary attack, or "straight mode," is specified using the -a 0 argument. The macOS-specific hashing mode is enabled using the -m 7100 argument and is required for all macOS hashes extracted from version 10.8 or later. To improve Hashcat's overall performance, set the -w (or --workload-profile) to 4, to maximize the cracking speed. Finally, the --potfile-path argument is used to save the cracked hash to the specified file.
It's also possible to perform hybrid attacks where digit combinations are appended to the end of every word in the wordlist. For example, "password12" and "password77."
hashcat -a 6 -m 7100 /path/to/hash.txt /path/to/wordlists/everyword.txt ?d?d -w 4 --potfile-path /tmp/db.potThe hybrid-attack is enabled with the -a 6 argument. This time an "everyword" wordlist containing 479,000 English words is used in combination with ?d?d which tells Hashcat to append every possible two digits combination to each password in the wordlist. To append three or four digits, use "?d?d?d" and "?d?d?d?d" respectively.
- Don't Miss: How to Hack WPA2 Wi-Fi Passwords Using USB Drops
While Hashcat is running, the below data will be displayed. If the password is guessed correctly, it will appear at the bottom of the terminal and Hashcat will stop.
Session..........: hashcat
Status...........: Running
Hash.Type........: macOS v10.8+ (PBKDF2-SHA512)
Hash.Target......: $ml$27548$ba6261885e349ecb847854136cf32e9561cd1af65...d41a42
Guess.Base.......: File (/root/wordlists/passwords.txt)
Guess.Queue......: 1/1 (100.00%)
Speed.Dev.#1.....:     7740 H/s (98.63ms) @ Accel:256 Loops:64 Thr:512 Vec:1
Recovered........: 0/1 (0.00%) Digests, 0/1 (0.00%) Salts
Progress.........: 0/329968 (0.00%)
Rejected.........: 0/0 (0.00%)
Restore.Point....: 0/329968 (0.00%)
Candidates.#1....: 123456 -> zzzzzzzz9
HWMon.Dev.#1.....: Temp: 57c Fan: 31% Util:100% Core:1873MHz Mem:3802MHz Bus:16

[s]tatus [p]ause [b]ypass [c]heckpoint [q]uit =>
Hash Cracking Considerations
Determining how long a hash will take to crack is difficult to speculate. Dictionary and hybrid attacks can take a varying amount of time, based on a few factors.
- Wordlist length — Obviously, a wordlist containing billions of words may take hours, days, or even months to complete. When performing brute-force attacks against macOS hashes, a small wordlist, specific to the target, is recommended.
- Hash iterations — Not all macOS hashes are created equal. Hash iterations are used as a "slowdown factor," which essentially forces CPUs and GPUs to take significantly longer when computing a single password attempt. The number of iterations varied in my tests against Mojave and High Sierra. In some cases, the iterations were set to 27,000. Other times, over 45,000. Whether this value is set at random or specific to each version of macOS isn't clear from my round of tests. One thing is certain, the higher this value is, the longer Hashcat will have to work to crack a single hash. Higher iterations could be the difference between 25,000 and only 1,000 password attempts per second. To identify the number of iterations used in the extracted .plist, have a look at the target's hash again (shown below). At the start of the hash, between the second and third dollar signs ($), the number of iterations (27,548) can be found.
$ml$27548$ba6261885e...- GPU model — With an old GeForce GTX 1060 graphics card and a hash with 27,548 iterations, it's possible to perform ~8,000 password attempts per second. The type of GPU used will drastically affect the overall performance of the attack. GPUs older than the GTX 750ti are not recommended.
How to Protect Yourself from Recovery Mode Attacks
There are a few things users can do to defend against such attacks (see below). For general macOS protection advice, check out "The Ultimate Guide to Hacking macOS."
- Enable firmware password protection. To prevent attacker's from booting into a live USB, single-user mode, or recovery mode, set a firmware password. The firmware will only prompt for an additional password at boot if someone attempts to boot the MacBook into single-user, startup manager, target disk, or recovery modes. A firmware password alone, however, will not protect the hard drive in the event the disk is physically removed from the MacBook. For more protection, enable hard drive encryption.
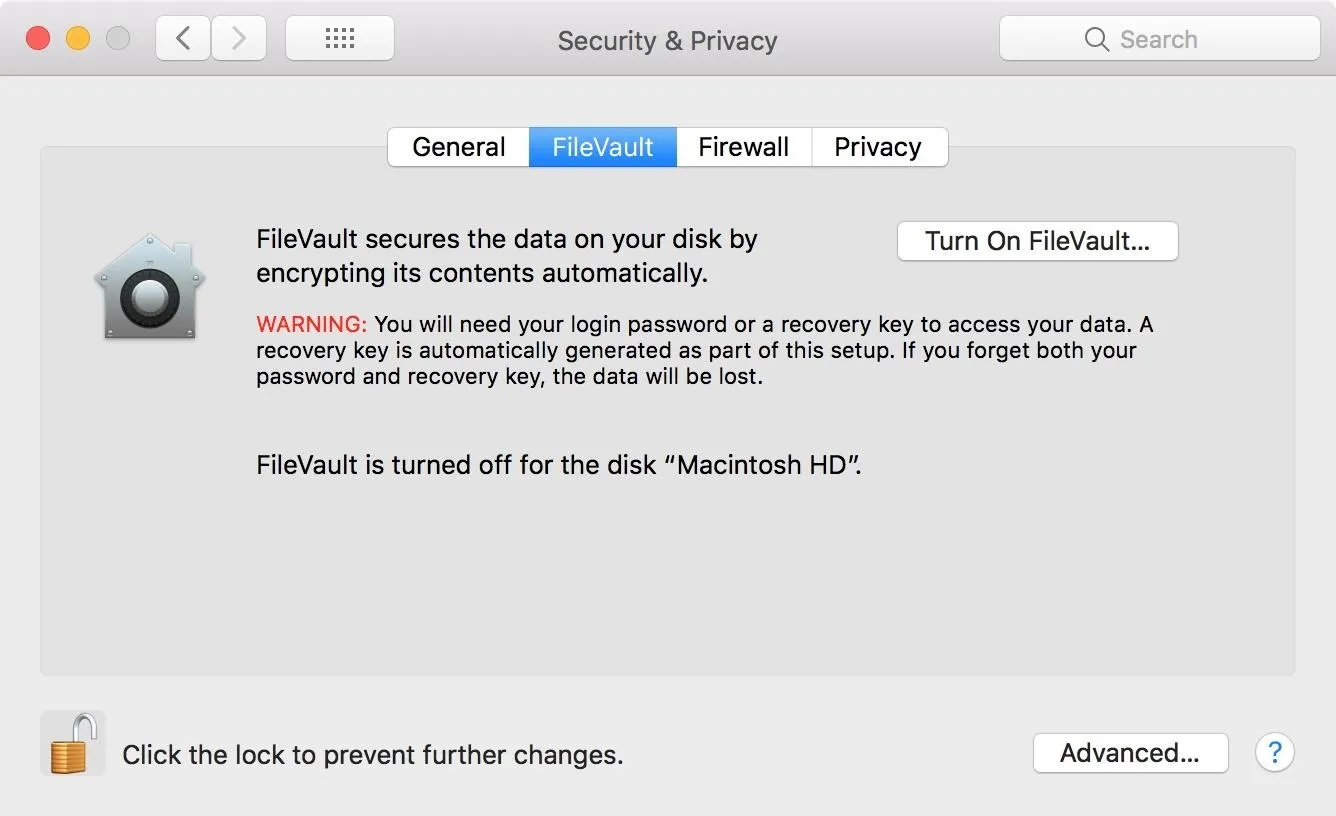
- Enable FileVault encryption. FileVault can be enabled by navigating to "System Preferences," then "Security & Privacy," and clicking "Turn On FileVault" (you may need to unlock the settings first). When it completes, the MacBook will restart and require a password to unlock the computer every time the Mac starts up. No account will be permitted to log in automatically and accessing single-user mode will also require a password. This is the best way to prevent attacks against the encrypted disk even if it's physically removed from the laptop. A complex passphrase over 21 characters in length is recommended to protect against attackers with dedicated brute-force hardware.
Until next time, follow me on Twitter @tokyoneon_ and GitHub. And as always, leave a comment below or message me on Twitter if you have any questions.
- Follow Null Byte on Twitter, Flipboard, and YouTube
- Sign up for Null Byte's weekly newsletter
- Follow WonderHowTo on Facebook, Twitter, Pinterest, and Flipboard
Cover photo by Wes Hicks/Unsplash; screenshots by tokyoneon/Null Byte (unless otherwise noted)


Comments
Be the first, drop a comment!