When using Linux, we often need to install new software, a script, or numerous large files. To make things easier on us, these files are usually compressed and combined together into a single file with a .tar extension, which makes them easier to download, since it's one smaller file.
As a Linux user, we need to understand how to decompress .tar files and extract what is in them. At the same time, we need to understand how to compress and combine these files into a .tar when we need to send files.
Those of you who come from the Windows world (most of you), are probably familiar with the .zip format. The .zip utility built into Windows lets you take several files and combine them into a single folder, then compress that folder to make it smaller for transferring over the internet or removable storage. The process we are addressing here in this tutorial is the equivalent of zipping and unzipping in the Windows world.
What Is Compression?
Compression is an interesting subject that I will have to expand upon in another tutorial at a later time. Basically, there are at least two categories of compression: lossy and lossless.
Lossy compression loses the integrity of the information. In other words, the compressed/decompressed file is not exactly the same as the original. This works great for graphics, video, and audio files where a smaller difference in the file is hardly noticed (.mp3 and .jpg are both lossy compression algorithms).
When sending files or software, lossy compression is not acceptable. We must have integrity with the original file when it is decompressed. That's the type of compression we are discussing here (lossless), and it is available from a number of different utilities and algorithms.
(More on all of this in a later tutorial.)
Tarring Files Together
In most cases, when archiving or combining files, the tar command is used in Linux/Unix. Tar stands for tape archive, a reference to the prehistoric days of computing when systems used tape to store data. Tar is used to create one single file from many files. These files are then often referred to as an archive, tar file, or tarball.
For instance, say we had three files, nullbyte1, nullbyte2, and nullbyte3. We can clearly see them below when we do a long listing.
kali > ls -l

Let's say we want to send all three of these files to a friend. We can combine them together and create a single archive file by using the following command:
kali > tar -cvf NB.tar nullbyte1 nullbyte2 nullbyte3
Let's break down that command to better understand:
- tar is the archiving command
- -c means create
- -v means verbose (optional)
- -f write or read from the following file
- NB.tar is the new file name we want

This will take all three files and create a single file, NB.tar, as seen below, when we do another long listing of the directory.

Please note the size of the tarball. When the three files are archived, tar uses significant overhead to do so. The sum of the three files before archiving was 72 bytes. After archiving, the tarball has grown to 10,240 bytes. The archiving process has added over 1,000 bytes. Although this overhead can be significant with small files, this overhead becomes less and less significant with larger and larger files.
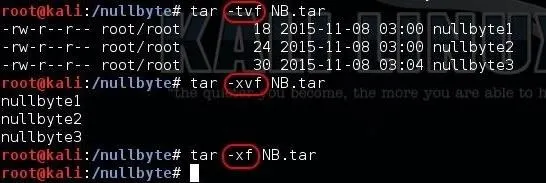
We can then display those files from the tarball by using the tar command, then the -t switch to display the files, as seen below.
kali > -tvf NB.tar

We can then extract those files from the tarball by using the tar command and then the -x switch to extract the files, as seen above.
kali > tar -xvf NB.tar
Finally, if we want to extract the files and do so "silently," we can remove the -v switch, and tar extracts the files without showing us any output.
kali > tar -xf NB.tar
Compressing Files
Tar is capable of taking many files and making them into one archived file, but what if want to compress those files, as well? We have three commands in Linux capable of creating compressed files:
They all are capable of compressing our files, but they use different compression algorithms and have different compression ratios (the amount they can compress the files).
Using Gzip
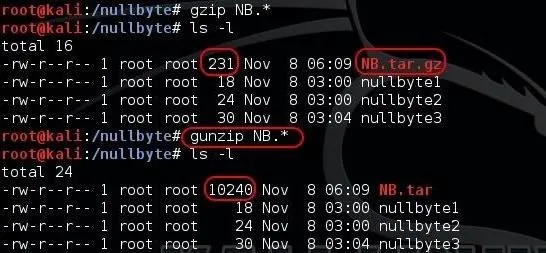
Let's try gzip (GNU zip) first, as it is the most commonly used compression utility in Linux. We can compress our NB.tar file by typing:
kali > gzip NB.*
Notice that I used the wild card (*) for my file extension meaning that the command should apply to any file that begins with "NB" with any file extension. I will use similar notation for the following examples. When we do a long listing on the directory, we can see that it has changed the file extension to .tar.gz, and the file size has been compressed to just 231 bytes!

We can then decompress that same file by using the gunzip (GNU unzip) command.
kali > gunzip NB.*
When we do, the file is no longer saved with the .tar.gz extension, and has now returned to its original size of 10,240 bytes.
Using Bzip2
One of the other widely used compression utilities in Linux is bzip2. It works similarly to gzip, but with better compression ratios. We can compress our NB.tar file by typing:
kali > bzip2 NB.*

As you can see in the screenshot above, bzip2 has compressed the file down to just 222 bytes! Also note that the file extension now is .tar.bz2.
To uncompress the compressed file, use bunzip2 (b unzip 2).
kali > bunzip2 NB.*

When we do, the file returns to its original size and its file extension returns to .tar.
Using Compress
Finally, we can use the command compress to compress the file. This is probably the least commonly used compression utility, but it is easy to remember.
kali > compress NB.*

Note in the screenshot above that the compress utility reduced the size of the file to 395 bytes, almost twice the size of bzip2. Also note that the file extension now is .tar.Z (with a capital Z).
To decompress the same file, use uncompress or the gunzip command.
kali > uncompress NB.*
Untarring & Uncompressing VMware Tools
Now that we have a basic understanding of these tools, let's use them in a real world example. Many of you, including myself, using VMware Workstation as a virtualization system. It allows you to run many operating systems on a single physical machine. No one does this better than VMWare.
If you are using VMware Workstation, you probably know that VMware encourages you to download and install its VMware tools. When you install VMware tools, your guest operating system integrates much better into your host operating system, which includes better graphics performance, drag-and-drop capability, shared folders, and better mouse performance, among other things.

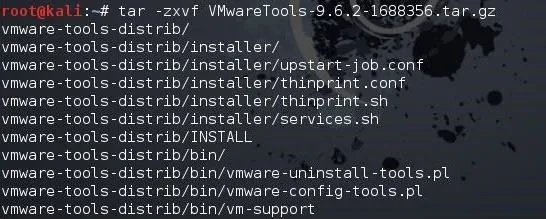
Now that we have downloaded VMware tools, you can see that it is a tarball and compressed with gzip. We know this because it has file extension of .tar.gz. So, to decompress it and separate each of the files so that we can use them, we can use the following command:
kali > tar -xvzf VMwareTools-.9.6.2-1688356.tar.gz
Let's break down that command to better understand:
- tar is the archiving command
- -x means extract
- -v means verbose output
- -z is used to decompress
- -f directs the command to the file that follows

When we hit enter, the compressed tarball is decompressed and extracted. Hundreds of files are extracted and decompressed from this VMware tarball. Now, we need to only run the script to install these tools.
Archiving and compressing are key Linux skills that any hacker/administrator must understand when using Linux. We will continue to explore the Linux basics in this series, so keep coming back, my aspiring hackers!
- Follow Null Byte on Twitter, Flipboard, and YouTube
- Follow WonderHowTo on Facebook, Twitter, Pinterest, and Flipboard
Cover image by McCarony/Shutterstock; Screenshots by OTW/Null Byte


Comments
Be the first, drop a comment!