While hackers know and love the Raspberry Pi, many don't know of its cheaper cousin, the microcontroller. Unlike a Pi, which can be used more or less like a regular computer, microcontrollers like the Wi-Fi connected ESP8266 require some necessary programming skill to master. In this guide, we'll build an Arduino program from scratch and explain the code structure in a way anyone can understand.
Raspberry Pi vs. ESP8266
The Raspberry Pi is a small, single-board computer first created in the United Kingdom in 2012 that changed the way people thought about what a computer can be. With a massive community of loyal fans and excellent documentation, part of the magic of the Pi is how easy it is to get started. Aside from Raspberry Pi's unusual appearance compared to a traditional PC, it functions more or less like most of the computers you've used in the past.
The significant difference between a Raspberry Pi and a full-blown computer is mostly in the ARM processor the Raspberry Pi uses. Aside from that, the Pi will boot an operating system the same way most computers are expected to. Operating systems like Windows, Linux, and macOS provide intuitive interfaces for humans to interact with in real time, and this is one of the things that sets MCUs apart.
Rather than load an operating system, MCUs get right to business. Code that we write for the Arduino is loaded directly onto the device and runs each time we power it on. We write some code that tells the microcontroller to do something and then load those instructions onto the device using a program like Arduino IDE. It might seem more limiting than having a full operating system at your disposal, but microcontrollers are capable of doing some pretty amazing things in clever ways.
The ESP8266 can be controlled via a web interface or mobile application to make it easy to manipulate, permitting a fancy GUI interface even on a device with no screen. Microcontrollers allow a hacker to decide what they need the device to do, write down the instructions, and have a working prototype in no time at all.
Code Structure of the Arduino
Unlike simply writing a Python program, writing code for microcontrollers will require us to learn a few new rules. The first is the way this code is structured, which allows us to use a simple device to do relatively complicated things. Because we don't have an operating system to do things for us, we'll need to do some things that an OS usually takes care of.
First, we'll be using the Arduino programming language, which is virtually identical to C++ in the way it works. That means we'll need to explicitly state variables we'll be using later on in our code and run some other functions to configure the hardware pins for input or output. To do this, we'll include a section just for declaring variables we'll be needing to use later.
Next, we can separate our code into two different main types. The first type is code that will run only once, which usually will set the pins to the correct mode and take care of other one-time tasks. The second is code that will repeatedly run, which is used to decide on how the microcontroller will react to its environment.
Setup Function
Code designed to run only once will often take care of critical setup functions like ensuring any pins you are using are set to the correct mode. The way that we do this is using what's called a void function, which means a function that doesn't return anything specific. Usually, when we call a function, we expect some value in response. Instead, this function will be responsible for setting up things we'll be relying on later.
To create the void setup function, we add a () at the end of "setup" to indicate that it's a function. After that, we use a { symbol to tell the program we're starting the instructions we want to run in setup, and a } symbol to tell the program when the setup function is done. Between these two symbols, we can add whatever code we want to run the first time.
In this example, I set pin 4 to output mode using the setup void function.
void setup()
{
  pinMode(4, OUTPUT);
}
What the instructions are saying here is that during setup, we want to set the mode of pin 4 to output. Once done, we can decide what we want to do with that pin in the loop portion of our code.
Loop Function
The loop function is where the primary logic of your code will live. This is anything that needs to run all the time, like checking a sensor, running a pattern over and over, or waiting for a specific trigger. Because of how fast a microcontroller operates, the loop function may execute many times per second, depending on how much it's doing.
The loop function is similar to the setup function, in that they are both void functions designed to hold the logic of your code. The formatting will be the same, but allow us to call functions or change the output to pins we defined earlier based on conditions we set in the loop.
In the example below, we'll switch on and off an LED, which would only be possible if pin 4 had been previously set to output mode in our setup() function.
void loop(){
  digitalWrite(4, HIGH);
  digitalWrite(4, LOW);
}
If we want to define a function and call it later in the loop, we can easily do so. To create a function that blinks an LED on and off in a particular pattern, we could write a function called blink() that contains the instructions, and then call blink() any time we detect a sensor attached to an input pin being triggered. Even though the blink() function is defined at the beginning of the code and not in the loop, it can be called in the loop function at any time.
Functions, Pin Modes & Delays
One of the best and most exciting parts of using microcontrollers is adding input and output devices. By connecting hardware to the pins of our Arduino device, we can control LEDs, read sensors, and combine to two in useful ways. A perfect example would be to create a simple motion alarm by setting a pin to input for reading the status of a motion sensor and setting a pin to output for sounding a buzzer when we detect motion nearby.
To do this, we'll need to use functions. Functions let us pack code that we'll run more than once into easy to reuse blocks. Some functions are built into Arduino, and some we'll need to create ourselves. For using hardware pins, we'll use built-in functions to decide whether we want the pins to operate as the input or output pins. Doing so is easy, as we need to tell the function the number of the pin we want to control, and which mode we want to switch it to.
Another thing to keep in mind when programming microcontrollers are delays. Microcontrollers work incredibly fast, and without delays, it can be hard for humans to see what is going on. We'll explore an example of this today while turning an LED on and off. In the code below, we're trying to blink an LED on and off, but there is a mistake that might not be obvious.
digitalWrite(4, HIGH);
delay(1000);
digitalWrite(4, LOW);
If we were to run this code to turn on an LED attached to pin 4, the LED would appear to stay on continuously, even though we're telling it to turn the light on, stay on for a second, and then turn off. Why?
Because of how fast the microcontroller works, the LED only stays off for a tiny fraction of a second. Without adding a second delay to tell the program how long we want the LED to stay off, the LED will appear to stay on forever. Delays are critical to working with microcontrollers, and we'll practice with them today while writing our code.
It might seem like a lot, but we're going to start with something simple so we can see how all the moving pieces work. To start, we'll create some code to control an LED, although this could also control an output like a laser module or piezo buzzer.
What You'll Need
To follow along, you'll only need a few basic materials. The setup is very flexible.
First, you need a breadboard (Amazon) to connect everything. You can either get a cheap $1 to $10 breadboard (Alibaba | Sparkfun) that you'll need to plug a microcontroller into or a fancier $45 STEMTera breadboard (Amazon | Sparkfun) that allows you to use an integrated Arduino for easy programming. If you're low on money or planning to work with microcontrollers that need Wi-Fi, grab the cheap breadboard.
Next, if you didn't get a STEMTera board, you'll need a microcontroller. While many people use devices like an Arduino Uno (Amazon), I like ESP8266-based devices (Amazon). Similar to a Raspberry Pi, these MCUs have a large community of enthusiastic developers, making troubleshooting working with them a lot easier. When selecting a device, I recommend using either a NodeMCU (Amazon) or a D1 Mini (Amazon).
The NodeMCU comes in several different versions. The least useful is a NodeMCU v3 (Alibaba | Amazon), which has an extremely inconvenient width for using with a breadboard. The NodeMCU v1, sometimes called V2 (Alibaba | Amazon) is slim and fits easily on a breadboard, so be sure to purchase the v1 rather than the space-hogging v3 which won't give you the space to connect anything else.
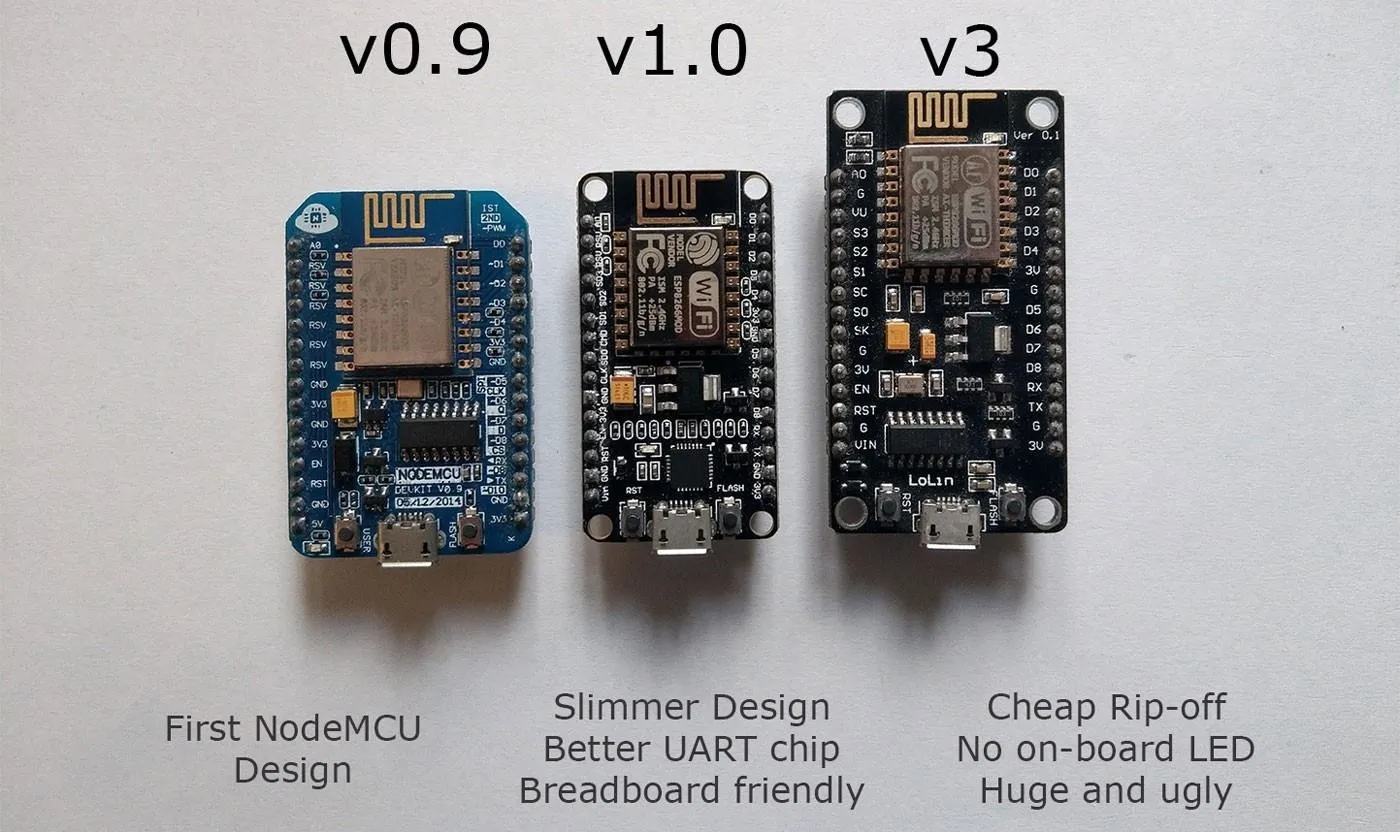
A visual guide to the different versions of NodeMCUs.
The other difference is in the UART chip, which allows you to connect to the device with a Micro-USB cable (Amazon). Cheaper devices will use the CH340 chip to do this, requiring you to download and install additional drivers to use. These boards are useful because they also can be connected to Wi-Fi. If Bluetooth is more your thing, ESP32 boards (Alibaba | Amazon) have Wi-Fi, Bluetooth, and can be programmed the same way, but are more expensive as a result.
Keep in mind, some of these boards do not come with pins soldered. If you get a cheap D1 Mini or the ESP32 board, you can expect to solder the pins on yourself. If you don't want this, the NodeMCU might be a better choice to start.
After we have our microcontroller and breadboard, we'll need jumper wires (Amazon). If you end up getting a breadboard kit, it may already come with jumpers. Also, we'll need between one and three pairs of resistors and LEDs (Amazon). It'd be one resistor per LED to ensure we don't burn out our LED prematurely, but if you're using a microcontroller that runs on 3.3-volt logic like the ESP8266, it's less of a concern. A STEMTera board runs on 5-volt logic, so it's more important when working with that or other 5-volt devices.
For resistors, you can use a resistor with a value of between 220 to 330 ohms. A higher amount of resistance will make your LED dimmer, while a lower value makes it brighter but dies faster. You can decide how bright you want your LED to be versus how long you want it to live to decide which is right for you.
There are kits you can buy (Amazon) that contain everything (and more) that you'll need for this guide, except for the microcontroller itself.
Connect Your Hardware
To start, we're going to control a single LED, and later on, we can connect more to begin doing multiple things at once. The basic setup will be to connect the digital pin we want to control to an LED by way of a resistor, and then attach the other pin of the LED to the ground pin of our microcontroller.
If you're using a microcontroller like the D1 mini or the NodeMCU, plug it into your breadboard and connect a wire to pin D3.
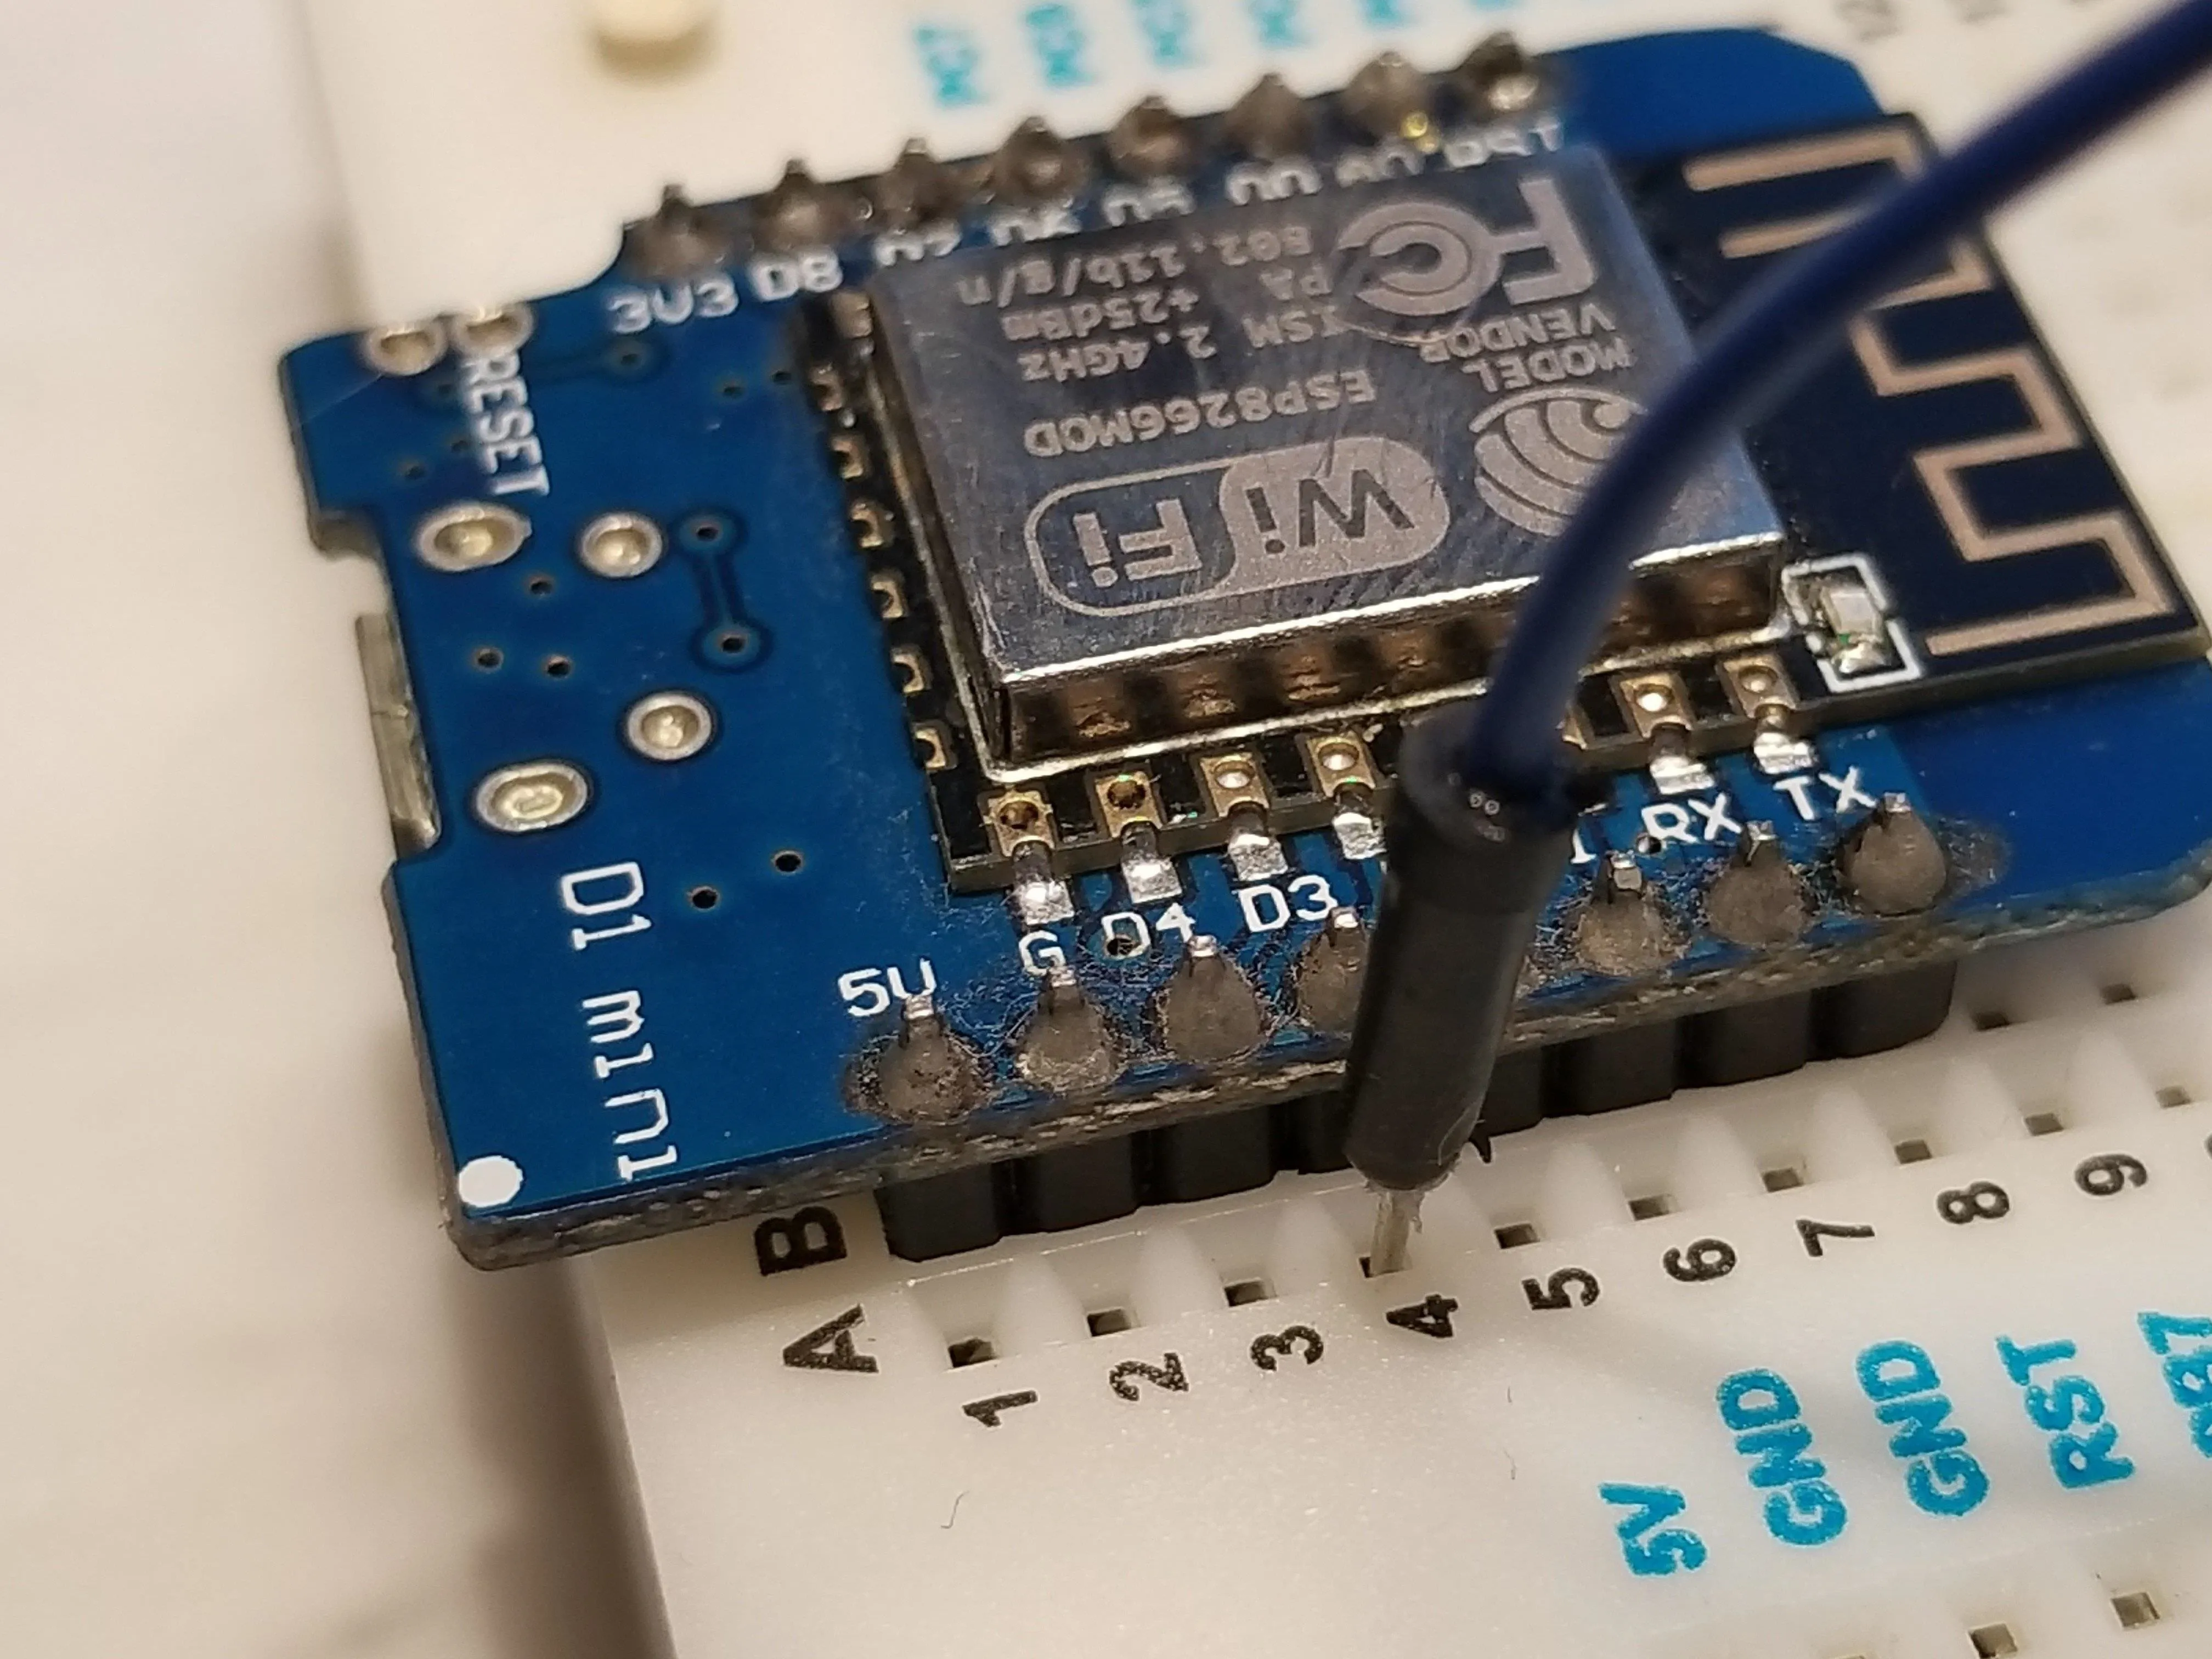
Kody/Null Byte
Now, place your resistor on the breadboard. Keep in mind that each numbered row is connected electronically, with a split separating each side down the center of the breadboard. Connect the wire from the D1 pin to the same row that the resistor is plugged in to. On your LED, look for one leg that is longer than the other — it should be the positive leg of the LED.
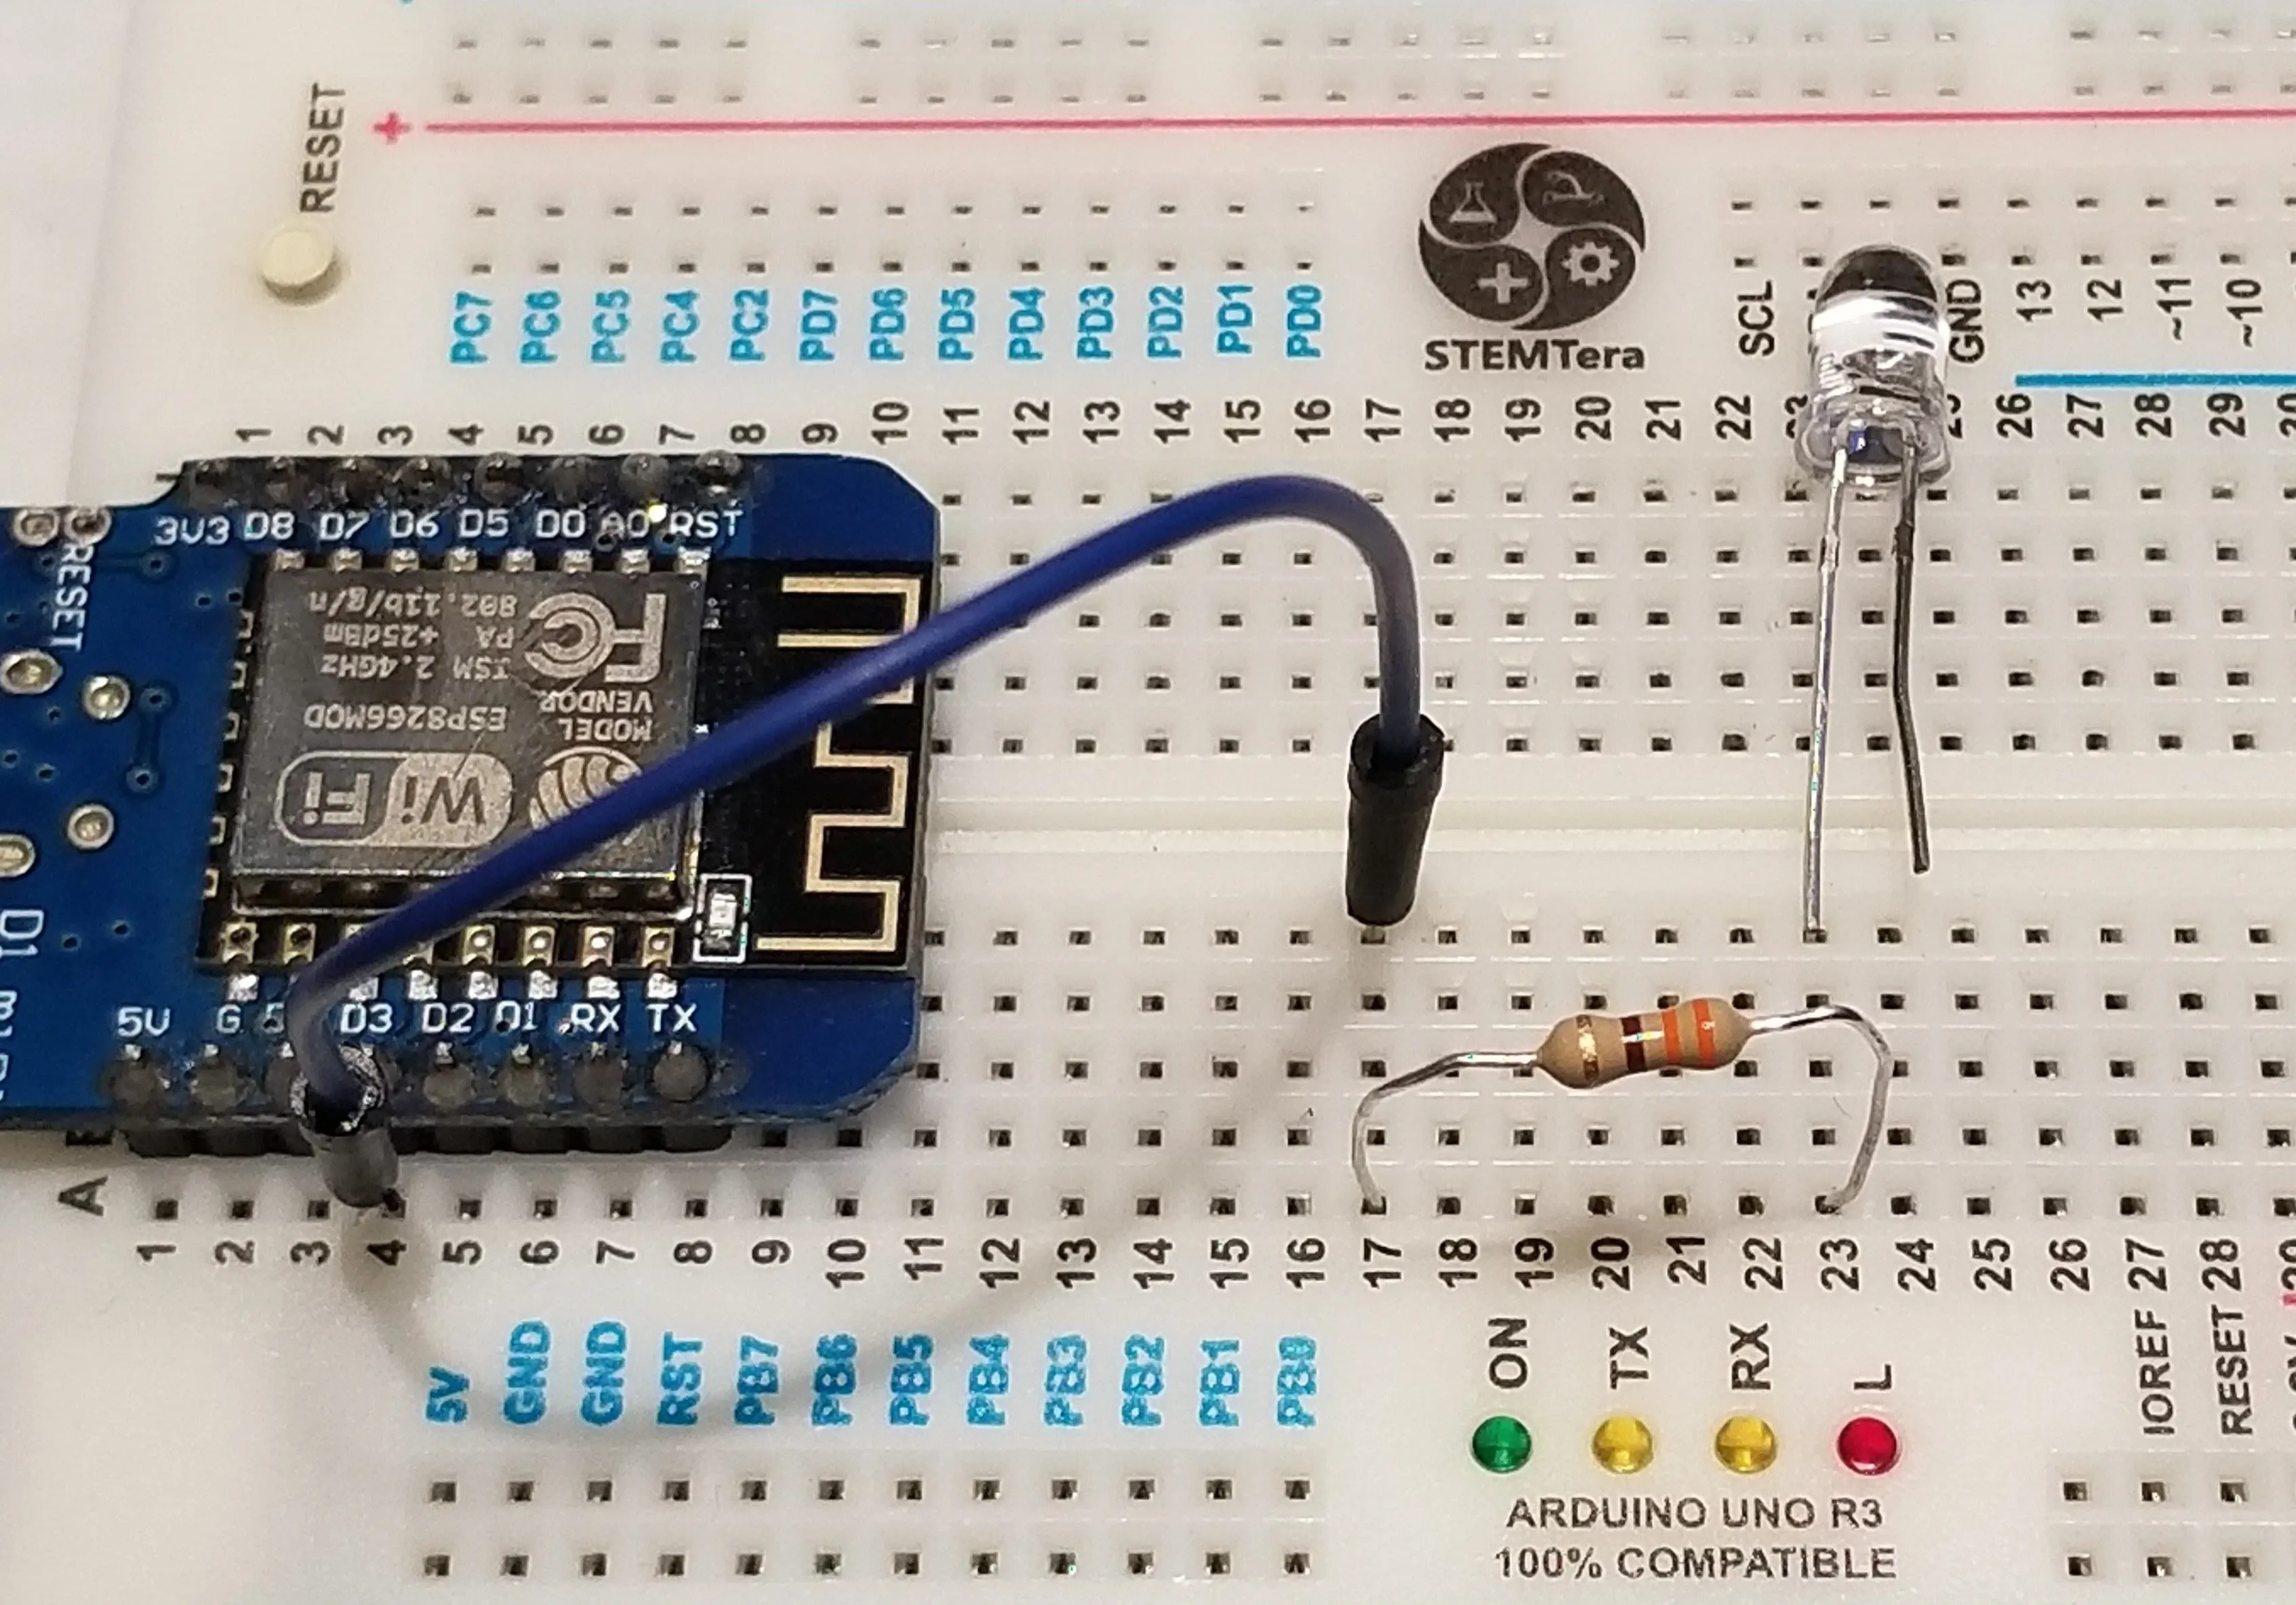
Kody/Null Byte
Plug the positive leg of the LED into the same row as the other side of the resistor, and then plug the remaining leg of the LED and a second wire into the same row. Finally, connect the end of the new wire to the ground pin, forming a path for electricity to flow from pin D1 to the resistor, to the LED, and back to the ground pin.
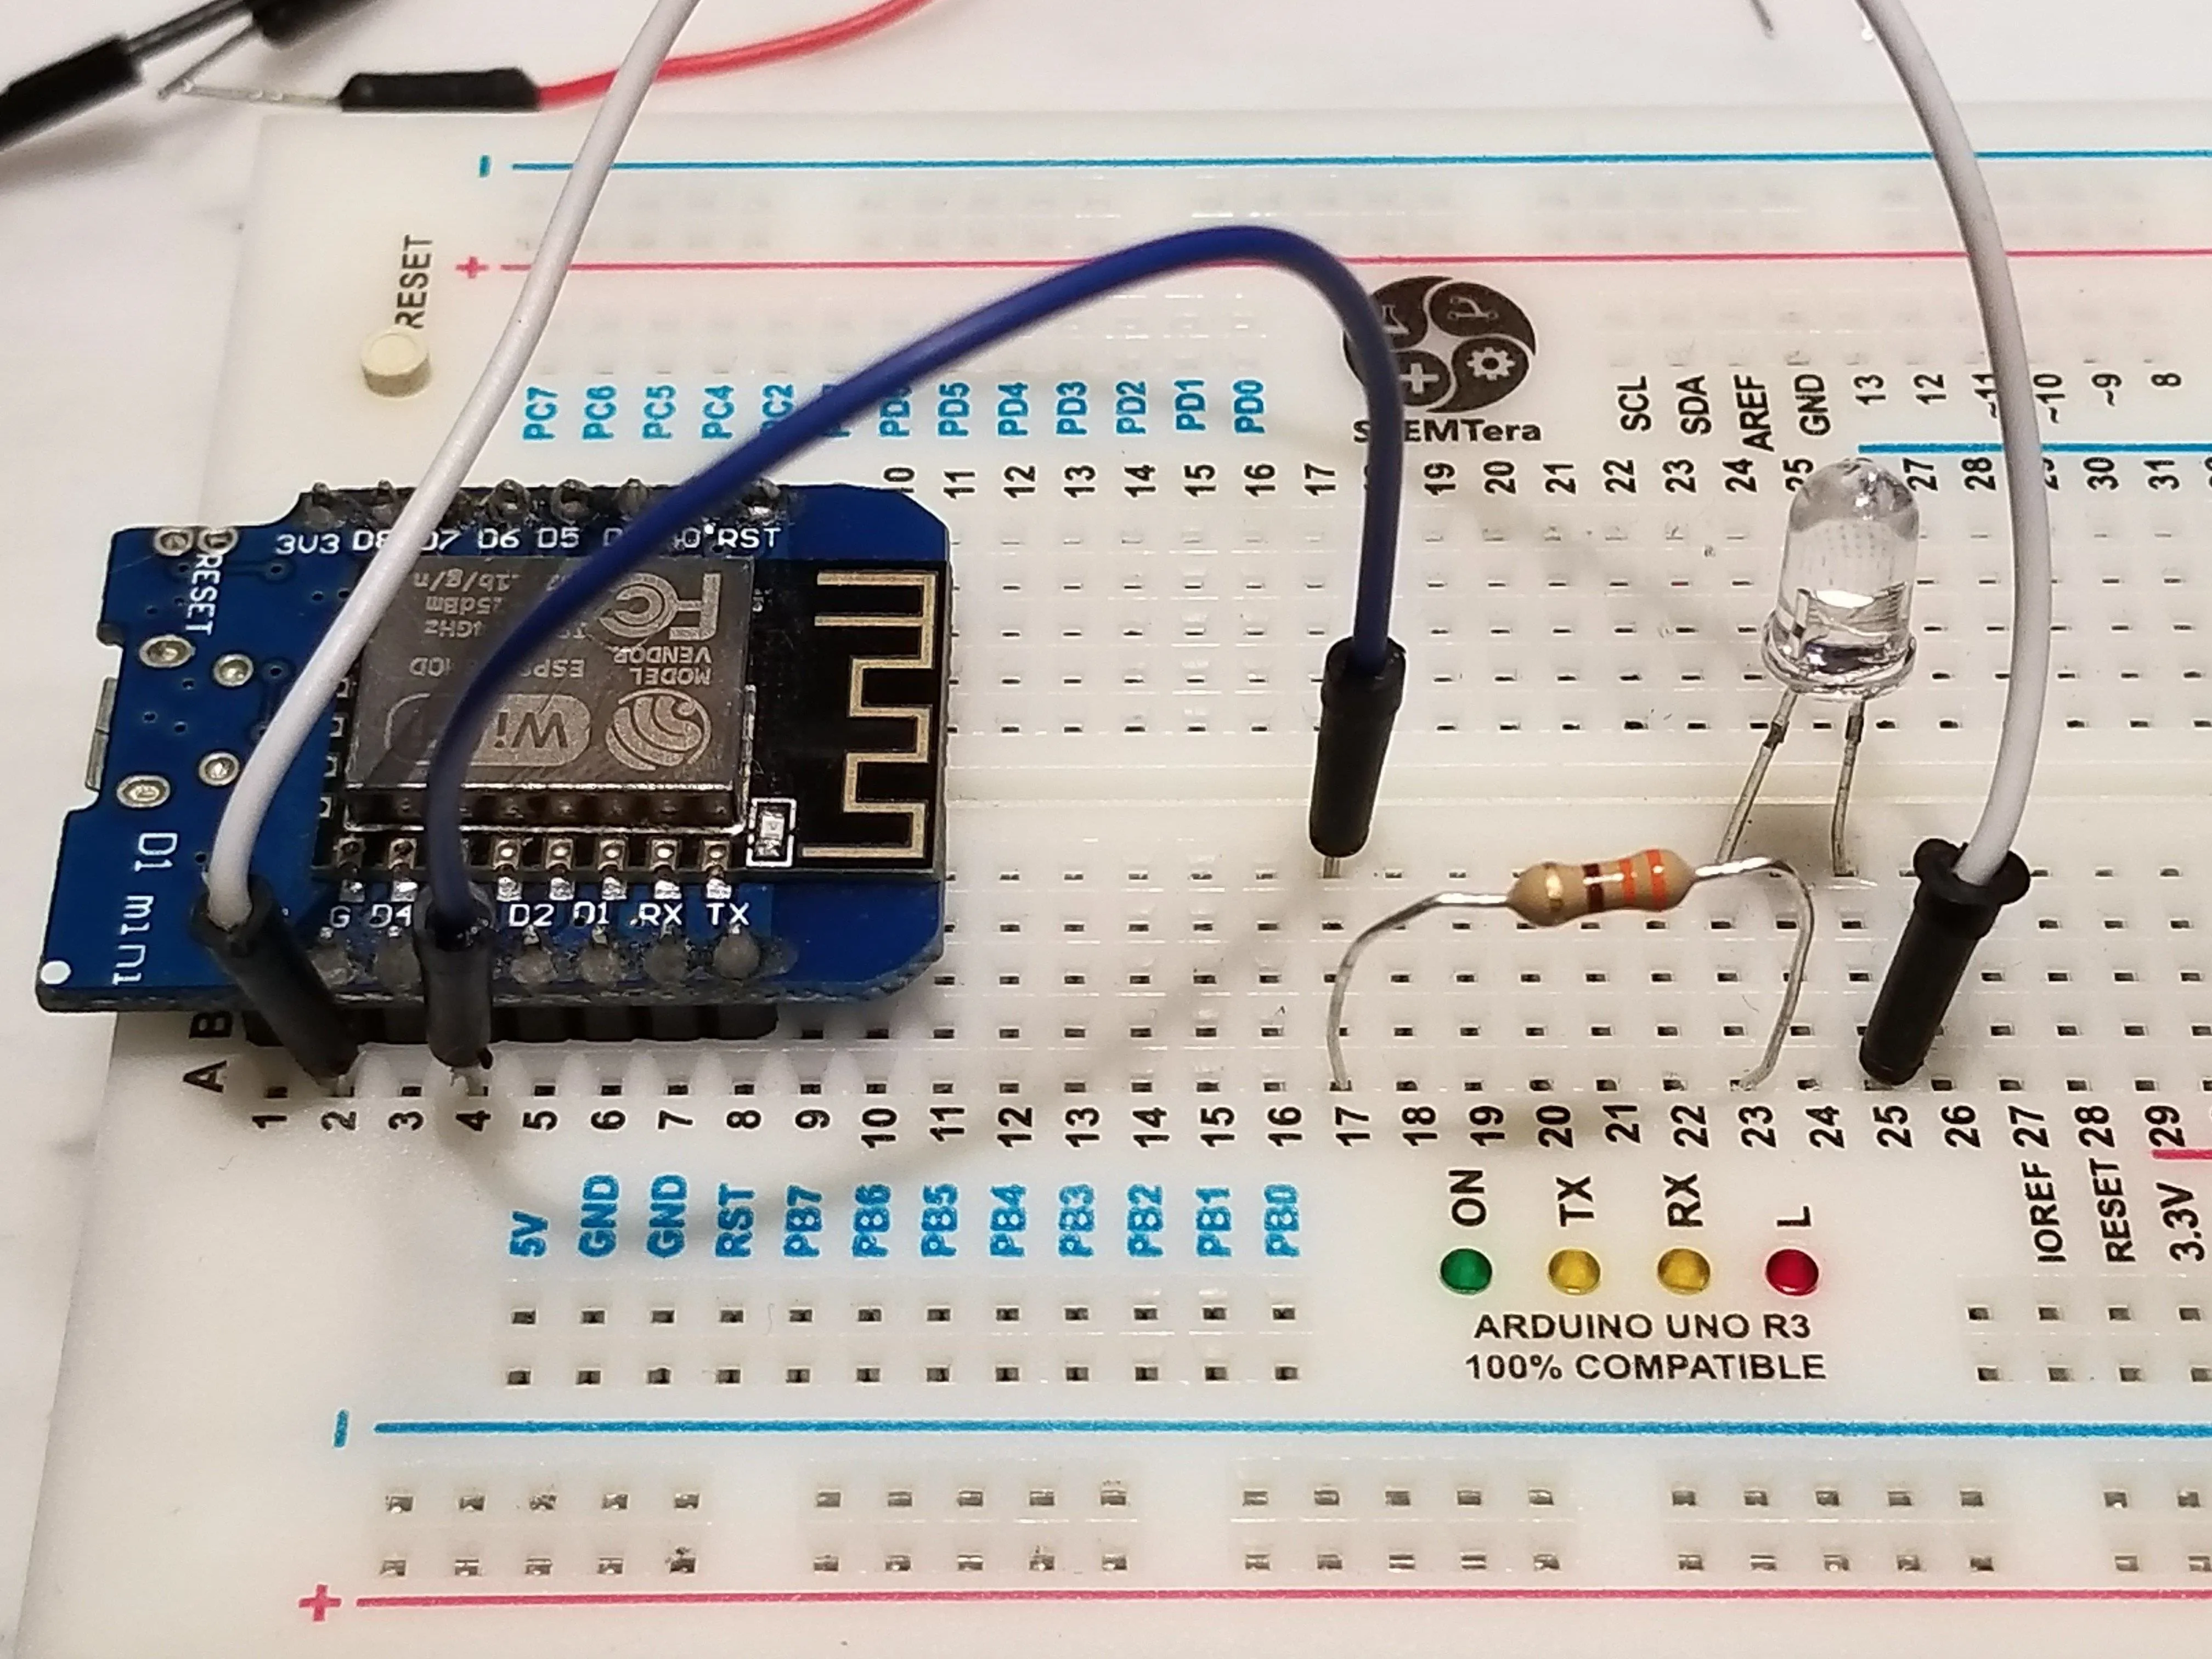
Kody/Null Byte
If you're using a STEMTera board, the setup is even easier. Locate your digital pins and connect pin 3 to the first leg of your resistor with a wire. Plug the longer leg of your LED into the same row as the second leg of the resistor, and then plug a wire into the negative leg of the LED, and connect it to the ground pin of the board, as seen below.
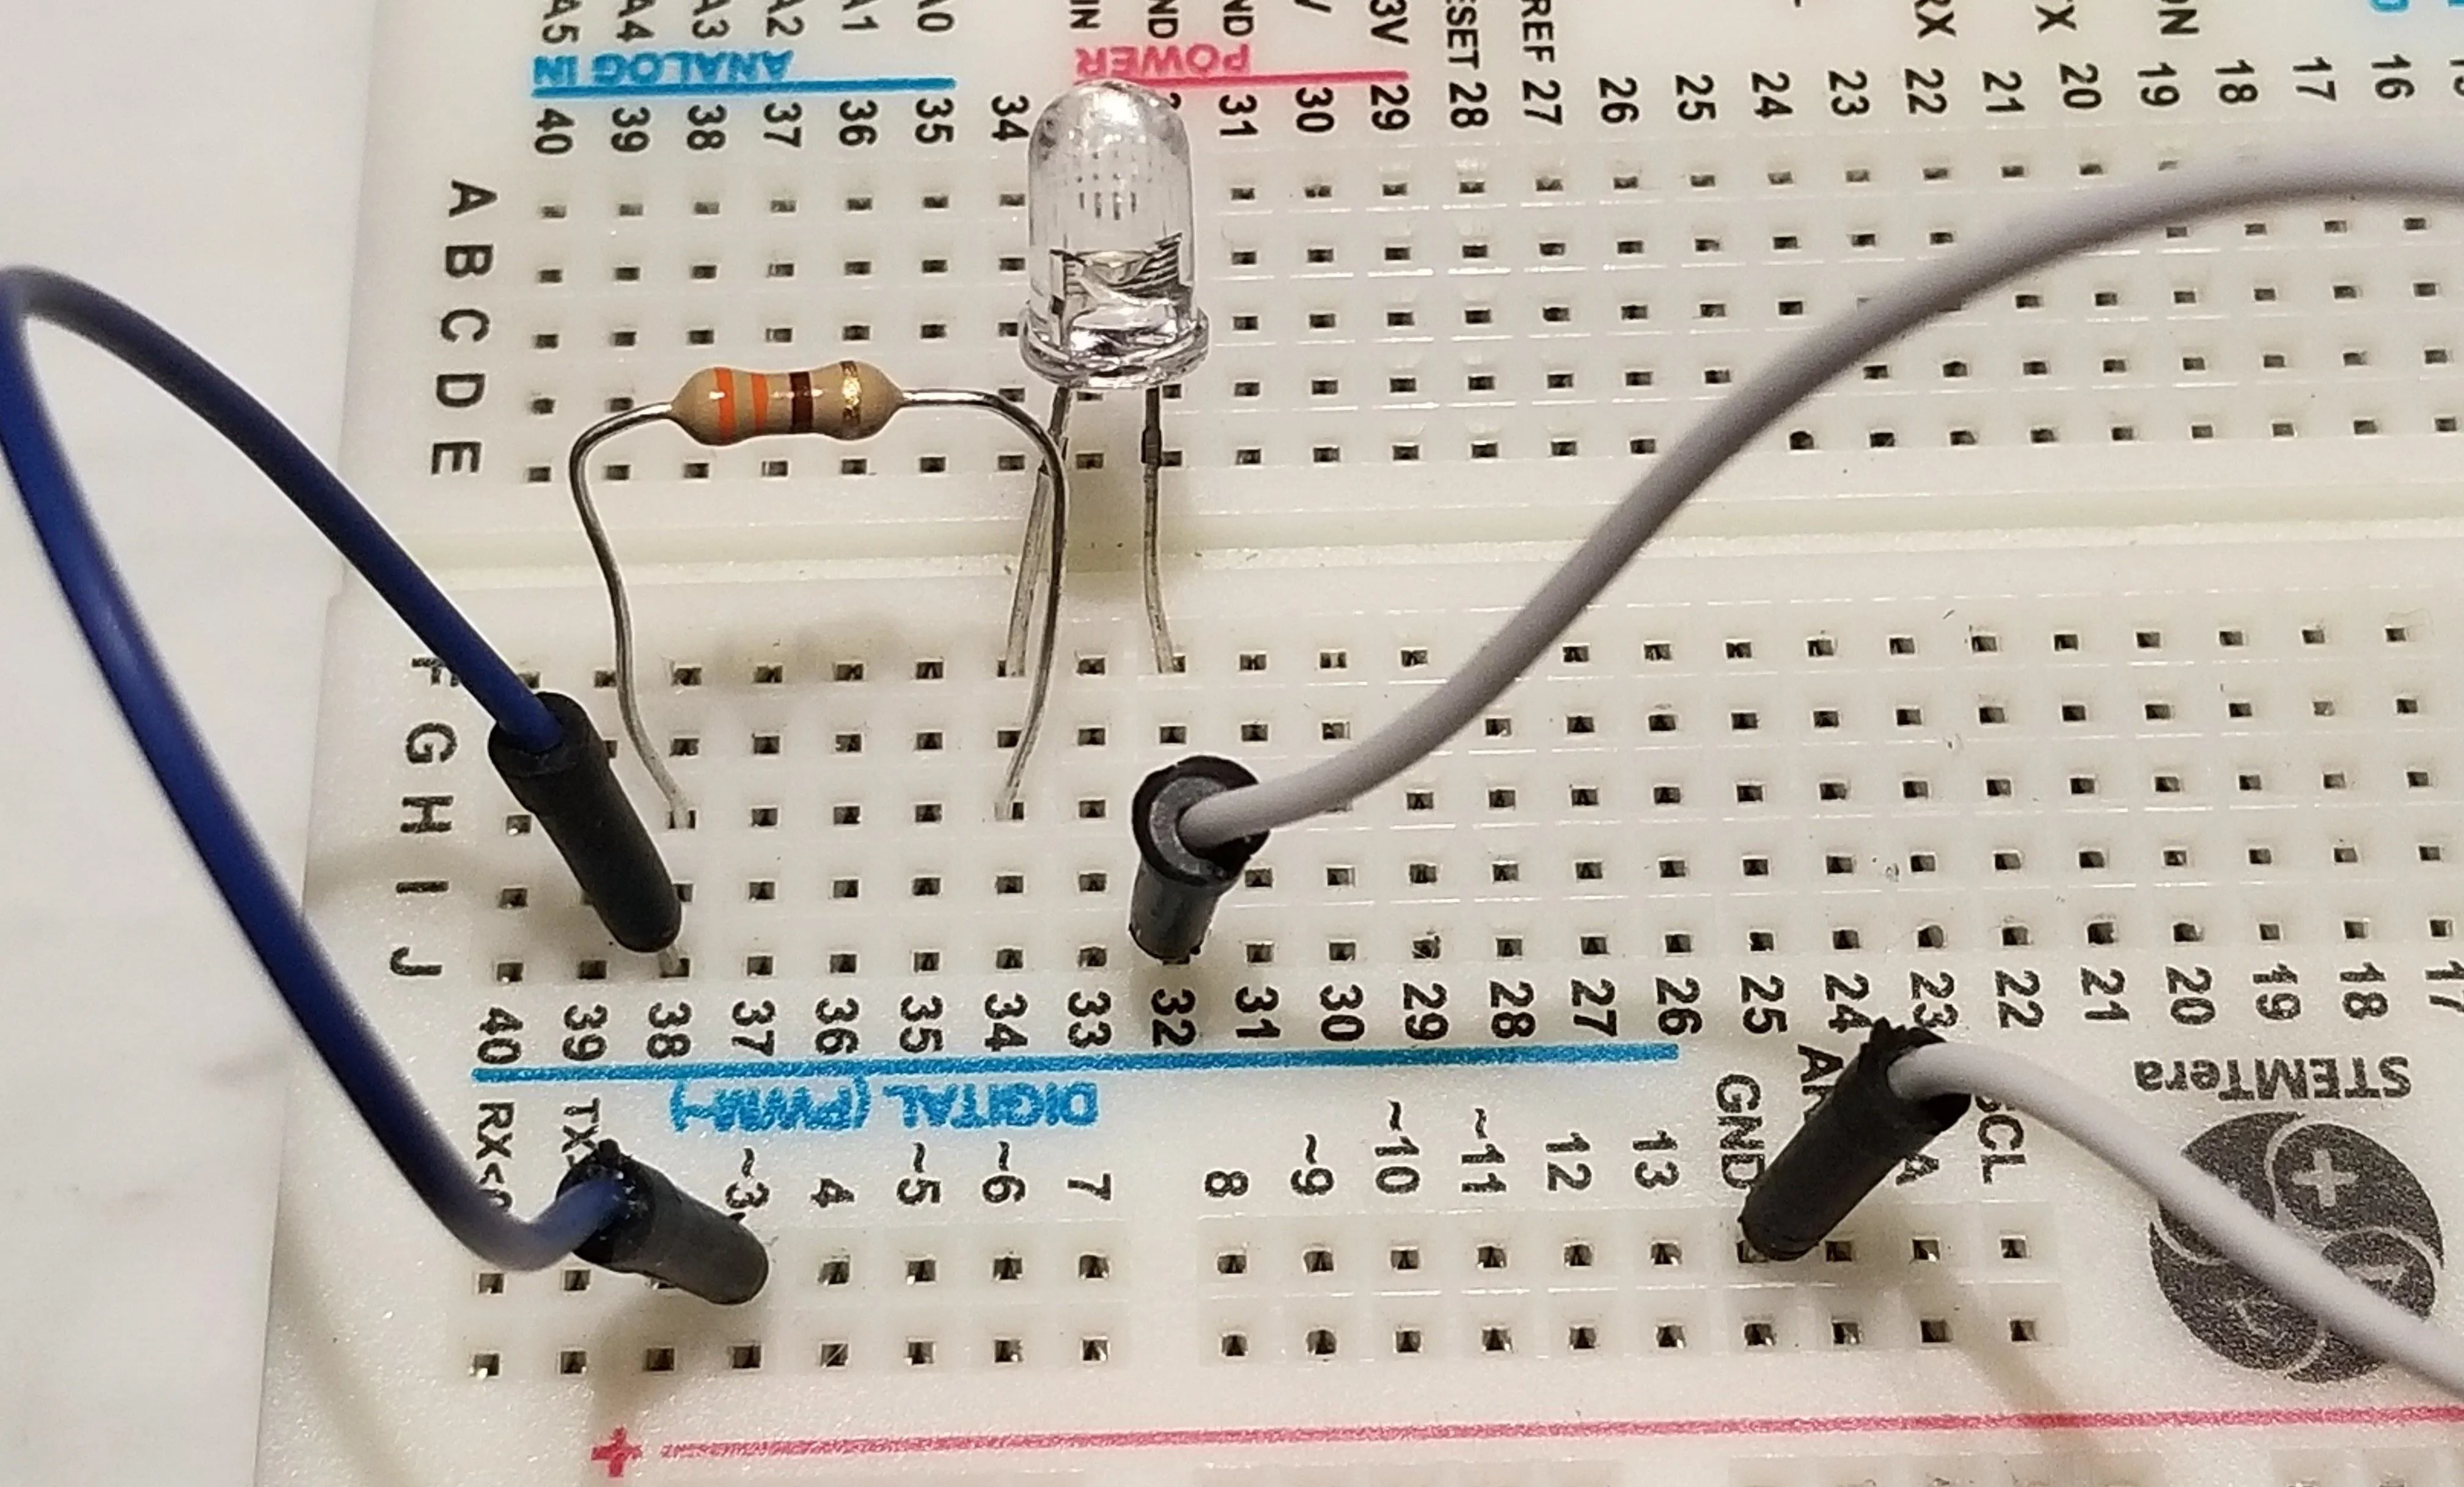
Kody/Null Byte
With this setup, we've wired pin D3 (or 3 on an Arduino Uno or STEMTera) to react to output. Now that we've selected a pin and connected it via hardware to an LED, let's get started controlling it.
Download & Install Arduino IDE
We'll be using the free and cross-platform Arduino IDE, which will allow us to quickly prototype what we need. Arduino IDE (the IDE stands for "integrated development environment") allows you to quickly write and upload scripts to Arduino-like microcontroller devices.
You can download the Arduino IDE from the official website. If you're using a STEMTera board, the correct board should already be contained in Arduino by default. Under the "Tools" menu, you can select "Arduino/Genuino Uno" from the drop-down menu to choose the right board.
If you're using an ESP8266-based microcontroller, you'll need to click on the "Arduino" drop-down menu, then select "Preferences." Next, paste the following URL into the Additional Boards Manager URLs field. Once that's complete, click "OK" to close the menu.
http://arduino.esp8266.com/stable/package_esp8266com_index.jsonNow you'll need to add the NodeMCU to the Boards Manager. Click on "Tools," then hover over the "Board" section to see the drop-down list. At the top, click "Boards Manager" to open the window that will allow us to add more boards. When the Boards Manager window opens, type "esp8266" into the search field. Select "esp8266" by "ESP8266 Community," and install it.
You should be ready to program your NodeMCU at this point. Plug in your breadboard to your computer, which should have the NodeMCU already attached, via the Micro-USB cable. When you click on "Tools," you should see the correct port auto-selected.
Select the "NodeMCU 1.0" or "D1 Mini," depending on which you are using from the "Board" menu. If you're using a bad cable or haven't installed the driver needed, the port may not show up, so if you don't see anything after you've completed the other steps, try another cable first.
Create a Blank Sketch
Now that we have Arduino IDE set up, open a blank sketch. You should see something like this:
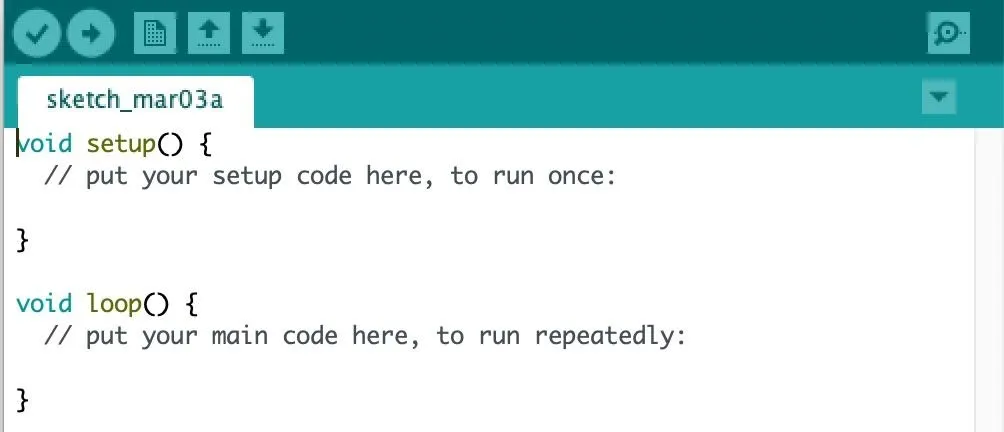
There are two main buttons up top. The check mark compiles and checks our code for mistakes, and the right arrow pushes the code to our microcontroller.
To start, we'll need to take care of the essential parts of the code, that being the header, variables, main, and loop functions. We can make all of these easier to understand with comments, which are parts of the code we leave to explain what we're doing and why. The compiler ignores these parts of the code, so they're not executed, and therefore are only for other humans to help understand the code.
While this might not seem important, trying to understand code without comments is a nightmare. In Arduino, we can leave comment out either a full line with the // marker or multiple lines with the /* symbol followed by a */ to indicate where it stops. You can see some examples below.
// This portion of the code won't be executed
/* Neither will this part */ But this part will
This whole line will be executed
/*
Everything from the symbol above to the symbol below will not be executed.
*/
This line will also be executed.
If we ran that block of code, only part of line 2, as well as lines 3 and 7, would be executed. The other lines are skipped by the compiler.
Write Header & Define Variables
Now, let's write the header of our code, which will describe what it's doing and who wrote it.
// Script to blink an LED on pin 3
// By Kody Kinzie, Null Byte 2019
A few lines down, we'll create another comment explaining that this is our variables section. Here, we'll set up any variables we'll need to work with later on. It will also make it easier for us to change things later, like how long the LED stays on or off.
To start, let's name the pin that our LED is connected to. Mine is a white LED, so I named it wLED, but you can pick any name that you'll remember. We'll also need to decide, in milliseconds, how long we want the LED to stay on and how long we want it to stay off. We'll pick half a second, or 500 milliseconds, and save it to variables called onDelay and offDelay.
// Variable definitions
const int wLED = 3;
int onDelay = 500;
int offDelay = 500;
In C++, we need to end each line with a ; (semicolon) to let the program know we're done with the line. After creating a constant integer (a variable that's not supposed to change) with the "const int" declaration, we can set it to a value of 3 (or D3 if we're using an ESP8266) by assigning it with the = symbol.
In Arduino, = does NOT mean equals. That is done with the == symbol instead. The single = symbol, by contrast, is a command. In the case above, you're telling Arduino that the value is 3, not asking it. This can be confusing later on if you try to check if a variable is equal to a value, and instead command the variable to be equal to that value instead.
Write Setup Function
Now that our variables are defined, we need to take care of the part of the code that will run only once. Although we've connected pin 3 via hardware, we still haven't told Arduino what we're expecting it to do with it. Arduino by itself has no idea if we want to use this pin for input, output, or something else, so we'll need to tell it in our setup function.
We already assigned the number of our pin to the variable "wLED," so we can use that to turn the pin to output mode. This is done by calling the pinMode() function and passing it the pin we wish to use and the mode we want it in.
//Setup settings to enable pinmodes

void setup()
{
  pinMode(wLED, OUTPUT);
}
Here, we've said that we want the wLED pin to be set to output mode, which will let us power the LED attached to pin 3.
Write Loop Function
Now, let's write the central portion of our code. Here, we'll include the delays we set, so that we can make the light stay on and off for periods a human can perceive. Within the loop, we'll call the digitalWrite() function, which will accept the pin we want to write to, and then either the value LOW or HIGH. A value of HIGH means that the LED is on, while a value of LOW means the LED is off.
//Loop function, which turns the LED on and off.

void loop(){
  digitalWrite(wLED, HIGH);
  delay(onDelay);
  digitalWrite(wLED, LOW);
  delay(offDelay);
}
Put together, this will first turn the LED on, wait the amount of time we specified (in this case half a second), and then turn it off. The code will then wait another half second before starting all over again, creating a blinking LED that spends equal time on and off. Together, our simple code now looks like this:
// Script to blink an LED on pin 3
// By Kody Kinzie, Null Byte 2019

// Variable definitions
const int wLED = 3;
int onDelay = 500;
int offDelay = 500;

//Setup settings to enable pinmodes

void setup()
{
  pinMode(wLED, OUTPUT);
}

//Loop function, which turns the LED on and off.

void loop()
{
  digitalWrite(wLED, HIGH);
  delay(onDelay);
  digitalWrite(wLED, LOW);
  delay(offDelay);
}
Push Code to Your Microcontroller
Now that we have the code together, we can click on the check mark to look for any mistakes. If the code compiles, then we can click on the arrow icon to send the code to our microcontroller. Make sure you select it under the "port" setting. If it doesn't appear here and your board is connected with a Micro-USB cable, you need to install the driver for the board, try another cable, or try installing the board first.
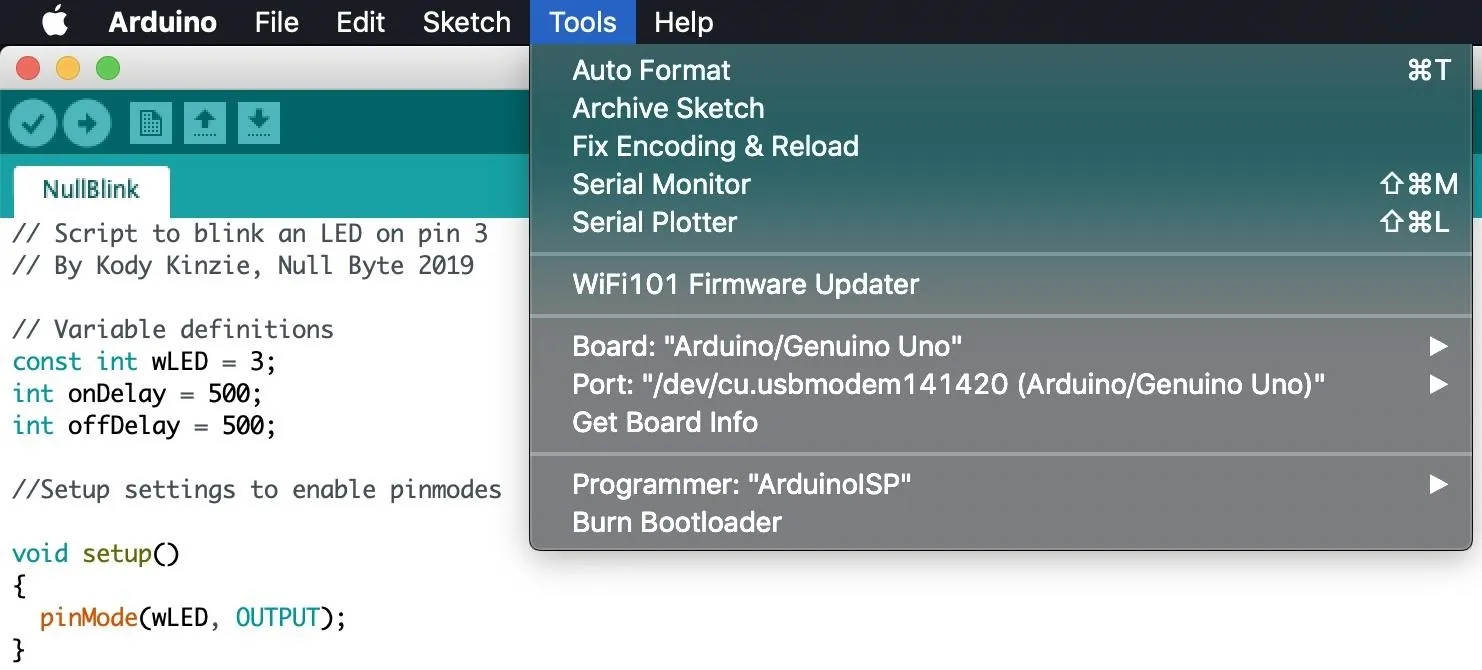
Once you push the code to the board, your microcontroller should reboot. After it does, we should see the LED we wired begin flashing according to the time we set in the "delay" variable.

Make Your Program More Complex
If you want to add more LEDs, we can expand on what we learned to create our functions and call them each time we want to blink that color.
If you add two more LEDs with a resistor each, we can add them to our code by just declaring new variables for each LED and setting each pin to output mode.
Take a look at the example code below, where I added a red, green, and blue LED as rLED, gLED, and bLED, respectively.
// Script to blink an LEDS on pins 3, 4, and 5
// By Kody Kinzie, Null Byte 2019

// Variable definitions
const int rLED = 4;
const int gLED = 3;
const int bLED = 5;
int onDelay = 200;
int offDelay = 10;
int shortDelay = 3000;
int mediumDelay = 1000;
int longDelay = 20000;

//Setup settings to enable pinmodes

void setup()
{
  pinMode(rLED, OUTPUT);
  pinMode(gLED, OUTPUT);
  pinMode(bLED, OUTPUT);
}
We can also create functions to make blinking patterns or make it easier to blink each LED. Below, I took the code to turn each LED on and off and created a function I can call in the main loop to turn on that LED color.
//Blink pattern functions

void red(){
  digitalWrite(rLED, HIGH);
  delay(onDelay);
  digitalWrite(rLED, LOW);
  delay(offDelay); }
void green(){
  digitalWrite(gLED, HIGH);
  delay(onDelay);
  digitalWrite(gLED, LOW);
  delay(offDelay); }
void blue(){
  digitalWrite(bLED, HIGH);
  delay(onDelay);
  digitalWrite(bLED, LOW);
  delay(offDelay); }
After I do this, I can call blue() to blink the blue LED, and change the length of the delays by changing the variables at the top. I can also create a pattern of lights in a function. If I want to make the blue and red LEDs flash on and off like the lights of a police car, I can make a function called polis() and save the pattern so that it's easy to call.
void polis(){
  red();
  blue();
  red();
  blue();
  red();
  blue();
  red();
  blue();
  red();
  blue();
  red();
  blue();
  red();
  blue();
  red();
  blue();
  delay(mediumDelay); }
Finally, in our loop function, we can keep things clean and simple by calling the functions that we created before. Here, I'll blink green, blue, red, green, and then our police flashing color pattern.
//Loop function, which lights to turn on in what order.

void loop(){
green();
blue();
red();
green();
polis();
}
As you can see, you can get a lot more organized and elaborate with what you're doing with these outputs! Aside from functions like digitalWrite, other useful functions like analogWrite can set precise power values on pins and help you customize the way your LED reacts to your program. While we're not covering inputs in this guide, the general format will follow what I've outlined for defining, setting, and using output pins.
Microcontrollers are easy to program and downright fun to put together. While our example simply teaches you how to bridge the physical world of hardware and the mental logic of coding, you can use this process to create incredible Arduino projects like the Wi-Fi Deauther.
I hope you enjoyed this guide to writing your first program for a microcontroller! If you have any questions about this tutorial programming in Arduino or you have a comment, feel free to reach me below in the comments or on Twitter @KodyKinzie.
- Follow Null Byte on Twitter, Flipboard, and YouTube
- Sign up for Null Byte's weekly newsletter
- Follow WonderHowTo on Facebook, Twitter, Pinterest, and Flipboard
Cover photo, screenshots, and GIF by Kody/Null Byte


Comments
Be the first, drop a comment!