Did you know Kali 1.0.8? You probably did, and you probably know about the EFI boot option that has been added.
That's a very interesting new feature because it allows Kali to be easily booted on Mac too, and every EFI-supported device.
First three preview lines gone? As always, sorry for any eventual grammar error or unclear concept, please tell me in the comments if you find any!
-UPDATE 1 05/08/2015: Added more FAQs about uefi and more solved issues (look at the comments section for more informations), fixed broken links.
If you came here to install Kali or Pentesting tools on Android or iDevices, follow these guides:
-Install Kali and Pentesting Apps on Rooted Android
-Install Kali Tools And Pentestig Tools on iDevices
Today I want to show you all the ways you have to use Kali Linux, to have the best performances. We are going to go trough a lot of steps, so prepare you coffee and let's go.
Today's topics:
-Some definitions
-Virtual Machine
-Create a live USB with major OSes
-Create a live CD with major OSes
-Add the persistence option
-Install as dual boot (partial)
-Smartphone alternatives
-Partitioning tricks, e.g. use Kali live USB also as windows storage (with ICEBOOT).
-Update: Troubleshooting and FAQ
-Update: How to UEFI boot a Kali Linux USB
Let's get started!
What Live Boot Means and Why You Should Love It (And Persistence).
Recently here on Null Byte I've seen that there's a lot of confusion when talking about Kali Linux setup and installing.
You can run Kali Linux in different ways:
-Virtual Machine: this is the fastest way, the one I recommend to use when doing lab tests. Using virtual machine softwares like VirtualBox and VMWare allows you to run an entire OS in a "box". We'll get there later. This comprehends all the boot options below:
-Live: IMO this is the best way if you don't care about updates. Every time you run Kali, the same OS will be loaded, without saving anything. This can be very useful: 1) it saves you time 2) it saves you by any kind of virus. Live boot requires a USB device or a CD, we'll get there later too.
3)It saves you by any change you made that let your Kali blow up.
-Persistence: the persistence option lets you save files and update tools when you open and close working sessions using a USB device.
-Install: You can also install Kali Linux on the HD of your computer, so that you can choose whether to both your OS or Kali without any external drive. Anything you change or update will remain as definitive.
I'm not going to talk about this option, because the objective of this how-to is portability. I just tell you that you can install Kali on the HD also by using a Live USB/CD.
So, you got this, live and persistence are useful when talking about USB/CD boot.
Another very important thing why you should prefer external drive boot is that Virtual Machines usually don't let you use the wireless adapter that is incorporated in your computer, instead they only simulate an ethernet connection. This sucks if you want Reaper and Aircrack. Live boot is also safer (practically untouchable) than normal OSes installations.
That's also why we consider Linux the best OS between the majors.
Virtual Machine (Using Virtual Box)
As said before, running Kali Linux in a Virtual Machine can be useful for lab tests, but you'll soon feel small in these shoes.
Although it's not that hard, I recently saw that new people are confused, so here we go.
Download the latest version of Kali Linux from Kali's official website.
Download Virtual Box from the dowload section of Virtual Box official website.
I'll be using the Mac OSX version for this part, but really there's no difference between other versions
Once installed Virtual Box, this is the main layout (sorry, but I have the italian version):
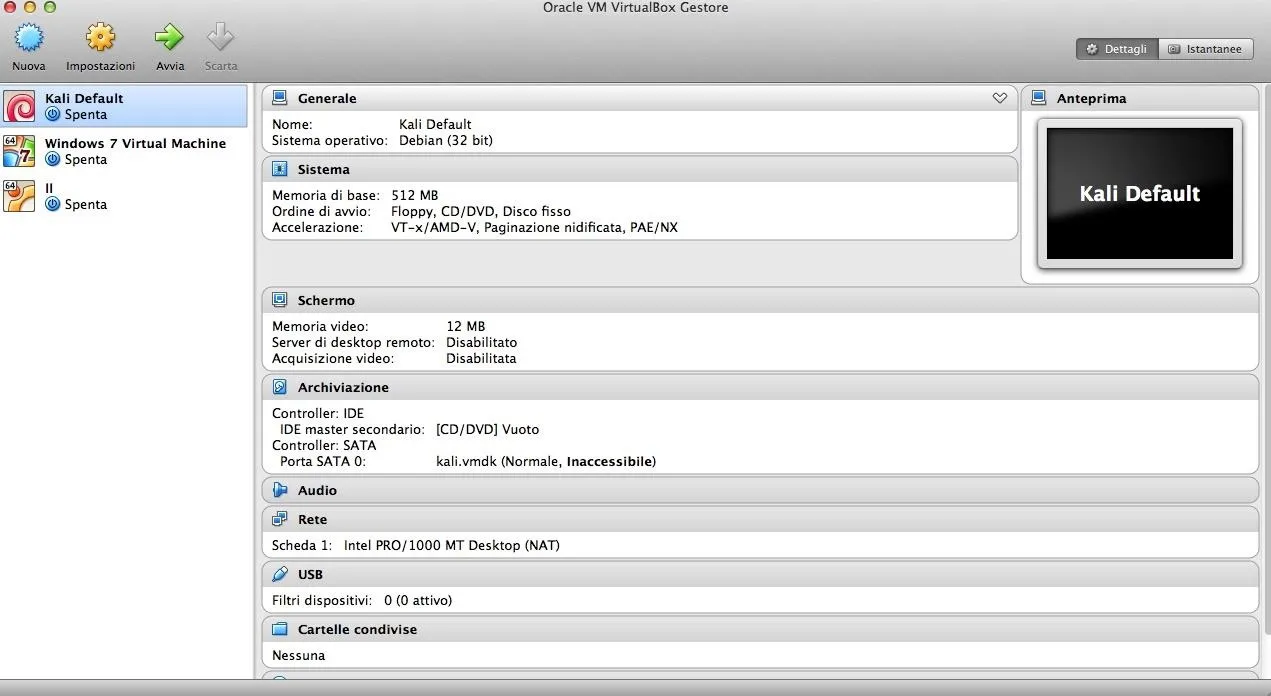
In the left panel we have all our virtual machines (VM), in the right one we have all the informations about each VM and in the top panel we have the main actions.
I'm taking part of the following process and words from one my old post
To create a new Virtual Machine, click on "New",then fill in the fields Name with the name you want, Operation System with "Linux", version with "Debian 32/64 bit" according to the ISO you downloaded. Then click on "create".
In the next page, leave everything as it is, or you can make base memory size bigger, but not more than 15 GB (recommended), should be enough. Then click on "create".
Little troubleshooting preview: some errors were reported because of unsupported 64 bit version or too much or not enough space. So, it might not be the case, but if 64 bit version gives you problems, you shall try 32 bit, with the recommended memory size.
Now you should be able to see that a new VM has been created (left panel).
We aren't ready to go yet. We need PAE/NX support. Select the machine and then click the "Settings" button in the top left, then go to "System" then "Processor" and check the PAE/NX checkbox. I'm not going to post every picture because it would be too heavy, if you need more please tell me in the comments.
Now select the machine from the left panel and run it from the top panel.
When Virtual Box asks you to address the source, browse to the Kali Linux ISO and the bootloader will... load.
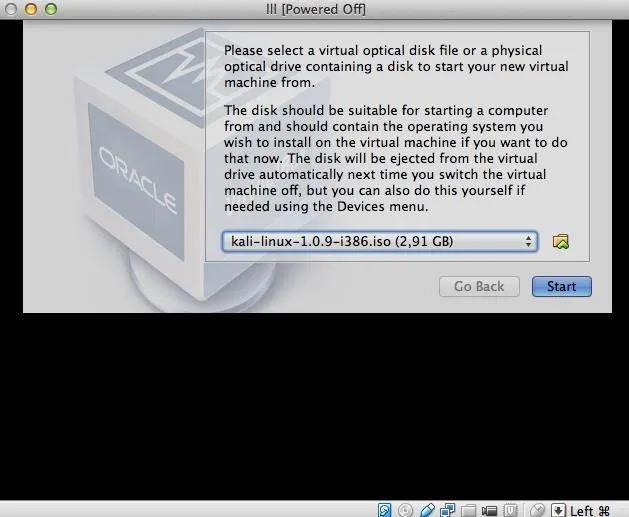
The boot loader looks like the logo of the how-to... except for the cat... I mean...yeah
Now you can select Persistence or Live boot. As I said we'll get there later.
Virtual Machine pros:
-very easy to setup
-allows you to use multiple OSes for lab tests and fast demos
But. There's a gigantic but.
Virtual Box, and VMWare too, which is the other great VM software, emulate an ethernet connection. It means you can't use the wireless adapter that is incorporated in your computer. You have two options: boot from USB/CD, or buy an USB wireless adapter, which is always useful. OTW made a great post about choosing the best wireless adapter, read it right now.
In case you have a wireless adapter, latest versions of Virtual Box should have USB support, but in case yours doesn't, go to the virtual box download page (linked above) and download the "Extension Pack" according to your version, then install the extension and once started Kali, go to devices->USB devices and click on your wireless adapter to mount it. In about 10 seconds Kali will recognize the USB wireless adapter and you'll be able to use it.
And right when you thought "I'm behind a VM, I'm perfectly fine", VUPENresearchers team comes to make you sad.
Ouch.
We can move on.
Setup Kali Linux to Boot from USB.
Every OS has his own way to do this.
First download the Kali Linux ISO, as said before.
Update: Wait. Before you go on, you must know if you are booting BIOS or UEFI. What are these and why should I know? I answer this in the FAQ. I decided to post only the BIOS way under this header as it's the most common. I repeat this:
->How to boot Kali from USB in UEFI is in the FAQ section<-
->How to check if you are using BIOS or UEFI and what are these is in the FAQ section<-
That said, if you are sure you are using BIOS (generally PCs older than 2010-11), then go on reading. Also Mac boots UEFI, but Macs are a very complicated story.
There are a lot of ways to image a Kali on a USB (Unebootin cross platform, LiLi USB creator), but today we are going to use Win32 Disk Manager for windows and the dd command for Unix.
Another great tool is Rufus, explained in the FAQ section.
If you are going to use Kali =>1.0.8 then you are probably interested in EFI boot. You probably have a Unix, then follow the dd command part, because you might have trouble imaging it on windows because of the EFI option.
Obviously, be ready to format the USB stick.
Before anyone gets angry, yes, the infos below are taken from Kali Linux official Documentation, but that's kinda obvious
WIndows:
Download Win32 Disk Imager from SourceForge or LaunchPad, and if you need you can follow the official Kali Linux documentation about it here.
Once plugged the USB stick, run Win32 Disk manager and choose the ISO to image and the device you are going to image it to and click write.
Sorry, no images, windows crashed... again.
Unix:
If you are using Linux, verify the path of the USB with the command dmesg, then run the command.
dd if=path/kali.iso of=/dev/sdb bs=512k
Where /dev/sdb is the path from dmesg.
If you are on Mac, that's almost the same, except that you first need to locate the USB storage with the command diskutil list and then unmount it with disukutil unmount /dev/diskN (or, eventually, diskutil unmountDisk path).
Then run:
sudo dd if=path/kali.iso of=/dev/DISK bs=512k
Where disk is the path we found with diskutil.
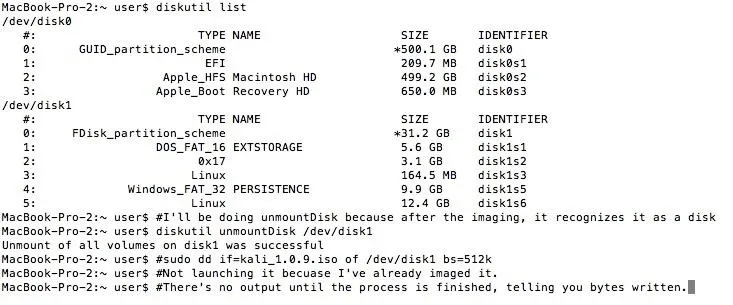
Mac terminal sample, notice how many partitions there are on my USB, I use the partition EXTSTORAGE as a windows storage (we'll talk about it later), the Persistence storage as a Unix storage (not the real persistence option!), then the other two are the real persistence and the MBR (boot). Have fun with partitioning!
Note: if you put 4m or 4M (depending on the Unix system, try which one works) instead of 512k, the process will be faster.
Once done you can un-plug the USB and stare at it: it's now a happy USB stick, and it's ready to boot in all its greatness.
But EFI boot will not work with a MacBoox Pro older than 2011-2012.
Don't worry, I got you covered with the next chapter.
Here, before my last update, I would go on talking about MBR and GPT. The question about:
->Booting both in UEFI and BIOS<-
->How to boot Kali USB in UEFI<-
are answered in the troubleshooting and FAQ section.
Create a Live CD/DVD of Kali
To create a live CD of Kali Linux, first download the ISO.
Once you are done, pick your way trough it:
Windows:
Right-click on the ISO and "Burn Disk to Image", choose the disk you want to image Kali on and Burn (obviously there are plenty of different tools, like Daemon tools and infra red).
Alternatively, I'm trying this process with windows 8 and a random DVD and I can't get it working, very weird (after this, I suggest you to never use windows again in your entire life, thanks). Let's call it troubleshooting: if you can't go trough the above process, try right-click->send to->DVD
Mac:
You can use Apple's Disk Utility. Insert your CD/DVD and launch Disk Utility (Applications->Utilities->Disk Utility )
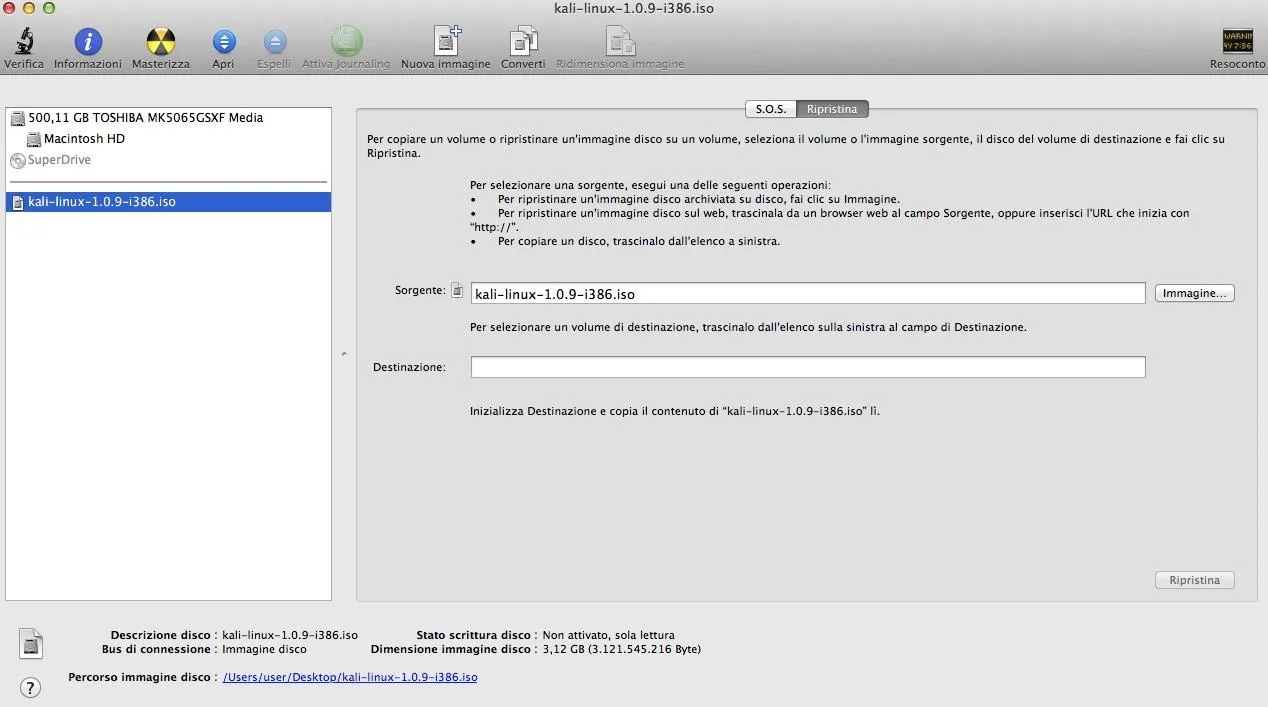
Again, sorry for the italian language, the burn button is the one with the radioactivity icon, nuke it!
Insert the CD, drag and drop your ISO in the left panel and select the ISO, then click on "burn". The CD will be burnt and the data verified.
Boot from CD or USB
Booting from CD or USB depends on your computer, e.g. Asus computers want you to press "esc" while booting to select the USB drive and then boot, while they usually give priority to CDs on HD OSes, so you don't have to press anything.
If you can't completely shut down windows 8 because it hibernates at shut down, I explained how to in the comments.
But Macs don't. In fact, you'll need to install rEFInd to get it working properly.
Refind is a boot manager that you can download from here:
http://sourceforge.net/projects/refind/files/0.8.3/refind-bin-0.8.3.zip/download
then move to the directory you just downloaded and run the install.sh script with:
sudo ./install.sh
So that at the next boot, refind will be loaded. Don't worry, to boot Mac OSX, just click the first options when asked (the big white apple!).
If you inserted the Disk, you should see a symbol with a little cd ("boot from legacy").
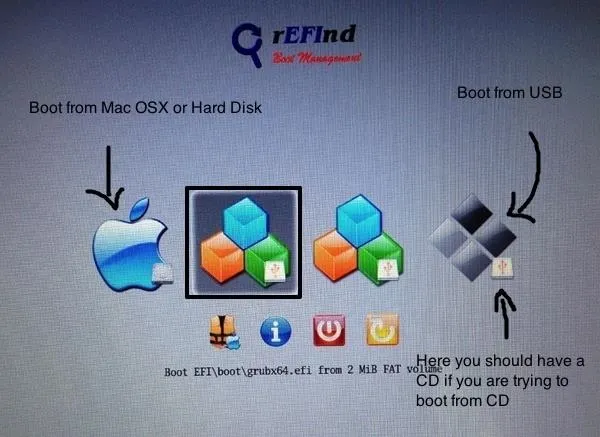
Don't worry if it doesn't appear as soon as you insert the CD, just reboot and try again, it never works at first try.
If you want to uninstall Refind just open the Terminal in OSX and type:
cd /
sudo rm -r EFI
You can use refind to boot from USB too (image above), but you should normally be able to do this by pressing the option (or "alt") key at boot and selecting the usb symbol ("EFI").
Now you should be able to Live boot.
Setup Persistence
If you want to setup the persistence option you have to create another partition in your USB stick. How?
This is too long too explain for every OS (I'm going to explain how to do this in Kali, because now you know how to boot Kali Live), but I want to recommend some tools you can use:
-Windows: MiniTool Partition Wizard Home Edition
-Linux:Gparted
The main process is:
1)create a new partition (resizing the only one existing hosting Kali, creating new unallocated space) using the unallocated space (select the unallocated space, then persistence->new).
2)create it with these options:
-Type: ext4
-Label: persistence
-Primary Partition
Apply the changes, also remember the path written in the "partition" tab for the partition you just created, we'll call it PART* (in the image is sbd6), but you have to put your own in the commands below.
3)Run the following commands (even if you partitioned the USB with another OS, you must run this by Kali Linux live boot, so open the terminal in Kali Linux Live and type):
mkdir -p /mnt/YOURUSB
mount /dev/PART* /mnt/YOURUSB
echo "/ union" > /mnt/YOURUSB/persistence.conf
umount /dev/PART*
Where YOURUSB is a random name, not related to anything.
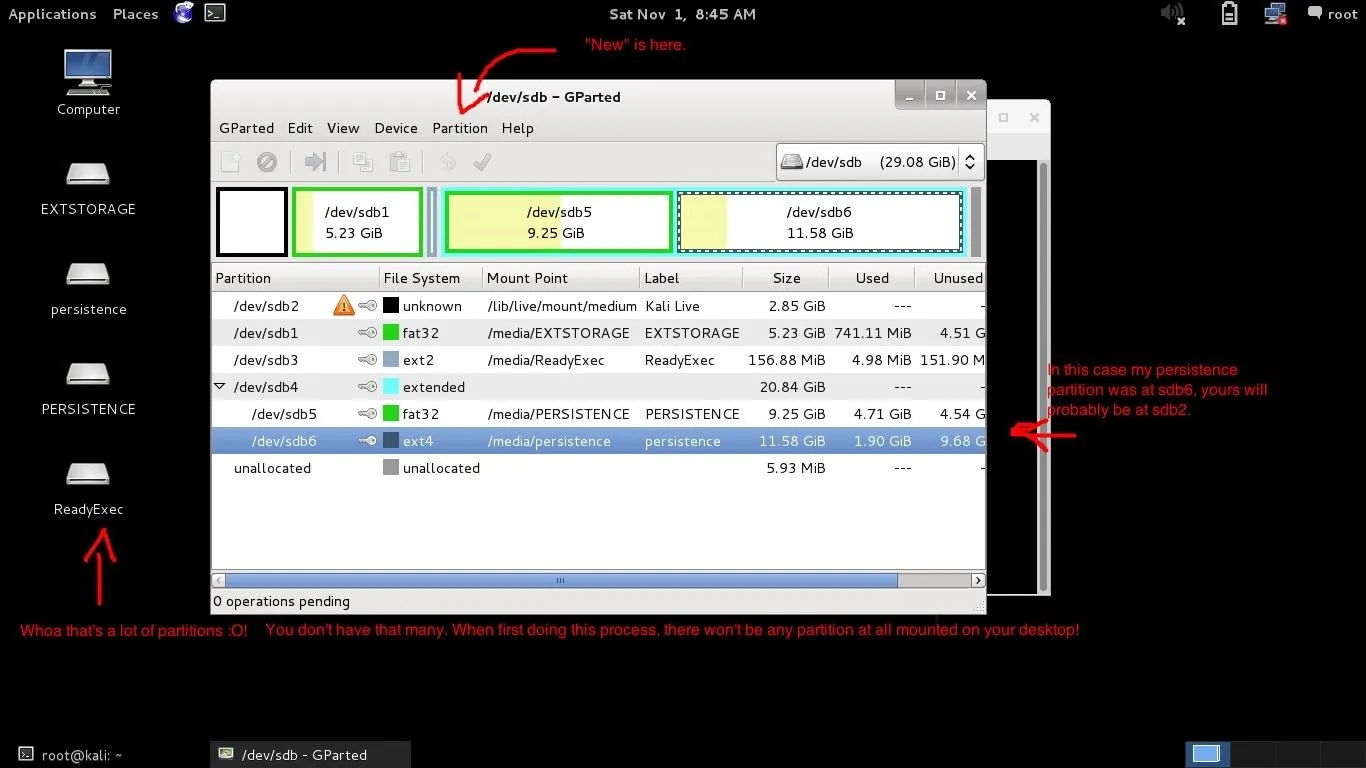
And next time you'll boot, choose "Live USB Persistence", so that every time you choose this boot option your changes and software updates (metasploit!) will be saved, but Live option will boot the same as before.
Install as Dual-Boot
This topic wasn't supposed to be in the guide, but this reference ca be useful.
You can find a tutorial about this by U31 here, just jump to the Kali part.
Smartphone Alternatives
You can install Kali Linux on Android, although I'm not going to explain it because I don't have one:http://www.kali.org/how-to/kali-linux-android-linux-deploy/
I wrote a how-to about porting Kali tools to iPhone with jailbreak:https://null-byte.wonderhowto.com/how-to/idevice-jailbroken-your-new-pentesting-tool-0157134/
The user ghost_ suggested Kali NetHunter for Nexus devices.
If you'd like to install Kali on your Android device or boot Linux from there, you can follow this guide I wrote.
Lastly, as Crakced Hacker suggested, give dSploit a look:http://dsploit.net. Edit: the dsploit project doesn't exist anymore.
Extra: How to Use Kali Linux USB Also as Windows Storage
Warning: Do this only if you are sure you are using a MBR/DOS partitioned USB (NOT GPT), or this will seriously damage your installation. It can be repaired but the process is too long and complicated, if you need it, ask me in the comments.
For more informations about GPT and MBR, see the Troubleshooting and FAQ section.
This is cool.
Using BOOTICE (http://www.pendriveapps.com/bootice-partition-flash-drive-edit-boot-sector/) you can change the active partition, so if you create an ext2 or NTFS partition (Primary Partition, it's important) and go in the management session, you can activate and assign a letter to that partition, so that windows will recognize it, because normally windows read only the first partition.
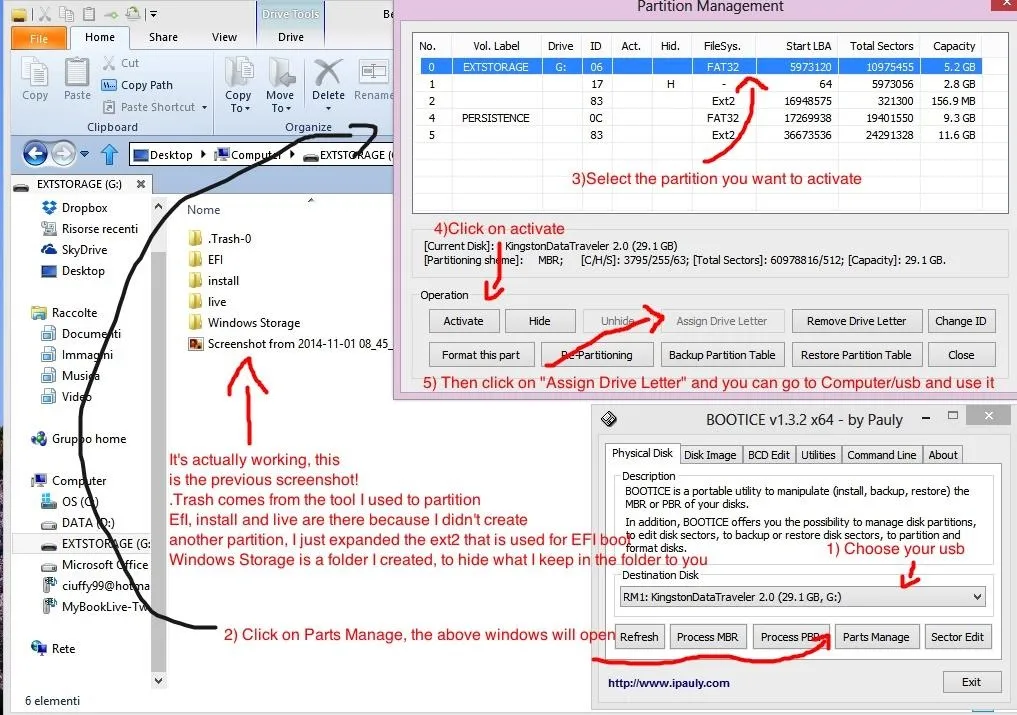
Graphical demonstration
Windows felt bad for me and started working. Thank you.
I had problems with this. If you have any problem just ask in the comments!
Troubleshooting and FAQ
FAQs:
-Q: What are the commands that I should run as soon as my first installation of Kali boots?
-A: We answered here.
-Q: How do I safely act on my USB? How to backup stuff before it's too late? I deleted Grub, what do I do?
-A: My first answer is pretty easy: practice with Unix utilities, in particular, gdisk, fdisk and dd. To safely act on your Kali Linux USB, use the Live option, so if you delete anything, there's no problem. Then , if everything works, do it with persistence. If you'd like to clone your USB, use the dd command as explained in this StackExchange topic, and follow this to fix the GPT partitioning scheme if the two USBs don't have the same size. If you deleted Grub, create a Live CD and chroot in the USB, then recreate the partition if it has been deleted and install Grub from the official repository. I don't have time to explain it here, but you can find documentation on the internet.
-Q: You said UEFI and BIOS, what do they mean, what's the difference and which problems are related to this?
-A: UEFI (that for our reasons can also be meant as EFI) and BIOS are two groups of software routines that makes the hardware accessible to the software. This includes the boot phase too. BIOS was developed a lot earlier than UEFI and it's the most common, however UEFI brings in new functions and possibilities, and that's why UEFI is slowly overcoming to BIOS. The main problem is that computers that support only UEFI have been made, but the globe is still divided, so UEFI only and BIOS only computers are both in use nowadays. To overcome to the issue of not being able to fully enjoy Kali on most of the computers, you need to prepare yourself.
-Q: How do I know if my computer is using UEFI or BIOS?
-A: A fundamental question that deservers a methodical answer: Macs boot with EFI (or at least with a slightly modified version), while PCs can vary. Although the rule is usually that computers after 2010/2011 Potentially have UEFI boot, this is not totally true. For example, almost every windows 8.1 computer is UEFI. To overcome to this problem, supposing you are using Windows, use Windows Disk Management Tool.
If your Hard Disk first partition is a EFI System Partition, then your computer is using UEFI, else you should be BIOS. Alternatively, you ca use the diskpart command, and if in the GPT colon there's a sign, then you are using GPT, therefore UEFI.
-Q: You also talked about GPT and MBR. What are these and what is the difference?
-A: To make things easy, GPT and MBR are two types of ways to partition an USB. These are usually associated respectively to UEFI and BIOS, but, as you'll see below, this association is not too restrictive. As soon as the USB is plugged in the computer, the partitioning scheme (GPT or MBR) answers to the request about how the USB is formatted. This is especially important for this guide because of the interaction they both have with BIOS and UEFI. BIOS uses MBR, while UEFI uses GPT, so this all comes to compatibility issues. However, with some tips, we can evade UEFI GPT restrictions and boot from MBR, because the GPT partition starts with a MBR that introduces GPT for security reasons. You can read more about GPT (Guid Partition Table) and MBR (Master Boot Record).
-Q: How can I boot Kali Linux USB with UEFI, then?
This is MBR booting with UEFI. I know I told you UEFI supports GPT better and they are usually correlated, but this can be done with MBR too. You can do this with GPT too obviously, and in some cases you won't be able to do different (or struggle trying) like for Arch Linux.
-A: Notice: for the following process a windows machine is needed (or Wine, although not tested nor recommended). Alternatively, you can follow the process in other OSes using Unetbootin, I'm just posting this with Rufus because this is the one I tested and worked with me.
Requirements :
-Kali Linux ISO image (64 bit recommended).
-Rufus Windows Program
-BOOTX64.efi and grubx64.efi:
-----------------------------
(OUTDATED)
[-BOOTX64.efi and grubx64.efi files downloadable at (download links are written in this pastebin) http://pastebin.com/sGZC2Vgk.]
From the comments section, user "Cracked Ninja".
"Under the topic "-Q: How can I boot Kali Linux USB with UEFI, then?" in the FAQ section, the pastebin link for the grub and BOOT are broken. (Moved to a new location)
I think they were moved to this archive location-
Link Here[General Archive, see below for the files]
I couldn't find the correct files.
Could someone direct me to the proper place to get these files?"
/"Ah I think I found the link in the archive!
Link to the Folder
This is the folder that the BOOTX64 and Grub64 files are in. It should be the same, but I can't be sure."
Turns out, the link actually works, so use last link to retrieve the aforementioned files.
--------------------------------
Process:
-Create a bootable USB with MBR for UEFI and BIOS. Run Rufus while your USB is plugged in (all your data will be lost), select your USB device in the first selection box, then click on the little cd image and select Kali Linux ISO. Be sure that the second selection box says "MBR partition scheme for BIOS or UEFI computers". Then start, and wait until the process is finished, and agree if it asks about downloading some syslinux files.
-Browse your USB and make sure that folders like ".disk" and "boot" exist. It means that the installation succeeded.
-Once in the USB, create a folder called "EFI" and inside this folder you just created, create another fodler called "BOOT". Copy BOOTX64.efi and grubx64.efi in the "BOOT" folder.In the "BOOT" folder, create a file called "grub.cfg" (make sure it is not a text file, but actually a .cfg), which content is the content of the pastebin at http://pastebin.com/2LrzFPS6.
-Once done, you should be able to boot from that USB choosing it in the boot menu or giving USB the boot priority.
A thank goes to CyberHitchHiker that addressed me into the right direction, after struggling for a long period about this.
Here's the reference.
-Q: Is it possible to create a USB bootable in UEFI and BIOS?
-A: Theoretically the process right above should work for this purpose, but I have not tested it yet.
-Q: I'm struggling to dual boot Kali and Windows 8/8.1, what do I do?
-A: There are various way to in order to achieve this objective. I'm going to go trough some of these since numerous users have requested it, even though this is out of the scopes of this guide.
As said previously, the main issue about Windows 8 PCs is that they use UEFI (explained above).
In order to dual boot Kali and Windows 8 (or similar) you have to partition your hard disk so that there's enough space to install Kali, and then install an UEFI boot manager.
"LinuxBSDos guide": using default installer.
Official Kali Linux Documentation GuideTROUBLESHOOTING
-Q: My virtual machine can't access internet. An error, "device not managed", is showing in the network section in the top right corner, below "wired network" and iwconfig shows no wlan0 interface.
-A: It's because VMWare and VIrtual Box both simulate only an ethernet connection.
Open a terminal and type:
nano /etc/NetworkManager/NetworkManager.conf
and edit the file like this:
----
main
plugins=ifupdown,keyfile
ifupdown
managed=true
----
Then type
service network-manager restart
-Q: I am not able to connect my wireless adapter to Virtual Box or VMware.
-A: Quoting older answers:
VirtualBox:"You have to go to Virtual Box official website download the extension pack and then install it, run VB, run Kali VM and in the main top menu go to Devices->USB Devices->Your wireless adapter.VMWare:Got the problem. you have to first disconnect it from the host and the connect to the VM, because you are running under a Virtual Machine.
Try:
TopMenu>VM>removabledevices>yourwirelessadapter->connect (Disconnect from host).
-Q: I have some problems accessing the BIOS and boot menu with windows 8. During the boot, any key I press it doesn't care, windows 8 boots without interaction.
-A: Quoting my comment under this post:
Windows 8 dosen't shut down, it hybrid shutdowns, so that you always boot with that. In order to change this, do a (not recommended, follow the process under this one) .bat shortcut with the command:
shutdown /s /t 0
There's also an option, but I don't remember where you disable it
Recommended:
Windows Key + X->Power Options-> Choose what the power button does-> Change settings that are currently unavailable (windows, you are just calling it)->Shutdown Settings and uncheck "Turn on fast startup" and save changes.
-Q: I just burnt the latest ISO on a CD/DVD but that won't boot.
-A: Do the steps in the answer right above, reboot and enter the boot menu (or change the priority in BIOS to CD/DVD). In the boot menu choose your CD slot. If this doesn't work, "you may need to get into BIOS and change from UEFI to Legacy BIOS mode" (suggested by ghost_).
-Q: See below to solve the following issue "You need to load the kernel first."
By user "Cracked Ninja" (see the comments section)
(This is a Windows 8.1 Laptop, Touchscreen, Wireless USB mouse connected. AMD A6 Quad-Core. {The exact model is IdeaPad S415 Touch})
I close everything.
Go to the start menu, click on the power options (Top right)
Then hold shift and press restart.
I get restart options.
I select Use a Device
Select EFI USB Device
Wait for it to restart.
When it restarts, wait for 2 seconds and it auto-starts. (I do get to Grub)
It then says-
Error: Unknown File System
Error: You need to load the kernal first.
It also says failed to load failsafe after that.
-A: The problem is very generic, but for this user the solution was: In the Grub config, I had to change the set root= (hd0,1) to set root = (hd1,1) And it worked!
Conclusion
I hope it was useful, it took me so much time and effort to write but I think that summing up everything in just one article was a good idea, because recently a lot of people asked this kind of questions!
Again, sorry for any grammar or concept error, if you find any please tell me.
Thank you for reading.
Edit 05/08/2015: I'd like to thank all of you who have been reporting errors and those who have been helping users to solve their troubles.
Thank to all of you, this guide is now, according to me, in Google's second page for "Kali Linux Install efi". Very, very, very big achievement for me, so thank you again.
cover image: Kali Linux 1.0.9 boot loader 64 bit + tribute to my cat


Comments
Be the first, drop a comment!