

We're nearly done getting our Mac set up for hacking. If you haven't checked out previous tutorials, I'd recommend you do so first before diving right into this one.
While macOS is a powerful POSIX-compliant operating system, some of our Linux tools do not work out of the box on it. In some cases, they can be made to run with a little bit of elbow grease. In other cases, there's a lot of work involved. And then there are those tools that simply won't work at all in macOS. For example, anything involving the proc filesystem, or many of the common hacking tools for wireless networks.
With a bit of know-how, you maybe able to port a tool that you want, but that's a long process and more of a side project. When we need tools, we need to be able to run them right away.
Since you will generally be working with a deadline and can't stop your current project, I recommend a Kali Linux virtual machine as part of your macOS toolkit. Kali comes with a large collection of pentesting tools preinstalled, and it's simple to set up. If you're a pentester or regular Null Byte user, you're probably well familiar with it already—a great deal of the tutorials here on Null Byte use Kali.
In these steps, I will show you how to get a VM up and running on macOS. If you dislike running in a VM for whatever reason, there are many computers that will run Kali well enough that can be purchased for very reasonable prices, or you can just boot from a USB stick. You can also install Kali on your Mac's hard disk as another partition.
Step 1: Install VirtualBox
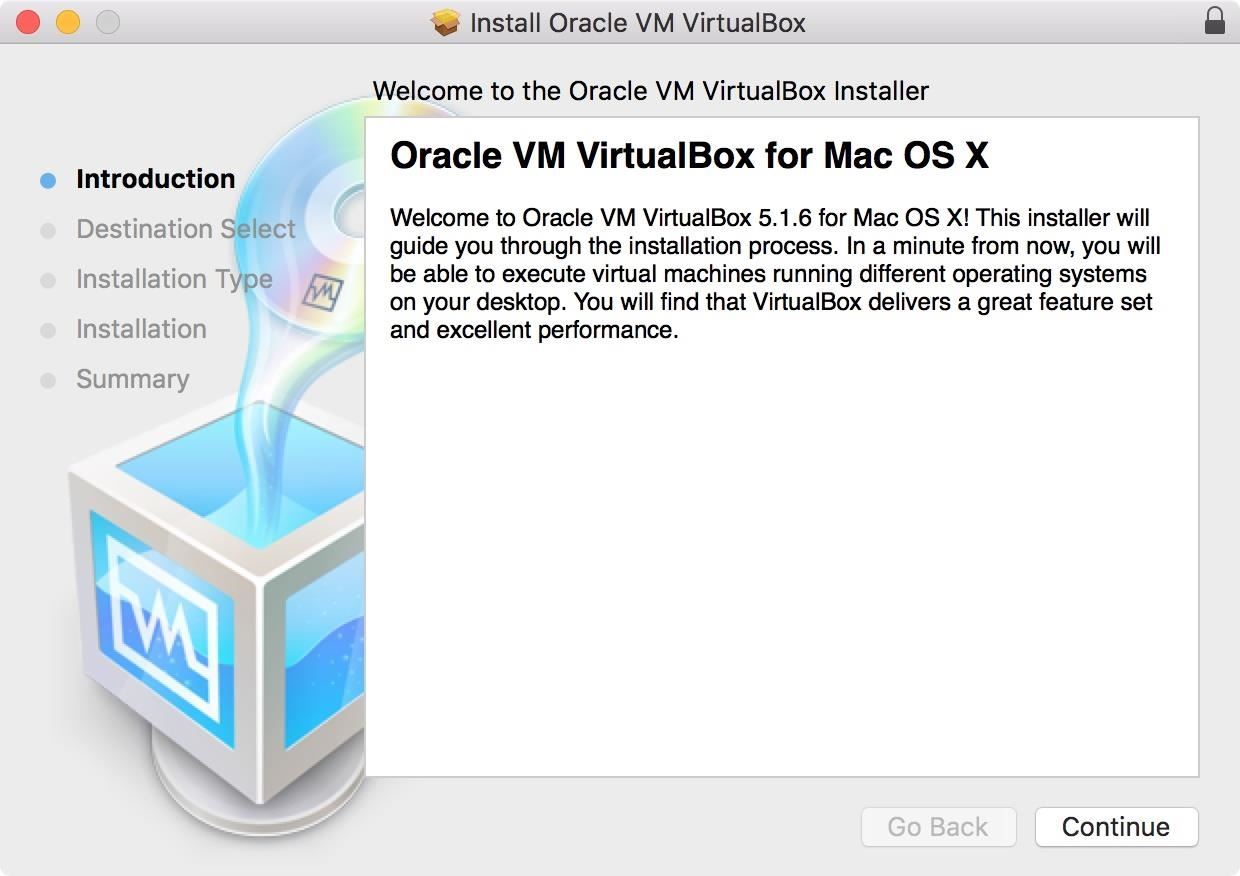
In order to run Kali, we will need some virtualization software first. While there are many options to choose from, such as those from VMware, I like to use Oracle's VirtualBox, which can be downloaded from its website for free. This is what I'll be using in this guide.
When the file finishes downloading, mount the disk image when it appears, then double-click on the VirtualBox.pkg within.
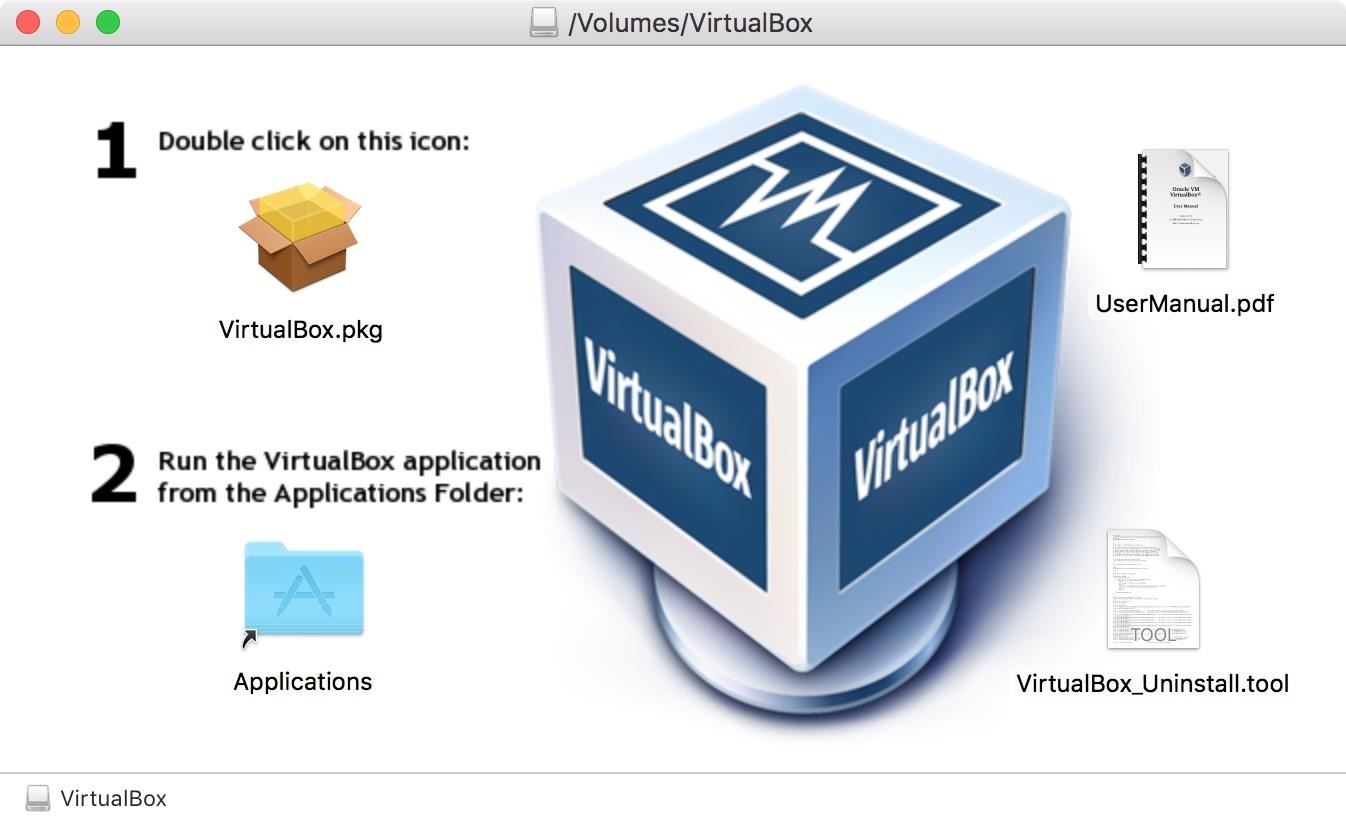
Installing VirtualBox couldn't be easier. Just continue through the on-screen instructions. You may be prompted for your password once or twice, but you probably already knew that.
Once the installer has finished, launch VirtualBox from your Applications folder.
Step 2: Download Kali
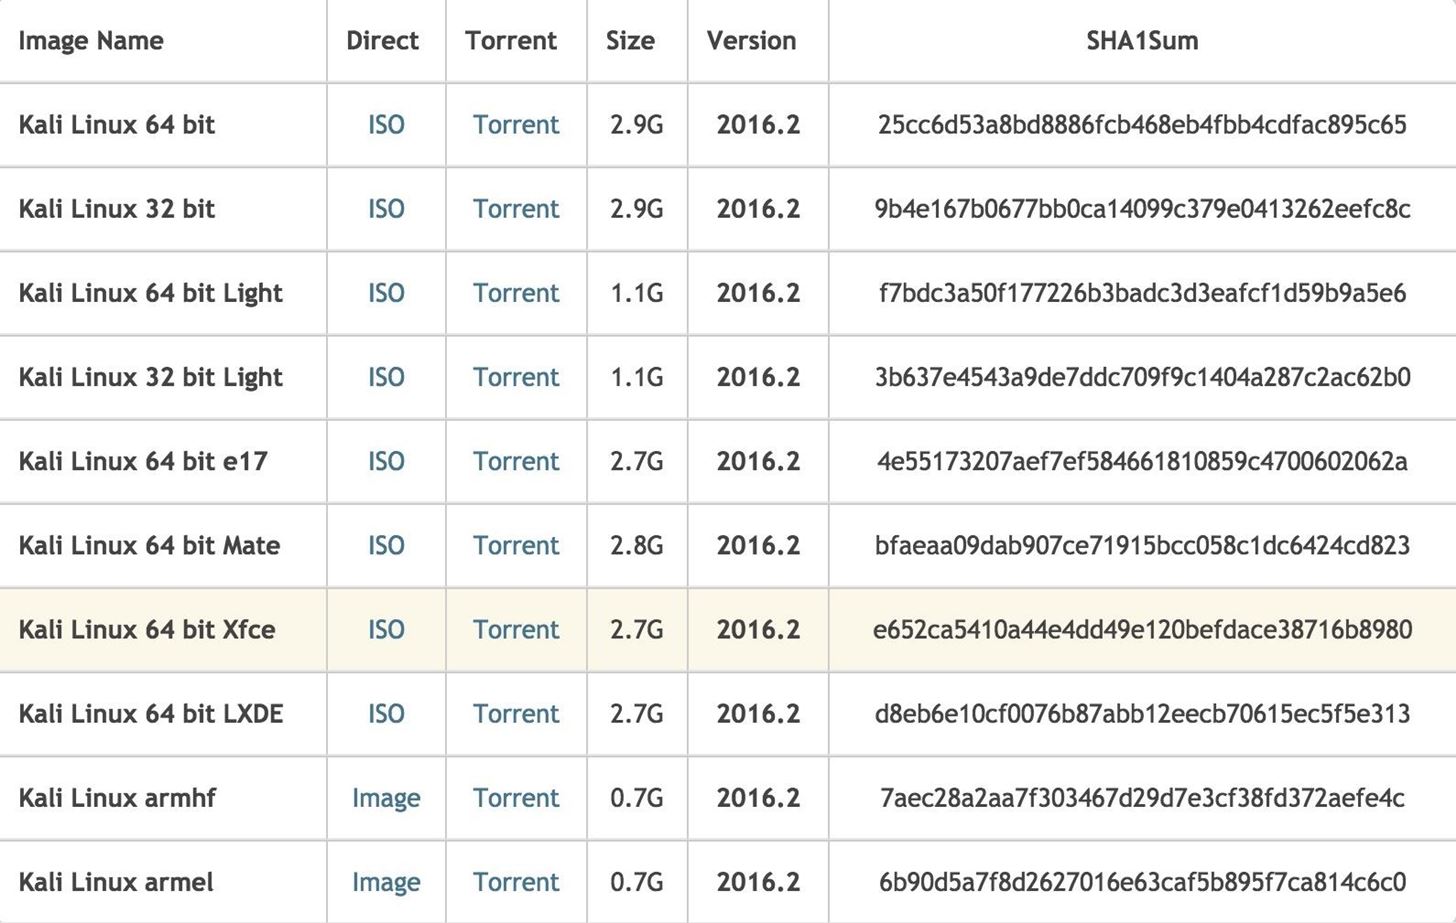
Kali images are located on its website, so you can download the one that best suits your needs from there. Kali also offers preinstalled VM images on Offensive Security's website, including ones specifically for VirtualBox. All you would do for those is download one, then double-click on the file to open it in VirtualBox, then follow the on-screen instructions to import everything in.
While the preinstalled images are super easy to install, and take no time at all to get up and running (though you will probably have to also install the Extension Pack to get USB working), the ISO image will allow you more options in the configuration. Personally, I prefer the XFCE image because I like a lighter desktop environment. This means that I will be installing the machine from scratch, which I'll run through below. The default image is Gnome, which is a great environment, but it's a little heavier on system resources.
Step 3: Create a New Virtual Machine
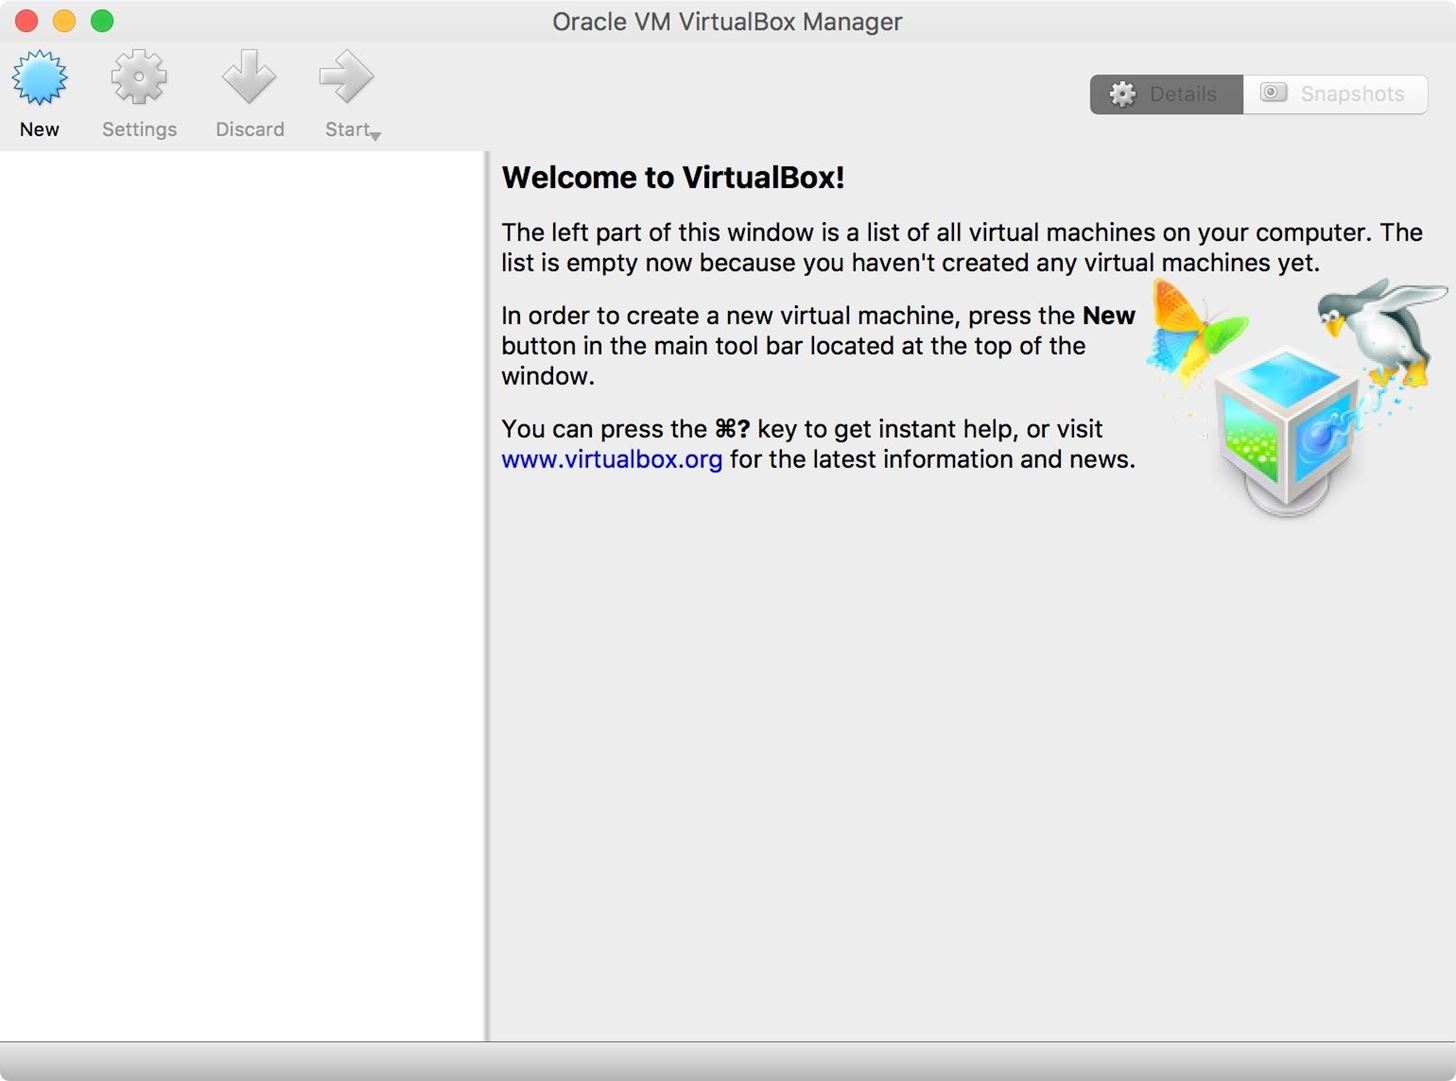
Click on the New button in the top-left corner of the VirtualBox app.
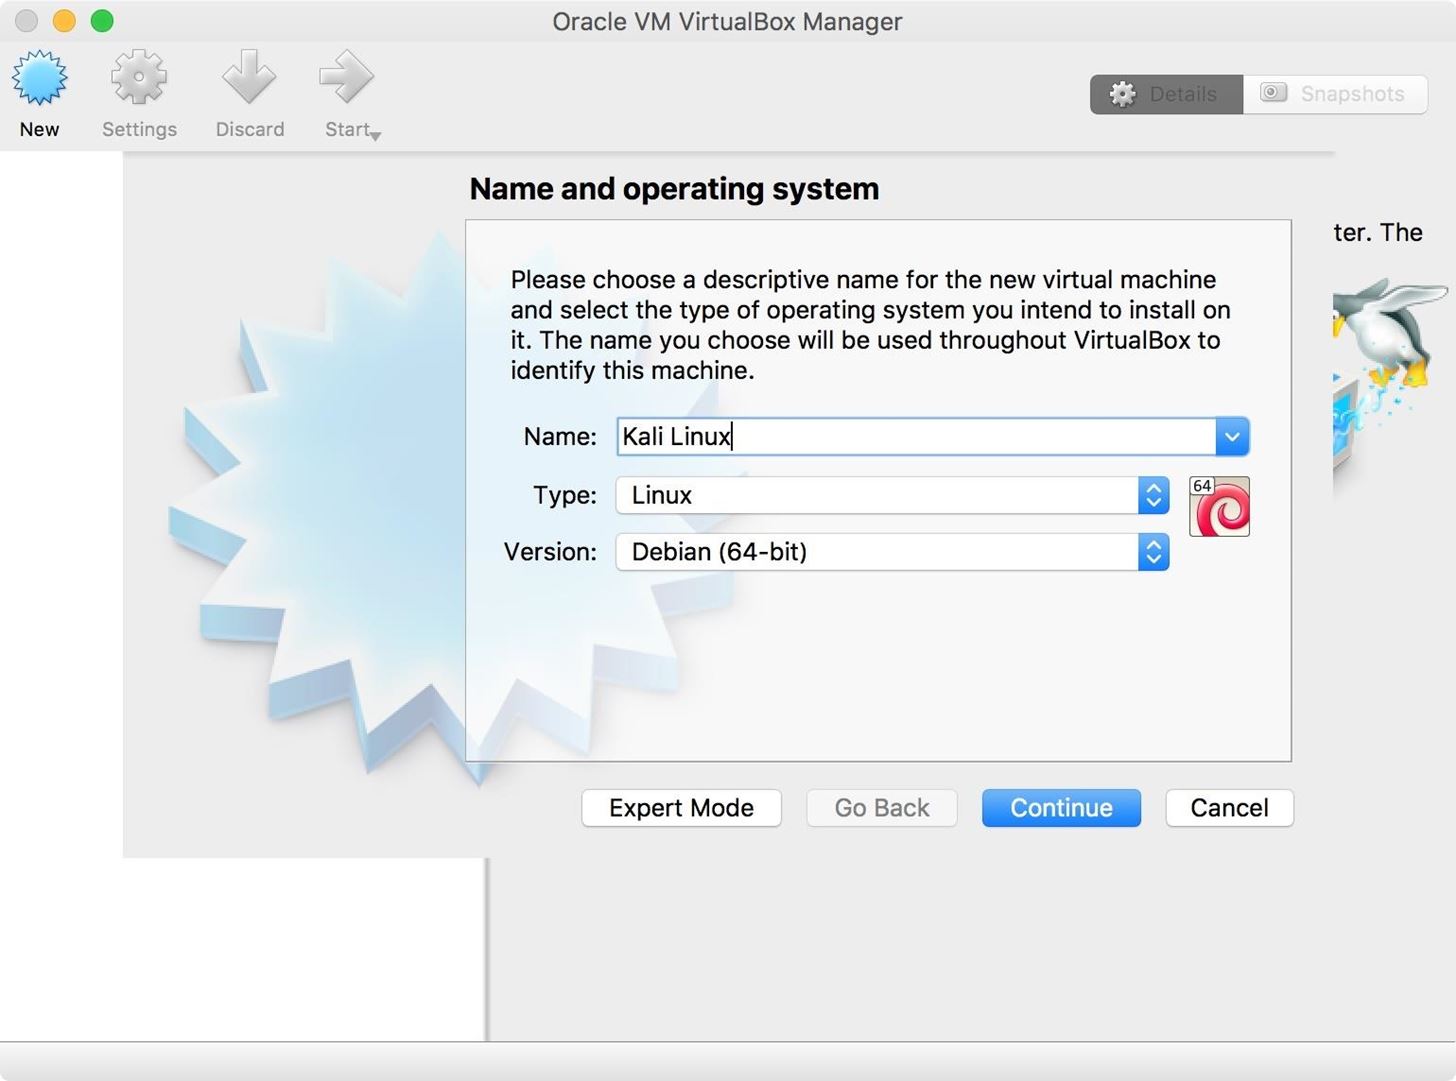
You will be presented with some options. I decided to name my machine "Kali Linux," then I selected "Linux" as the type, and "Debian 64-bit" as the version. Once you have selected the appropriate options, click "Continue."
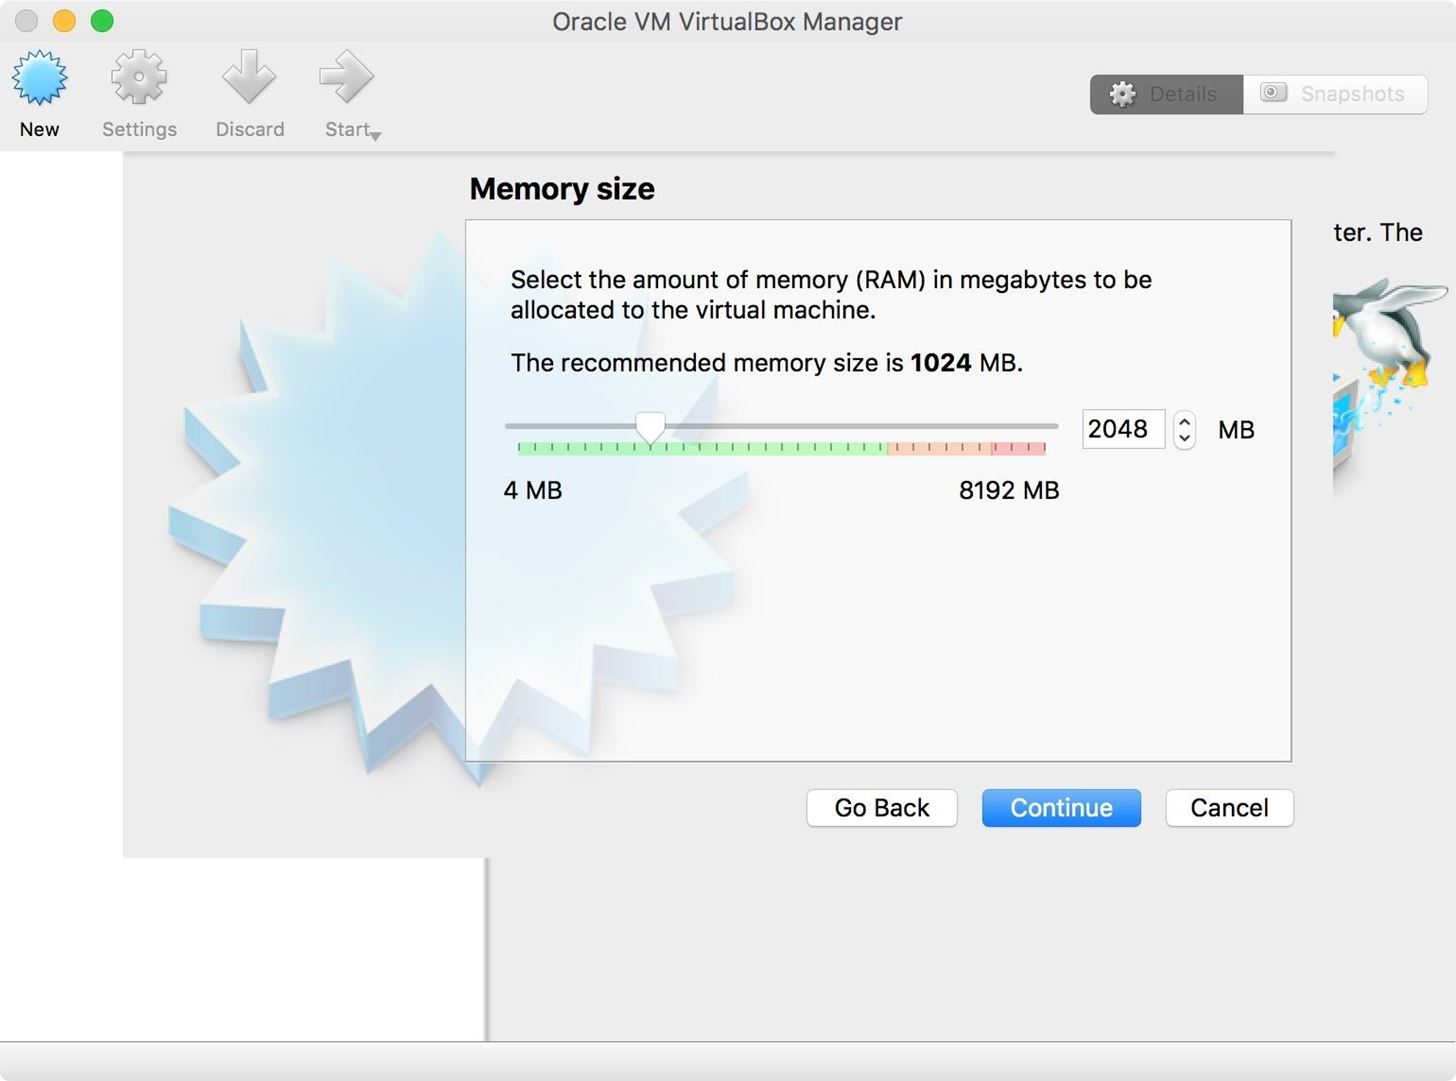
You will be prompted to select the memory size. This will depend on your machine's configuration, since using a lot of RAM may slow your host operating system down. I gave my guest machine 2 GB, which should be more than sufficient for Kali Linux. Once you have set a suitable amount of RAM, click the "Continue" button.
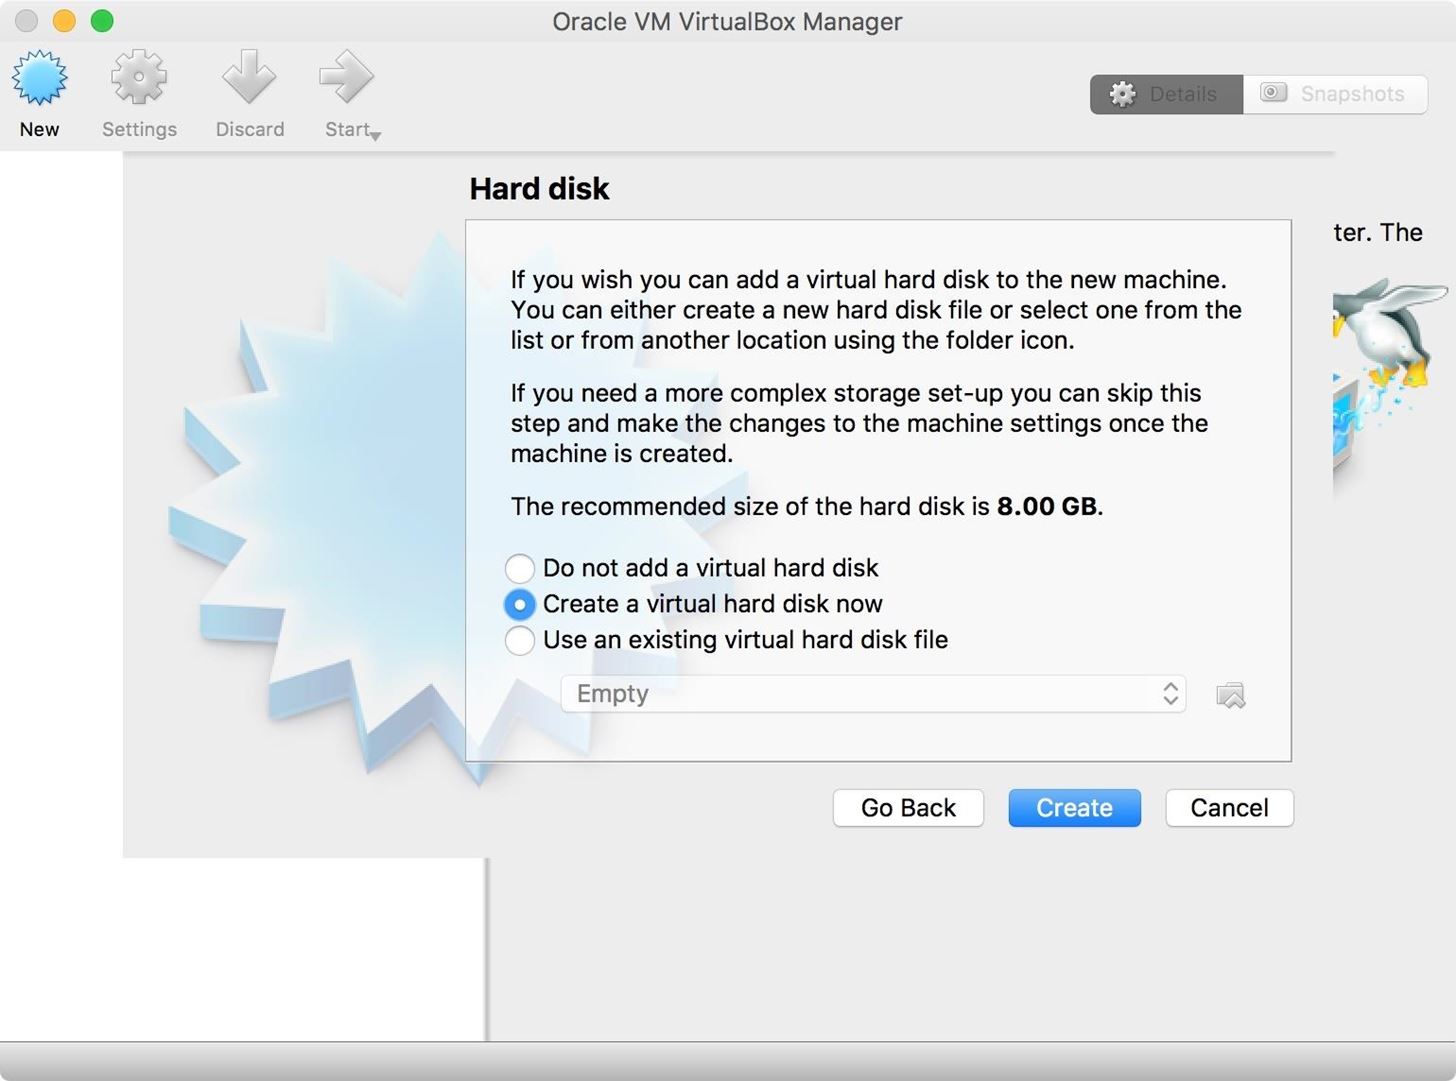
Now we are presented with a choice for the guest machine's hard disk size with some options.
- Do not add a virtual hard disk: This allows us to run Kali Linux in live mode, essentially emulating a machine with no attached hard disk. This is the equivalent of booting Kali from a USB stick. Changes made to the file system will not persist.
- Create a virtual hard disk now: This allows us to create a fresh hard disk that we can install Kali Linux to. I prefer to have a virtual hard disk so that my updates are saved to the system, and so that I can store information that I've gathered about my targets on the OS. For example, Metasploit uses a database to keep track of credentials, etc.
- Use an existing virtual hard disk file: This is if you want to load an already created hard disk. For example, if we already had a Kali Linux hard disk image, we could load it here.
Needs vary. Running in live mode is acceptable, but in some cases, you will be working on files on the VM and you want persistence. This is why I opted to create a virtual hard disk. Once you are satisfied with your option, click the "Create" button.
Since I opted to create a new virtual hard disk, I have some more work to do. I selected the VDI file type because I'm not really concerned about compatibility with other virtualization software. If you need compatibility with other virtualization software, you will need to select the appropriate file type for the virtualization software. When you are satisfied with your selection, click the "Continue" button.

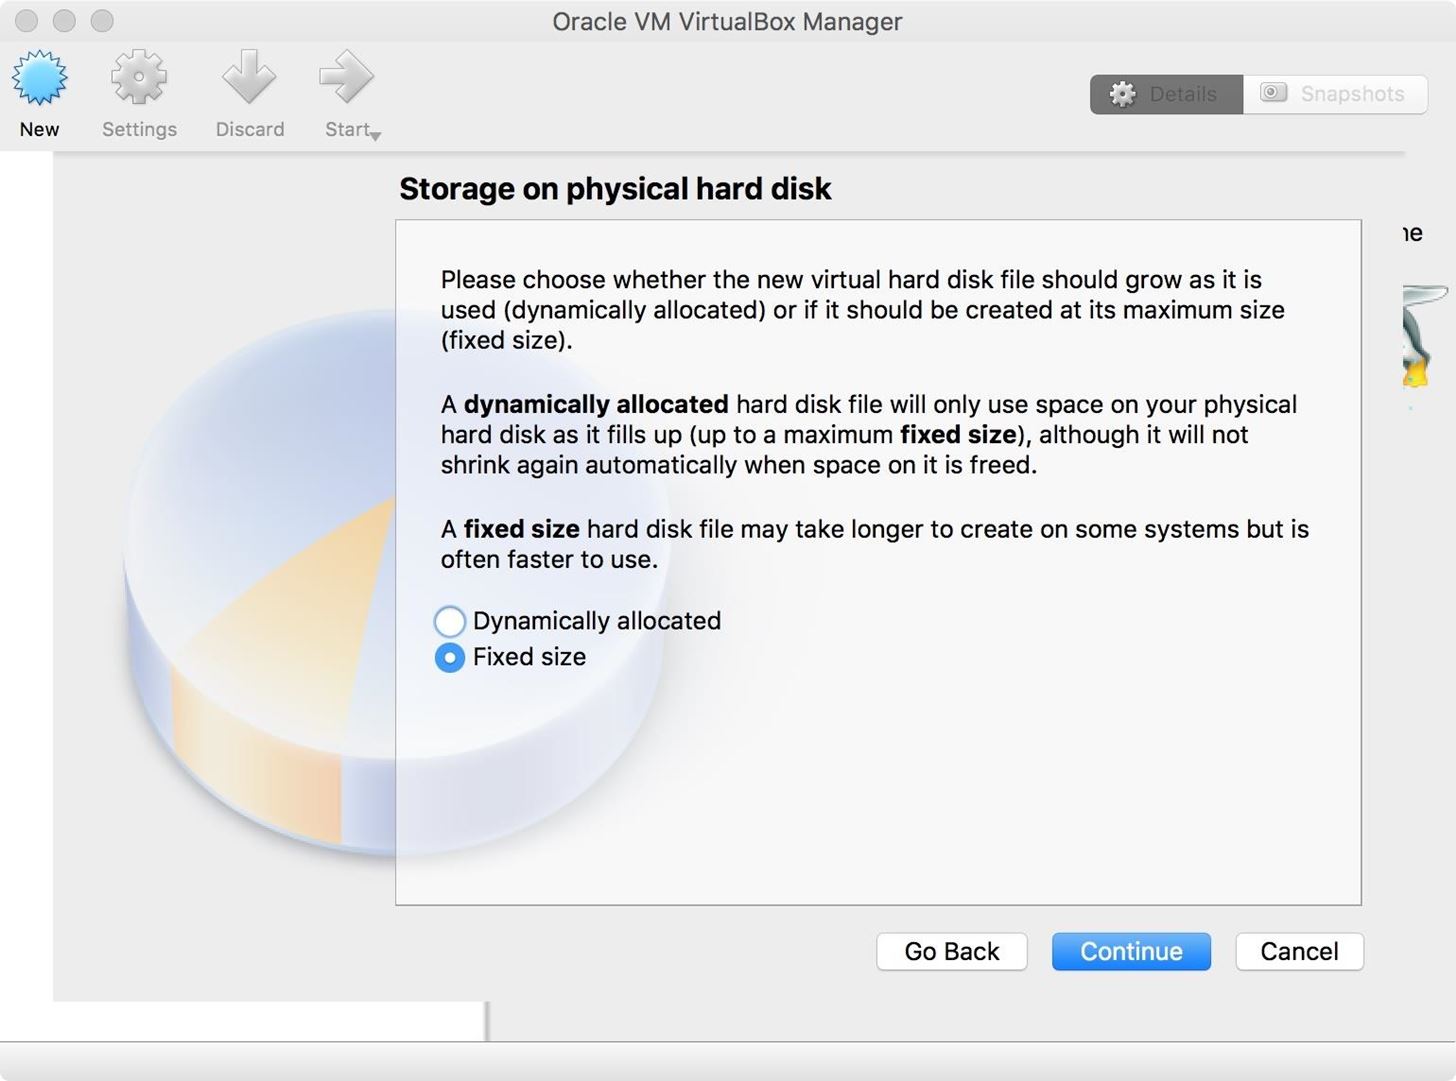
Our next configuration step is deciding how the hard disk space will be allocated, and there are two options:
- Fixed size: This will create a hard disk file of the size we have selected.
- Dynamically allocated: This will allow the hard drive file to grow and shrink depending on the guest operating systems needs.
Dynamically allocated can save a bit of space, but having a fixed size is a little bit faster. I opted for fixed size since I have plenty of space on my machine. When you're satisfied, click the "Continue" button.
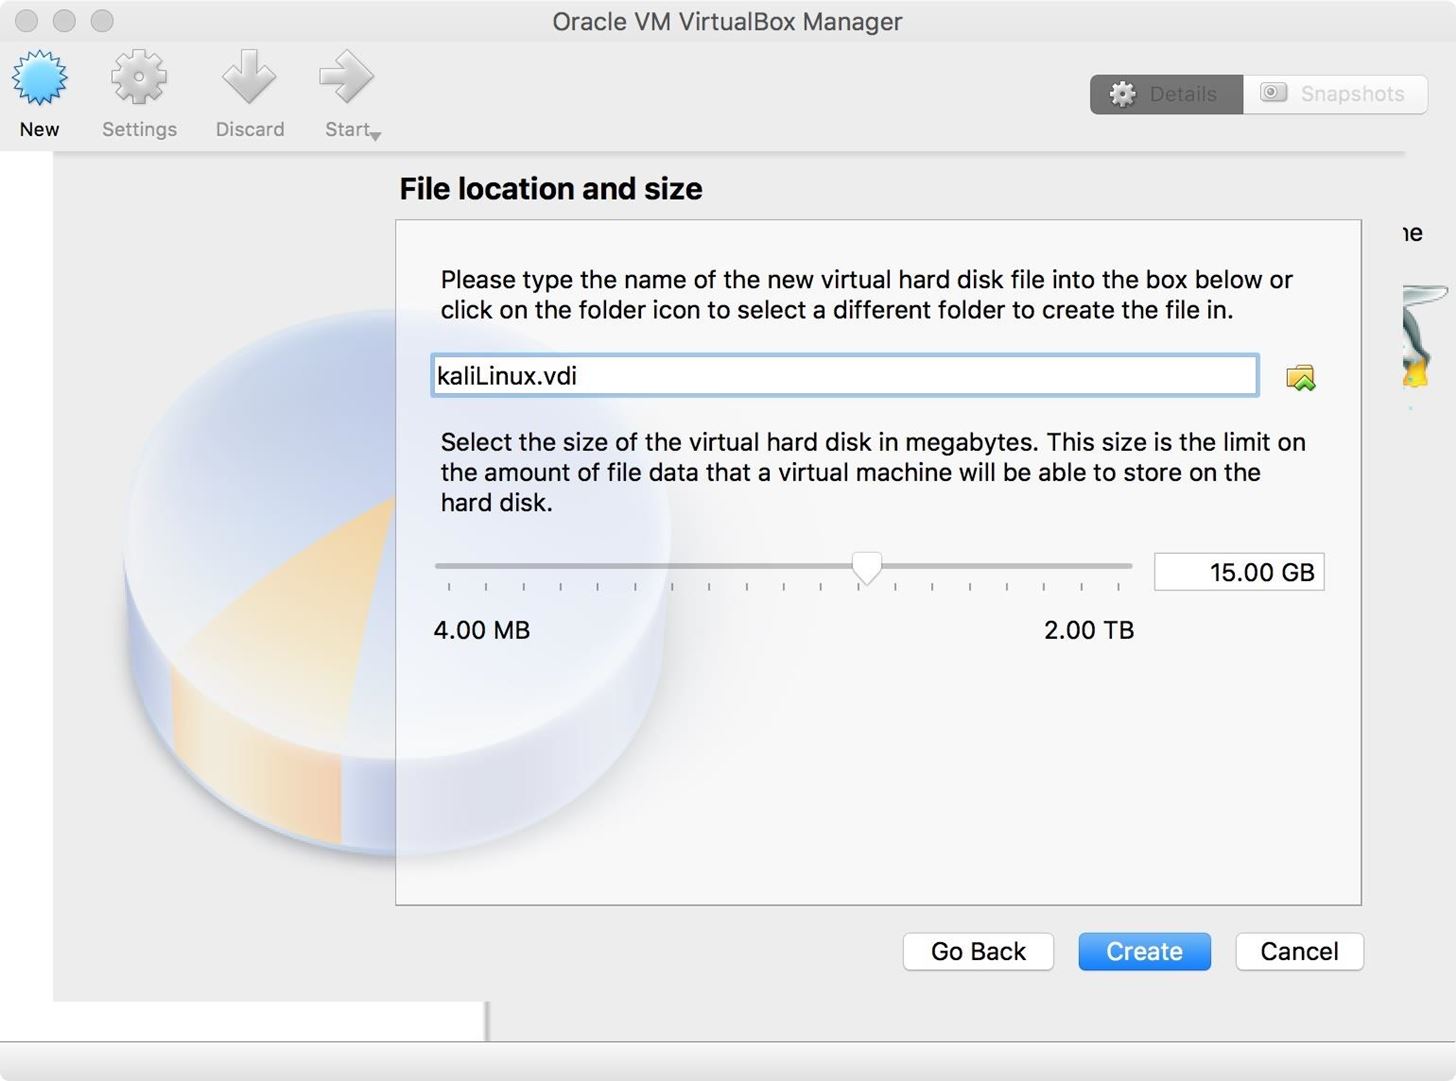
Next, we need to decide the size of the hard disk. I am going to allot 15 GB to my virtual drive. Kali Linux requires a minimum of 10 GB of space, so 15 should allow me wiggle room. You will also need to select the location to save your virtual hard disk. This can be done by clicking on the folder icon by the "Name" field. I usually keep mine in the Documents folder, though, it doesn't really matter where you put it. Once you are finished, click the "Create" button.
On my machine with newer hardware, I was able to create the image in roughly 12 seconds. Older hardware may take longer.
Step 4: Install & Run Kali Linux
If everything went according to plan, you should have a fresh virtual machine in your VirtualBox Manager.
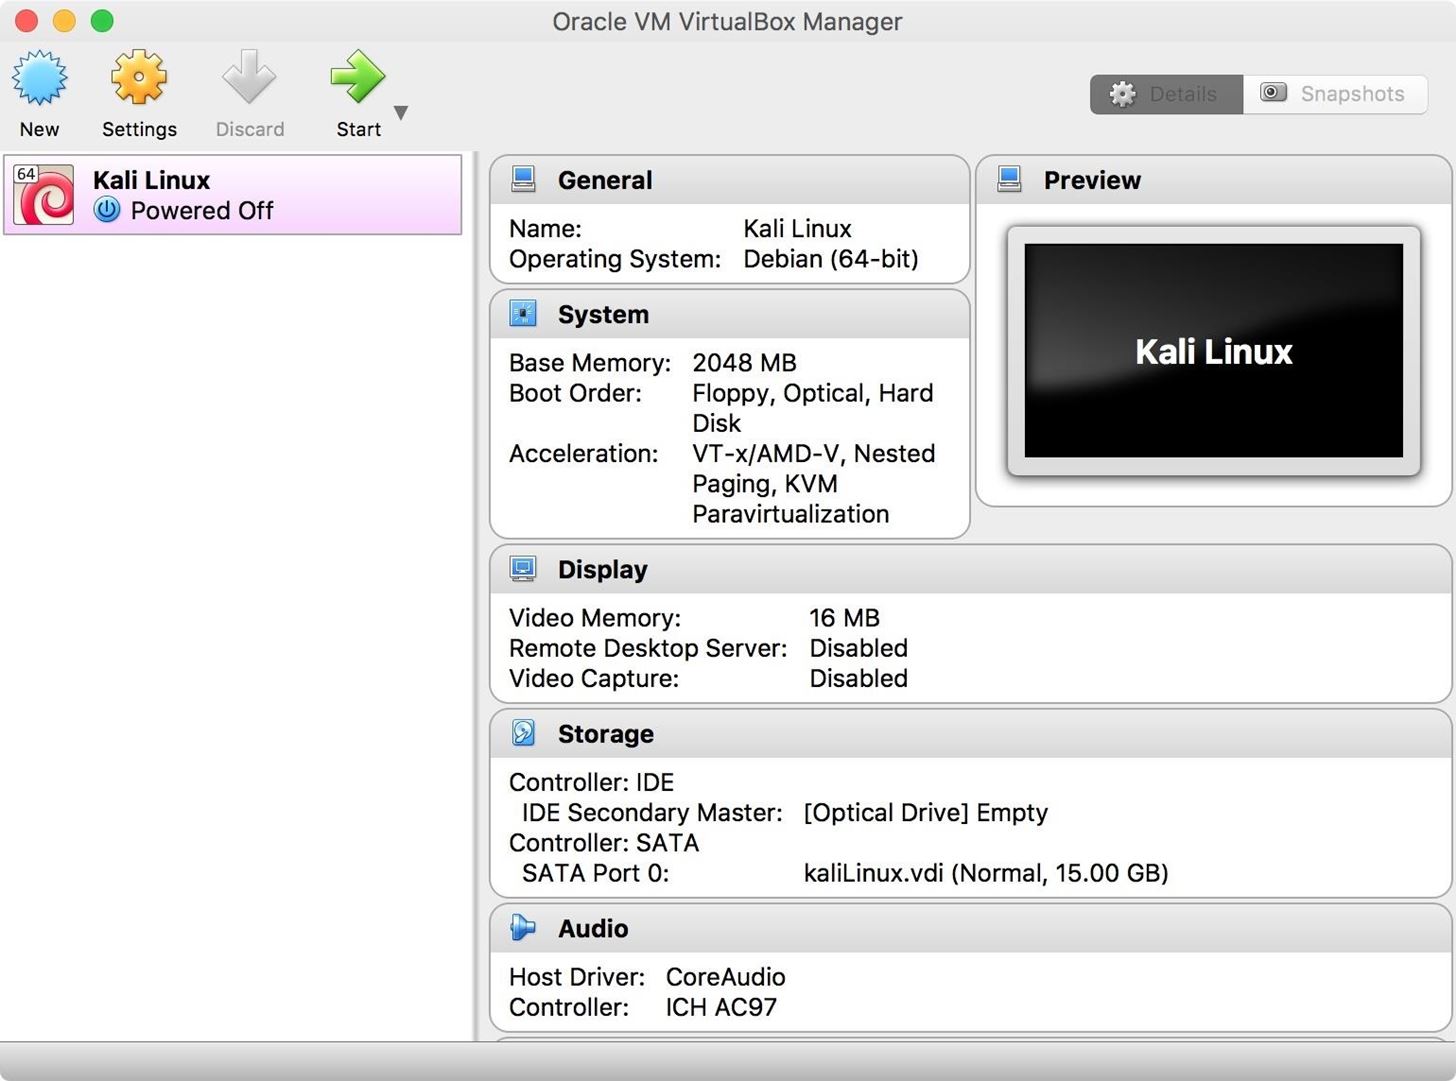
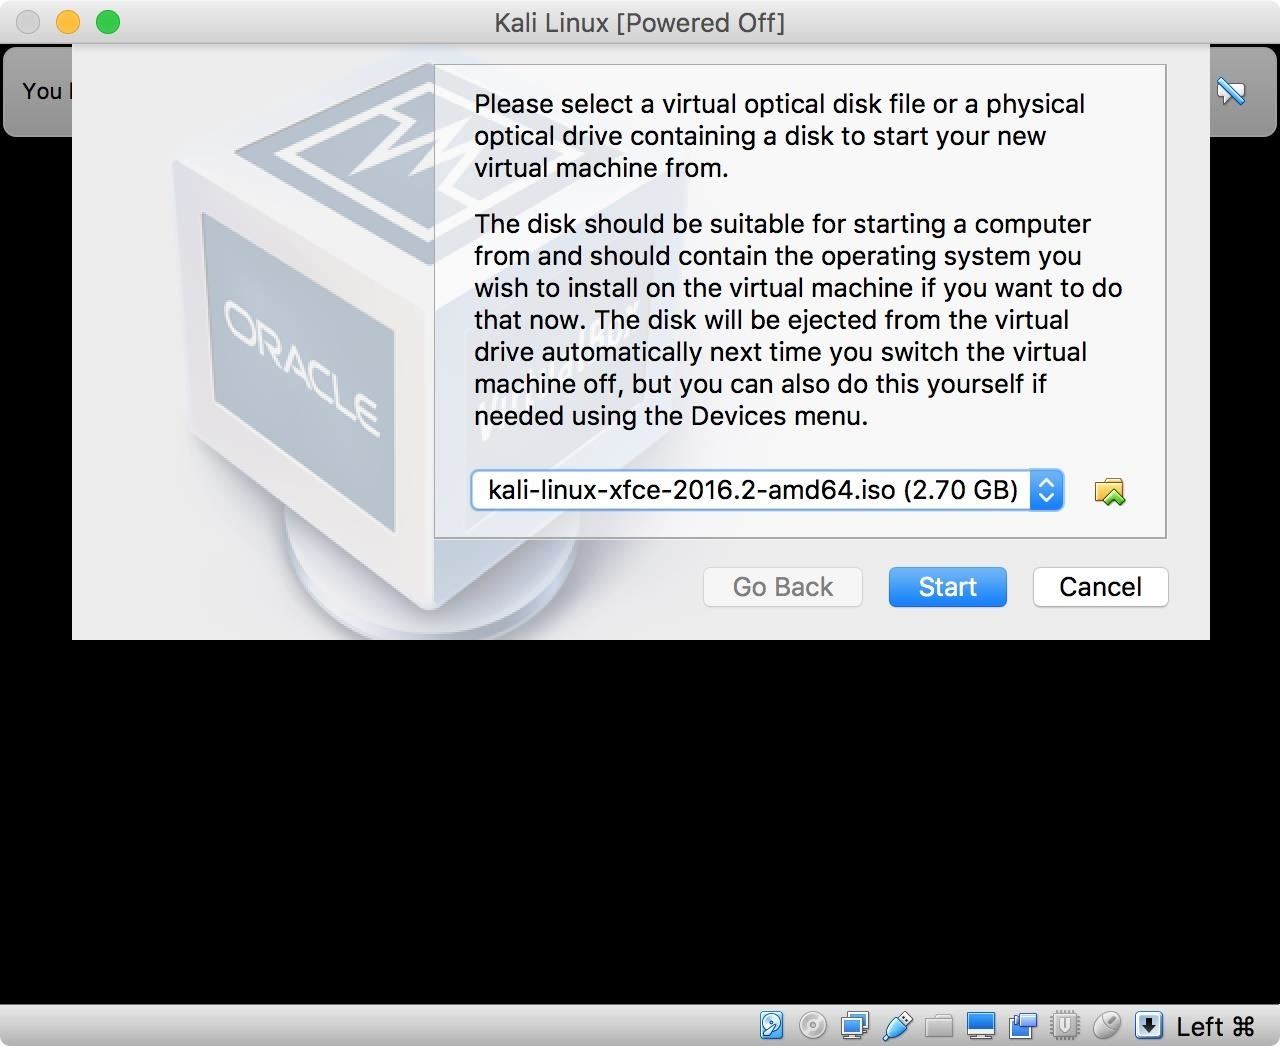
Start the virtual machine by selecting the Kali Linux VM, and then clicking on the green "Start" button. You will be prompted to select your Kali install media. Click on the small folder icon and navigate to your Kali ISO that you downloaded in Step 2 above. Once it is selected, click the "Start" button.
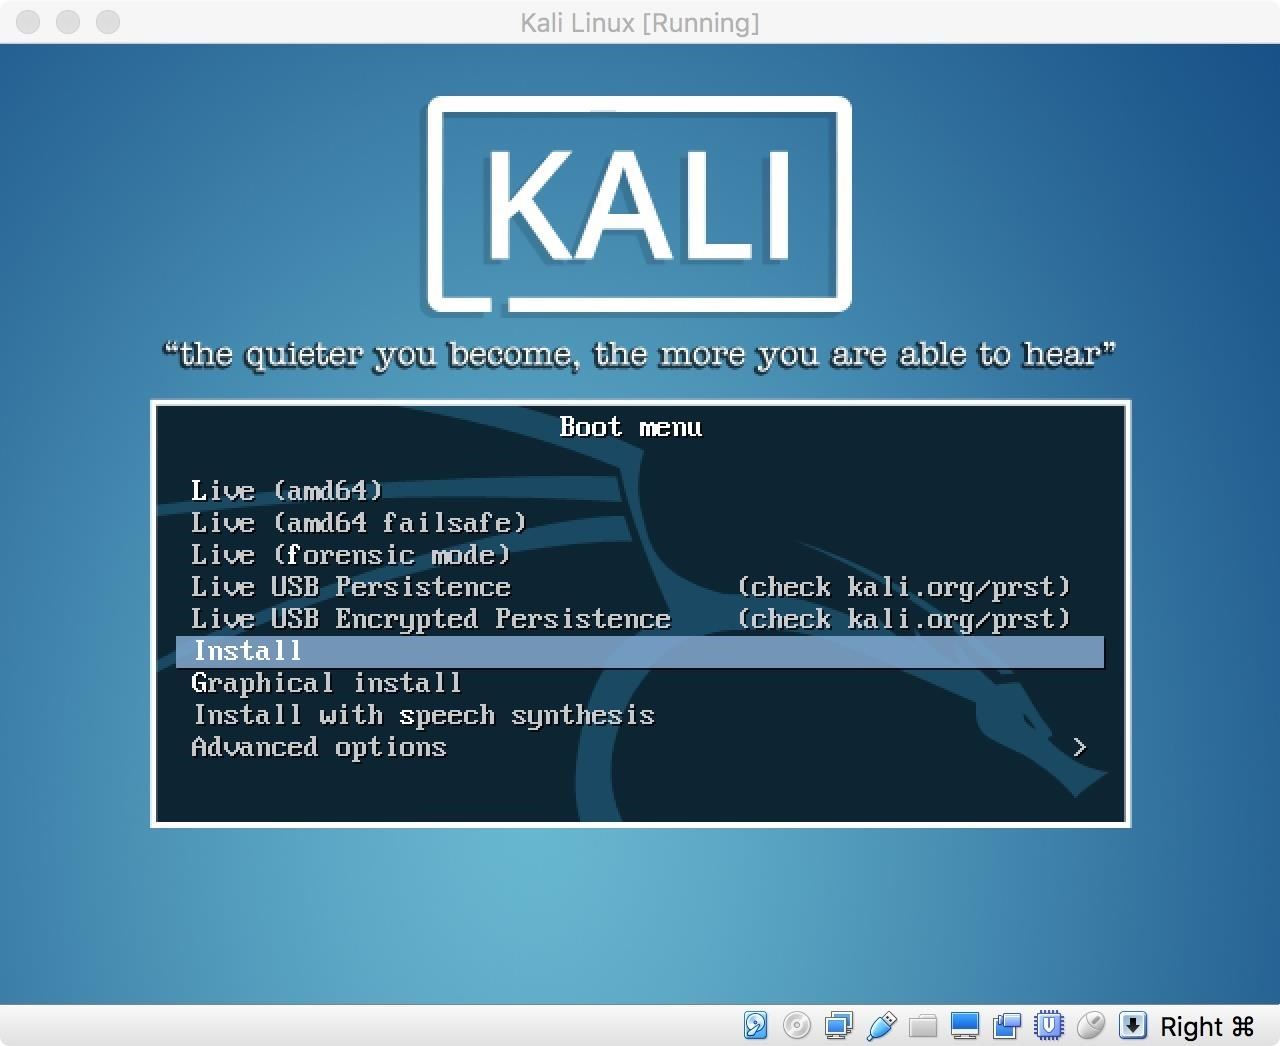
The machine will start up. Select your preferred installation mode in the GRUB menu, and install as usual.
And Now You Have Kali on a Mac
Between the already capable macOS and a Kali Linux guest machine, your Apple should be ready to take on almost any security challenge. Coming up, we'll be diving into more tools for macOS, so stay tuned.
Just updated your iPhone? You'll find new emoji, enhanced security, podcast transcripts, Apple Cash virtual numbers, and other useful features. There are even new additions hidden within Safari. Find out what's new and changed on your iPhone with the iOS 17.4 update.


26 Comments
Hi, with Kali set up in VirtualBox, how do you give it access to the WirelessCard? Thanks
Hi!
Its a little late for answering but:
Just press Devices in the Menu bar. A dropdown menu will appear with the option USB. Go ahead and press USB. Another Menu will going to open. From this menu you can easily select the device you want to attach to your VM
You can add another network card to the VM bridged, but this won't give you access to tools like airodump. You will want a USB card. I recommend Alfa cards, the more range the better.
Cheers mate
In the VBOX settings, select Bridged and then click Advanced and then enable promiscuous mode.
Anything for windows?
help! need to crack WPA2 PSK :)
You need a good Dictionary to crack the encryption of the password or you can simply phish the password by fluxion or wifi-phisher tool. :)
I keep getting a fatal error when I try to start the machine. Can any one help?
what is the error?
You might have been opening the .ova file and then it would be trying to open a different instance. Try downloading an .iso which you can easily run after the virutal harddisk is setup. You can choose the same one he did: https://www.kali.org/downloads/
Thanks for the great tutorial.
Hoo Boy. Ok I just installed Kali Linux, it seemed to go successfully. Until it asked to login. I seem to have forgotten my username and password. Is there a way to fix this or am I fucked?
You can mount the disk with another VM and eliminate the password, or you can set your boot target to /bin/bash.
When downloading Kali, I don't have the ISO option, only the torrent. Then when I try to start on virtualbox, I am unable to select the kali download. What do I do?
welp nvm it was hiding in the depths of the downloads
two years later lol I have this same problem but can't figure it out
hello, will the Alfa AWUS036NHA adapter work considering that I am using Kali through a virtual machine on a mac? I know some people had problems... if this adapter won't work, can you suggest me a good one to use through a virtual machine on a mac?
It should work providing you attach it to the VM
I got an error (this kernel requires an x86-64 CPU, but only detects an i686 CPU, unable to boot)
I can only pick the Debian 32-bit also, idk why. I just can't chose 64 bit only 32.
Anyone know a way to switch it to 64 bit or if you know about this error and know how to fix it?
Nevermind. I have solved this problem, in the setting BIOS you have to enable something in the Virtualization under security
While trying to install the VirtualBox an error occurred and it says the installation failed. Can someone tell me what could've went wrong/ how to fix it?
nvm I figured it out lmao
Can you help me how to fix it as I have the same problem, please.
Im using the box on win10 but keep running into sda mount issue! Any help in the right direction
hello , i've been having hard time installing the linux on my mac for good three months now , it keep saying error will appreciate if someone can help me
Share Your Thoughts