


Overclocking is quite an awesome thing. When computer components are designed, they are made to run at a certain speed, otherwise known as their clock and bus speeds. These limits are not actually limits. You can overclock components, which essentially makes them go faster than their set limitations. This can save you a lot of cash when newer components come out and you don't have enough money to upgrade. However, when you overclock components, you must be careful and make sure that the machine is getting adequate power and cooling.
When overclocking, the corresponding part will start throwing off a lot more heat, because it is working very hard to push itself beyond its mortal-computer threshold. So if you're not careful, you can actually fry components. That would cost you a lot more than a new graphics card would run you in the first place. So, in order to keep our parts cool and functioning, we need to ensure that our fans are cooling everything down properly, which may require an increase in fan speeds.
That brings us to yet another issue. If you are overclocking and running your fan speeds up, you will start consuming loads more power than your system may be able to handle. Make sure your power supply is a beast and can handle what we throw at it. I'm hoping that the chances of that are pretty high, seeing as you already own a gaming PC, so you must have at least some power to spare. Since we require extra power, we must also increase the voltages available to them.
What You Need
- Windows operating system
- ATI or NVIDIA graphics
- Overclockable RAM or processor
- ATI tool (a tool for benchmarking your GPU)
- Sapphire TriXX or MSI Afterburner
- A BIOS capable of overclocking
- CPU-Z to monitor CPU and RAM speeds
- Core Temp to monitor CPU temperatures
- SpeedFan (to make sure you can throw your fans to 100% speed in a pinch if you need it)
Step 1 Start Overclocking
GPUs
- Start TriXX or Afterburner.
- You have four values you can adjust: Core Clock, Shader Clock, Memory Clock , and Fan Speed. The shader clock is only adjustable on NVIDIA cards, so if you have an AMD card, just ignore this setting.
- Keep the settings linked (enabled by default), because you will often run into issues overclocking things separately.
- Raise the clock speed by only 5 MHz at a time, to make sure we don't push the parts too far.
- Repeat the GPU parts in step one and two until you reach your desired (or maximum) overclock level.
RAM and CPU
- Reboot your computer and go into the BIOS settings (usually F2 during the Power On Self-Test).
- Navigate to your advanced settings tab and try to find the options pertaining to RAM and CPU voltages or clock/bus speeds (bear with me, this varies on every system).
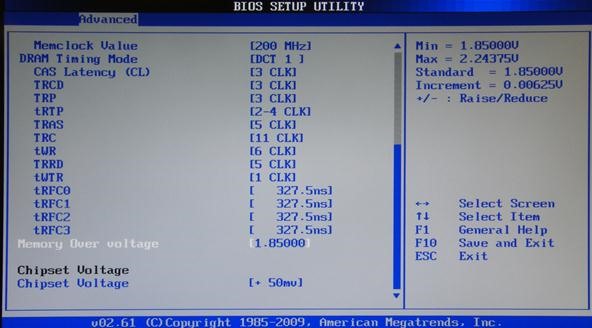
- A good rule of thumb that I use for both RAM and CPU is to increase voltages to the next available one (meaning one "up" from your current speeds, ex: 2000MHz to 2200MHz etc.) and then your bus speeds also increased by one interval. Don't go crazy, you could break components.
Step 2 Benchmark & Test
Now we need to test the new clock settings and make sure it's not too much for our components to handle by giving them a stress test.
GPUs
- Open up Furmark.
- Set your resolution to the resolution of your screen.
- Check Fullscreen and hit the BURN-IN test button.
- Make sure you don't see any black lines in the circle. This means that you pushed the card too far and need to down clock. Also, watch your temperatures. Generally, I think anything over 85 degrees Celsius is really unsafe.
- After you find a sweet spot, run it in Furmark for 45 minutes or so, just to make sure it can handle extended use in its new clock speed.
RAM and CPU
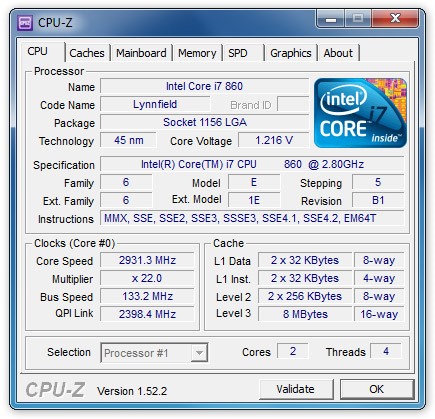
- After you have changed your CPU or RAM bus speeds, you need to test it.
- Run CPU-Z and make sure your voltages and speeds checkout. They need to be stable and, of course, faster than they were before overclocking.
- Monitor your temperature with Core Temp, again, making sure that you don't pass anything beyond 85 degress celsius.
Easy as pie!
You can chat with members of Null Byte, including myself through our IRC channel. You can also follow me on Twitter or circle me on Google+ for my latest tutorials and posts.
Just updated your iPhone? You'll find new emoji, enhanced security, podcast transcripts, Apple Cash virtual numbers, and other useful features. There are even new additions hidden within Safari. Find out what's new and changed on your iPhone with the iOS 17.4 update.


8 Comments
"Since we require extra power, we must also increase the voltages available to them."
What does that actually mean?
I believe it means that since you are making it go faster you are going to need more power for it to do that.
It means that in order to overclock, you need to increase the amount of power available to the component.
I meant do you literally mean you need to admit higher voltages to your computer parts, because while you said voltage a number of times and there was a thing labelled "Chipset Voltage" in your image with units mv, you didn't mention it. Instead you did things like: "increase voltages to the next available one (meaning one "up" from your current speeds, ex: 2000MHz to 2200MHz etc.)". That's not changing voltage that's changing the frequency of the parts inside, which would necessitate more power but I didn't see anywhere a mention of how you actually do that. Or is it automatic?
I believe it does it when you are changing the MHz
Nonono, I mean the clock-speed as an example of the "next one up". You actually do increase the voltages. My m18x does it in increments of 1.5(? something weird like that).
Overclocking so long as moderately tuned, is a good thing, over tuned can be BSOD's My Alienware Wartime Edition and Also Wife's AlienWare Area-51 Both Have AwardBIOS & Overclocking Built IN, It's Quite Easy To Tweak Only Three or so settings and wah-lah overclocked, Just gotta read the F1 Info's So You don't flubber up the settings causing BSOD's or worse...! Cheers...-=8^)~(^8=-+
I am thinking to overclock a video card and a pair of RAM sticks.
EVGA 01G-P3-1302-LR GeForce 8400 GS 1GB 64-bit DDR3 PCI Express 2.0 x16 HDCP Ready Low Profile Ready Video Card
Team Elite 4GB (2 x 2GB) 240-Pin DDR3 SDRAM DDR3 1333 (PC3 10660) Desktop Memory Model TED34096M1333HC9DC
I have heard people mention overclocking these before. I have been trying to find information on the results they got in performance and the new clock settings they left it at for good results, but have been unable to find anything. Do you know of anyone who has overclocked these items, or know where I could maybe find information on overclocking these items in particular besides on google?
Share Your Thoughts