
As pentesters and hackers, we're going to be working with text frequently — wordlists, configuration files, etc. A lot of this we'll be doing on our machine, where we have access to whatever editor we prefer. The rest of it will be on remote machines, where the tools for editing will be limited. If nano is installed, we have an easy-to-use terminal text editor, but it isn't very powerful.
Luckily, most systems will have either Vi or Vim installed. Vi stands for visual and is a powerful, fast modal text editor that works in either insert mode (where you're typing inside the document) or normal mode (where you input commands for the session). Switching between these sessions is as easy as a keystroke, so it's great for those of you who don't like taking your hands off your keyboard.
Vim, which stands for Vi IMproved, has all the features of Vi with some excellent additions that aid in editing source code. There's also a comprehensive help system and lots of customization options available. Many systems symlink Vi to Vim, including macOS. Personally, Vim is for all of my editing on remote hosts.
Vim may seem complicated and unintuitive, but don't worry — it feels that way for everyone when they're just starting. The trick is to keep at it. The longer you use Vim, the better you will get with it — to the point where you won't even need to take your hands off the keyboard.
This guide will be very introductory. There are entire books written about Vi/Vim, but I want to make sure you know at least the basics so you can get up and running with it.
Configuring Vim
Our first step is to configure Vim. Since we'll generally be working with code or configuration, we'll want line numbering and syntax highlighting on. Vim can be configured by editing the .vimrc file in your home directory.
Step 1: Open a Terminal
Open up a terminal emulator such as iTerm, and ensure you are at your home directory with the command:
pwdThe terminal should show that you are in /Users/$yourusername or something like root@kali. If it doesn't, enter the following command, which will change directories to your home directory.
cdStep 2: Edit the File
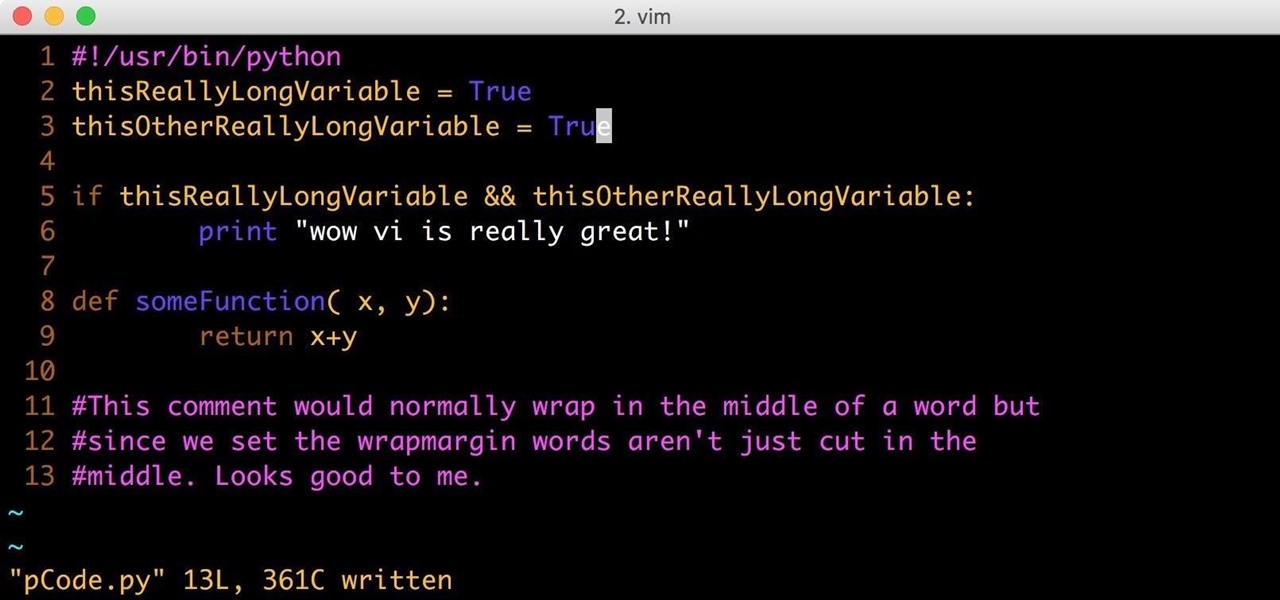
Your .vimrc file is where your Vim configurations are stored. As you use Vim, you will start to have more custom configuration in your .vimrc file. I keep a copy of my complex .vimrc on my GitHub, but in general, when you are using Vim on a remote host, unless you are an authorized user, you won't have a custom .vimrc so it's important to be familiar with basic behavior.
In the terminal, enter the command:
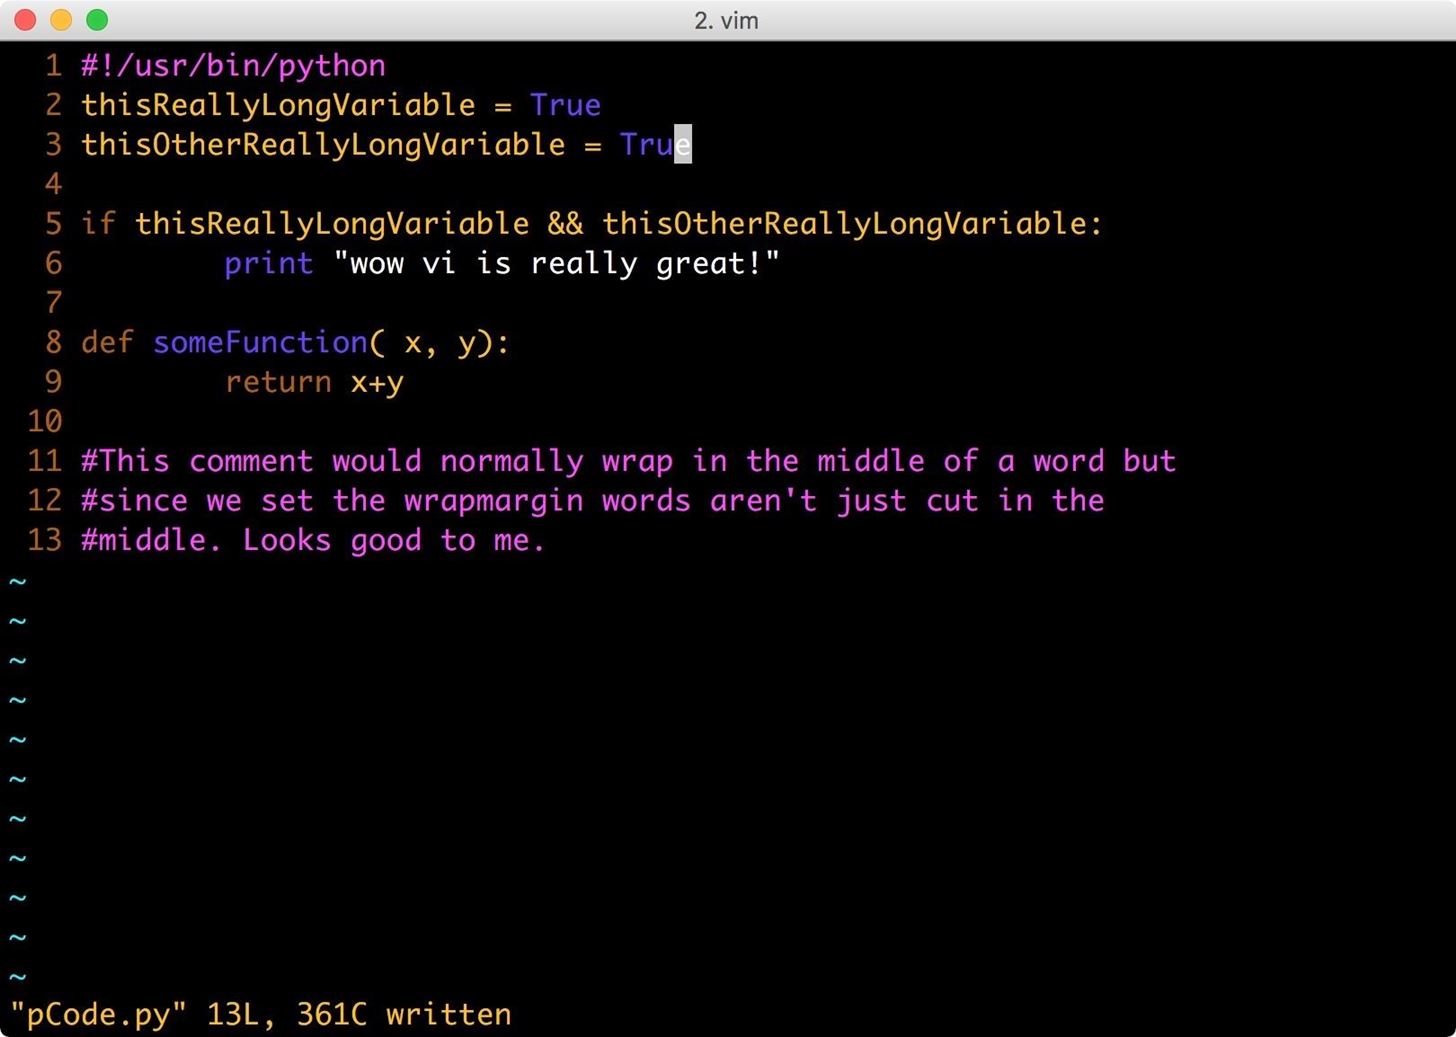
vim .vimrcThis tells Vim to open the file .vimrc. This file may not exist. In my case, I haven't configured .vimrc yet. As you can see below, it's an empty document, and the tilde (~) symbols simply indicate empty lines.
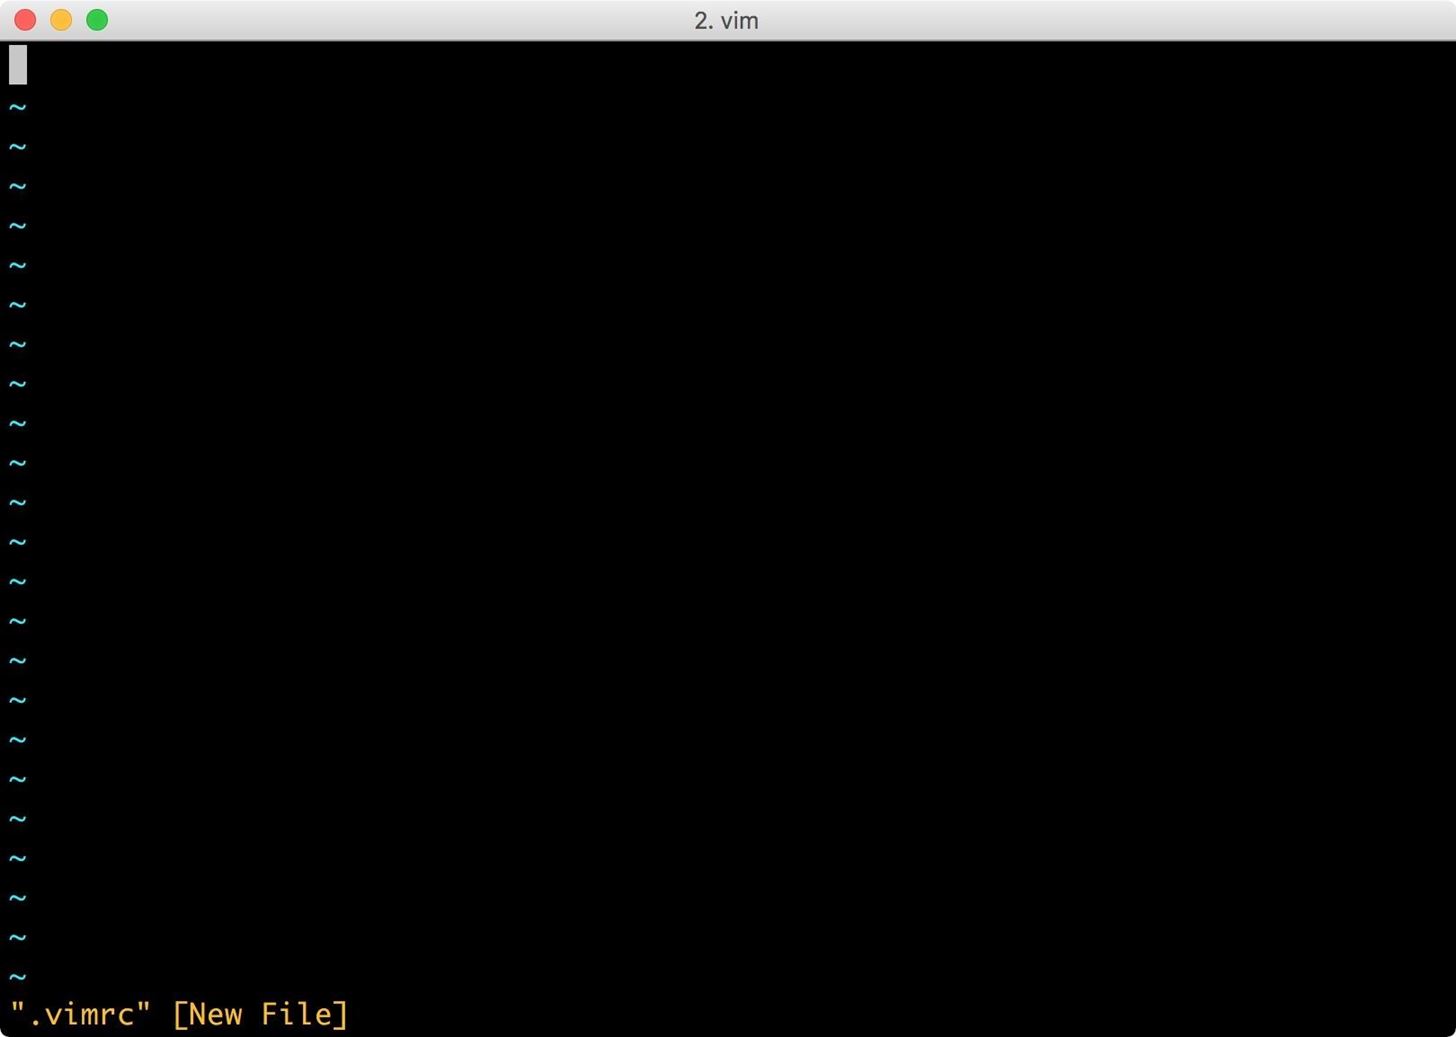
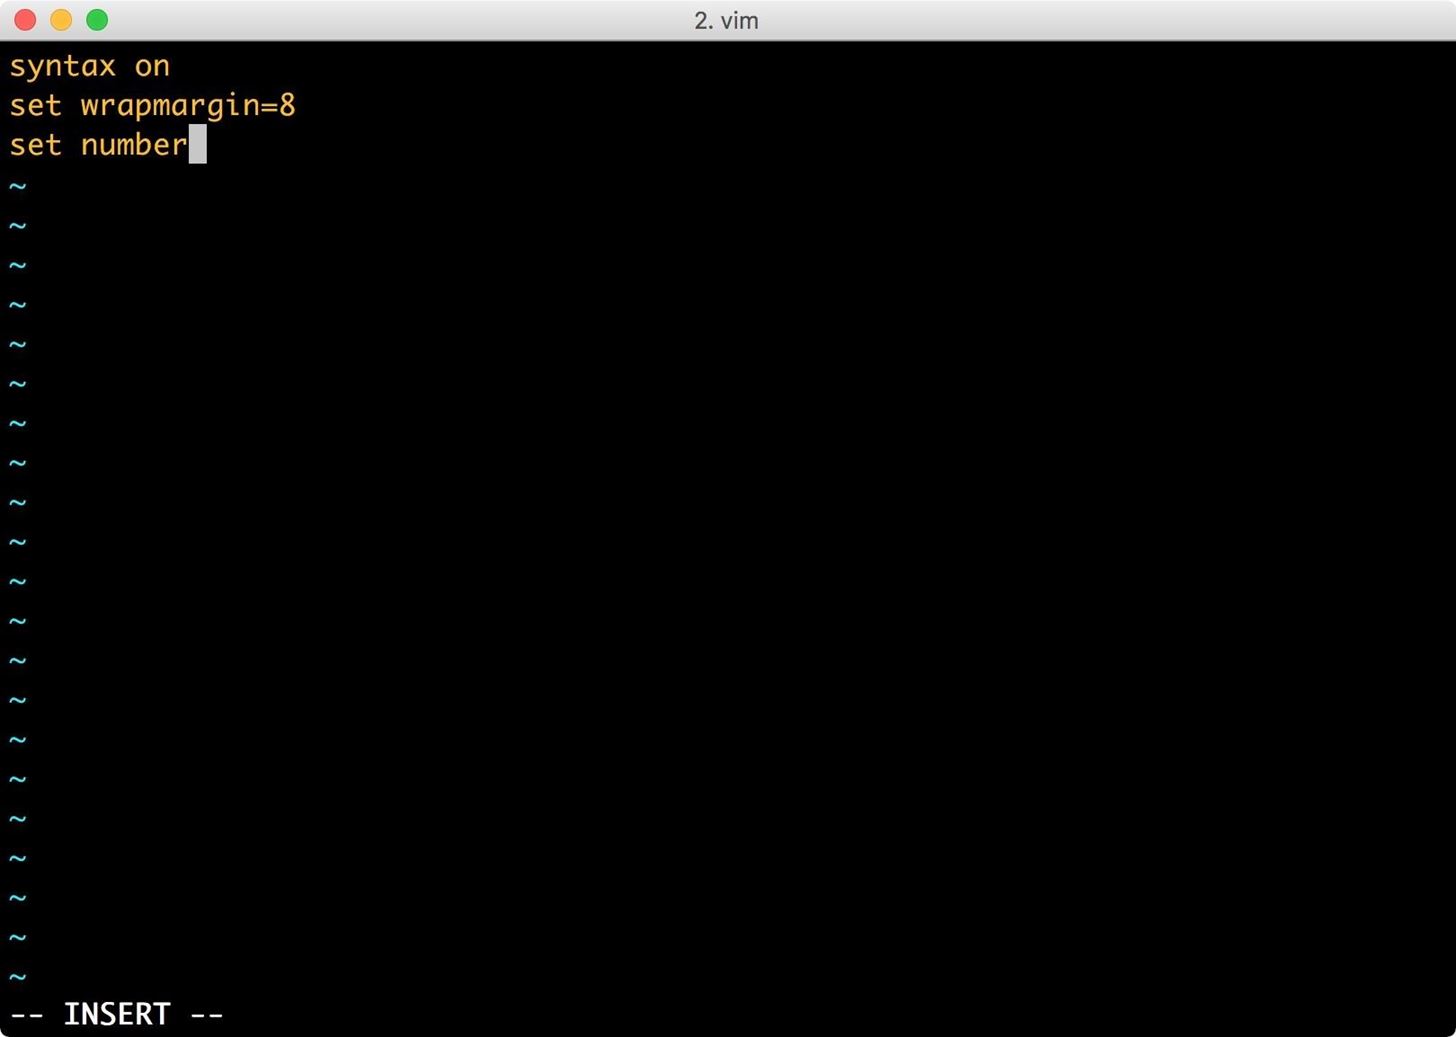
Vim starts up in command mode (aka normal mode), not insert mode. This means that keys pressed will be interpreted as commands for Vim and not data entry. In order to get out of command mode, you will need to press i on your keyboard. This enables insert mode. If you were to press a instead, Vim would move the cursor one space to the left and begin insert mode there.

In the image above, in the bottom left of the screen, we can see we are in insert mode. Now we can type in our configuration. You will want the following lines in the file:
syntax on
set wrapmargin=8
set number
Syntax on enables built-in syntax highlighting for many programming languages and configuration files. Set wrapmargin=8 gives us an 8-character buffer before the end of the terminal and makes the screen more legible. Set number simply turns on line numbering.
Step 3: Write Your Changes & Quit
We will now need to press the esc key in order to change Vim's mode back to command mode. The "INSERT" text at the bottom left of the screen should disappear when you are in command mode.
In order to write (w) and quit (q), we simply enter the following command, including the colon (:) character.
:wqWe now have a .vimrc file, and the next time we edit something with Vim, we will see the changes. As you can see below, it looks a whole lot better.
Step 4: Move Around in Command Mode
When we're in command mode, we can move around the document quickly. The arrow keys will move around the document, as well as h, j, k, l — these keys work just like the arrow keys. If you've ever played Crawl, you will be very familiar with them.
h       moves left
j       moves down
k       moves up
l       moves right
Some additional movement keys:
e       moves you forward to the end of a word
w       moves you forward to the beginning of a word
b       moves you back to the beginning of a word
$       moves you to the end of a line
0       (zero) moves you the beginning of a line
G       moves you to the end of a file
gg      moves you to the start of a file
There are, of course, many more ways to move around a file, but these should cover most use-cases.
Step 5: Search a File
Often we will need to find strings in files, usually configuration, but it can also help with history files or anything else we maybe editing. For this, you will need to be in command mode. If you aren't sure what mode you are in, press the escape key, which will bring you back to command mode if you're not there already.
For a simple search, we use / and then the string. For example, /password. If we were at the end of the file, we would use ?, as in ?password, to search backward. The n command will repeat the last forward search, and the N command will repeat the last backward search.
/string     searches forward (replace string with your query)
?string     searches backward from end of file (replace string with your query)
n           repeats the last forward search
N           repeats the last backward search
In order to search and replace, we use the :%s/search/replace/ syntax (you will need to enter the colon). For instance, :%s/tcpdump/ls/ will search the entire file and replace every instance of tcpdump with ls. And :%s/myPrivEscalationScript/ls/c will search the entire file and replace each instance only if you confirm it.
:%s/search/replace/     searches entire file for "search" phrase, replaces with "replace" phrase
:%s/search/replace/c    same as above, but requires confirmation to replace
Vim also supports regular expressions in the same way that grep does.
- Don't Miss: An Introduction to Regular Expressions (Regex)
Step 6: Save, Quit & Shell Escape
Exiting Vim is always a problem for people just starting out. In order to exit, use these commands:
:w                  writes the file
:wq                 writes the file and quits
:q!                 exits the editor and discards all changes
:w someFileName     writes the changes to a file called "someFileName"
In some cases, we might want to escape to a shell to browse directory trees or look at other files. In order to execute a system command in Vim, we use the command:
:!commandThis will execute whatever command we put after the bang. This can be a shell :!bash, which we can exit to return to Vim, or we could :!ls /etc to view the contents of the /etc directory.
That Should Get You Started
This article barely scratches the surface. As I stated in the introduction, Vim is a very powerful tool with entire books being dedicated to it. However, with these basic commands, you should be able to get around files, manipulate them, and exit the editor. I highly recommend picking up a copy of O'Reilly's guides below until you feel comfortable using it.
- Vi and Vim Editors Pocket Reference: Support for Every Text Editing Task
- Learning the Vi and Vim Editors: Text Processing at Maximum Speed and Power
Once you become skilled with Vim, you'll be flying through those text files like they were clouds.
Just updated your iPhone? You'll find new emoji, enhanced security, podcast transcripts, Apple Cash virtual numbers, and other useful features. There are even new additions hidden within Safari. Find out what's new and changed on your iPhone with the iOS 17.4 update.


6 Comments
great tutorial !
I use vim for almost all project that I've created
Depends on the scope. Sometimes I just want an IDE.
It is up to preference, but with the proper configs, plugins, and scripts, VIM can do everything an IDE can and often more efficiently (if you muster past the learning curve).
Let me see, looking at my own setup, with YouCompleteMe, CTRLP, Lightline, Gitgutter, Nerd Tree, Syntastic, and the SimpleNote plugin, I can:
That and once you learn to edit with the modes and gestures, you will start thinking that using a mouse while coding is a waste of time. Find a video of someone editing in VIM who really knows how to use it... it literally looks like they are thinking about making changes, and shit happens. That is the way the editor was designed.
The learning curve is pretty steep and with determination, you can get back to parity within 3-4 weeks, so after this investment, you are at least the speed of before and only getting faster and more efficient. I have been exclusive (excepting a few tools) for probably 6 months and love it.
Side effect: you really begin to fully appreciate and love that mechanical keyboard with Cherry MX blues (or browns) in them, to the point all other keyboards (built in laptop keyboard, shitty old one at desk at home) becomes unbearable.
To make things easier, go through tutorials, get VIM keybinding keyboard stickers, etc. and it will start becoming natural. The trick is to actually use it in real coding situations, so you unlearn bad habits and learn efficient ones.
I am in complete agreement with you. But I mainly use VIM for remote boxes/config files. Sure it works great with setup, and yeah I could turn it into an IDE but Xcode, Sublime Text, and Visual Studio are all available to me ready to go on my work machines.
Oh and for keyboards, I actually don't mind the old Sun microsystems and they're reasonably priced.
Amazing tutorial, clear and helpful, many thanks.
Share Your Thoughts