


Internet Relay Chat, or IRC, is one of the most popular chat protocols on the internet. The technology can be connected to the Tor network to create an anonymous and secure chatroom — without the use of public IP addresses.
IRC servers allow one to create and manage rooms, users, and automated functions, among other tools, to administer an instant messaging environment. IRC's roots began in 1988 when Jarkko Oikarinen decided to attempt to implement a new chat protocol for users at the University of Oulu, Finland. Since then, it's been widely adopted and used as a lightweight means of communication.
The chat protocol has proven especially popular in tech communities, with channels for software user groups, support and help, and discussion areas for developers and programmers. Its user base eventually expanded to include hackers and security activists, many of whom enjoyed the protocol but found it lacked some aspects of privacy.
For hackers, and anyone else who desires anonymity, combining IRC with a proxying system such as Tor proved to be a valuable solution. Learning to join and create Tor-connected IRC channels allows one to form private communication platforms, for those interested in protecting their identity.
Combining Tor and IRC is more complicated than simply downloading the Tor Browser, so we will explain how to configure a local IRC server, connect this server to the Tor network, and connect to the server as a client.
Gather the Prerequisites
An IRC server will be easiest to combine with Tor on a Linux system, and will be more secure on a distribution intended for server usage. Some popular choices for server operating systems are Debian, Ubuntu Server, or CentOS. Any Linux distribution is technically suitable, and while Kali is used in this example, it is not necessarily the best option for a secure server.
The Linux installation used to host the server may be on a remote Virtual Private Server (VPS), a Raspberry Pi, or even just a personal server on your local network.
With our server itself selected, the first piece of software we'll need to host an IRC server is InspiRCd. This will manage the entirety of the IRC component of our server. We'll also need to install Tor. For the server, it must be able to be called as a service, so it's best to install the Tor version available on Linux repositories.
On Debian-based distros, we can update our repositories using apt. On other systems, the modules are available from their respective websites. We can do this by opening a terminal window and typing the following.
~$ sudo apt-get update

[sudo] password for kali:
Get:1 http://kali.download/kali kali-rolling InRelease [30.5 kB]
Get:2 http://kali.download/kali kali-rolling/main amd64 Packages [16.5 MB]
Get:3 http://kali.download/kali kali-rolling/non-free amd64 Packages [197 kB]
Get:4 http://kali.download/kali kali-rolling/contrib amd64 Packages [101 kB]
Fetched 16.9 MB in 9s (1,974 kB/s)
Reading package lists... Done
After our repositories are updated, we can install the necessary software by typing the command below.
~$ sudo apt-get install inspircd tor

Reading package lists... Done
Building dependency tree
Reading state information... Done
The following additional packages will be installed:
  libtre5 tor-geoipdb torsocks
Suggested packages:
  gnutls-bin ldap-server tre-agrep mixmaster torbrowser-launcher tor-arm
  apparmor-utils obfs4proxy
The following NEW packages will be installed:
  inspircd libtre5 tor tor-geoipdb torsocks
0 upgraded, 5 newly installed, 0 to remove and 782 not upgraded.
Need to get 5,156 kB of archives.
After this operation, 24.9 MB of additional disk space will be used.
Do you want to continue? [Y/n] y
Get:1 http://kali.download/kali kali-rolling/main amd64 libtre5 amd64 0.8.0-6+b1 [59.0 kB]
Get:2 http://kali.download/kali kali-rolling/main amd64 inspircd amd64 3.4.0-2 [1,585 kB]
Get:3 http://kali.download/kali kali-rolling/main amd64 tor amd64 0.4.3.6-1 [1,943 kB]
Get:4 http://kali.download/kali kali-rolling/main amd64 tor-geoipdb all 0.4.3.6-1 [1,492 kB]
Get:5 http://kali.download/kali kali-rolling/main amd64 torsocks amd64 2.3.0-2+b1 [76.3 kB]
Fetched 5,156 kB in 2s (3,322 kB/s)
Selecting previously unselected package libtre5:amd64.
(Reading database ... 287092 files and directories currently installed.)
Preparing to unpack .../libtre5_0.8.0-6+b1_amd64.deb ...
Unpacking libtre5:amd64 (0.8.0-6+b1) ...
Selecting previously unselected package inspircd.
Preparing to unpack .../inspircd_3.4.0-2_amd64.deb ...
Unpacking inspircd (3.4.0-2) ...
Selecting previously unselected package tor.
Preparing to unpack .../tor_0.4.3.6-1_amd64.deb ...
Unpacking tor (0.4.3.6-1) ...
Selecting previously unselected package tor-geoipdb.
Preparing to unpack .../tor-geoipdb_0.4.3.6-1_all.deb ...
Unpacking tor-geoipdb (0.4.3.6-1) ...
Selecting previously unselected package torsocks.
Preparing to unpack .../torsocks_2.3.0-2+b1_amd64.deb ...
Unpacking torsocks (2.3.0-2+b1) ...
Setting up libtre5:amd64 (0.8.0-6+b1) ...
Setting up inspircd (3.4.0-2) ...
update-rc.d: We have no instructions for the inspircd init script.
update-rc.d: It looks like a network service, we disable it.
inspircd.service is a disabled or a static unit, not starting it.
Setting up tor (0.4.3.6-1) ...
Something or somebody made /var/lib/tor disappear.
Creating one for you again.
Something or somebody made /var/log/tor disappear.
Creating one for you again.
update-rc.d: We have no instructions for the tor init script.
update-rc.d: It looks like a network service, we disable it.
Setting up torsocks (2.3.0-2+b1) ...
Setting up tor-geoipdb (0.4.3.6-1) ...
Processing triggers for libc-bin (2.30-4) ...
Processing triggers for systemd (245.4-3) ...
Processing triggers for man-db (2.9.1-1) ...
Processing triggers for kali-menu (2020.2.2) ...
Configure InspIRCd
Once our IRC server daemon is installed, we can begin to configure it to meet our needs. The configuration file is available on Linux systems at /etc/inspircd/inspircd.conf. We can edit this file using Nano by running the following command. If IndspIRCd was installed correctly, the file which opens should appear similar to the one below.
~$ sudo nano /etc/inspircd/inspircd.conf

  GNU nano 4.9.2           /etc/inspircd/inspircd.conf
# This is just a more or less working example configuration file, please
# customize it for your needs!
#
# Once more: Please see the examples in /usr/share/doc/inspircd/examples/

<server name="irc.local"
        description="Local IRC Server"
        network="Localnet">

<admin name="Root Penguin"
       nick="Nick"
       email="root@localhost">

<bind address="127.0.0.1" port="6667" type="clients">

<power diepass="3456" restartpass="7890" pause="2">

<connect allow="*"
         timeout="60"
         flood="20"
         threshold="1"
         pingfreq="120"
         sendq="262144"
         recvq="8192"
         localmax="3"
         globalmax="3">

<class name="Shutdown"
       commands="DIE RESTART REHASH LOADMODULE UNLOADMODULE RELOAD">
<class name="ServerLink"
       commands="CONNECT SQUIT RCONNECT MKPASSWD MKSHA256">
<class name="BanControl"
       commands="KILL GLINE KLINE ZLINE QLINE ELINE">
<class name="OperChat"
       commands="WALLOPS GLOBOPS SETIDLE SPYLIST SPYNAMES">
<class name="HostCloak"
       commands="SETHOST SETIDENT SETNAME CHGHOST CHGIDENT">

<type name="NetAdmin"
      classes="OperChat BanControl HostCloak Shutdown ServerLink"
      host="netadmin.omega.org.za">
<type name="GlobalOp"
      classes="OperChat BanControl HostCloak ServerLink"
      host="netadmin.omega.org.za">
<type name="GlobalOp"
      classes="OperChat BanControl HostCloak ServerLink"
      host="ircop.omega.org.za">
<type name="Helper"
      classes="HostCloak"
      host="helper.omega.org.za">

<oper name="root"
      password="12345"
      host="*@localhost"
      type="NetAdmin">

<files motd="/etc/inspircd/inspircd.motd"
       rules="/etc/inspircd/inspircd.rules">

<channels users="20"
          opers="60">

<dns server="127.0.0.1" timeout="5">

<pid file="/var/run/inspircd/inspircd.pid">

<options prefixquit="Quit: "
         noservices="no"
         qaprefixes="no"
         deprotectself="no"
         deprotectothers="no"
         flatlinks="no"
         hideulines="no"
         syntaxhints="no"
         cyclehosts="yes"
         ircumsgprefix="no"
         announcets="yes"
         disablehmac="no"
         hostintopic="yes"
         quietbursts="yes"
         pingwarning="15"
         allowhalfop="yes"
         exemptchanops="">

<security hidewhois=""
          userstats="Pu"
          customversion=""
          hidesplits="no"
          hidebans="no"
          operspywhois="no"
          hidemodes="eI"
          maxtargets="20">

<performance nouserdns="no"
             maxwho="128"
             softlimit="1024"
             somaxconn="128"
             netbuffersize="10240">

<whowas groupsize="10"
        maxgroups="100000"
        maxkeep="3d">

<timesync enable="no" master="no">

<badnick nick="ChanServ" reason="Reserved For Services">
<badnick nick="NickServ" reason="Reserved For Services">
<badnick nick="OperServ" reason="Reserved For Services">
<badnick nick="MemoServ" reason="Reserved For Services">

^G Get Help    ^O Write Out   ^W Where Is    ^K Cut Text    ^J Justify
^X Exit        ^R Read File   ^\ Replace     ^U Paste Text  ^T To Spell
There are several configuration parameters which we should review and edit to suit our purposes. First, we'll want to look at the "server" parameter section seen below.
<server name="irc.local"
        description="Local IRC Server"
        network="Localnet">
We can change this to whatever we would like to name our IRC channel, but the "name" option must be formed in a similar format to "irc.website.com." While for most servers, this would be important as it could be relevant to the URL, which resolves to the IRC server's IP, but as we are going to instead make our server available over Tor, we can leave it whatever we choose. For this tutorial, I left these at the default "Local" settings.
Next, we should update the "admin" settings.
<admin name="Root Penguin"
       nick="Nick"
       email="root@localhost">
The "name" and "nick" should be changed to the preferred identification for your server admin. To make identifying these slightly more straightforward, I turned them both to "admin." I left the email setting as it was, as it does not need to be a valid email address.
<admin name="admin"
       nick="admin"
       email="root@localhost">
In most cases, we'd want to change the "bind" value as well, but as all of our connections are going to be made through Tor, we can leave the address as 127.0.0.1 and the port at 6667 or the port of our choice.
<bind address="127.0.0.1" port="6667" type="clients">One important field to update is the "power" section. This provides two passwords that could be used by yourself or channel operators to restart or turn off the server. Make sure to set them to something more secure than the default passwords given.
<power diepass="useastrongpasswordhere" restartpass="andoneheretoo" pause="2">The last sections of this configuration file we'll want to modify are the "oper" or operators section, as well as the "files" section. In the operators section, we'll want to update the operator credentials to provide server authority to the users we wish. The most crucial part to update is the "password" field. Be sure to change the password to something more secure.
<oper name="root"
      password="12345"
      host="*@localhost"
      type="NetAdmin">
Lastly, we'll want to define the location of the Message of the Day and Rules files.
<files motd="/etc/inspircd/inspircd.motd"
       rules="/etc/inspircd/inspircd.rules">
If these files are already set to an appropriate location, you can simply directly edit them to update these files in nano. These files will be displayed in the channel when a user requests either of them by running /motd or /rules.
~$ sudo nano /etc/inspircd/inspircd.motd

  GNU nano 4.9.2           /etc/inspircd/inspircd.motd
**************************************************
*             H    E    L    L    O              *
*  This is a private irc server. Please contact  *
*  the admin of the server for any questions or  *
*  issues.                                       *
**************************************************
*  The software was provided as a package of     *
*  Debian GNU/Linux <https://www.debian.org/>.   *
*  However, Debian has no control over this      *
*  server.                                       *
**************************************************
(The sysadmin possibly wants to edit </etc/inspircd/inspircd.motd>)

^G Get Help    ^O Write Out   ^W Where Is    ^K Cut Text    ^J Justify
^X Exit        ^R Read File   ^\ Replace     ^U Paste Text  ^T To Spell
~$ sudo nano /etc/inspircd/inspircd.rules
GNU nano 4.9.2 /etc/inspircd/inspircd.rules
Please edit /etc/inspircd/motd
[ Read 1 line ]
^G Get Help ^O Write Out ^W Where Is ^K Cut Text ^J Justify
^X Exit ^R Read File ^\ Replace ^U Paste Text ^T To SpellWe can further update this configuration file by referencing the InspIRCd Wiki. Save the file by pressing Control-O in Nano, and then press Control-X to exit. Once the configuration file is complete, we can test our server locally.
Test the Local IRC Server
First, we can start the server daemon using systemd by typing the following in terminal.
~$ sudo service inspircd startIf the command succeeds, we can confirm it's status using the systemd status parameter.
~$ sudo service inspircd status

● inspircd.service - InspIRCd - Internet Relay Chat Daemon
     Loaded: loaded (/lib/systemd/system/inspircd.service; disabled; vendo>
     Active: active (running) since Thu 2020-08-06 20:19:27 EDT; 11s ago
       Docs: man:inspircd(8)
    Process: 2133 ExecStart=/usr/lib/inspircd/inspircd start (code=exited,>
   Main PID: 2135 (inspircd)
      Tasks: 1 (limit: 2317)
     Memory: 1.3M
     CGroup: /system.slice/inspircd.service
             └─2135 /usr/sbin/inspircd --config=/etc/inspircd/inspircd.conf

Aug 06 20:19:27 kali systemd[1]: Starting InspIRCd - Internet Relay Chat D>
Aug 06 20:19:27 kali inspircd[2133]: InspIRCd - Internet Relay Chat Daemon
Aug 06 20:19:27 kali inspircd[2133]: For contributors & authors: See /INFO>
Aug 06 20:19:27 kali inspircd[2135]: InspIRCd Process ID: 2135
Aug 06 20:19:27 kali inspircd[2135]: Loading core modules ................>
Aug 06 20:19:27 kali inspircd[2135]: InspIRCd is now running as 'irc.local>
Aug 06 20:19:27 kali systemd[1]: Started InspIRCd - Internet Relay Chat Da>
lines 1-18/18 (END)
We can now test connect to our server using the IRC client of our choice. I used Irssi. Irssi is in most Linux repositories, and on Debian-based systems, it can also be installed using apt, as seen below.
~$ sudo apt install irssi

[sudo] password for kali:
Reading package lists... Done
Building dependency tree
Reading state information... Done
Suggested packages:
  irssi-scripts
The following NEW packages will be installed:
  irssi
0 upgraded, 1 newly installed, 0 to remove and 782 not upgraded.
Need to get 1,183 kB of archives.
After this operation, 2,919 kB of additional disk space will be used.
Get:1 http://kali.download/kali kali-rolling/main amd64 irssi amd64 1.2.2-1+b1 [1,183 kB]
Fetched 1,183 kB in 1s (1,320 kB/s)
Selecting previously unselected package irssi.
(Reading database ... 287426 files and directories currently installed.)
Preparing to unpack .../irssi_1.2.2-1+b1_amd64.deb ...
Unpacking irssi (1.2.2-1+b1) ...
Setting up irssi (1.2.2-1+b1) ...
Processing triggers for kali-menu (2020.2.2) ...
Processing triggers for man-db (2.9.1-1) ...
Irssi can be launched directly from the command line just by using its name.
~$ irssi

 Irssi v1.2.2-1+b1 - https://irssi.org
20:30 -!-  ___           _
20:30 -!- |_ _|_ _ _____(_)
20:30 -!-  | || '_(_-<_-< |
20:30 -!- |___|_| /__/__/_|
20:30 -!- Irssi v1.2.2-1+b1 - https://irssi.org
20:30 -!- Irssi: The following settings were initialized
20:30                        real_name Kali
20:30                        user_name kali
20:30                             nick kali

[(status)]
Within Irssi, we can connect to our server with the connect command. This command will connect us to our server. You should see something like below.
[(status)] /connect irc.localhost

20:31 -!- Irssi: Looking up irc.localhost
20:31 -!- Irssi: Connecting to irc.localhost [127.0.0.1] port 6667
20:31 -!- Irssi: Connection to irc.localhost established
20:31 !irc.localhost *** Looking up your hostname...
20:31 !irc.localhost *** Could not resolve your hostname: Request timed out; using your IP address (127.0.0.1) instead...
20:31 !irc.localhost *** Welcome to Localnet!
20:31 -!- Welcome to the Localnet IRC Network admin@127.0.0.1
20:31 -!- Your host is irc.local, running version InspIRCd-3.4.0
20:31 -!- This server was created on Debian
20:31 -!- irc.local InspIRCd-3.4.0 iosw biklmnopstv bklov
20:31 -!- AWAYLEN=200 CASEMAPPING=rfc1459 CHANMODES=b,k,l,imnpst CHANNELLEN=64 CHANTYPES=#
          CHARSET=ascii ELIST=MU FNC KICKLEN=255 MAP MAXBANS=60 MAXCHANNELS=20 MAXPARA=32
          are supported by this server
20:31 -!- MAXTARGETS=20 MOADES=20 NETWORK=Localnet NICKLEN=32 PREFIX=(ov)@+ STATUSMSG=@+
          TOPICLEN+307 VBANLIST WALLCHOPS WALLVOICES are supported by this server
20:31 -!- 811AAAAAA your unique ID
20:31 -!- irc.local message of the day
20:31 -!- - - message of the day goes here
20:31 -!- -
20:31 -!- End of message of the day.
20:31 -!- There are 1 users and 0 invisible on 1 servers
20:31 -!- 0 channels formed
20:31 -!- I have 1 clients and 0 servers
20:31 -!- Current Local Users: 1  Max: 1
20:31 -!- Current Global Users: 1  Max: 1
20:31 -!- Mode change [+i] for user admin

[(status)]
Once the IRC client has successfully connected to the local IRC server, it can be administered in the same way as a server which is connected to the internet. The test server is connected only to the machine in which it is running, so the only users who could connect to the server must be on the local machine as well.
After the local IRC server connection is verified, and any IRC configurations are changed, we can disconnect from the local server and connect it to the Tor network. If you're using the Irssi IRC client, you can disconnect with /quit.
Connect the IRC Server to Tor
The Tor-routing of our IRC server will be configured in the torrc file. To find this file and confirm our Tor installation, we can use whereis as in the example below.
~$ whereis tor

tor: /usr/bin/tor /usr/sbin/tor /etc/tor /usr/share/tor /usr/share/man/man1/tor.1.gz
This returns several locations that Tor uses for configuration. The "torrc" file we're looking for is most likely in /etc/tor. We can open it with the following command. Once opened, you should see something similar to below.
~$ sudo nano /etc/tor/torrc

  GNU nano 4.9.2                    /etc/tor/torrc
## Configuration file for a typical Tor user
## Last updated 9 October 2013 for Tor 0.2.5.2-alpha.
## (may or may not work for much older or much newer versions of Tor.)
##
## Lines that begin with "## " try to explain what's going on. Lines
## that begin with just "#" are disabled commands: you can enable them
## by removing the "#" symbol.
##
## See 'man tor', or https://www.torproject.org/docs/tor-manual.html,
## for more options you can use in this file.
##
## Tor will look for this file in various places based on your platform:
## https://www.torproject.org/docs/faq#torrc

## Tor opens a socks proxy on port 9050 by default -- even if you don't
## configure one below. Set "SocksPort 0" if you plan to run Tor only
## as a relay, and not make any local application connections yourself.
#SocksPort 9050 # Default: Bind to localhost:9050 for local connections.
#SocksPort 192.168.0.1:9100 # Bind to this address:port too.

## Entry policies to allow/deny SOCKS requests based on IP address.
## First entry that matches wins. If no SocksPolicy is set, we accept
## all (and only) requests that reach a SocksPort. Untrusted users who
## can access your SocksPort may be able to learn about the connections
## you make.
#SocksPolicy accept 192.168.0.0/16
#SocksPolicy reject *

## Logs go to stdout at level "notice" unless redirected by something
## else, like one of the below lines. You can have as many Log lines as
## you want.
##
## We advise using "notice" in most cases, since anything more verbose
## may provide sensitive information to an attacker who obtains the logs.
##
## Send all messages of level 'notice' or higher to /var/log/tor/notices.log
#Log notice file /var/log/tor/notices.log
## Send every possible message to /var/log/tor/debug.log
#Log debug file /var/log/tor/debug.log
## Use the system log instead of Tor's logfiles
#Log notice syslog
## To send all messages to stderr:
#Log debug stderr

## Uncomment this to start the process in the background... or use
## --runasdaemon 1 on the command line. This is ignored on Windows;
## see the FAQ entry if you want Tor to run as an NT service.
#RunAsDaemon 1

## The directory for keeping all the keys/etc. By default, we store
## things in $HOME/.tor on Unix, and in Application Data\tor on Windows.
#DataDirectory /var/lib/tor

## The port on which Tor will listen for local connections from Tor
## controller applications, as documented in control-spec.txt.
#ControlPort 9051
## If you enable the controlport, be sure to enable one of these
## authentication methods, to prevent attackers from accessing it.
#HashedControlPassword 16:872860B76453A77D60CA2BB8C1A7042072093276A3D701AD684053>
#CookieAuthentication 1

############### This section is just for location-hidden services ###

## Once you have configured a hidden service, you can look at the
## contents of the file ".../hidden_service/hostname" for the address
## to tell people.
##
## HiddenServicePort x y:z says to redirect requests on port x to the
## address y:z.

#HiddenServiceDir /var/lib/tor/hidden_service/
#HiddenServicePort 80 127.0.0.1:80

#HiddenServiceDir /var/lib/tor/other_hidden_service/
#HiddenServicePort 80 127.0.0.1:80
#HiddenServicePort 22 127.0.0.1:22

################ This section is just for relays #####################
#
## See https://www.torproject.org/docs/tor-doc-relay for details.

## Required: what port to advertise for incoming Tor connections.
#ORPort 9001
## If you want to listen on a port other than the one advertised in
## ORPort (e.g. to advertise 443 but bind to 9090), you can do it as
## follows.  You'll need to do ipchains or other port forwarding
## yourself to make this work.
#ORPort 443 NoListen
#ORPort 127.0.0.1:9090 NoAdvertise

## The IP address or full DNS name for incoming connections to your
## relay. Leave commented out and Tor will guess.
#Address noname.example.com

## If you have multiple network interfaces, you can specify one for
## outgoing traffic to use.
# OutboundBindAddress 10.0.0.5

## A handle for your relay, so people don't have to refer to it by key.
#Nickname ididnteditheconfig

## Define these to limit how much relayed traffic you will allow. Your
## own traffic is still unthrottled. Note that RelayBandwidthRate must
## be at least 20 KB.
## Note that units for these config options are bytes per second, not bits
## per second, and that prefixes are binary prefixes, i.e. 2^10, 2^20, etc.
#RelayBandwidthRate 100 KB  # Throttle traffic to 100KB/s (800Kbps)
#RelayBandwidthBurst 200 KB # But allow bursts up to 200KB/s (1600Kbps)

## Use these to restrict the maximum traffic per day, week, or month.
## Note that this threshold applies separately to sent and received bytes,
## not to their sum: setting "4 GB" may allow up to 8 GB total before
## hibernating.
##
## Set a maximum of 4 gigabytes each way per period.
#AccountingMax 4 GB
## Each period starts daily at midnight (AccountingMax is per day)
#AccountingStart day 00:00
## Each period starts on the 3rd of the month at 15:00 (AccountingMax
## is per month)
#AccountingStart month 3 15:00

## Administrative contact information for this relay or bridge. This line
## can be used to contact you if your relay or bridge is misconfigured or
## something else goes wrong. Note that we archive and publish all
## descriptors containing these lines and that Google indexes them, so
## spammers might also collect them. You may want to obscure the fact that
## it's an email address and/or generate a new address for this purpose.
#ContactInfo Random Person <nobody AT example dot com>
## You might also include your PGP or GPG fingerprint if you have one:
#ContactInfo 0xFFFFFFFF Random Person <nobody AT example dot com>

## Uncomment this to mirror directory information for others. Please do
## if you have enough bandwidth.
#DirPort 9030 # what port to advertise for directory connections
## If you want to listen on a port other than the one advertised in
## DirPort (e.g. to advertise 80 but bind to 9091), you can do it as
## follows.  below too. You'll need to do ipchains or other port
## forwarding yourself to make this work.
#DirPort 80 NoListen
#DirPort 127.0.0.1:9091 NoAdvertise
## Uncomment to return an arbitrary blob of html on your DirPort. Now you
## can explain what Tor is if anybody wonders why your IP address is
## contacting them. See contrib/tor-exit-notice.html in Tor's source
## distribution for a sample.
#DirPortFrontPage /etc/tor/tor-exit-notice.html

## Uncomment this if you run more than one Tor relay, and add the identity
## key fingerprint of each Tor relay you control, even if they're on
## different networks. You declare it here so Tor clients can avoid
## using more than one of your relays in a single circuit. See
## https://www.torproject.org/docs/faq#MultipleRelays
## However, you should never include a bridge's fingerprint here, as it would
## break its concealability and potentionally reveal its IP/TCP address.
#MyFamily $keyid,$keyid,...

## A comma-separated list of exit policies. They're considered first
## to last, and the first match wins. If you want to _replace_
## the default exit policy, end this with either a reject *:* or an
## accept *:*. Otherwise, you're _augmenting_ (prepending to) the
## default exit policy. Leave commented to just use the default, which is
## described in the man page or at
## https://www.torproject.org/documentation.html
##
## Look at https://www.torproject.org/faq-abuse.html#TypicalAbuses
## for issues you might encounter if you use the default exit policy.
##
## If certain IPs and ports are blocked externally, e.g. by your firewall,
## you should update your exit policy to reflect this -- otherwise Tor
## users will be told that those destinations are down.
##
## For security, by default Tor rejects connections to private (local)
## networks, including to your public IP address. See the man page entry
## for ExitPolicyRejectPrivate if you want to allow "exit enclaving".
##
#ExitPolicy accept *:6660-6667,reject *:* # allow irc ports but no more
#ExitPolicy accept *:119 # accept nntp as well as default exit policy
#ExitPolicy reject *:* # no exits allowed

## Bridge relays (or "bridges") are Tor relays that aren't listed in the
## main directory. Since there is no complete public list of them, even an
## ISP that filters connections to all the known Tor relays probably
## won't be able to block all the bridges. Also, websites won't treat you
## differently because they won't know you're running Tor. If you can
## be a real relay, please do; but if not, be a bridge!
#BridgeRelay 1
## By default, Tor will advertise your bridge to users through various
## mechanisms like https://bridges.torproject.org/. If you want to run
## a private bridge, for example because you'll give out your bridge
## address manually to your friends, uncomment this line:
#PublishServerDescriptor 0

^G Get Help  ^O Write Out ^W Where Is  ^K Cut Text  ^J Justify   ^C Cur Pos
^X Exit      ^R Read File ^\ Replace   ^U Paste Text^T To Spell  ^_ Go To Line
The section we need to edit is after the following banner.
############### This section is just for location-hidden services ###To skip directly to this section, press Control-W, type "location-hidden" and press Enter. To specify our hidden service location to Tor, we'll want to un-comment the following two lines.
HiddenServiceDir /var/lib/tor/hidden_service/
HiddenServicePort 80 127.0.0.1:80
To do this, remove the "#" symbols at the beginning of these lines. We'll also want to edit one of the lines to specify our IRC port instead of port 80. When you're done, the line should look like this.
HiddenServiceDir /var/lib/tor/hidden_service/
HiddenServicePort 6667 127.0.0.1:6667
Write these changes to the file with Control-O and exit Nano with Control-X.
Now that our Tor service is configured, we can launch it with the following command.
~$ sudo tor

Aug 06 20:58:27.242 [notice] Tor 0.4.3.6 running on Linux with Libevent 2.1.11-stable, OpenSSL 1.1.1g, Zlib 1.2.11, Liblzma 5.2.4, and Libzstd 1.4.4.
Aug 06 20:58:27.242 [notice] Tor can't help you if you use it wrong! Learn how to be safe at https://www.torproject.org/download/download#warning
...
Aug 06 20:58:36.000 [notice] Bootstrapped 100% (done): Done
Once the Tor service is running, an onion address should be generated and placed in /var/lib/tor/hidden_service/hostname. We can retrieve this address with the cat command, seen below.
~$ sudo cat /var/lib/tor/hidden_service/hostname

XXXXXXXXXXXXXXXXXXXXXXXXXXXXXXXXXXXXXXXXXXXX.onion
If needed, it's also possible to customize this onion address using tools like Eschalot.
- Don't Miss: How to Use Private Encrypted Messaging Over Tor
If cat returns an onion address, your IRC server is now available over Tor!
Connect to an IRC Server Over Tor
Now that your server is connected to Tor, it's available for anyone with the address to connect to it. As such, to test our server connectivity, it's best to do it from a different device than the one on which the server is running. If you've installed your server on a VPS or virtual machine, just switch back to using the device you configured it with.
To test connecting to my server, I used an IRC client I already had installed, HexChat. It's also available in most Linux repositories, and on Debian-based systems, and it can be installed with apt as seen below.
~$ sudo apt install hexchat

Reading package lists... Done
Building dependency tree
Reading state information... Done
The following additional packages will be installed:
  hexchat-common hexchat-perl hexchat-plugins hexchat-python3
Suggested packages:
  hexchat-otr unifont
The following NEW packages will be installed:
  hexchat hexchat-common hexchat-perl hexchat-plugins hexchat-python3
0 upgraded, 5 newly installed, 0 to remove and 782 not upgraded.
Need to get 1,214 kB of archives.
After this operation, 5,570 kB of additional disk space will be used.
Do you want to continue? [Y/n] y
Get:1 http://kali.download/kali kali-rolling/main amd64 hexchat-common all 2.14.3-3 [762 kB]
Get:2 http://kali.download/kali kali-rolling/main amd64 hexchat amd64 2.14.3-3 [338 kB]
Get:3 http://kali.download/kali kali-rolling/main amd64 hexchat-perl amd64 2.14.3-3 [42.5 kB]
Get:4 http://kali.download/kali kali-rolling/main amd64 hexchat-plugins amd64 2.14.3-3 [37.8 kB]
Get:5 http://kali.download/kali kali-rolling/main amd64 hexchat-python3 amd64 2.14.3-3 [33.6 kB]
Fetched 1,214 kB in 6s (202 kB/s)
Selecting previously unselected package hexchat-common.
(Reading database ... 287612 files and directories currently installed.)
Preparing to unpack .../hexchat-common_2.14.3-3_all.deb ...
Unpacking hexchat-common (2.14.3-3) ...
Selecting previously unselected package hexchat.
Preparing to unpack .../hexchat_2.14.3-3_amd64.deb ...
Unpacking hexchat (2.14.3-3) ...
Selecting previously unselected package hexchat-perl:amd64.
Preparing to unpack .../hexchat-perl_2.14.3-3_amd64.deb ...
Unpacking hexchat-perl:amd64 (2.14.3-3) ...
Selecting previously unselected package hexchat-plugins:amd64.
Preparing to unpack .../hexchat-plugins_2.14.3-3_amd64.deb ...
Unpacking hexchat-plugins:amd64 (2.14.3-3) ...
Selecting previously unselected package hexchat-python3:amd64.
Preparing to unpack .../hexchat-python3_2.14.3-3_amd64.deb ...
Unpacking hexchat-python3:amd64 (2.14.3-3) ...
Setting up hexchat-plugins:amd64 (2.14.3-3) ...
Setting up hexchat-common (2.14.3-3) ...
Setting up hexchat (2.14.3-3) ...
Setting up hexchat-perl:amd64 (2.14.3-3) ...
Setting up hexchat-python3:amd64 (2.14.3-3) ...
Processing triggers for desktop-file-utils (0.24-1) ...
Processing triggers for mime-support (3.64) ...
Processing triggers for hicolor-icon-theme (0.17-2) ...
Processing triggers for man-db (2.9.1-1) ...
Processing triggers for kali-menu (2020.2.2) ...
After launching HexChat with:
~$ hexchatSet your preferred nickname choices, and then select "Add" in the networks section.
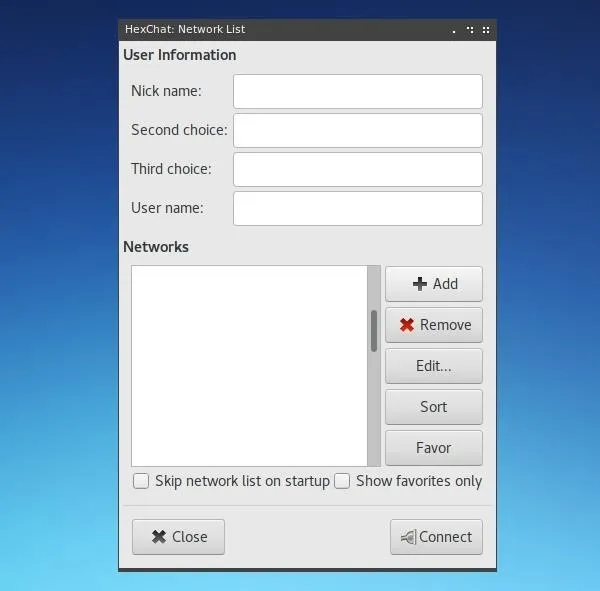
Assign a name to your new network, and then right-click on it and hit "Edit."
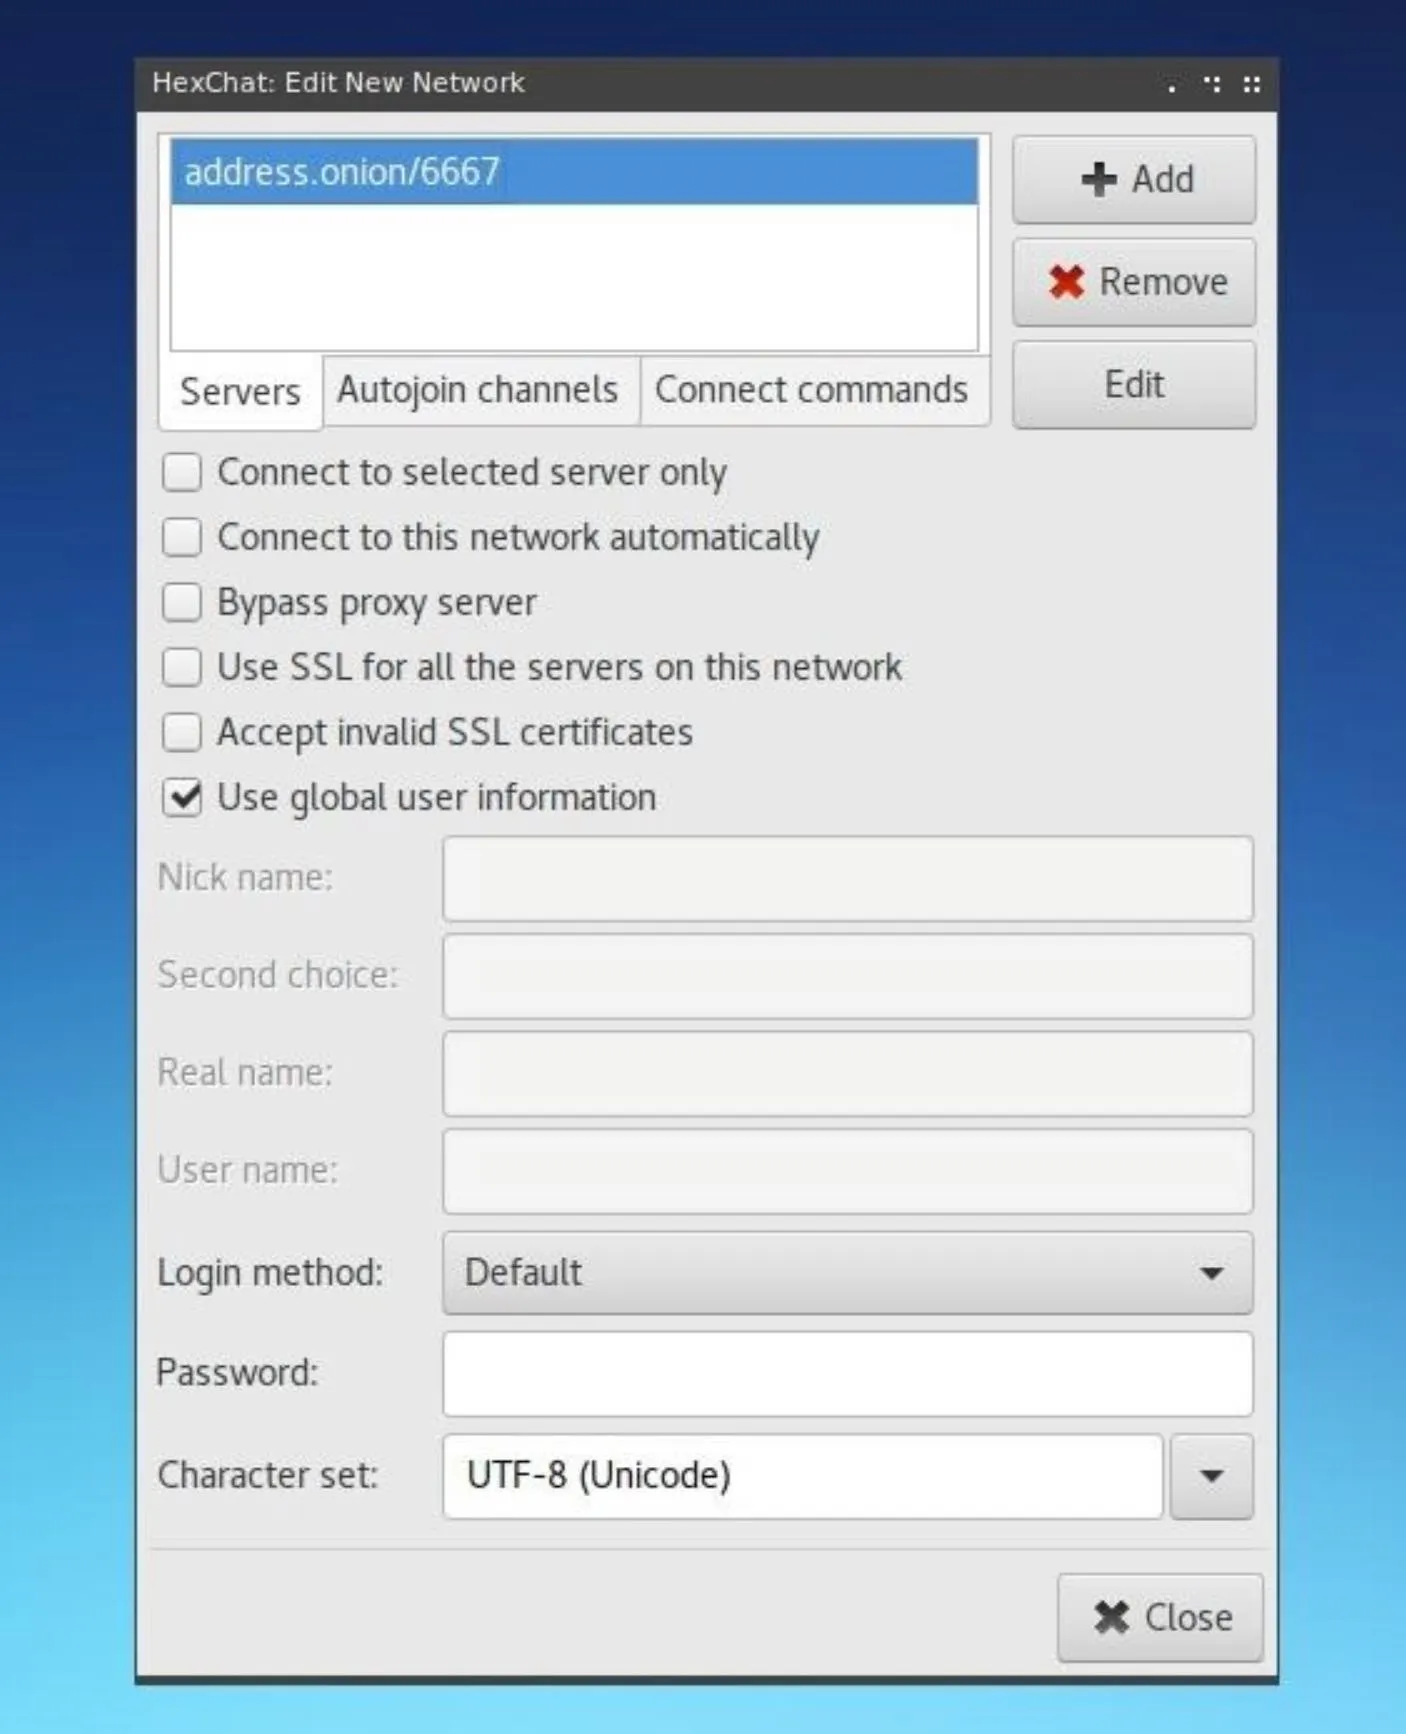
Within this edit window, update the address shown in the Servers box to be the onion address which was assigned to it by Tor in the previous step.
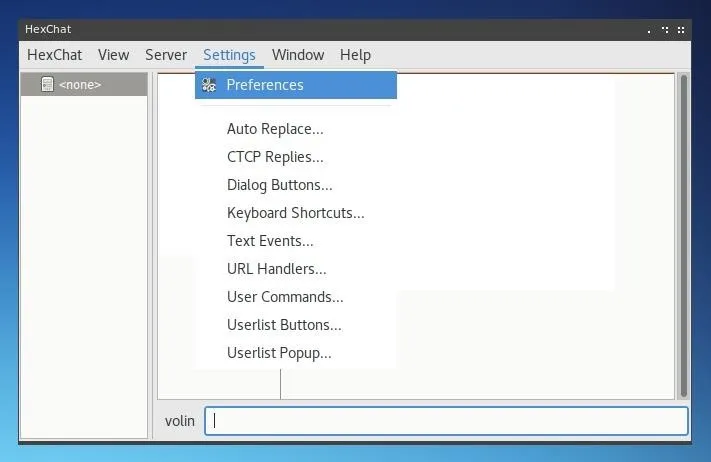
Close this window, and then select "Connect." The connection will not immediately be established, as we need to change our network settings to resolve the onion address. To do this, click on "Preferences" under the "Settings" menu on top of the new window which has opened.
Within the Preferences window, select "Network Settings" under the Network category in the left menu. On this page, under Proxy Server change the Hostname to 127.0.0.1, the Port to 9050, and select "Socks5" for the Type.
This utilizes Tor as a proxy server for the client and allows onion address resolution. Keep in mind that this will only work on devices were Tor can be called as a service on port 9050. On Linux systems, the Tor service can be started in the same way as if it were a server. To do so, type the command below.
~$ sudo tor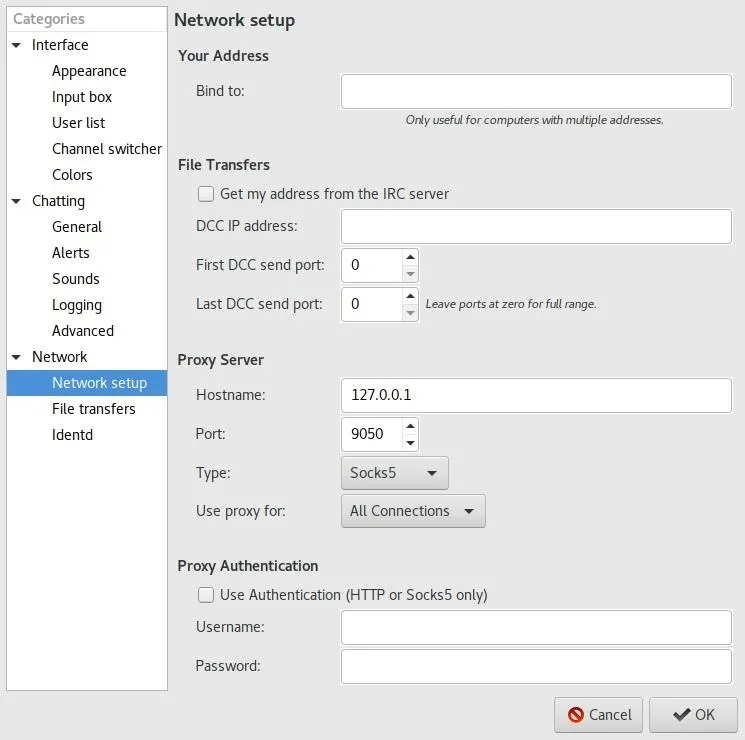
Once the network configuration is updated, hit "OK." HexChat should attempt to reconnect to the onion address provided. This time, it should work.
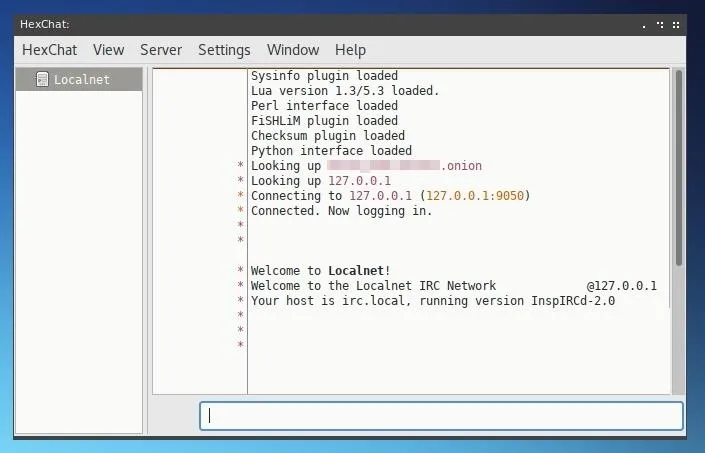
If the Welcome message appears, you've successfully created a Tor-connected IRC server!
You may notice that after the onion address is looked up, the IP provided is the localhost address on the server itself, 127.0.0.1. This is because Tor routes connecting clients to the server and does not at any point disclose the server's public IP, so clients connecting to it see the server almost as if it were on their local network, rather than at a secret IP hidden by an onion address.
Now that your server is running, you can customize it like any other IRC server and begin inviting more users to interact with its channels.
Thanks for reading, and if you have any questions, you can ask them in the comments below or on Twitter @tahkion.
Cover photo by Kody/Null Byte; Screenshots by Takhion/Null Byte


Comments
Be the first, drop a comment!