

Design flaws in many routers can allow hackers to steal Wi-Fi credentials, even if WPA or WPA2 encryption is used with a strong password. While this tactic used to take up to 8 hours, the newer WPS Pixie-Dust attack can crack networks in seconds. To do this, a modern wireless attack framework called Airgeddon is used to find vulnerable networks, and then Bully is used to crack them.
When attacking a Wi-Fi network, the first and most obvious place for a hacker to look is the type of network encryption. While WEP networks are easy to crack, most easy techniques to crack WPA and WPA2 encrypted Wi-Fi rely on the password being bad or having the processing power to churn through enough results to make brute-forcing a practical approach.
In some cases, an access point's encryption is not the weakest point of the network, so it's good to think outside of the box, or, in this case ... focus on the box. Since the source of the Wi-Fi signal is being broadcast from the router's hardware, the device itself would be a great target to attack instead of the encryption. And one weakness many access points have is a feature called Wi-Fi Protected Setup, which we will learn how to exploit in this guide.
If you forget the password to your access point, Wi-Fi Protected Setup, better known simply as WPS, lets you connect to the network using an 8-digit number printed on the bottom of the router. This is somewhat more convenient than just resetting the router with the button on the back, but also a massive security hole because of the way many routers deal with implementing this feature.

WPS PINs have been attacked by two successive generations of attacks, starting with the most basic brute-forcing methods targeting the way some routers split the PIN into two separate halves before checking them. Years later, another attack emerged that remains effective against many routers and greatly reduces the amount of time needed to attack a target.
Reaver: Now Obsolete Against Most Modern Routers
The Reaver brute-force attack was a radical new weapon for Wi-Fi hacking when it was presented in 2011. One of the first practical attacks against WPA- and WPA2-encrypted networks, it totally ignored the type of encryption a network used, exploiting poor design choices in the WPS protocol.
Reaver allowed a hacker to sit within range of a network and brute-force the WPS PIN, spilling all the credentials for the router. Worse, the 8-digit-long PIN could be guessed in two separate halves, allowing for the attack to take significantly shorter than working against the full length of the PIN.
While it did require a hacker to be within range of the target Wi-Fi network, it was able to penetrate even WPA and WPA2 networks with strong passwords using an online attack. This is opposed to an offline attack, such as WPA handshake brute-forcing, which does not require you to be connected to the network to succeed. While this was a limitation, the benefit is that there is typically no sign of this kind of attack to the average user.
The Reaver attack proved extremely popular, and since 2011, many routers now have protections to detect and shut down a Reaver-type attack. In particular, these attacks have been greatly slowed by rate-limiting, which forces a hacker to wait several seconds before each PIN attack. Many routers will now "lock" the WPS setting in response to too many failed PIN attempts. This has led the Reaver attack to be considered deprecated against most modern routers.
WPS Pixie-Dust Attack: The Better Attack Method
While routers updated some settings to prevent routers from being attacked via brute-force, serious flaws still existed in the way many routers implement encryption. In programming, it's difficult to create truly random numbers, which is required to produce strong encryption. To do this, we use a function that starts with a number called a "seed," which, after being passed into the function, produces a pseudo-random number.
If you use a long or varying "seed" number, you can get the same result as a number that's actually random, but if you use an easily guessed "seed," or even worse ... the same one repeatedly, you create weak encryption that is easy to break. This is exactly what router manufacturers did, giving rise to Pixie-Dust, the second generation of WPS PIN attacks.
Since many routers with WPS enabled use known functions to produce random numbers with seed values like "0" or the time stamp of the beginning of the WPS transaction, the WPS key exchange has fatal flaws in the way it encrypts messages. This allows the WPS PIN to be cracked in a matter of seconds.
What You'll Need for This Hack
Our tool of choice for demonstrating a WPS Pixie-Dust attack will be a wireless attack framework called Airgeddon. Integrating many wireless attack tools into a suite well suited for beginners, Airgeddon will allow you to select and configure your wireless card, find and load targeting data from nearby networks, and attack targeted networks — all from the same tool.
There are some trade-offs to using Airgeddon, as the way it passes data between reconnaissance and attack modules requires you to be able to open multiple terminal windows in a GUI desktop environment. If you are using SSH to access your Kali device, you may need to target vulnerable networks using the wash command included in the Reaver tool and pass the data manually to the Bully tool instead.
Since different wireless network cards work better or worse with Reaver or Bully, Airgeddon lets you pass target data between the two scripts and find the sweet spot for your wireless card, the attack module you are using, and the target you are attacking.
To use the Bully module of Airgeddon, you'll need to be running Kali Linux or another supported distro. Make sure your Kali Linux is fully updated before you begin, as you'll need several packages installed for this tool to work.
You'll also need a wireless network adapter capable of packet injection and wireless monitor mode. We recommend the Panda PAU09, or you can check out our guide linked below to see other popular wireless network adapters.
Finally, make sure you have permission from the owner of the network you're testing this tool on before you start. This tool can work very quickly, and if the network is monitored, you will leave evidence in the logs.
Step 1: Download Airgeddon
First, you'll need to install Airgeddon by cloning the git repository. Open a terminal window, and type the following to clone the repo, change directory to the new folder, and run "airgeddon.sh" as a bash script.
git clone github.com/v1s1t0r1sh3r3/airgeddon.git
cd airgeddon
sudo bash ./airgeddon.sh
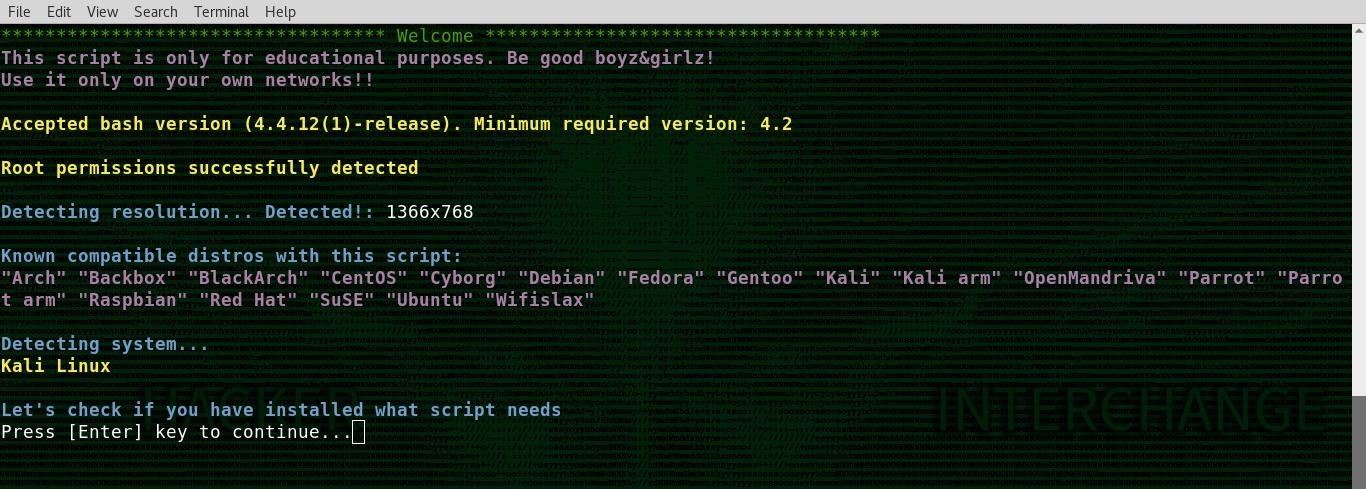
If it works, you should see an alien loading screen. Don't get too spooked, the script will start soon.
Step 2: Install Dependencies
Airgeddon will detect your OS and terminal resolution. Press return to check on all the tools contained in the framework.
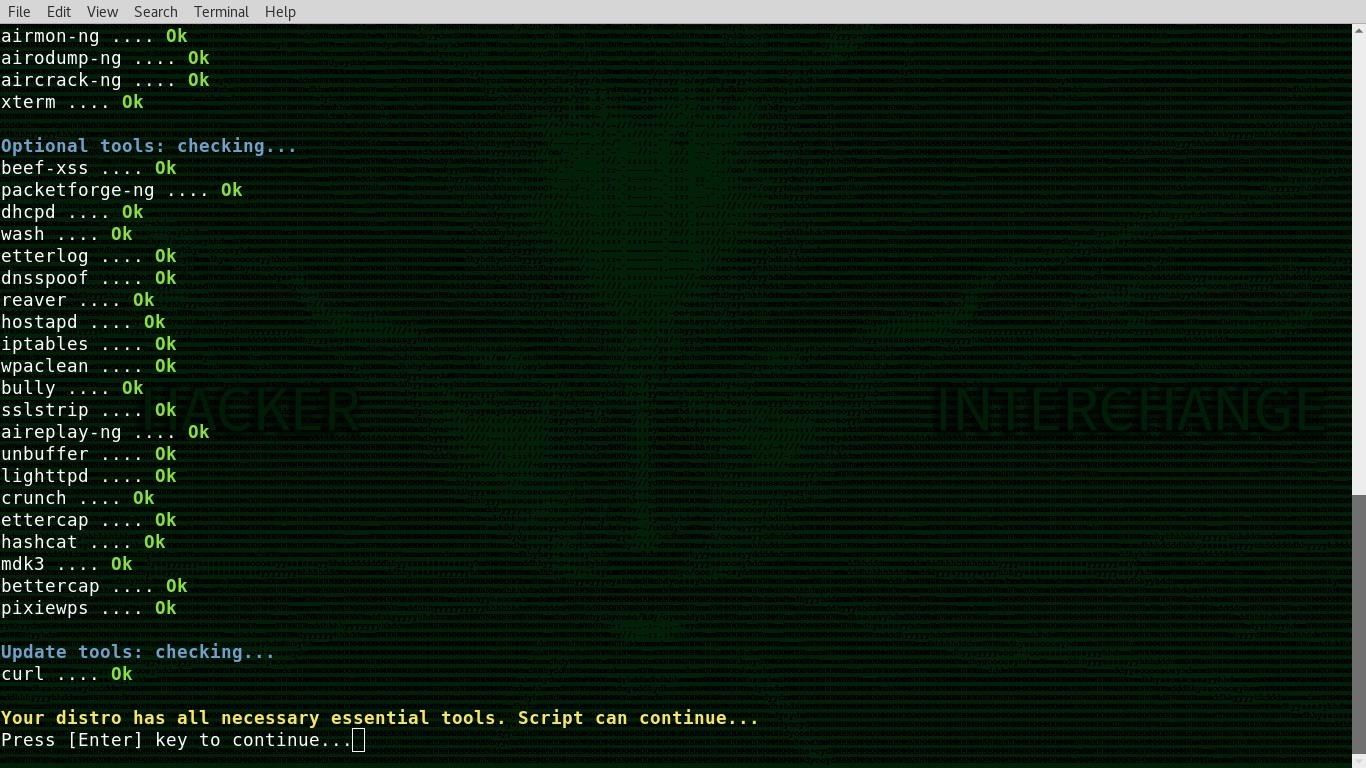
Airgeddon will do a check to see what essential tools are installed. You should try to make sure you have a completely green board before you begin, but in particular, you will need Bully for this attack. To install a missing repo, you have a number of options. The easiest is to follow the format below.
apt-get install (whatever you are missing)
If that doesn't work, you can also try using Python pip to install Python modules by typing pip3 install nameofwhatyouaremissing into a terminal window. When all the results are a green "Ok," press return to proceed to the adapter selection.
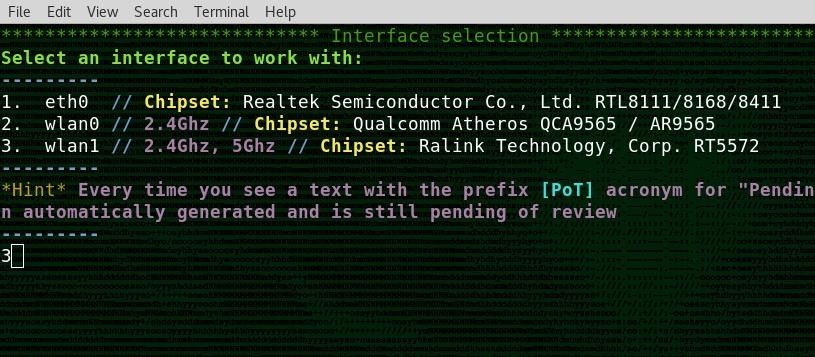
Step 3: Select Your Wireless Network Adapter
In the next step, Airgeddon will list your network adapters. Select the one you wish to use for the attack by typing the number next to it. You may want to change the MAC address of your adapter with a tool like GNU MAC Changer before doing this.
In this case, I am selecting my dual-band 2.4 and 5 GHz network card, which is option 3.
Next, you will be dropped into the main attack screen. In this case, I will be performing a WPS attack, so I will select option 8 and press return.

Step 4: Enable Monitor Mode
Now, you will need to put your card into monitor mode. Rather than the usual airmon-ng commands, simply type the number 2 into the menu, and press return.
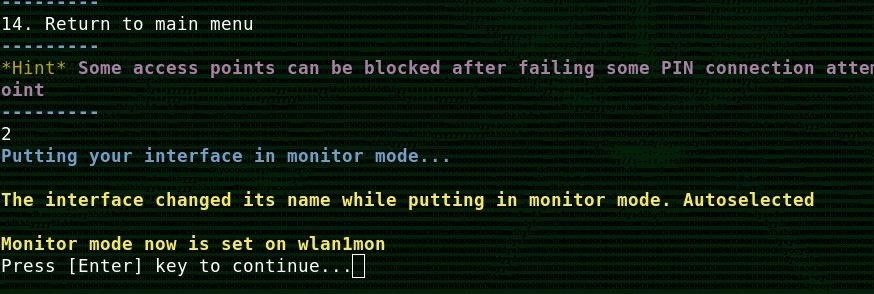
If all goes well, your card should be put into monitor mode and change its name. Airgeddon will keep track of the changed name, and you will be able to proceed to the targeting menu.
Step 5: Sweep the Area for Vulnerable Targets
To find vulnerable routers, you can now turn your card to the networks in the immediate area by selecting option 4, scan for targets. If you have a dual-band card, you will be asked if you want to scan the 2.4 or 5 GHz spectrum, allowing you to decide what kind of networks to target. Type Y for 5 GHz and N for 2.4 GHz.
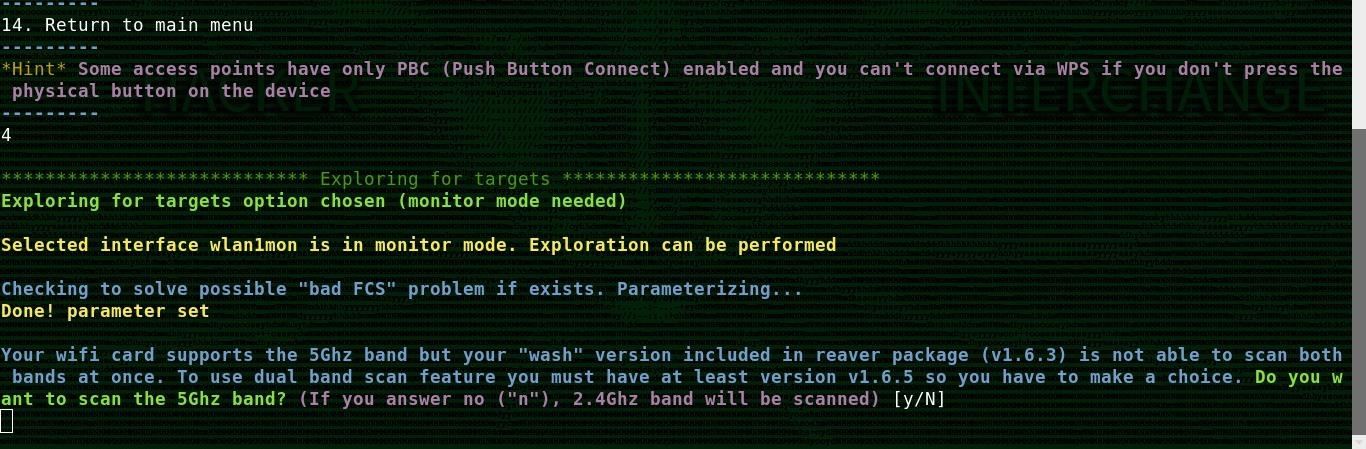
A window should open showing you all of the vulnerable networks. Allow it to stay open for a few scans while your card runs up and down the wireless channels and tries to find new networks. After waiting for about a minute, exit out of the window, or hit Ctrl + C.
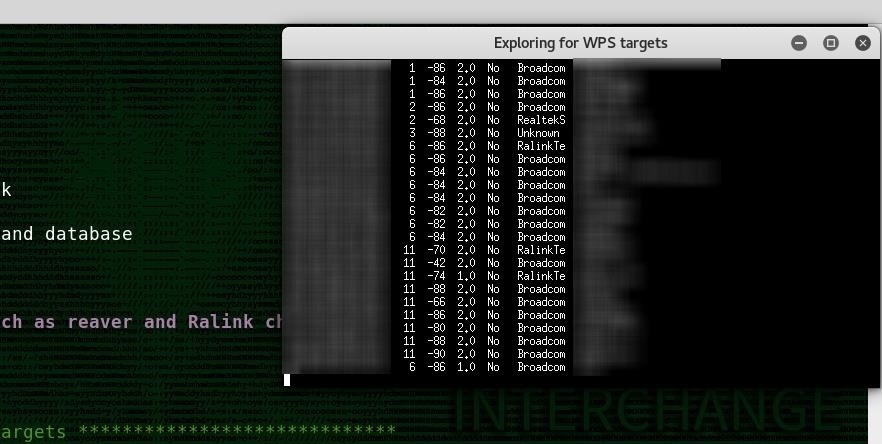
You should see your Wi-Fi target data loaded into a selector screen, meaning you're ready to load target data into an attack module!
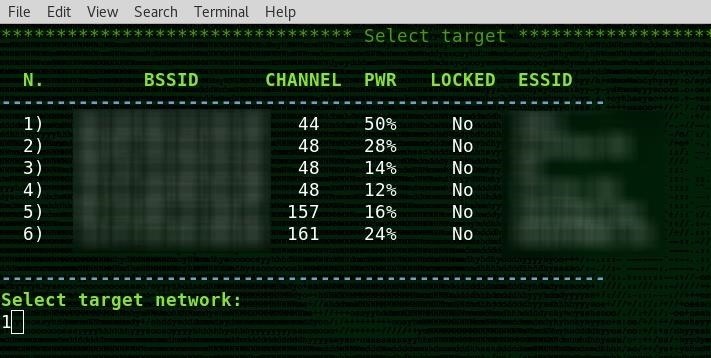
Step 6: Load Wi-Fi Target Data into the Bully Attack Module
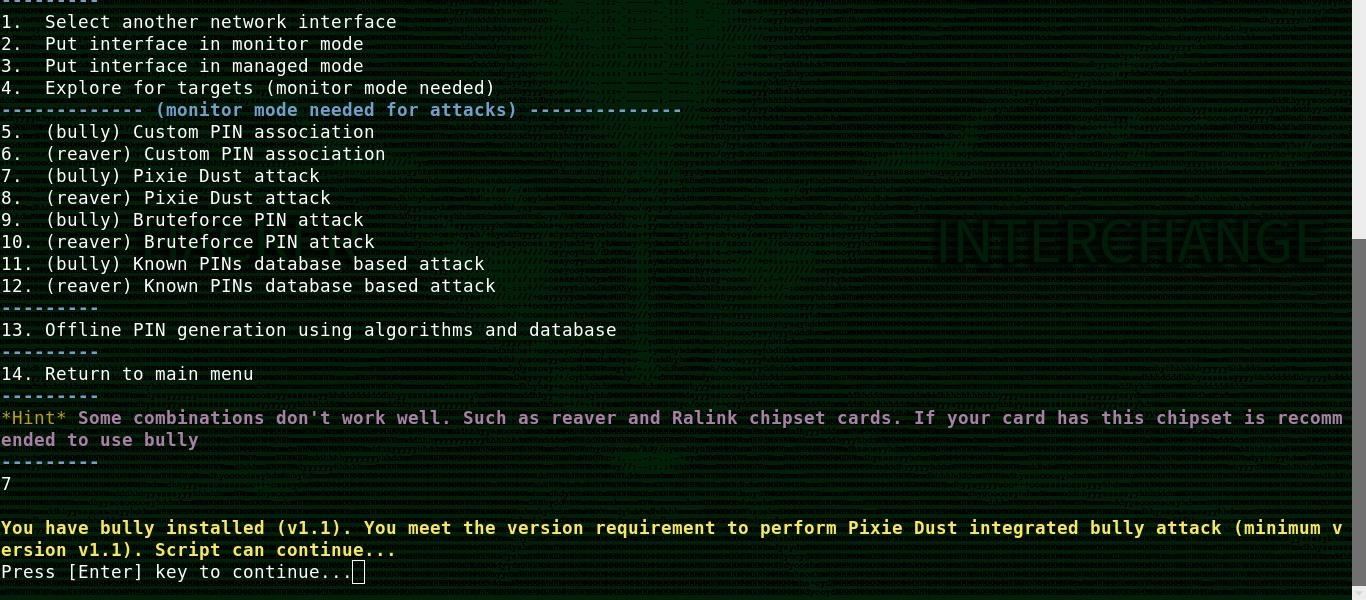
Now, you should see a screen which contains target data for each vulnerable network you detected. Type the number of the network you want to target to pass the targeting data to Airgeddon, and press return. Next, you will select which attack module will use these values as an argument.
In my example, my WPS attack screen is now fully live and ready to fire. My wireless card is in monitor mode, and I have selected a network by BSSID, channel number, ESSID, and other information I pulled from my scan. Now, all I need to do is select an attack module.
As you can see below, quite a few are offered. Depending on your wireless card, you will have more luck with either Reaver or Bully. In this guide, we're focusing on Bully, so type 7 to load the target data into the Bully attack module, and press return.
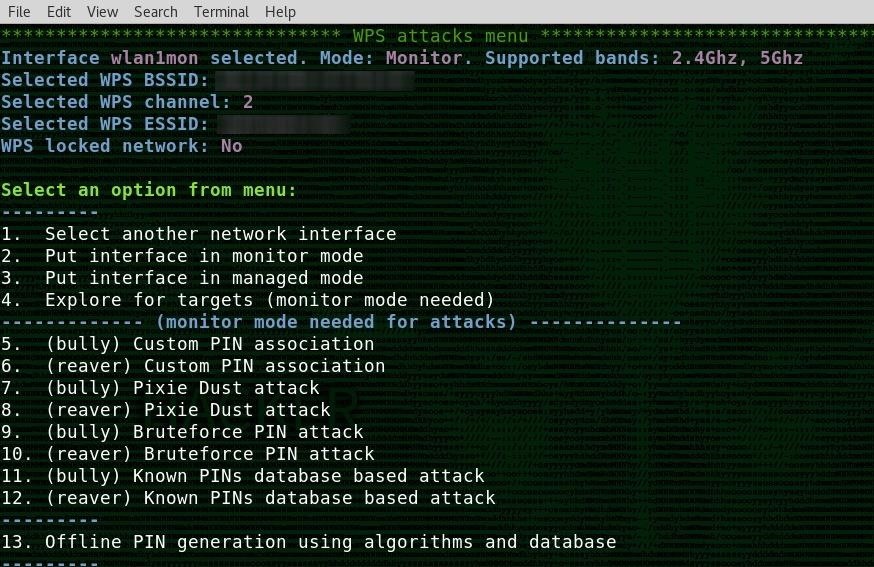
The final value you will need to input is the timeout, or how long before the program assumes the attack has failed. For now, set the value to around 55 seconds. Press return, and the attack will begin.
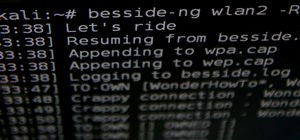
Step 7: Launch the Attack & Break the WPS PIN
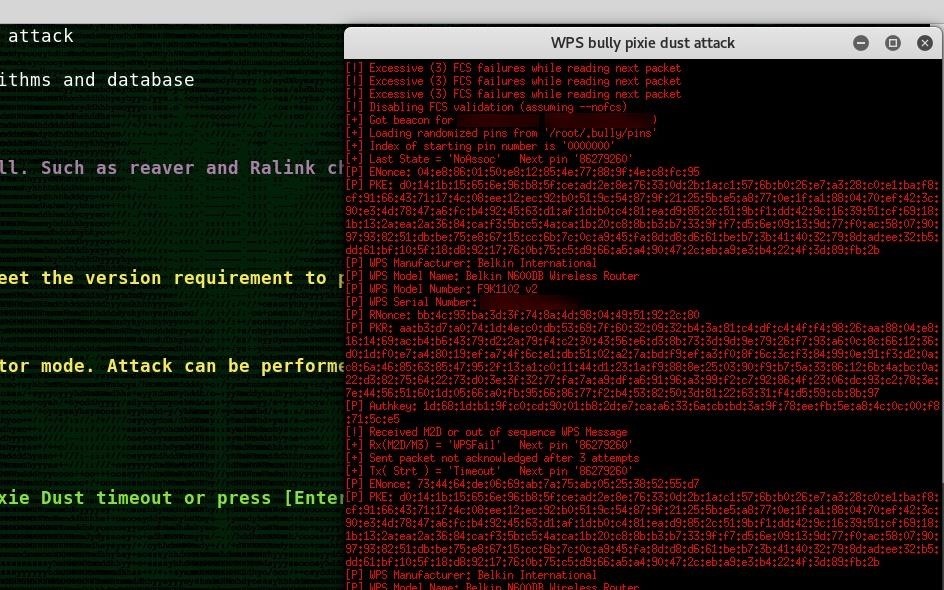
Once you start the attack module, a window will open with red text on the screen. If communication is successful, you will see many encrypted transactions like the one in the image below. If you are out of range or the target isn't really vulnerable, you will see failed transactions.
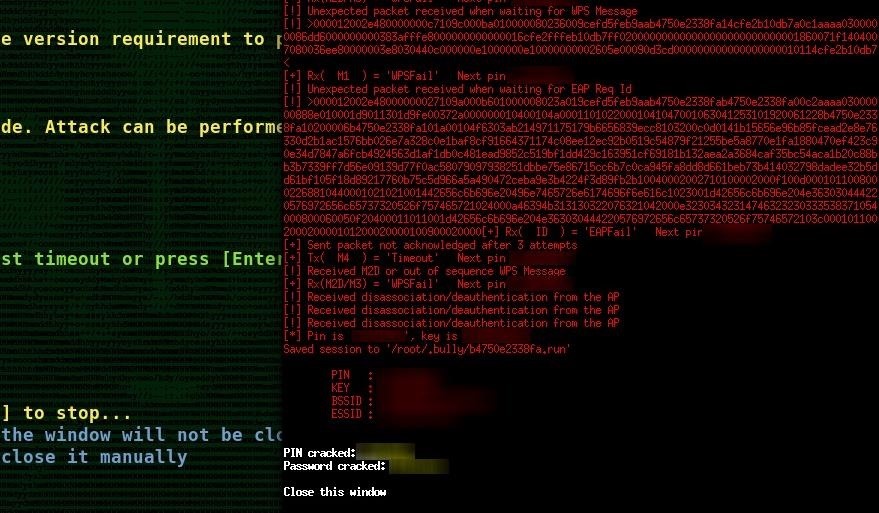
As soon as Bully has the needed data to break the PIN, it will pass it to the WPS Pixie-Dust program.
This can happen in a matter of seconds or less, but if your connection is weak, it may take as long as a few minutes. You should see the cracked PIN and the Wi-Fi password appear at the bottom of the screen. That's it! You have complete access to the router.
If you write down the PIN, you can use the "custom PIN association" module to be able to get the new password any time it's changed until the target buys a new router or disables WPS. This also works if you just got the PIN but didn't get the router to dump the Wi-Fi credentials.
Defending Against WPS-Pixie Based Attacks
The best and most obvious solution to pulling the plug on a Pixie-Dust attack is to disable the nebulously useful feature at the heart of the issue — Wi-Fi Protected Setup. You can easily reset your router with the reset button located on virtually all routers, meaning pretty much no one will be sad if you disable the WPS feature. You can do this through the administration page of most routers.
Another important piece of information is that older routers may say they have disabled the WPS option when, in fact, they are still vulnerable to this attack even with this setting supposedly "off." This is a serious issue for older hardware, and if you test this tool against an older router with the WPS set to "off" and the attack succeeds, your only option may be simply replacing the hardware and buying a new router.
WPS-Based Attacks Continue to Evolve
Hardware-based attacks are a brilliant way of bypassing a strong password, and sustained interest in this attack vector continues to fuel the cat-and-mouse game between router manufacturers, ISPs, and the hackers trying to break into these devices. Learning the history of Reaver and the evolution to WPS Pixie-Dust-based attacks will keep you on the bleeding edge of Wi-Fi hacking and expand your hacking toolkit to enable you to take on any router with vulnerable WPS enabled.
I hope you enjoyed this guide to hacking WPS PINs with Airgeddon! If you have any questions about this tutorial or Airgeddon, feel free to leave a comment or reach me on Twitter @KodyKinzie. We'll be doing more in our Wi-Fi hacking series, so stay tuned.
Just updated your iPhone? You'll find new emoji, enhanced security, podcast transcripts, Apple Cash virtual numbers, and other useful features. There are even new additions hidden within Safari. Find out what's new and changed on your iPhone with the iOS 17.4 update.


14 Comments
I tried this on some routers I have lying around. Most just lock up after a few second. Does one have to push the WPS button for this to work for newer routers?
So this is just a new Gui....
Beautiful GUI, and well explained. Thanks you!
do these methods still work?because i have tried both reaver and pixie dust on multiple wps unlocked routers which resulted into nothing but timeout errors.
u don t have kali linux or even if u want to use something simple and easy and get the job done go and watch me live hacking my wifi in this video :
if u don t understand the language just drop a like and comment and i will upload the english version of it xD
I have recently installed Airgeddon couple of days ago from Github. I have Kali 2018.03 64 bit installed on my PC and using ALFA AWUS36ACH WiFi Adapter.
I am running into a small problem. While running Airgeddon and selecting Option 8 for WPS Attack, when I select Option 4 to scan all networks around me ,I see all network but do not see my Home Network (router) . Where as when I run airodump-ng, I can see my home network.
Any idea what I am doing wrong? or what should I do?
Thank you for your suggestions.
please check your router settings, if WPS option is disabled? Enable is and try again, I hope you will your router in the list :D
What laptop is being used in the thumbnail?
Hi
You know that's wps pin was used to crack wifi password, but I want the reverse (I mean use wifi password to pull wps pin)
So, is there any way to do that?
What even are terminal multiplexers, anyway?
Will it work with the TL-WN722N v1.10?
I have tried and follow the same steps but it stopped every time with a second! I have tried both on Kali and Parrot OS!
having problem with airgeddon not detecting X window system im running it on VM could that be the problem
Hi - I believe that I have fallen prey to an Airgeddon attack. The past two months have been hell and I am slowly losing my mind. Can someone/anyone please help me and teach me how to get rid of this? I am not tech savvy and have been reading up on this for days. It has been so awful. I've lost my job, all my banks have been compromised, and about to lose my mind. Any guidance / help / advice is greatly appreciated. Please contact me at dvstin@icloud.com. thanks in advance for even reading this. That's D(underscore)vstin@icloud.com
i am not able to see networks and i am using TL-WN722N v1.10? adapter....
can i know the issues.....
Share Your Thoughts