
Hello, fellow hackers! Today I am going to show you just how easy it is to spoof E-Mails and impersonate any E-Mail address. Because of how easy it is to do, anyone with five minutes of free time can send malicious E-Mails to you while pretending to be your boss, teacher, SO, etc. You can probably guess how devastating the consequences of such an attack can be.
Explaining the Attack: The SMTP Protocol
SMTP stands for Simple Mail Transfer Protocol and has existed for much longer than the Internet.
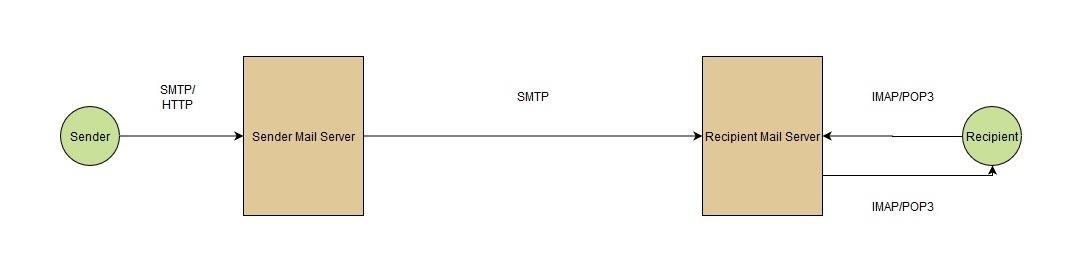
When you want to send an E-Mail, you need to first craft the E-Mail message using a user agent. Common user agents include the GMail app or the Protonmail application on your phone. Once you click "Send", your user agent forwards the E-Mail (usually over SMTP or HTTP) to your mail server (typically your ISP's mail server) where it is placed in an outgoing message queue. When the time comes, the mail server looks at the recipient's E-Mail, specified in the E-Mail message, and sends the message over SMTP to that recipient's mail server. The recipient can later view his E-Mails on-demand over POP3 or IMAP using his user agent.
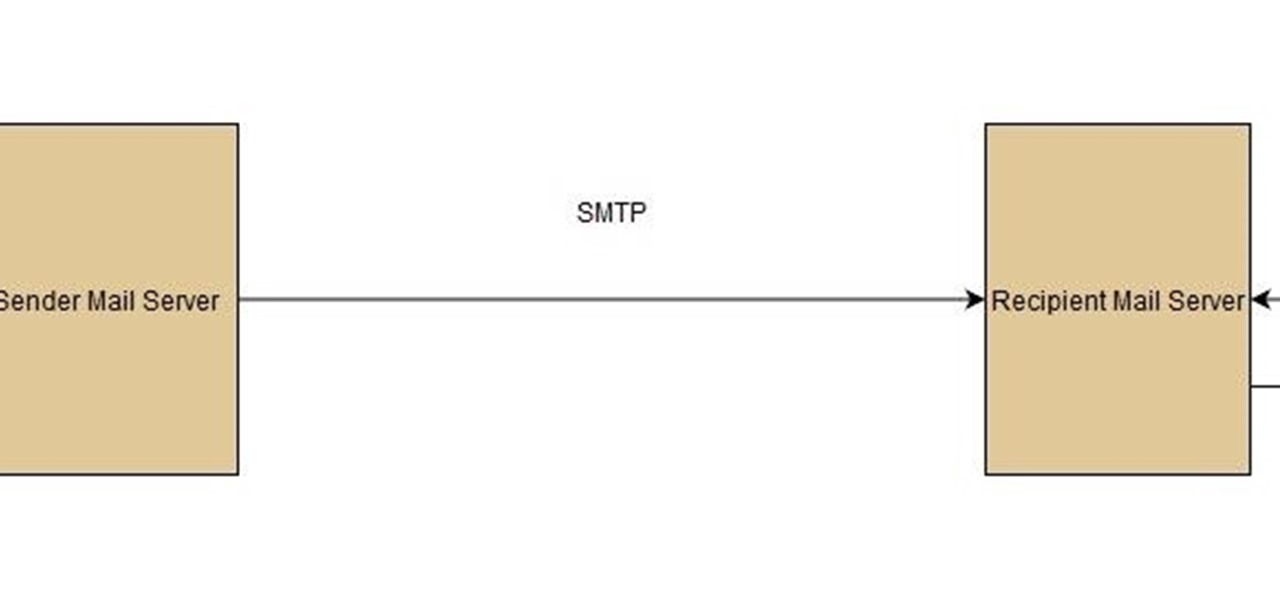
In order to explain the way our attack will work, let's look at a simple message exchange between two mail servers. We will call the sender's mail server, the client (C), and the recipient's mail server - the server (S). This might be a bit confusing at first glance, but if you think about it, the sender's mail server initiates a connection with the recipient's mail server, which in this context makes the former one a client and the latter one a server.
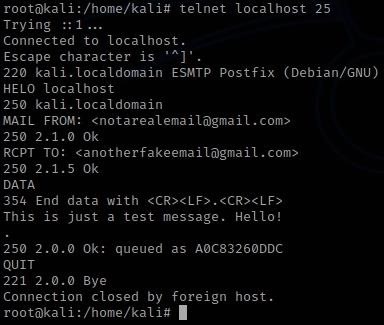
S: 220 kali.localdomain ESMTP Postfix (Debian/GNU)
C: HELO localhost
S: 250 kali.localdomain
Just as us humans, SMTP servers first greet each other with what's called a handshake. After connecting to the server, the server responds with a 220 <SERVER> Service ready message which means that it's ready to proceed with the handshake. Next, our client uses the HELO command to initiate the handshake, to which the server responds with 250, denoting that the previous command was run successfully. The handshake is complete and the client can now start sending E-Mail messages to the server. Let's see how this is done:
C: MAIL FROM: <notarealemail@gmail.com>
S: 250 2.1.0 Ok
C: RCPT TO: <anotherfakeemail@gmail.com>
S: 250 2.1.5 Ok
C: DATA
S: 354 End data with <CR><LF>.<CR><LF>
C: This is just a test message. Hello!
.
S: 250 2.0.0 Ok: queued as A0C83260DDC
C: QUIT
S: 221 2.0.0 Bye
Above we can see how a simple E-Mail message is sent from one mail server to another. After a successful handshake, the client sends a MAIL FROM: <sender e-mail address> command, telling the server who the sender of the E-Mail is. To that the server replies with a 250 Requested mail action okay, completed, meaning that the last command was executed successfully and the server is ready to proceed. Next, the client issues a RCPT TO: <recipient e-mail address> command to tell the server who to deliver the E-Mail message to. The server again replies with a 250 Success message. Finally, the client sends a DATA command, telling the server that it will soon send the contents of the E-Mail message. The server responds with 354 Start mail input and some additional information as to how the client should format the message. Next, the client writes the E-Mail message and once he is done, he puts a dot on a new line and then another new line(<CR><LF>), which tells the server that the message is complete and ready to be queued. The server accept the message (again giving us a 250 Success code) and puts it in its message queue. If the client wants to send more E-Mail messages, he can do so by repeating the above steps for each message. If not he can just issue the QUIT command to terminate the connection.
Note that above we described the process of sending an E-Mail message between a user agent and a mail server, not the process of sending an E-Mail message between two mail servers. That process is exactly the same with the only difference, being that when the receiving mail server gets the message, it won't put it in an outgoing queue, but will instead save the message in the recipient's inbox.
This is all well and good, but how does it helps us? Here comes the fun part! SMTP does no checking of the information for the sender's E-Mail address. It completely trusts that what it's presented with is the correct address. We can use that to our advantage by specifying an arbitrary E-Mail address as the sender. The recipient will see the message as sent by the E-Mail address, contained in the message, even though it was actually us simply impersonating it.
Now that we understand the attack, let's see how we can execute it.
Step 1: Installing Postfix and SendEmail
We need to get the proper tools on our machine before we can do anything. In order to successfully complete an attack, we need to first host our own mail server or use a server which will provide one for us, such as smtp2go. For simplicity here, we will host our own server with Postfix. You can install it by running the following command as root:
$ apt install postfix
You can ignore any warnings about copying configuration files around. Next, we need to get sendemail, which is what we will use to send the actual fake E-Mail messages. Install it by running the following command as root:
$ apt install sendemail
Step 2: Starting the Mail Server
After getting the proper tools, it's time for us to start our local mail server. Execute as root:
$ systemctl start postfix
This will start Postfix E-Mail server and have it listen on port 25 for connections.
You can skip this step, if you are using an existing mail server.
Step 3: Sending the Email
To craft the custom E-Mail, we will be using SendEmail - a lightweight, command line SMTP client, written by Brandon Zehm. We can do so with the following command:
$ sendemail -f a1ucard0@gmail.com -t dummymail31337@gmail.com -u "A Real Email" -m "This is a very real email"

As you can see, the E-Mail was sent successfully and if I check my inbox...

You might have noticed that the E-Mail got delivered to my spam folder. This is because I am using my own mail server and so the message never gets encrypted or validated by Google or my ISP's mail server. This wouldn't be the case if I actually used an external mail server, such as the ones provided by smtp2go.
Let's dissect the above command to learn what each of the arguments mean:
-f - used to specify the sender's email address. Here you have to input the address you want to appear as.
-t - used to specify the recipient's email address.
-u - specifies the subject of the E-Mail. Note that this option is not required.
-m - specifies the actual contents of the E-Mail.
Some additional arguments you can use are:
-a - followed by a filepath for attaching files.
-o message-file=FILENAME - you can specify a file that contains the contents of the E-Mail, instead of manually typing them on the command line.
-o message-header="Name:Value" - here you can specify additional E-Mail headers such as the "From:" header which will change the name (but not the E-Mail address, that is done with -f) of the sender.
-s SERVER:PORT - you can use this to specify the IP Address and port of the server you will be using. Defaults to localhost:25.
Step 4: Cleaning Up
Don't forget to shut down the Postfix mail server:
$ systemctl stop postfix
Conclusion
Now you know just how easy it is to spoof E-Mail. You also surely realize what the consequences of such an attack might be!
I have shown you this purely for educational purposes and I am not responsible for anything you do with that knowledge!
Keep learning and see you soon!
-A1ucard0


1 Response
Why i dont receive the emails? Even while using a server and checking my spams.
Share Your Thoughts